Hadoop集群入门配置
文章目录Hadoop概述Hadoop组成HDFS架构概述YARN架构概述MapReduce架构概述一、模板虚拟机环境准备1、hadoop100虚拟机配置要求如下1、安装epel-release2、net-tool:工具包集合3、关闭防火墙,关闭防火墙开机自启4、创建用户 并修改密码5、(可选)配置liyuhao用户具有root权限,方便后期加sudo执行root权限的命令6、在/opt目录下创建文
文章目录
Hadoop概述
Hadoop组成
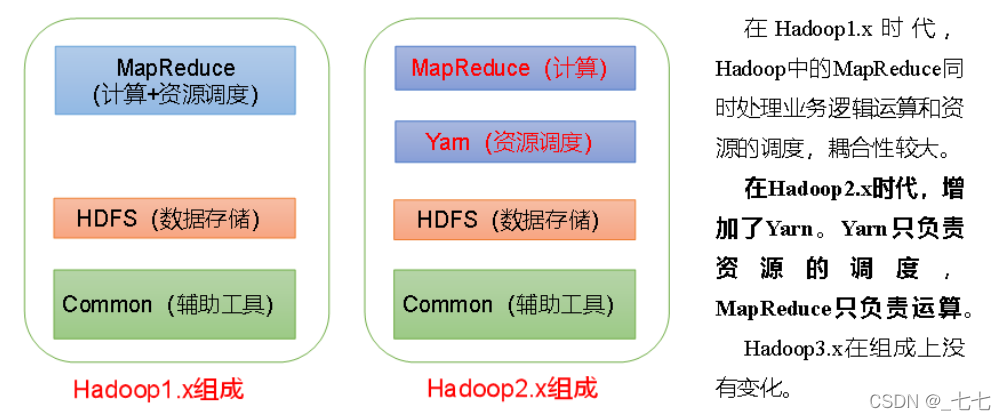
HDFS架构概述
Hadoop Distributed File System,简称HDFS,是一个分布式文件系统。
-
NameNode (nn)︰存储文件的元数据。如文件名,文件目录结构,文件属性(生成时间、副本数、文件权限),以及每个文件的块列表和块所在的DataNode等。
-
DataNode(dn):在本地文件系统存储文件块数据。以及块数据的校验和。
3 ) Secondary NameNode(2nn):每隔一段时间对NameNode元数据备份。
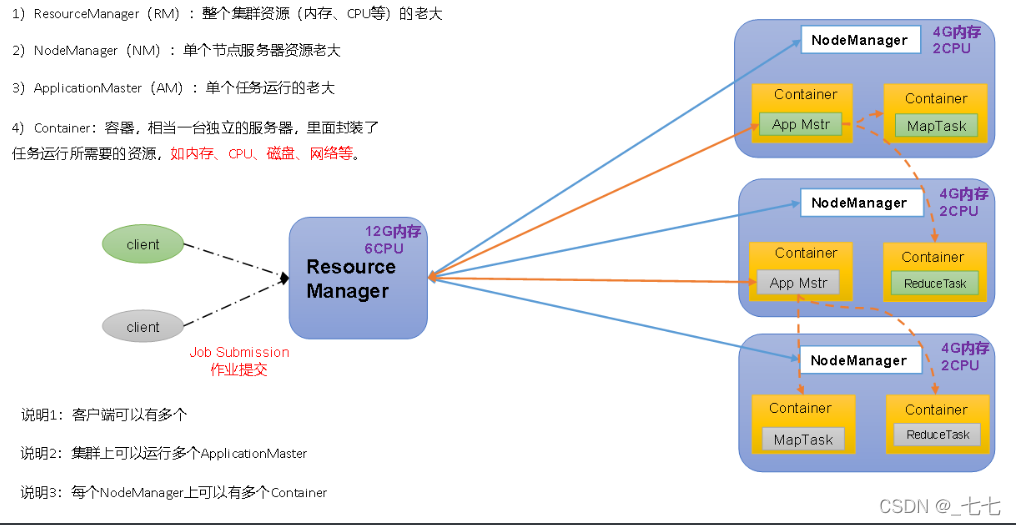
YARN架构概述
MapReduce架构概述
MapReduce将计算过程分为两个阶段:Map和Reduce
1)Map阶段并行处理输入数据
2)Reduce阶段对Map结果进行汇总
一、模板虚拟机环境准备
安装模板虚拟机,IP地址192.168.10.100、主机名称hadoop100
1、hadoop100虚拟机配置要求如下
1、安装epel-release
[root@hadoop100 ~]# yum install epel-release
2、net-tool:工具包集合
[root@hadoop100 ~]# yum install -y net-tools
3、关闭防火墙,关闭防火墙开机自启
[root@hadoop100 ~]# systemctl stop firewalld
[root@hadoop100 ~]# systemctl disable firewalld.service
Removed symlink /etc/systemd/system/multi-user.target.wants/firewalld.service.
Removed symlink /etc/systemd/system/dbus-org.fedoraproject.FirewallD1.service.
4、创建用户 并修改密码
[root@hadoop100 ~]# useradd liyuhao
[root@hadoop100 ~]# passwd liyuhao
5、(可选)配置liyuhao用户具有root权限,方便后期加sudo执行root权限的命令
[root@hadoop100 ~]# vim /etc/sudoers
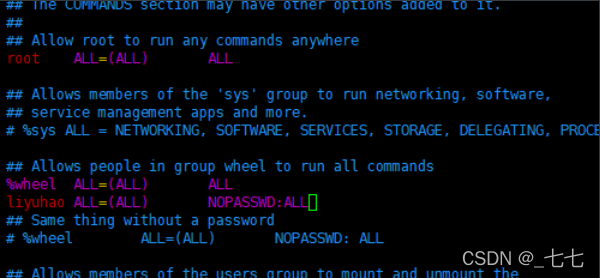
注意:liyuhao这一行不要直接放到root行下面,因为所有用户都属于wheel组,你先配置了liyuhao具有免密功能,但是程序执行到%wheel行时,该功能又被覆盖回需要密码。所以liyuhao要放到%wheel这行下面。
6、在/opt目录下创建文件夹,并修改所属主和所属组
(1)在/opt目录下创建module、software文件夹
[root@hadoop100 ~]# mkdir /opt/module
[root@hadoop100 ~]# mkdir /opt/software
[root@hadoop100 ~]# ll /opt
总用量 12
drwxr-xr-x. 2 root root 4096 2月  17 11:32 module
drwxr-xr-x. 2 root root 4096 10月 31 2018 rh
drwxr-xr-x. 2 root root 4096 2月  17 11:32 software

[root@hadoop100 ~]# chown liyuhao:liyuhao /opt/module
[root@hadoop100 ~]# chown liyuhao:liyuhao /opt/software
[root@hadoop100 ~]# ll /opt/
总用量 12
drwxr-xr-x. 2 liyuhao liyuhao 4096 2月  17 11:32 module
drwxr-xr-x. 2 root    root    4096 10月 31 2018 rh
drwxr-xr-x. 2 liyuhao liyuhao 4096 2月  17 11:32 software
7、卸载虚拟机自带的JDK
[root@hadoop100 ~]# rpm -qa | grep -i java
java-1.8.0-openjdk-headless-1.8.0.222.b03-1.el7.x86_64
python-javapackages-3.4.1-11.el7.noarch
tzdata-java-2019b-1.el7.noarch
java-1.7.0-openjdk-headless-1.7.0.221-2.6.18.1.el7.x86_64
javapackages-tools-3.4.1-11.el7.noarch
java-1.8.0-openjdk-1.8.0.222.b03-1.el7.x86_64
java-1.7.0-openjdk-1.7.0.221-2.6.18.1.el7.x86_64

[root@hadoop100 ~]# rpm -qa | grep -i java | xargs -n1 rpm -e --nodeps
[root@hadoop100 ~]# rpm -qa | grep -i java
[root@hadoop100 ~]#
rpm -qa:查询所安装的所有rpm软件包
grep -i:忽略大小写
xargs -n1:表示每次只传递一个参数
rpm -e –nodeps:强制卸载软件
8、重启虚拟机
reboot
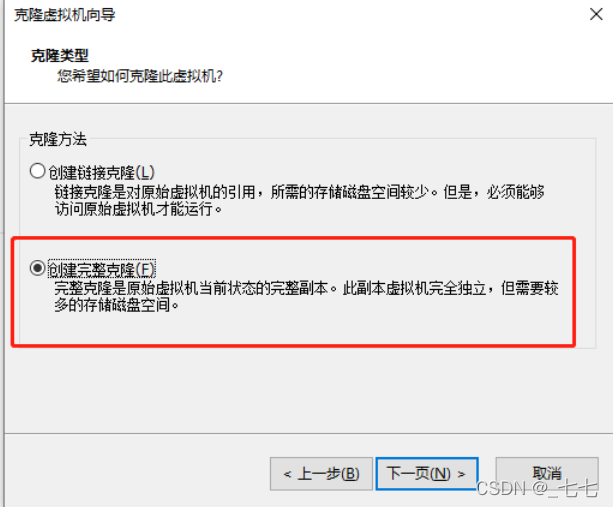
二、克隆虚拟机
1)利用模板机hadoop100,克隆三台虚拟机:hadoop102 hadoop103 hadoop104
注意:克隆时,要先关闭hadoop100

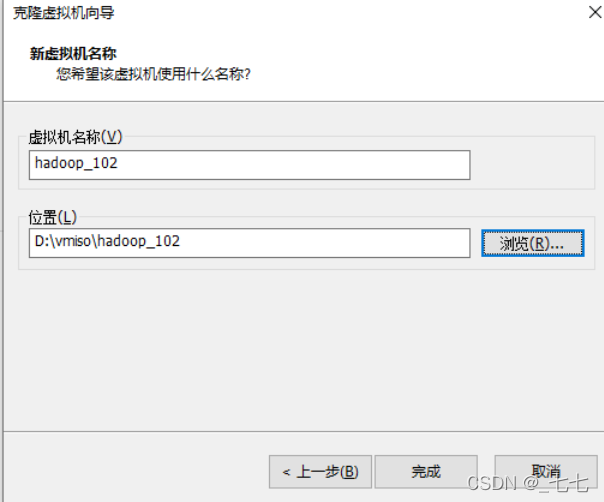
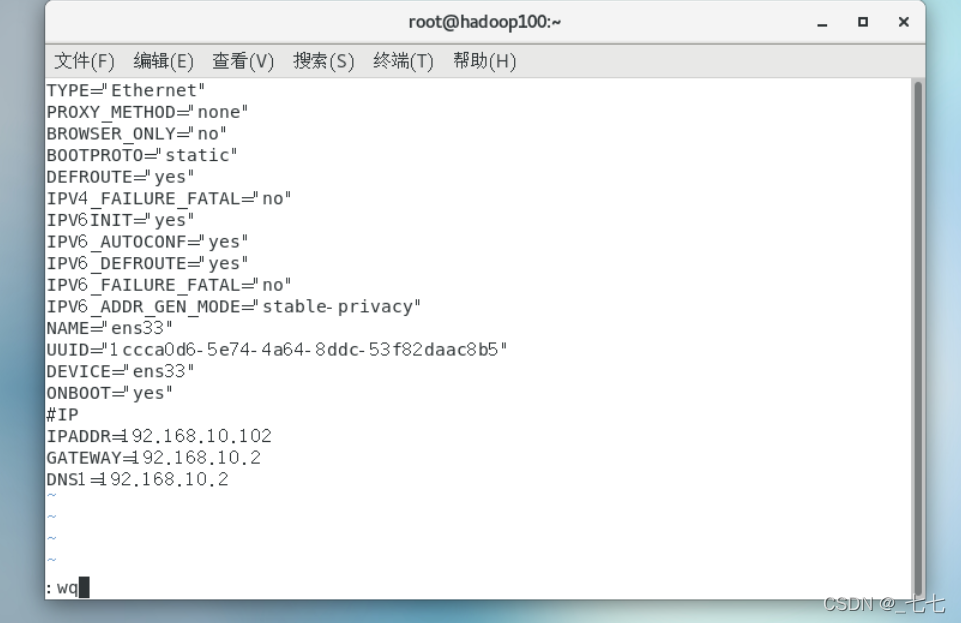
2)修改克隆机IP,以下以hadoop102举例说明
[root@hadoop100 ~]# vim /etc/sysconfig/network-scripts/ifcfg-ens33

改成

BOOTPROTO=static
IPADDR=192.168.10.102
GATEWAY=192.168.10.2
DNS1=192.168.10.2
(1)修改克隆机主机名
[root@hadoop100 ~]# vim /etc/hostname
hadoop102

主机名称映射hosts文件
[root@hadoop100 ~]# vim /etc/hosts
(2)reboot
3)在hadoop102安装JDK
1)卸载JDK
[root@hadoop100 ~]# rpm -qa | grep -i java | xargs -n1 rpm -e --nodeps
[root@hadoop100 ~]# rpm -qa | grep -i java
2)官网下载
https://www.java.com/zh-CN/download/manual.jsp
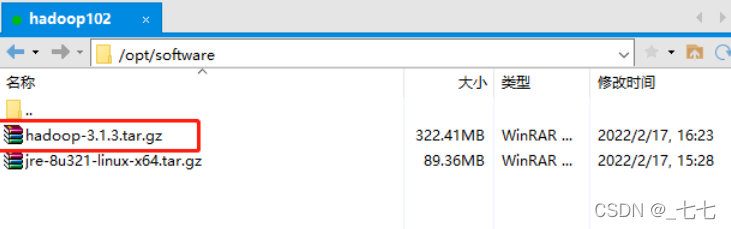
用XShell传输工具将JDK导入到opt目录下面的software文件夹下面

3)在Linux系统下的opt目录中查看软件包是否导入成功
[root@hadoop102 ~]# ls /opt/software/
jre-8u321-linux-x64.tar.gz
4)解压JDK到/opt/module目录下
[root@hadoop102 software]# tar -zxvf jre-8u321-linux-x64.tar.gz -C /opt/module/
5)配置JDK环境变量
(1)新建/etc/profile.d/my_env.sh文件
[root@hadoop102 software]# vim /etc/profile.d/my_env.sh

#JAVA_HOME
export JAVA_HOME=/opt/module/jre1.8.0_321
export PATH=$PATH:$JAVA_HOME/bin
(2)source一下/etc/profile文件,让新的环境变量PATH生效
[root@hadoop102 software]# source /etc/profile
(3)测试JDK是否安装成功
[root@hadoop102 software]# java -version
java version "1.8.0_321"
Java(TM) SE Runtime Environment (build 1.8.0_321-b07)
Java HotSpot(TM) 64-Bit Server VM (build 25.321-b07, mixed mode)
4)在hadoop102安装Hadoop
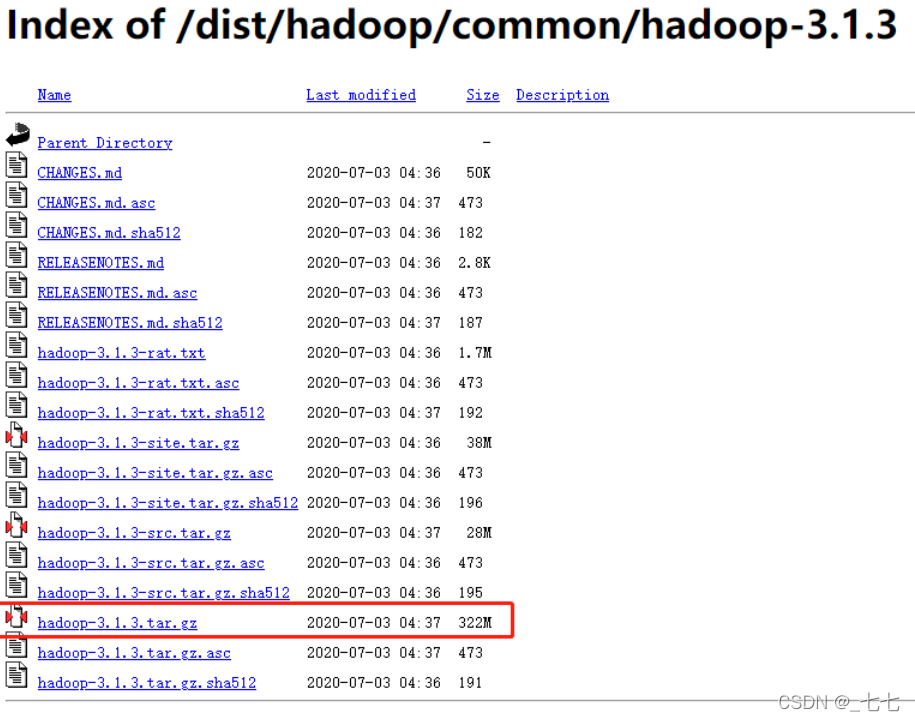
Hadoop下载地址:https://archive.apache.org/dist/hadoop/common/hadoop-3.1.3/
(1)解压安装文件到/opt/module下面
[root@hadoop102 module]# tar -cxvf hadoop-3.1.3.tar.gz -C /opt/module/

[root@hadoop102 module]# cd hadoop-3.1.3/
[root@hadoop102 hadoop-3.1.3]# ll
总用量 200
drwxr-xr-x. 2 lyh lyh   4096 9月  12 2019 bin
drwxr-xr-x. 3 lyh lyh   4096 9月  12 2019 etc
drwxr-xr-x. 2 lyh lyh   4096 9月  12 2019 include
drwxr-xr-x. 3 lyh lyh   4096 9月  12 2019 lib
drwxr-xr-x. 4 lyh lyh   4096 9月  12 2019 libexec
-rw-rw-r--. 1 lyh lyh 147145 9月   4 2019 LICENSE.txt
-rw-rw-r--. 1 lyh lyh  21867 9月   4 2019 NOTICE.txt
-rw-rw-r--. 1 lyh lyh   1366 9月   4 2019 README.txt
drwxr-xr-x. 3 lyh lyh   4096 9月  12 2019 sbin
drwxr-xr-x. 4 lyh lyh   4096 9月  12 2019 share
(2)将Hadoop添加到环境变量
获取Hadoop安装路径
[root@hadoop102 hadoop-3.1.3]# pwd
/opt/module/hadoop-3.1.3
打开/etc/profile.d/my_env.sh文件
[root@hadoop102 hadoop-3.1.3]# sudo vim /etc/profile.d/my_env.sh

#HADOOP_HOME
export HADOOP_HOME=/opt/module/hadoop-3.1.3
export PATH=$PATH:$HADOOP_HOME/bin
export PATH=$PATH:$HADOOP_HOME/sbin

[root@hadoop102 hadoop-3.1.3]# source /etc/profile
[root@hadoop102 hadoop-3.1.3]# hadoop version
Hadoop 3.1.3
Source code repository https://gitbox.apache.org/repos/asf/hadoop.git -r ba631c436b806728f8ec2f54ab1e289526c90579
Compiled by ztang on 2019-09-12T02:47Z
Compiled with protoc 2.5.0
From source with checksum ec785077c385118ac91aadde5ec9799
This command was run using /opt/module/hadoop-3.1.3/share/hadoop/common/hadoop-common-3.1.3.jar
5)hadoop 的目录结构
[root@hadoop102 hadoop-3.1.3]# ll
总用量 200
drwxr-xr-x. 2 lyh lyh   4096 9月  12 2019 bin
drwxr-xr-x. 3 lyh lyh   4096 9月  12 2019 etc
drwxr-xr-x. 2 lyh lyh   4096 9月  12 2019 include
drwxr-xr-x. 3 lyh lyh   4096 9月  12 2019 lib
drwxr-xr-x. 4 lyh lyh   4096 9月  12 2019 libexec
-rw-rw-r--. 1 lyh lyh 147145 9月   4 2019 LICENSE.txt
-rw-rw-r--. 1 lyh lyh  21867 9月   4 2019 NOTICE.txt
-rw-rw-r--. 1 lyh lyh   1366 9月   4 2019 README.txt
drwxr-xr-x. 3 lyh lyh   4096 9月  12 2019 sbin
drwxr-xr-x. 4 lyh lyh   4096 9月  12 2019 share
重要目录
(1)bin目录:存放对Hadoop相关服务(hdfs,yarn,mapred)进行操作的脚本
(2)etc目录:Hadoop的配置文件目录,存放Hadoop的配置文件
(3)lib目录:存放Hadoop的本地库(对数据进行压缩解压缩功能)
(4)sbin目录:存放启动或停止Hadoop相关服务的脚本
(5)share目录:存放Hadoop的依赖jar包、文档、和官方案例
三、Hadoop运行模式
Hadoop运行模式包括:本地模式、伪分布式模式以及完全分布式模式。
-
本地模式:单机运行,只是用来演示一下官方案例。生产环境不用。数据存储LINUX本地。
-
伪分布式模式:也是单机运行,但是具备Hadoop集群的所有功能,一台服务器模拟一个分布式的环境。个别缺钱的公司用来测试,生产环境不用。数据存储HDFS。
-
完全分布式模式:多台服务器组成分布式环境。生产环境使用。数据存储HDFS,多台服务器。
1、本地运行模式(官方WordCount)
1)创建在hadoop-3.1.3文件下面创建一个wcinput文件夹
[root@hadoop102 ~]# cd /opt/module/hadoop-3.1.3/
[root@hadoop102 hadoop-3.1.3]# mkdir wcinput
[root@hadoop102 hadoop-3.1.3]# cd wcinput/
[root@hadoop102 wcinput]# vim word.txt

[root@hadoop102 wcinput]# cat word.txt
hadoop yarn
hadoop mapreduce
liyuhao
liyuhao
2)回到Hadoop目录/opt/module/hadoop-3.1.3
[root@hadoop102 hadoop-3.1.3]# hadoop jar share/hadoop/mapreduce/hadoop-mapreduce-examples-3.1.3.jar wordcount wcinput wcoutput


[root@hadoop102 hadoop-3.1.3]# cat wcoutput/part-r-00000
hadoop	2
liyuhao	2
mapreduce	1
yarn	1
2、完全分布式运行模式(开发重点)
1、编写集群分发脚本
1)scp(secure copy)安全拷贝
(1)scp定义
scp可以实现服务器与服务器之间的数据拷贝。(from server1 to server2)
(2)基本语法
scp    -r        $pdir/$fname             $user@$host:$pdir/$fname
命令   递归     要拷贝的文件路径/名称   目的地用户@主机:目的地路径/名称
案例实操
前提:在hadoop102、hadoop103、hadoop104都已经创建好的/opt/module、/opt/software两个目录,并且已经把这两个目录修改为root:root
sudo chown root:root -R /opt/module
(a)在hadoop102上,将hadoop102中/opt/module/jdk1.8.0_212目录拷贝到hadoop103上。
[root@hadoop102 ~]$ scp -r /opt/module/jdk1.8.0_212 root@hadoop103:/opt/module
(b)在hadoop103上,将hadoop102中/opt/module/hadoop-3.1.3目录拷贝到hadoop103上。
[root@hadoop103 ~]$ scp -r root@hadoop102:/opt/module/hadoop-3.1.3 /opt/module/
(c)在hadoop103上操作,将hadoop102中/opt/module目录下所有目录拷贝到hadoop104上。
[root@hadoop103 opt]$ scp -r root@hadoop102:/opt/module/* root@hadoop104:/opt/module
2)rsync远程同步工具
rsync主要用于备份和镜像。具有速度快、避免复制相同内容和支持符号链接的优点。
rsync和scp区别:用rsync做文件的复制要比scp的速度快,rsync只对差异文件做更新。scp是把所有文件都复制过去。
(1)基本语法
rsync    -av       $pdir/$fname             $user@$host:$pdir/$fname
命令   选项参数   要拷贝的文件路径/名称   目的地用户@主机:目的地路径/名称

选项参数说明
选项	功能
-a	归档拷贝
-v	显示复制过程
(2)案例实操
(a)删除hadoop103中/opt/module/hadoop-3.1.3/wcinput
hadoop103
[root@hadoop103 hadoop-3.1.3]# ll
总用量 208
drwxr-xr-x. 2 lyh  lyh    4096 9月  12 2019 bin
drwxr-xr-x. 3 lyh  lyh    4096 9月  12 2019 etc
drwxr-xr-x. 2 lyh  lyh    4096 9月  12 2019 include
drwxr-xr-x. 3 lyh  lyh    4096 9月  12 2019 lib
drwxr-xr-x. 4 lyh  lyh    4096 9月  12 2019 libexec
-rw-rw-r--. 1 lyh  lyh  147145 9月   4 2019 LICENSE.txt
-rw-rw-r--. 1 lyh  lyh   21867 9月   4 2019 NOTICE.txt
-rw-rw-r--. 1 lyh  lyh    1366 9月   4 2019 README.txt
drwxr-xr-x. 3 lyh  lyh    4096 9月  12 2019 sbin
drwxr-xr-x. 4 lyh  lyh    4096 9月  12 2019 share
drwxr-xr-x. 2 root root   4096 2月  17 16:45 wcinput
drwxr-xr-x. 2 root root   4096 2月  17 16:47 wcoutput

[root@hadoop103 hadoop-3.1.3]# rm -rf wcinput/

[root@hadoop103 hadoop-3.1.3]# ll
总用量 204
drwxr-xr-x. 2 lyh  lyh    4096 9月  12 2019 bin
drwxr-xr-x. 3 lyh  lyh    4096 9月  12 2019 etc
drwxr-xr-x. 2 lyh  lyh    4096 9月  12 2019 include
drwxr-xr-x. 3 lyh  lyh    4096 9月  12 2019 lib
drwxr-xr-x. 4 lyh  lyh    4096 9月  12 2019 libexec
-rw-rw-r--. 1 lyh  lyh  147145 9月   4 2019 LICENSE.txt
-rw-rw-r--. 1 lyh  lyh   21867 9月   4 2019 NOTICE.txt
-rw-rw-r--. 1 lyh  lyh    1366 9月   4 2019 README.txt
drwxr-xr-x. 3 lyh  lyh    4096 9月  12 2019 sbin
drwxr-xr-x. 4 lyh  lyh    4096 9月  12 2019 share
drwxr-xr-x. 2 root root   4096 2月  17 16:47 wcoutput
(b)同步hadoop102中的/opt/module/hadoop-3.1.3到hadoop103
hadoop102
[root@hadoop102 module]#  rsync -av hadoop-3.1.3/ root@hadoop103:/opt/module/hadoop-3.1.3/
The authenticity of host 'hadoop103 (192.168.10.103)' can't be established.
ECDSA key fingerprint is SHA256:01MEqjbUTtlwu/eeW4s/lw5f3Rg+IQfuc43NMVLqckk.
ECDSA key fingerprint is MD5:ac:a2:7c:97:22:44:ba:31:1d:73:f2:67:28:cf:ba:a8.
Are you sure you want to continue connecting (yes/no)? yes
Warning: Permanently added 'hadoop103,192.168.10.103' (ECDSA) to the list of known hosts.
root@hadoop103's password:
sending incremental file list
./
wcinput/
wcinput/word.txt

sent 683,973 bytes  received 2,662 bytes  16,953.95 bytes/sec
total size is 844,991,426  speedup is 1,230.63
hadoop103
[root@hadoop103 hadoop-3.1.3]# ll
总用量 208
drwxr-xr-x. 2 lyh  lyh    4096 9月  12 2019 bin
drwxr-xr-x. 3 lyh  lyh    4096 9月  12 2019 etc
drwxr-xr-x. 2 lyh  lyh    4096 9月  12 2019 include
drwxr-xr-x. 3 lyh  lyh    4096 9月  12 2019 lib
drwxr-xr-x. 4 lyh  lyh    4096 9月  12 2019 libexec
-rw-rw-r--. 1 lyh  lyh  147145 9月   4 2019 LICENSE.txt
-rw-rw-r--. 1 lyh  lyh   21867 9月   4 2019 NOTICE.txt
-rw-rw-r--. 1 lyh  lyh    1366 9月   4 2019 README.txt
drwxr-xr-x. 3 lyh  lyh    4096 9月  12 2019 sbin
drwxr-xr-x. 4 lyh  lyh    4096 9月  12 2019 share
drwxr-xr-x. 2 root root   4096 2月  17 16:45 wcinput
drwxr-xr-x. 2 root root   4096 2月  17 16:47 wcoutput
3)xsync集群分发脚本
期望脚本在任何路径都能使用(需要把脚本放在声明了全局环境变量的路径)
rsync命令原始拷贝:
rsync -av /opt/module root@hadoop103:/opt/
(a)创建xsync文件
查看全局变量
[root@hadoop102 home]# echo $PATH
/usr/local/bin:/usr/local/sbin:/usr/bin:/usr/sbin:/bin:/sbin:/opt/module/jre1.8.0_321/bin:/opt/module/hadoop-3.1.3/bin:/opt/module/hadoop-3.1.3/sbin:/root/bin:/opt/module/jre1.8.0_321/bin:/opt/module/hadoop-3.1.3/bin:/opt/module/hadoop-3.1.3/sbin
创建xsync脚本
[root@hadoop102 bin]# vim xsync
#!/bin/bash

#1. 判断参数个数
if [ $# -lt 1 ]
# 如果 参数 个数小于 1 :未传参
then
    echo Not Enough Arguement!
    exit;
fi

#2. 遍历集群所有机器
for host in hadoop102 hadoop103 hadoop104
do
    echo ====================  $host  ====================
    #3. 遍历所有目录,挨个发送
    for file in $@
    do
        #4. 判断文件是否存在
        if [ -e $file ]
        then
            #5. 获取 当前 父目录 -P:软连接希望同步到到根目录
            # 软连接 ln s aaa bbb    cd -P bbb -> 进入aaa路径
            pdir=$(cd -P $(dirname $file); pwd)

            #6. 获取当前文件的名称
            fname=$(basename $file)
            ssh $host "mkdir -p $pdir" # 到目标host创建文件  -p:无论是否存在文件名都创建
            rsync -av $pdir/$fname $host:$pdir
        else
            echo $file does not exists!
        fi
    done
done
(b)修改脚本 xsync 具有执行权限
[root@hadoop102 bin]# ll xsync
-rw-r--r--. 1 root root 948 2月  18 10:39 xsync

[root@hadoop102 bin]# chmod +x xsync

[root@hadoop102 bin]# ll xsync
-rwxr-xr-x. 1 root root 948 2月  18 10:39 xsync
(c)将脚本复制到/bin中,以便全局调用
[root@hadoop102 bin]# cp xsync /bin

[root@hadoop102 bin]# cd /bin/

[root@hadoop102 bin]# ll | grep xsync
-rwxr-xr-x. 1 root root        948 2月  18 11:00 xsync
(d)目标文件分发使用
[root@hadoop102 bin]# xsync /bin/xsync
==================== hadoop102 ====================
root@hadoop102's password:
root@hadoop102's password:
sending incremental file list

sent 43 bytes  received 12 bytes  22.00 bytes/sec
total size is 948  speedup is 17.24
==================== hadoop103 ====================
root@hadoop103's password:
root@hadoop103's password:
sending incremental file list
xsync

sent 1,038 bytes  received 35 bytes  429.20 bytes/sec
total size is 948  speedup is 0.88
==================== hadoop104 ====================
root@hadoop104's password:
root@hadoop104's password:
sending incremental file list
xsync

sent 1,038 bytes  received 35 bytes  429.20 bytes/sec
total size is 948  speedup is 0.88
(e)分发环境变量
[root@hadoop102 bin]# sudo /bin/xsync /etc/profile.d/my_env.sh
==================== hadoop102 ====================
root@hadoop102's password:
root@hadoop102's password:
sending incremental file list

sent 48 bytes  received 12 bytes  24.00 bytes/sec
total size is 215  speedup is 3.58
==================== hadoop103 ====================
root@hadoop103's password:
root@hadoop103's password:
sending incremental file list

sent 48 bytes  received 12 bytes  24.00 bytes/sec
total size is 215  speedup is 3.58
==================== hadoop104 ====================
root@hadoop104's password:
root@hadoop104's password:
sending incremental file list

sent 48 bytes  received 12 bytes  24.00 bytes/sec
total size is 215  speedup is 3.58
让环境变量生效
[root@hadoop103 bin]# source /etc/profile
[root@hadoop104 bin]# source /etc/profile
3、SSH无密登录配置
1、配置ssh
基本语法
ssh 另一台电脑的IP地址
ssh连接:
[root@hadoop102 bin]# ssh hadoop103
root@hadoop103's password:
Last login: Fri Feb 18 09:41:23 2022
[root@hadoop103 ~]# exit
登出
Connection to hadoop103 closed.
2、生成公钥和私钥
现在想要hadoop102 免密登录 103 104
[root@hadoop102 .ssh]# pwd
/root/.ssh

[root@hadoop102 .ssh]# ll
总用量 4
-rw-r--r--. 1 root root 558 2月  18 11:16 known_hosts
.ssh目录下 ssh-keygen -t rsa,
然后敲(三个回车),就会生成两个文件id_rsa(私钥)、id_rsa.pub(公钥)
[root@hadoop102 .ssh]# ssh-keygen -t rsa
Generating public/private rsa key pair.
Enter file in which to save the key (/root/.ssh/id_rsa):
Enter passphrase (empty for no passphrase):
Enter same passphrase again:
Your identification has been saved in /root/.ssh/id_rsa.
Your public key has been saved in /root/.ssh/id_rsa.pub.
The key fingerprint is:
SHA256:TFAcmwMOZ9pCsjsFiBFyFgcI8Qdo5uk17+flzOQEd+ root@hadoop102
The key's randomart image is:
+---[RSA 2048]----+
|OBOo+ =oo.       |
|** B B o.o       |
|+ + = o =        |
| o * . o .  .    |
|. + o  .S. . .   |
| . . .  o . .    |
|    .    +   E   |
|     . .O        |
+----[SHA256]-----+

[root@hadoop102 .ssh]# ll
总用量 12
-rw-------. 1 root root 1675 2月  18 13:45 id_rsa
-rw-r--r--. 1 root root  396 2月  18 13:45 id_rsa.pub
-rw-r--r--. 1 root root  558 2月  18 11:16 known_hosts
(3)将hadoop102公钥拷贝到要免密登录的目标机器上
[root@hadoop102 .ssh]# ssh-copy-id hadoop103
/usr/bin/ssh-copy-id: INFO: attempting to log in with the new key(s), to filter out any that are already installed
/usr/bin/ssh-copy-id: INFO: 1 key(s) remain to be installed -- if you are prompted now it is to install the new keys
root@hadoop103's password:

Number of key(s) added: 1

Now try logging into the machine, with:   "ssh 'hadoop103'"
and check to make sure that only the key(s) you wanted were added.

[root@hadoop102 .ssh]# ssh hadoop103
Last login: Fri Feb 18 13:38:22 2022 from hadoop102
[root@hadoop103 ~]# exit
登出
Connection to hadoop103 closed.
(4)分发数据
[root@hadoop102 bin]# xsync test.txt
==================== hadoop102 ====================
root@hadoop102's password:
sending incremental file list

sent 46 bytes  received 12 bytes  16.57 bytes/sec
total size is 0  speedup is 0.00
==================== hadoop103 ====================
sending incremental file list
test.txt

sent 89 bytes  received 35 bytes  82.67 bytes/sec
total size is 0  speedup is 0.00
==================== hadoop104 ====================
sending incremental file list
test.txt

sent 89 bytes  received 35 bytes  82.67 bytes/sec
total size is 0  speedup is 0.00
3、.ssh文件夹下(~/.ssh)的文件功能解释
known_hosts	记录ssh访问过计算机的公钥(public key)
id_rsa	生成的私钥
id_rsa.pub	生成的公钥
authorized_keys	存放授权过的无密登录服务器公钥
4、集群配置
1)集群部署规划
注意:
1、NameNode和SecondaryNameNode不要安装在同一台服务器
2、ResourceManager也很消耗内存,不要和NameNode、SecondaryNameNode配置在同一台机器上。
		hadoop102 		hadoop103			hadoop104
HDFS	 NameNode	 					SecondaryNameNode

YARN				 ResourceManager
2)配置文件
core-site.xml、hdfs-site.xml、yarn-site.xml、mapred-site.xml四个配置文件存放在$HADOOP_HOME/etc/hadoop这个路径上,用户可以根据项目需求重新进行修改配置。
[root@hadoop102 hadoop]# pwd
/opt/module/hadoop-3.1.3/etc/hadoop

[root@hadoop102 hadoop]# ll | grep site.xml
-rw-r--r--. 1 lyh lyh   774 9月  12 2019 core-site.xml
-rw-r--r--. 1 lyh lyh   775 9月  12 2019 hdfs-site.xml
-rw-r--r--. 1 lyh lyh   620 9月  12 2019 httpfs-site.xml
-rw-r--r--. 1 lyh lyh   682 9月  12 2019 kms-site.xml
-rw-r--r--. 1 lyh lyh   758 9月  12 2019 mapred-site.xml
-rw-r--r--. 1 lyh lyh   690 9月  12 2019 yarn-site.xml
3)配置集群
(1)核心配置文件
配置core-site.xml,在<configuration>中添加内容
[root@hadoop102 hadoop]# cd $HADOOP_HOME/etc/hadoop
[root@hadoop102 hadoop]# vim core-site.xml
?xml version="1.0" encoding="UTF-8"?>
<?xml-stylesheet type="text/xsl" href="configuration.xsl"?>
<!--
  Licensed under the Apache License, Version 2.0 (the "License");
  you may not use this file except in compliance with the License.
  You may obtain a copy of the License at

    http://www.apache.org/licenses/LICENSE-2.0

  Unless required by applicable law or agreed to in writing, software
  distributed under the License is distributed on an "AS IS" BASIS,
  WITHOUT WARRANTIES OR CONDITIONS OF ANY KIND, either express or implied.
  See the License for the specific language governing permissions and
  limitations under the License. See accompanying LICENSE file.
-->

<!-- Put site-specific property overrides in this file. -->

<configuration>
    <!-- 指定NameNode的地址 -->
    <property>
        <name>fs.defaultFS</name>
        <value>hdfs://hadoop102:8020</value>
    </property>

    <!-- 指定hadoop数据的存储目录 -->
    <property>
        <name>hadoop.tmp.dir</name>
        <value>/opt/module/hadoop-3.1.3/data</value>
    </property>

    <!-- 配置HDFS网页登录使用的静态用户为root -->
    <property>
        <name>hadoop.http.staticuser.user</name>
        <value>root</value>
    </property>
</configuration>
(2)HDFS配置文件
[root@hadoop102 hadoop]# vim hdfs-site.xml
<?xml-stylesheet type="text/xsl" href="configuration.xsl"?>
<!--
  Licensed under the Apache License, Version 2.0 (the "License");
  you may not use this file except in compliance with the License.
  You may obtain a copy of the License at

    http://www.apache.org/licenses/LICENSE-2.0

  Unless required by applicable law or agreed to in writing, software
  distributed under the License is distributed on an "AS IS" BASIS,
  WITHOUT WARRANTIES OR CONDITIONS OF ANY KIND, either express or implied.
  See the License for the specific language governing permissions and
  limitations under the License. See accompanying LICENSE file.
-->

<!-- Put site-specific property overrides in this file. -->

<configuration>
        <!-- nn web端访问地址-->
	<property>
        <name>dfs.namenode.http-address</name>
        <value>hadoop102:9870</value>
    </property>
        <!-- 2nn web端访问地址-->
	<property>
		<name>dfs.namenode.secondary.http-address</name>
		<value>hadoop104:9868</value>
	</property>
</configuration>
(3)YARN配置文件
注意 value的值千万不能有空格或缩进!!!
[root@hadoop102 hadoop]# vim yarn-site.xml
<?xml version="1.0"?>
<!--
  Licensed under the Apache License, Version 2.0 (the "License");
  you may not use this file except in compliance with the License.
  You may obtain a copy of the License at

    http://www.apache.org/licenses/LICENSE-2.0

  Unless required by applicable law or agreed to in writing, software
  distributed under the License is distributed on an "AS IS" BASIS,
  WITHOUT WARRANTIES OR CONDITIONS OF ANY KIND, either express or implied.
  See the License for the specific language governing permissions and
  limitations under the License. See accompanying LICENSE file.
-->
<configuration>
	<!-- 指定MR走shuffle -->
	<property>
		<name>yarn.nodemanager.aux-services</name>
		<value>mapreduce_shuffle</value>
	</property>
	<!-- 指定ResourceManager的地址 -->
	<property>
		<name>yarn.resourcemanager.hostname</name>
		<value>hadoop103</value>
	</property>
	<!-- 环境变量的继承 -->
	<property>
		<name>yarn.nodemanager.env-whitelist</name>
		<value>JAVA_HOME,HADOOP_COMMON_HOME,HADOOP_HDFS_HOME,HADOOP_CONF_DIR,CLASSPATH_PREPEND_DISTCACHE,HADOOP_YARN_HOME,HADOOP_MAPRED_HOME</value>
	</property>
</configuration>
(4)MapReduce配置文件
配置mapred-site.xml
[root@hadoop102 hadoop]# vim mapred-site.xml
[root@hadoop102 hadoop]# cat mapred-site.xml
<?xml version="1.0"?>
<?xml-stylesheet type="text/xsl" href="configuration.xsl"?>
<!--
  Licensed under the Apache License, Version 2.0 (the "License");
  you may not use this file except in compliance with the License.
  You may obtain a copy of the License at

    http://www.apache.org/licenses/LICENSE-2.0

  Unless required by applicable law or agreed to in writing, software
  distributed under the License is distributed on an "AS IS" BASIS,
  WITHOUT WARRANTIES OR CONDITIONS OF ANY KIND, either express or implied.
  See the License for the specific language governing permissions and
  limitations under the License. See accompanying LICENSE file.
-->

<!-- Put site-specific property overrides in this file. -->

<configuration>
	<!-- 指定MapReduce程序运行在Yarn上 -->
	<property>
		<name>mapreduce.framework.name</name>
		<value>yarn</value>
	</property>

    <property>
		<name>yarn.app.mapreduce.am.env</name>
		<value>HADOOP_MAPRED_HOME=/opt/module/hadoop-3.1.3</value>
	</property>
	<property>
		<name>mapreduce.map.env</name>
		<value>HADOOP_MAPRED_HOME=/opt/module/hadoop-3.1.3</value>
	</property>
	<property>
		<name>mapreduce.reduce.env</name>
		<value>HADOOP_MAPRED_HOME=/opt/module/hadoop-3.1.3</value>
	</property>

</configuration>
4)在集群上分发配置好的Hadoop配置文件
[root@hadoop102 hadoop]# xsync /opt/module/hadoop-3.1.3/etc/hadoop/
==================== hadoop102 ====================
root@hadoop102's password:
root@hadoop102's password:
sending incremental file list

sent 989 bytes  received 18 bytes  402.80 bytes/sec
total size is 107,799  speedup is 107.05
==================== hadoop103 ====================
sending incremental file list
hadoop/
hadoop/core-site.xml
hadoop/hdfs-site.xml
hadoop/mapred-site.xml
hadoop/yarn-site.xml

sent 3,633 bytes  received 139 bytes  2,514.67 bytes/sec
total size is 107,799  speedup is 28.58
==================== hadoop104 ====================
sending incremental file list
hadoop/
hadoop/core-site.xml
hadoop/hdfs-site.xml
hadoop/mapred-site.xml
hadoop/yarn-site.xml

sent 3,633 bytes  received 139 bytes  7,544.00 bytes/sec
total size is 107,799  speedup is 28.58
5)去103和104上查看文件分发情况
[root@hadoop103 ~]# cat /opt/module/hadoop-3.1.3/etc/hadoop/core-site.xml
[root@hadoop104 ~]# cat /opt/module/hadoop-3.1.3/etc/hadoop/core-site.xml
5、群起集群
1)配置workers
[root@hadoop102 hadoop]# vim /opt/module/hadoop-3.1.3/etc/hadoop/workers
在该文件中增加如下内容:
hadoop102
hadoop103
hadoop104
注意:该文件中添加的内容结尾不允许有空格,文件中不允许有空行。
同步所有节点配置文件
[root@hadoop102 hadoop]# xsync /opt/module/hadoop-3.1.3/etc/
==================== hadoop102 ====================
sending incremental file list

sent 1,014 bytes  received 19 bytes  2,066.00 bytes/sec
total size is 107,829  speedup is 104.38
==================== hadoop103 ====================
sending incremental file list
etc/hadoop/
etc/hadoop/workers

sent 1,104 bytes  received 51 bytes  2,310.00 bytes/sec
total size is 107,829  speedup is 93.36
==================== hadoop104 ====================
sending incremental file list
etc/hadoop/
etc/hadoop/workers

sent 1,104 bytes  received 51 bytes  2,310.00 bytes/sec
total size is 107,829  speedup is 93.36


[root@hadoop102 hadoop]# ssh hadoop103
Last login: Mon Feb 21 14:58:42 2022 from hadoop102
[root@hadoop103 ~]# cat /opt/module/hadoop-3.1.3/etc/hadoop/workers
localhost
hadoop102
hadoop103
hadoop104
[root@hadoop103 ~]# exit
登出
Connection to hadoop103 closed.
[root@hadoop102 hadoop]# ssh hadoop104
Last login: Mon Feb 21 14:59:14 2022 from hadoop102
[root@hadoop104 ~]# cat /opt/module/hadoop-3.1.3/etc/hadoop/workers
localhost
hadoop102
hadoop103
hadoop104
2)启动集群
(1)如果集群是第一次启动,需要在hadoop102节点格式化NameNode(注意:格式化NameNode,会产生新的集群id,导致NameNode和DataNode的集群id不一致,集群找不到已往数据。如果集群在运行过程中报错,需要重新格式化NameNode的话,一定要先停止namenode和datanode进程,并且要删除所有机器的data和logs目录,然后再进行格式化。)
[root@hadoop102 hadoop]# cd /opt/module/hadoop-3.1.3/
[root@hadoop102 hadoop-3.1.3]# hdfs namenode -format
(2)启动HDFS
[root@hadoop102 hadoop-3.1.3]# sbin/start-dfs.sh
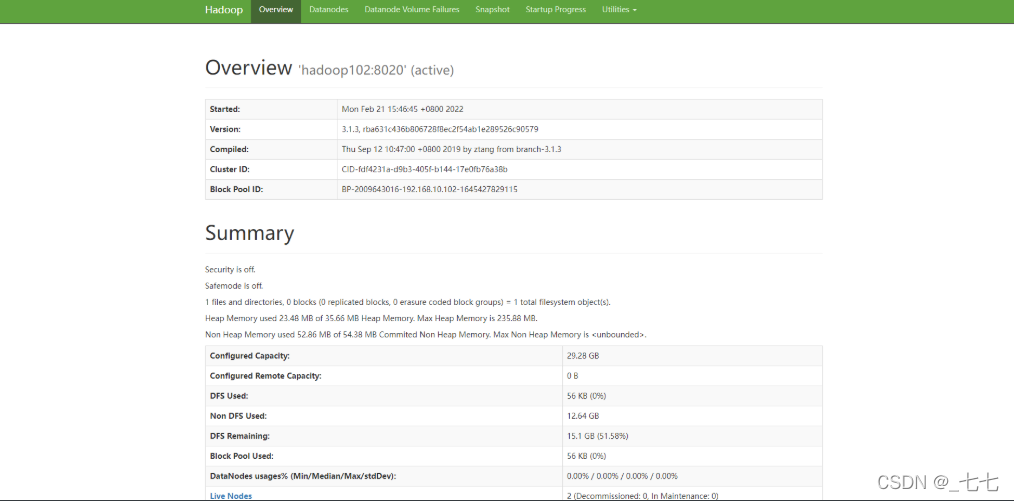
Web端查看HDFS的NameNode
(a)浏览器中输入:http://hadoop102:9870
(b)查看HDFS上存储的数据信息
(3)在配置了ResourceManager的节点(hadoop103)启动YARN
[root@hadoop103 hadoop-3.1.3]# cd /opt/module/hadoop-3.1.3/
[root@hadoop103 hadoop-3.1.3]# sbin/start-yarn.sh
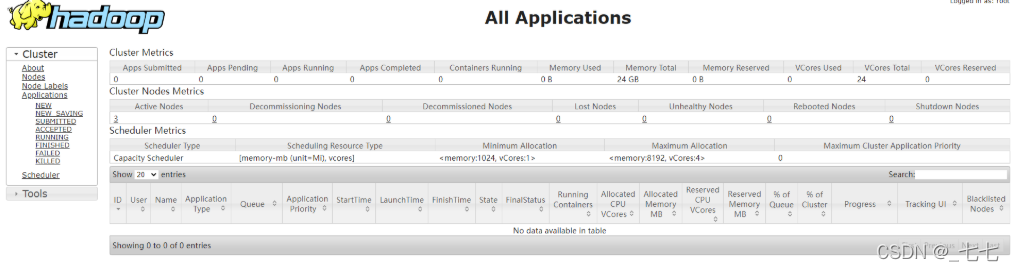
Web端查看YARN的ResourceManager
(a)浏览器中输入:http://hadoop103:8088
(b)查看YARN上运行的Job信息
3)集群基本测试
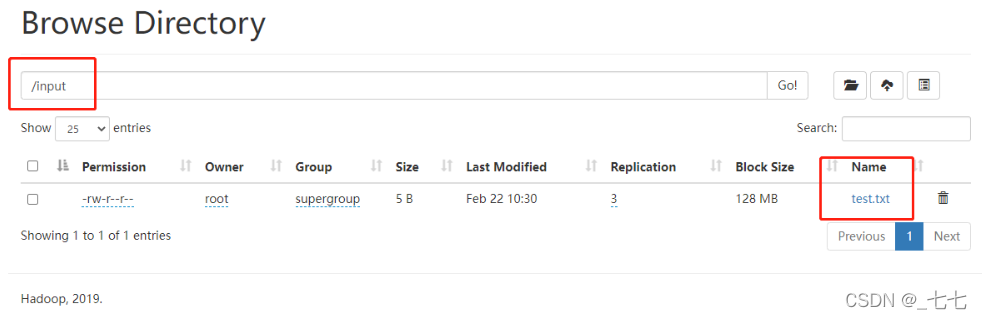
(1)上传文件到集群
上传小文件
[root@hadoop102 ~]# hadoop fs -mkdir /input
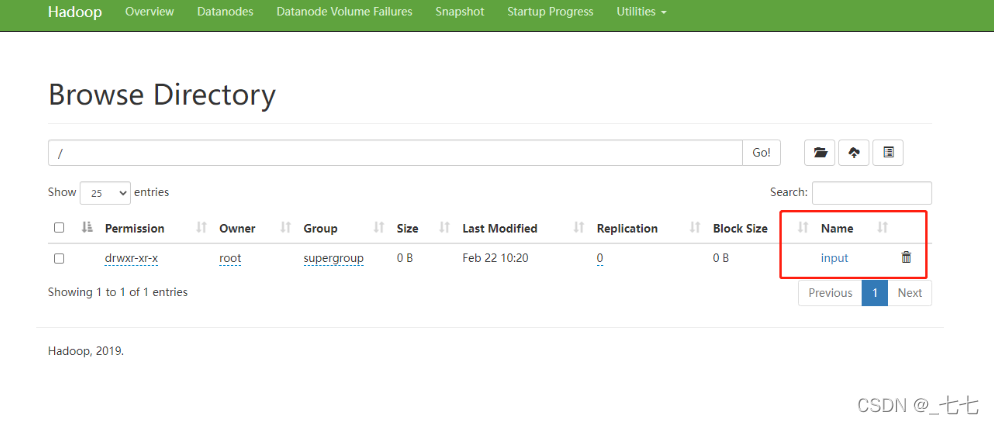
[root@hadoop102 ~]# vim test.txt
[root@hadoop102 ~]# hadoop fs -put /root/test.txt /input
2022-02-22 10:30:05,347 INFO sasl.SaslDataTransferClient: SASL encryption trust check: localHostTrusted = false, remoteHostTrusted = false
(2)查看HDFS文件存储路径
[root@hadoop102 ~]# cd /opt/module/hadoop-3.1.3/data/dfs/data/current/BP-2009643016-192.168.10.102-1645427829115/current/finalized/subdir0/subdir0

[root@hadoop102 subdir0]# ll
总用量 8
-rw-r--r--. 1 root root  5 2月  22 10:30 blk_1073741825
-rw-r--r--. 1 root root 11 2月  22 10:30 blk_1073741825_1001.meta
(3)查看HDFS在磁盘存储文件内容
[root@hadoop102 subdir0]# cat blk_1073741825
test
(4)下载文件
[root@hadoop102 ~]# ll
总用量 40
-rw-------. 1 root root 1685 2月  17 10:28 anaconda-ks.cfg
...

[root@hadoop102 ~]# hadoop fs -get /input/test.txt
2022-02-22 10:55:07,798 INFO sasl.SaslDataTransferClient: SASL encryption trust check: localHostTrusted = false, remoteHostTrusted = false

[root@hadoop102 ~]# ll
总用量 44
-rw-------. 1 root root 1685 2月  17 10:28 anaconda-ks.cfg
-rw-r--r--. 1 root root    5 2月  22 10:55 test.txt
...
(5)执行wordcount程序
[root@hadoop102 hadoop-3.1.3]# hadoop jar share/hadoop/mapreduce/hadoop-mapreduce-examples-3.1.3.jar wordcount /input /output
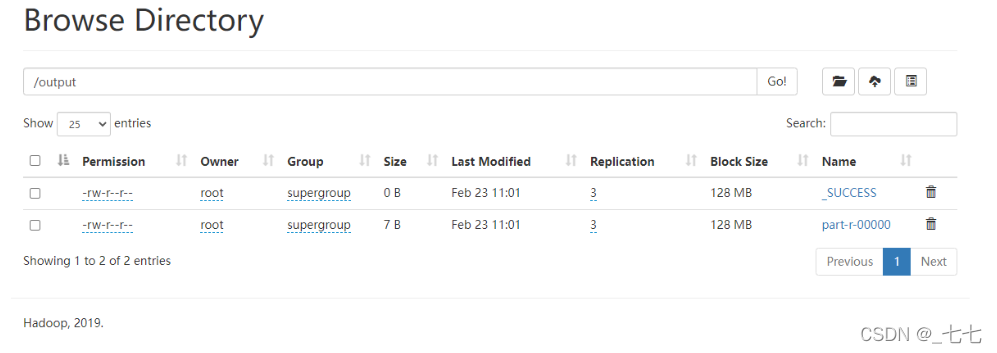
[root@hadoop102 wcoutput]# hadoop fs -get /output
2022-02-23 11:04:39,586 INFO sasl.SaslDataTransferClient: SASL encryption trust check: localHostTrusted = false, remoteHostTrusted = false
[root@hadoop102 wcoutput]# cd output/
[root@hadoop102 output]# ll
总用量 4
-rw-r--r--. 1 root root 7 2月 23 11:04 part-r-00000
-rw-r--r--. 1 root root 0 2月 23 11:04 _SUCCESS
[root@hadoop102 output]# cat part-r-00000
test 1
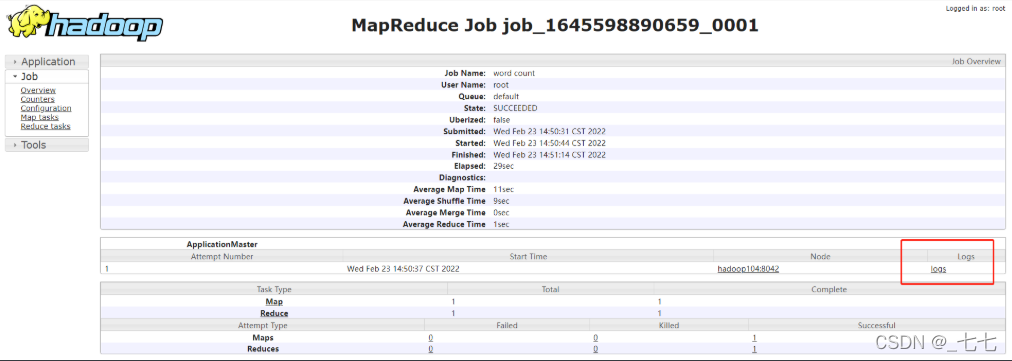
6、配置历史服务器
为了查看程序的历史运行情况,需要配置一下历史服务器。具体配置步骤如下:
1)配置mapred-site.xml
[root@hadoop102 hadoop-3.1.3]# vim etc/hadoop/mapred-site.xml
添加历史服务器内容
<!-- 历史服务器端地址 -->
<property>
    <name>mapreduce.jobhistory.address</name>
    <value>hadoop102:10020</value>
</property>

<!-- 历史服务器web端地址 -->
<property>
    <name>mapreduce.jobhistory.webapp.address</name>
    <value>hadoop102:19888</value>
</property>
2)分发
[root@hadoop102 hadoop-3.1.3]# xsync etc/hadoop/mapred-site.xml
==================== hadoop102 ====================
sending incremental file list

sent 64 bytes  received 12 bytes  152.00 bytes/sec
total size is 1,554  speedup is 20.45
==================== hadoop103 ====================
sending incremental file list
mapred-site.xml

sent 969 bytes  received 47 bytes  677.33 bytes/sec
total size is 1,554  speedup is 1.53
==================== hadoop104 ====================
sending incremental file list
mapred-site.xml

sent 969 bytes  received 47 bytes  677.33 bytes/sec
total size is 1,554  speedup is 1.53
3)在hadoop102启动历史服务器
[root@hadoop102 hadoop-3.1.3]# mapred --daemon start historyserver
4)查看进程
[root@hadoop102 hadoop]# jps
111254 Jps
110649 JobHistoryServer
46056 NameNode
109448 NodeManager
46237 DataNode
5)查看JobHistory
http://hadoop102:19888/jobhistory

7、配置日志的聚集
日志聚集概念:应用运行完成以后,将程序运行日志信息上传到HDFS系统上。
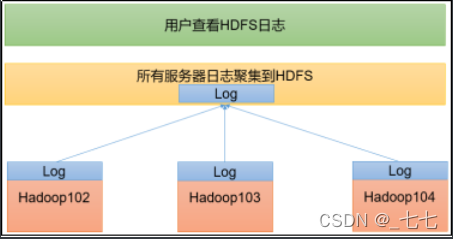
日志聚集功能好处:可以方便的查看到程序运行详情,方便开发调试。
注意:开启日志聚集功能,需要重新启动NodeManager 、ResourceManager和HistoryServer。
1)配置yarn-site.xml
[root@hadoop102 hadoop]# vim yarn-site.xml
添加日志聚集功能
    <!-- 开启日志聚集功能 -->
    <property>
        <name>yarn.log-aggregation-enable</name>
        <value>true</value>
    </property>
    <!-- 设置日志聚集服务器地址 -->
    <property>
        <name>yarn.log.server.url</name>
        <value>http://hadoop102:19888/jobhistory/logs</value>
    </property>
    <!-- 设置日志保留时间为7天 -->
    <property>
        <name>yarn.log-aggregation.retain-seconds</name>
        <value>604800</value>
    </property>
2)分发
[root@hadoop102 hadoop]# xsync yarn-site.xml
==================== hadoop102 ====================
sending incremental file list

sent 62 bytes  received 12 bytes  148.00 bytes/sec
total size is 2,097  speedup is 28.34
==================== hadoop103 ====================
sending incremental file list
yarn-site.xml

sent 814 bytes  received 53 bytes  1,734.00 bytes/sec
total size is 2,097  speedup is 2.42
==================== hadoop104 ====================
sending incremental file list
yarn-site.xml

sent 814 bytes  received 53 bytes  1,734.00 bytes/sec
total size is 2,097  speedup is 2.42
3)关闭NodeManager 、ResourceManager和HistoryServer
[root@hadoop103 sbin]# stop-yarn.sh
[root@hadoop102 hadoop]# mapred --daemon stop historyserver

[root@hadoop103 sbin]# start-yarn.sh
[root@hadoop102 hadoop]# mapred --daemon start historyserver
4)进行测试、删除HDFS上已经存在的输出文件
hadoop fs -rm -r /output
5)执行wordcount
hadoop jar /opt/module/hadoop-3.1.3/share/hadoop/mapreduce/hadoop-mapreduce-examples-3.1.3.jar wordcount /input /output
6)查看日志
(1)历史服务器地址
http://hadoop102:19888/jobhistory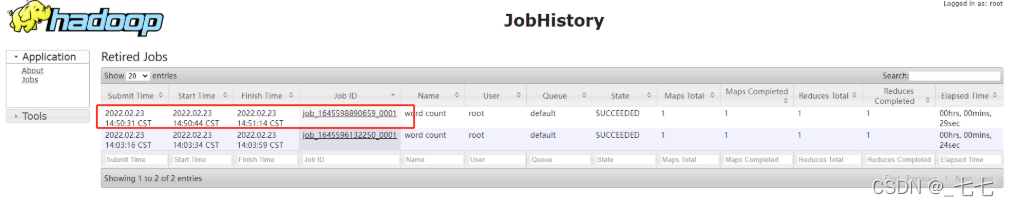
8、集群启动/停止方式总结
1)各个模块分开启动/停止(配置ssh是前提)常用
(1)整体启动/停止HDFS
start-dfs.sh
stop-dfs.sh
(2)整体启动/停止YARN
start-yarn.sh
stop-yarn.sh
2)各个服务组件逐一启动/停止
(1)分别启动/停止HDFS组件
hdfs --daemon start namenode/datanode/secondarynamenode
hdfs --daemon stop namenode/datanode/secondarynamenode
(2)启动/停止YARN
yarn --daemon start resourcemanager/nodemanager
yarn --daemon stop resourcemanager/nodemanager
9、编写Hadoop集群常用脚本
1)Hadoop集群启停脚本(包含HDFS,Yarn,Historyserver):myhadoop.sh
放入/bin/目录
#!/bin/bash

if [ $# -lt 1 ]
then
    echo "No Args Input..."
    exit ;
fi

case $1 in
    "start")
        echo " =================== 启动 hadoop集群 ==================="

        echo " --------------- 启动 hdfs ---------------"
        ssh hadoop102 "/opt/module/hadoop-3.1.3/sbin/start-dfs.sh"
        echo " --------------- 启动 yarn ---------------"
        ssh hadoop103 "/opt/module/hadoop-3.1.3/sbin/start-yarn.sh"
        echo " --------------- 启动 historyserver ---------------"
        ssh hadoop102 "/opt/module/hadoop-3.1.3/bin/mapred --daemon start historyserver"
    ;;
    "stop")
        echo " =================== 关闭 hadoop集群 ==================="

        echo " --------------- 关闭 historyserver ---------------"
        ssh hadoop102 "/opt/module/hadoop-3.1.3/bin/mapred --daemon stop historyserver"
        echo " --------------- 关闭 yarn ---------------"
        ssh hadoop103 "/opt/module/hadoop-3.1.3/sbin/stop-yarn.sh"
        echo " --------------- 关闭 hdfs ---------------"
        ssh hadoop102 "/opt/module/hadoop-3.1.3/sbin/stop-dfs.sh"
    ;;
    *)
        echo "Input Args Error..."
    ;;
esac
10、常用端口号说明
端口名称					Hadoop2.x			Hadoop3.x
NameNode内部通信端口		8020 / 9000			8020 / 9000/9820
NameNode HTTP UI			50070				9870
MapReduce查看执行任务端口		8088				8088
历史服务器通信端口			19888				19888
11、集群时间同步
如果服务器在公网环境(能连接外网),可以不采用集群时间同步,因为服务器会定期和公网时间进行校准;
如果服务器在内网环境,必须要配置集群时间同步,否则时间久了,会产生时间偏差,导致集群执行任务时间不同步。
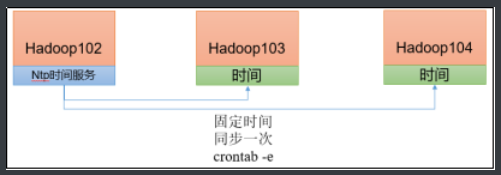
1)需求
找一个机器,作为时间服务器,所有的机器与这台集群时间进行定时的同步,生产环境根据任务对时间的准确程度要求周期同步。测试环境为了尽快看到效果,采用1分钟同步一次。
2)时间服务器配置(必须root用户)
(1)查看所有节点ntpd服务状态和开机自启动状态
[root@hadoop102 ~]$ sudo systemctl status ntpd
[root@hadoop102 ~]$ sudo systemctl start ntpd
[root@hadoop102 ~]$ sudo systemctl is-enabled ntpd
(2)修改hadoop102的ntp.conf配置文件
[root@hadoop102 ~]$ sudo vim /etc/ntp.conf
(a)修改1(授权192.168.10.0-192.168.10.255网段上的所有机器可以从这台机器上查询和同步时间)
#restrict 192.168.10.0 mask 255.255.255.0 nomodify notrap
为
restrict 192.168.10.0 mask 255.255.255.0 nomodify notrap
(b)修改2(集群在局域网中,不使用其他互联网上的时间)
server 0.centos.pool.ntp.org iburst
server 1.centos.pool.ntp.org iburst
server 2.centos.pool.ntp.org iburst
server 3.centos.pool.ntp.org iburst
为
#server 0.centos.pool.ntp.org iburst
#server 1.centos.pool.ntp.org iburst
#server 2.centos.pool.ntp.org iburst
#server 3.centos.pool.ntp.org iburst
(c)添加3(当该节点丢失网络连接,依然可以采用本地时间作为时间服务器为集群中的其他节点提供时间同步)
server 127.127.1.0
fudge 127.127.1.0 stratum 10
(3)修改hadoop102的/etc/sysconfig/ntpd 文件
[root@hadoop102 ~]$ sudo vim /etc/sysconfig/ntpd
增加内容如下(让硬件时间与系统时间一起同步)
SYNC_HWCLOCK=yes
(4)重新启动ntpd服务
[root@hadoop102 ~]$ sudo systemctl start ntpd
(5)设置ntpd服务开机启动
[root@hadoop102 ~]$ sudo systemctl enable ntpd
3)其他机器配置(必须root用户)
(1)关闭所有节点上ntp服务和自启动
[root@hadoop103 ~]$ sudo systemctl stop ntpd
[root@hadoop103 ~]$ sudo systemctl disable ntpd
[root@hadoop104 ~]$ sudo systemctl stop ntpd
[root@hadoop104 ~]$ sudo systemctl disable ntpd
(2)在其他机器配置1分钟与时间服务器同步一次
[root@hadoop103 ~]$ sudo crontab -e
编写定时任务如下:
*/1 * * * * /usr/sbin/ntpdate hadoop102
(3)修改任意机器时间
[root@hadoop103 ~]$ sudo date -s "2021-9-11 11:11:11"
(4)1分钟后查看机器是否与时间服务器同步
[root@hadoop103 ~]$ sudo date
$ sudo vim /etc/ntp.conf
(a)修改1(授权192.168.10.0-192.168.10.255网段上的所有机器可以从这台机器上查询和同步时间)

```shell
#restrict 192.168.10.0 mask 255.255.255.0 nomodify notrap
为
restrict 192.168.10.0 mask 255.255.255.0 nomodify notrap
(b)修改2(集群在局域网中,不使用其他互联网上的时间)
server 0.centos.pool.ntp.org iburst
server 1.centos.pool.ntp.org iburst
server 2.centos.pool.ntp.org iburst
server 3.centos.pool.ntp.org iburst
为
#server 0.centos.pool.ntp.org iburst
#server 1.centos.pool.ntp.org iburst
#server 2.centos.pool.ntp.org iburst
#server 3.centos.pool.ntp.org iburst
(c)添加3(当该节点丢失网络连接,依然可以采用本地时间作为时间服务器为集群中的其他节点提供时间同步)
server 127.127.1.0
fudge 127.127.1.0 stratum 10
(3)修改hadoop102的/etc/sysconfig/ntpd 文件
[root@hadoop102 ~]$ sudo vim /etc/sysconfig/ntpd
增加内容如下(让硬件时间与系统时间一起同步)
SYNC_HWCLOCK=yes
(4)重新启动ntpd服务
[root@hadoop102 ~]$ sudo systemctl start ntpd
(5)设置ntpd服务开机启动
[root@hadoop102 ~]$ sudo systemctl enable ntpd
3)其他机器配置(必须root用户)
(1)关闭所有节点上ntp服务和自启动
[root@hadoop103 ~]$ sudo systemctl stop ntpd
[root@hadoop103 ~]$ sudo systemctl disable ntpd
[root@hadoop104 ~]$ sudo systemctl stop ntpd
[root@hadoop104 ~]$ sudo systemctl disable ntpd
(2)在其他机器配置1分钟与时间服务器同步一次
[root@hadoop103 ~]$ sudo crontab -e
编写定时任务如下:
*/1 * * * * /usr/sbin/ntpdate hadoop102
(3)修改任意机器时间
[root@hadoop103 ~]$ sudo date -s "2021-9-11 11:11:11"
(4)1分钟后查看机器是否与时间服务器同步
[root@hadoop103 ~]$ sudo date

华为开发者空间,是为全球开发者打造的专属开发空间,汇聚了华为优质开发资源及工具,致力于让每一位开发者拥有一台云主机,基于华为根生态开发、创新。
更多推荐


 3
3 0
0- 0


 已为社区贡献5条内容

所有评论(0)