Docker 入门
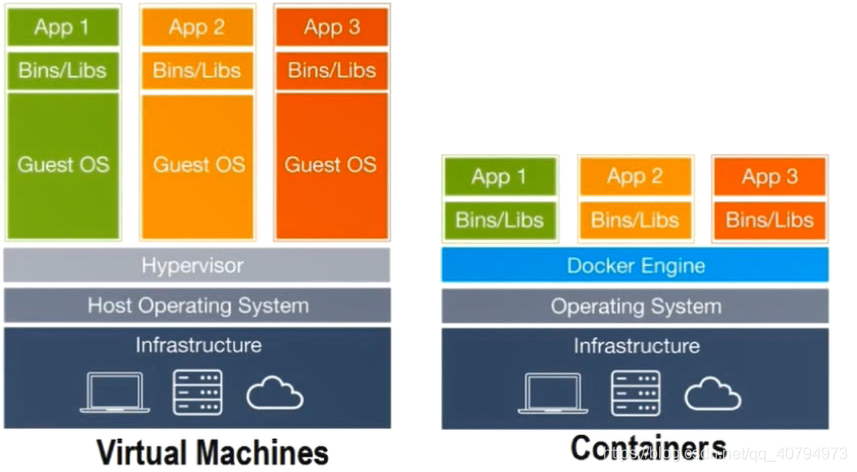
虚拟机和容器对比
·
- https://docs.docker.com/install/
- centos安装:https://docs.docker.com/install/linux/docker-ce/centos/
- VirtualBox:https://www.virtualbox.org/wiki/Downloads
- Vagrant:https://www.vagrantup.com/
- https://app.vagrantup.com/ubuntu/boxes/xenial64
- Docker Hub:https://hub.docker.com/
- wordpress:https://hub.docker.com/_/wordpress
- Docker_安装_入门:https://blog.csdn.net/qq_40794973/article/details/98764503
- docker-library:https://github.com/docker-library
- Dockerfile reference:https://docs.docker.com
/v17.09/engine/reference/builder/
centos 安装 Docker
// 1. 删除以前安装的
yum remove -y docker \
		  docker-client \
		  docker-client-latest \
		  docker-common \
		  docker-latest \
		  docker-latest-logrotate \
		  docker-logrotate \
		  docker-engine
// 2.
yum install -y yum-utils \
			  device-mapper-persistent-data \
			  lvm2
// 3.
yum-config-manager \
    --add-repo \
    https://download.docker.com/linux/centos/docker-ce.repo
// 4.
yum -y install docker-ce docker-ce-cli containerd.io
// 5. 启动docker
systemctl start docker
// 6. 查看docker版本
docker version
// 7. 运行官网样例
docker run hello-world
虚拟机和容器对比
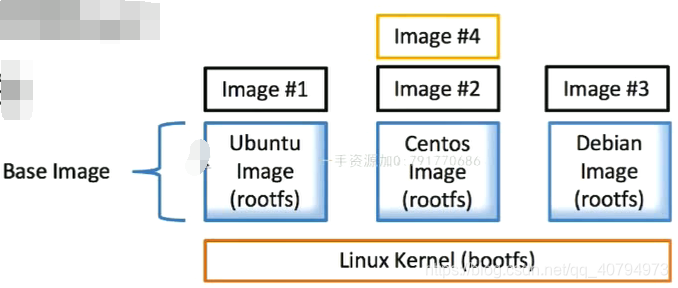
什么是 Image
- 文件和 meta data的集合(root filesystem)
- 分层的,并且每一层都可以添加改变删除文件,成为一个新的image
- 不同的image可以共享相同的 layer
- Image本身是read-ony的
DIY一个Base Image
运行官方的 hello-world
docker pull hello-world
docker run hello-world
安装依赖
yum install -y gcc glibc-static
[yuanyu@localhost root]$ cd ~
[yuanyu@localhost ~]$ mkdir hello-world
[yuanyu@localhost ~]$ cd hello-world/
[yuanyu@localhost hello-world]$ vi hello.c
[yuanyu@localhost hello-world]$ cat hello.c
#include<stdio.h>
int main(){
	printf("hello docker\n");
	return 0;
}
[yuanyu@localhost hello-world]$ gcc -static hello.c -o hello
[yuanyu@localhost hello-world]$ ll
total 848
-rwxrwxr-x. 1 yuanyu yuanyu 860831 Aug 29 03:41 hello
-rw-rw-r--. 1 yuanyu yuanyu     70 Aug 29 03:41 hello.c
[yuanyu@localhost hello-world]$ ./hello
hello docker

[yuanyu@localhost hello-world]$ pwd
/home/yuanyu/hello-world
[yuanyu@localhost hello-world]$ vim Dockerfile
[yuanyu@localhost hello-world]$ vim Dockerfile
[yuanyu@localhost hello-world]$ docker build -t yuanyu1997/hello-wrold .
Sending build context to Docker daemon  864.8kB
Step 1/3 : FROM scratch
 --->
Step 2/3 : ADD hello /
 ---> 37094e3b9c83
Step 3/3 : CMD ["/hello"]
 ---> Running in f676ab846a22
Removing intermediate container f676ab846a22
 ---> 2e3b8931eff5
Successfully built 2e3b8931eff5
Successfully tagged yuanyu1997/hello-wrold:latest
[yuanyu@localhost hello-world]$ docker image ls
REPOSITORY               TAG                 IMAGE ID            CREATED             SIZE
yuanyu1997/hello-wrold   latest              2e3b8931eff5        25 seconds ago      861kB
wordpress                latest              fc03dc56d371        7 days ago          502MB
hello-world              latest              fce289e99eb9        8 months ago        1.84kB
[yuanyu@localhost hello-world]$ ls -lh
total 852K
-rw-rw-r--. 1 yuanyu yuanyu   40 Aug 29 03:48 Dockerfile
-rwxrwxr-x. 1 yuanyu yuanyu 841K Aug 29 03:41 hello
-rw-rw-r--. 1 yuanyu yuanyu   70 Aug 29 03:41 hello.c
[yuanyu@localhost hello-world]$ docker history 2e3b8931eff5
IMAGE               CREATED             CREATED BY                                      SIZE                COMMENT
2e3b8931eff5        7 minutes ago       /bin/sh -c #(nop)  CMD ["/hello"]               0B
37094e3b9c83        7 minutes ago       /bin/sh -c #(nop) ADD file:eb323f2aea3aa1fc1…   861kB

[yuanyu@localhost hello-world]$ docker run yuanyu1997/hello-wrold
hello docker
Dockerfile
FROM scratch
ADD hello /
CMD ["/hello"]
hello.c
#include<stdio.h>
int main(){
   printf("hello docker\n");
   return 0;
}
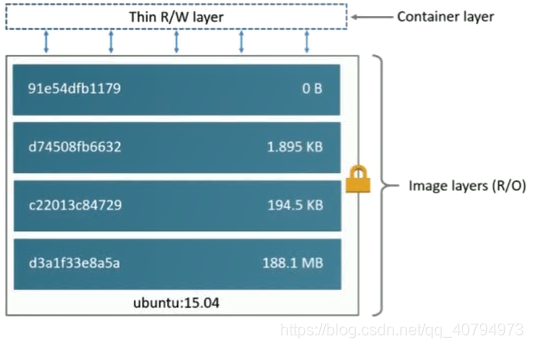
什么是 Container
- 通过Image创建(copy)
- 在 Image layer之上建立一个container layer(可读写)
- 类比面向对象:类和实例
- Image负责app的存储和分发,Container负责运行app
常用命令
查看运行中的 container
- docker container ls
- docker ps
查看所有的 container
- docker container ls -a
- docker ps -a
删除指定的 container
- docker container rm id
- docker rm id
查看 image
- docker image ls
- docker images
删除 image
- docker image rm id
- docker rmi id
显示所有的 container 的id
- docker container ls -aq
- docker container ls -a | awk {'print$1'}
清理所有 container
- 清理所有:docker rm $(docker container ls -aq)
- 清理所有退出的:docker rm $(docker container ls -f "status=exited" -q)
[yuanyu@localhost hello-world]$ docker pull centos
//交互式运行
[yuanyu@localhost hello-world]$ docker run -it centos
//进入了centos 系统里面
[root@6eee110ca26f /]# ls
anaconda-post.log  bin  dev  etc  home  lib  lib64  media  mnt  opt  proc  root  run  sbin  srv  sys  tmp  usr  var
构建自己的Docker镜像
- docker container commit
- docker commit
- docker image build
- docker build
方式一:基于已经存在的container构建成image
这种方式不太安全,也不知道image是如何产生的
[root@localhost ~]# docker images
REPOSITORY          TAG                 IMAGE ID            CREATED             SIZE
centos              latest              67fa590cfc1c        8 days ago          202MB
[root@localhost ~]# docker run -it centos
//安装一些软件
[root@7ead4429f041 /]# yum install -y vim
[root@d26d6adc06a4 ~]# exit
//构建docker image
[root@localhost ~]# docker commit crazy_beaver yuanyu1997/centos-vim:latest
sha256:79811bb06ce7be0011bfa18a058f04d527d1154c4503178594fbbed6fc367119
[root@localhost ~]# docker images
REPOSITORY              TAG                 IMAGE ID            CREATED             SIZE
yuanyu1997/centos-vim   latest              79811bb06ce7        21 seconds ago      369MB
centos                  latest              67fa590cfc1c        8 days ago          202MB
//原始的centos
[root@localhost ~]# docker history 6
IMAGE               CREATED             CREATED BY                                      SIZE                COMMENT
67fa590cfc1c        8 days ago          /bin/sh -c #(nop)  CMD ["/bin/bash"]            0B
<missing>           8 days ago          /bin/sh -c #(nop)  LABEL org.label-schema.sc…   0B
<missing>           8 days ago          /bin/sh -c #(nop) ADD file:4e7247c06de9ad117…   202MB
//构建的centos(可以看到是在原始的基础上构建的)
[root@localhost ~]# docker history 7
IMAGE               CREATED              CREATED BY                                      SIZE                COMMENT
79811bb06ce7        About a minute ago   /bin/bash                                       167MB
67fa590cfc1c        8 days ago           /bin/sh -c #(nop)  CMD ["/bin/bash"]            0B
<missing>           8 days ago           /bin/sh -c #(nop)  LABEL org.label-schema.sc…   0B
<missing>           8 days ago           /bin/sh -c #(nop) ADD file:4e7247c06de9ad117…   202MB
方式二:通过 Dockerfile 构建
[root@localhost ~]# docker images
REPOSITORY          TAG                 IMAGE ID            CREATED             SIZE
centos              latest              67fa590cfc1c        8 days ago          202MB
[root@localhost ~]# mkdir docker-centos-vim
[root@localhost ~]# cd docker-centos-vim/
[root@localhost docker-centos-vim]# vim Dockerfile
[root@localhost docker-centos-vim]# cat Dockerfile
FROM centos
RUN yum install -y vim
[root@localhost docker-centos-vim]# docker build -t yuanyu1997/centos-vim-new .

[root@localhost docker-centos-vim]# docker images
REPOSITORY                  TAG                 IMAGE ID            CREATED             SIZE
yuanyu1997/centos-vim-new   latest              544ee7564cfd        3 minutes ago       369MB
centos                      latest              67fa590cfc1c        8 days ago          202MB
Dockerfile
FROM centos
RUN yum install -y vim
Dockerfile语法梳理及最佳实践
FROM
尽量使用官方的image作为 base image!
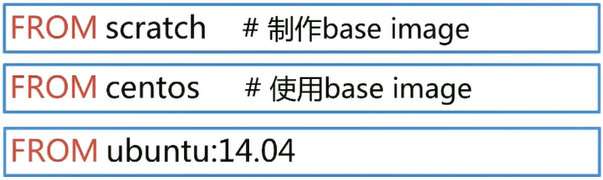
scratch 的意思是重头制作一个base image
LABEL
Metadata不可少!
作者、版本、描述

RUN
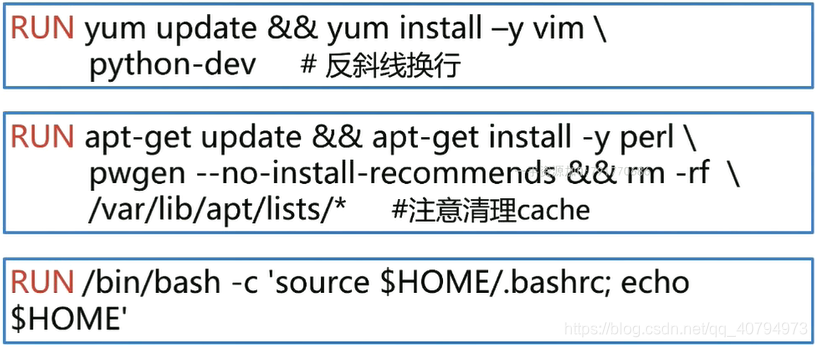
- 为了美观,复杂的RUN请用反斜线换行!
- 避免无用分层,合并多条命令成一行!
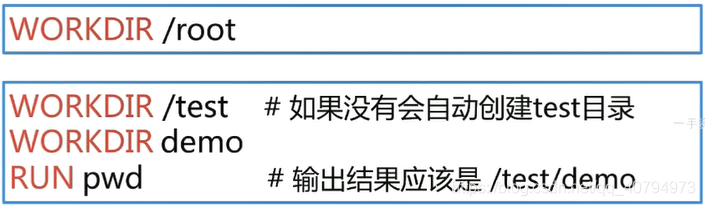
WORKDIR
- 用 WORKDIR,不要用 RUN cd!
- 尽量使用绝对目录!
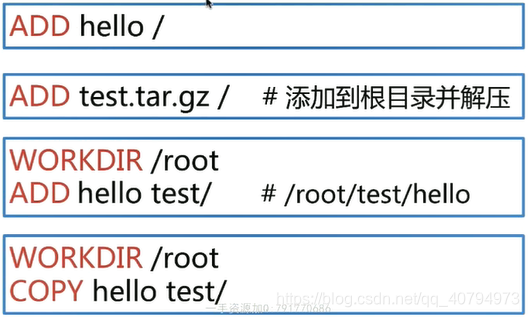
ADD and COPY
- 大部分情况,COPY优于ADD!
- ADD除了COPY还有额外功能(解压)!
- 添加 远程文件/目录 请使用crul成者wget!
ENV
- 尽量使用ENV增加可维护性!

VOLUME and EXPOSE
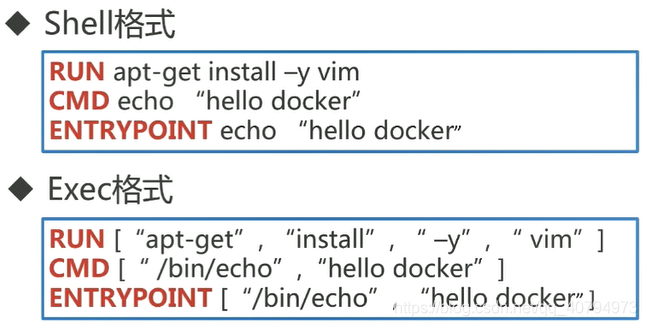
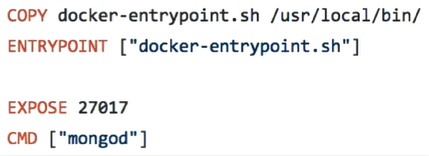
CMD and ENTRYPOINT
- RUN:执行命令并创建新的 Image Layer
- CMD:设置容器启动后默认执行的命令和参数
- ENTRYPOINT:设置容器启动时运行的命令
Shell和Exec格式
[root@localhost ~]# mkdir cmd_vs_entrypoint
[root@localhost ~]# cd cmd_vs_entrypoint/
[root@localhost cmd_vs_entrypoint]# ll
total 0
[root@localhost cmd_vs_entrypoint]# vim Dockerfile
[root@localhost cmd_vs_entrypoint]# cat Dockerfile
FROM centos
ENV name Docker
ENTRYPOINT echo "hello $name"
[root@localhost cmd_vs_entrypoint]# docker build -t yuamyu1997/centos-entrypoint-shell .

[root@localhost cmd_vs_entrypoint]# docker images
REPOSITORY                           TAG                 IMAGE ID            CREATED             SIZE
yuamyu1997/centos-entrypoint-shell   latest              2cf971bce716        3 seconds ago       202MB
yuanyu1997/centos-vim                latest              79811bb06ce7        2 hours ago         369MB
centos                               latest              67fa590cfc1c        8 days ago          202MB
[root@localhost cmd_vs_entrypoint]# docker run yuamyu1997/centos-entrypoint-shell
hello Docker

//-----------------------
[root@localhost cmd_vs_entrypoint]# vim Dockerfile
[root@localhost cmd_vs_entrypoint]# cat Dockerfile
FROM centos
ENV name Docker
ENTRYPOINT ["/bin/bash", "-c", "echo hello $name"]

[root@localhost cmd_vs_entrypoint]# docker build -t yuamyu1997/centos-entrypoint-exec .
[root@localhost cmd_vs_entrypoint]# docker run yuamyu1997/centos-entrypoint-exec
hello $name
CMD
- 容器启动时默认执行的命令
- 如果 docker run指定了其它命令,CMD命令被忽略
- 如果定义了多个CMD,只有最后一个会执行

ENTRYPOINT
- 让容器以应用程序或者服务的形式运行
- 不会被忽略,一定会执行
- 最佳实践:写一个she脚本作为 entrypoint
CMD 和 ENTRYPOINT 演示
[root@localhost cmd_vs_entrypoint]# cat Dockerfile
FROM centos
ENV name Docker
CMD echo "hello $name"
[root@localhost cmd_vs_entrypoint]# docker build -t yuamyu1997/centos-cmd-shell .
[root@localhost cmd_vs_entrypoint]# docker run yuamyu1997/centos-cmd-shell
hello Docker
[root@localhost cmd_vs_entrypoint]# docker run -it  yuamyu1997/centos-cmd-shell /bin/bash

//----------------------
//centos-entrypoint-shell 前面演示有创建过
[root@localhost cmd_vs_entrypoint]# docker run yuamyu1997/centos-entrypoint-shell
hello Docker
[root@localhost cmd_vs_entrypoint]# docker run -it yuamyu1997/centos-entrypoint-shell /bin/bash
hello Docker
手动构建上传到DockerHub
[root@localhost ~]# docker images
REPOSITORY TAG IMAGE ID CREATED SIZE
yuanyu1997/hello-wrold latest 9c72be46c8ac 10 hours ago 861kB latest 67fa590cfc1c 9 days ago 202MB
//登录
[root@localhost ~]# docker login
Login Succeeded
//push 到 docker hub
[root@localhost ~]# docker push yuanyu1997/hello-wrold:latest
//删除本地image,后测试
[root@localhost ~]# docker pull yuanyu1997/hello-wrold
[root@localhost ~]# docker run yuanyu1997/hello-wrold:latest
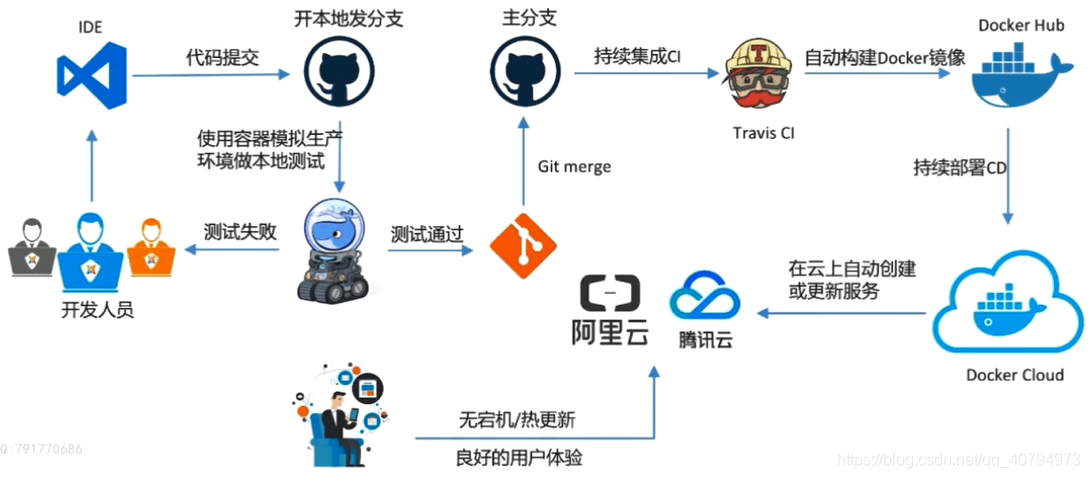
hello dockerDockerHub基于Github自动化构建
搭建私有仓库
//ip: 192.168.1.5
// 私有docker服务器下载 registry
[root@localhost ~]# docker run -d -p 5000:5000 --restart always --name registry registry:2
[root@localhost ~]# docker ps
CONTAINER ID        IMAGE               COMMAND                  CREATED             STATUS              PORTS                    NAMES
09a666dd5a14        registry:2          "/entrypoint.sh /etc…"   9 seconds ago       Up 6 seconds        0.0.0.0:5000->5000/tcp   registry
//测试是否 私有docker服务器 5000 端口是否可用
[root@localhost ~]# telnet 192.168.1.5 5000
Trying 192.168.1.5...
Connected to 192.168.1.5.
Escape character is '^]'.
//
[root@localhost hello-world]# docker build -t 192.168.1.5:5000/hello-world .
[root@localhost hello-world]# docker images
REPOSITORY                           TAG                 IMAGE ID            CREATED             SIZE
192.168.1.5:5000/hello-world         latest              1fc300c17ce3        14 seconds ago      861kB

//
[root@localhost docker]# ls /etc/docker/
daemo.json  key.json
[root@localhost docker]# vim /etc/docker/daemo.json
[root@localhost docker]# cat /etc/docker/daemo.json
{
  "insecure-registries" : ["192.168.1.5:5000"]
}

[root@localhost docker]# vim /lib/systemd/system/docker.service
[root@localhost docker]# cat /lib/systemd/system/docker.service
[Service]
Type=notify
# the default is not to use systemd for cgroups because the delegate issues still
# exists and systemd currently does not support the cgroup feature set required
# for containers run by docker
ExecStart=/usr/bin/dockerd -H fd:// --containerd=/run/containerd/containerd.sock

# 添加这一句
EnvironmentFile=-/etc/docker/daemo.json

[root@localhost docker]# service docker restart
Redirecting to /bin/systemctl restart  docker.service
Warning: docker.service changed on disk. Run 'systemctl daemon-reload' to reload units.
[root@localhost docker]# systemctl daemon-reload
[root@localhost docker]#
[root@localhost docker]# docker push 192.168.1.5:5000/hello-world
The push refers to repository [192.168.1.5:5000/hello-world]
Get https://192.168.1.5:5000/v2/: http: server gave HTTP response to HTTPS client
[root@localhost docker]#
dockerfile实战
app.py
from flask import Flask
app = Flask(__name__)
@app.route('/')
def hello():
    return "hello docker"
if __name__ == '__main__':
    app.run(host="127.0.0.1", port=5000)
Dockerfile
FROM python:2.7
LABEL maintainer="Yuan Yu<1750762853@qq.com>"
RUN pip install flask
COPY app.py /app/
WORKDIR /app
EXPOSE 5000
CMD ["python", "app.py"]
[root@localhost flask-hello-world]# pwd
/root/flask-hello-world
[root@localhost flask-hello-world]# ll
total 8
-rw-r--r--. 1 root root 167 Aug 30 02:20 app.py
-rw-r--r--. 1 root root 152 Aug 30 02:25 Dockerfile
[root@localhost flask-hello-world]# docker build -t yuanyu1997/flask-hello-world .
//后台运行
[root@localhost flask-hello-world]# docker run -d yuanyu1997/flask-hello-world
//进入临时 image检查错误
docker run -it id /bin/bashdocker run -d -p 5000:5000 yuanyu1997/flask-hello-world
普通用户执行docker命令
//使我的的用户可以执行sudo命令
	//切换到root用户下
	//添加sudo文件的写权限
	chmod u+w /etc/sudoers
	//编辑sudoers文件
	vi /etc/sudoers
	找到这行 root ALL=(ALL) ALL,在他下面添加xxx ALL=(ALL) ALL (这里的xxx是你的用户名)
		ps:这里说下你可以sudoers添加下面四行中任意一条
		youuser            ALL=(ALL)                ALL
		%youuser           ALL=(ALL)                ALL
		youuser            ALL=(ALL)                NOPASSWD: ALL
		%youuser           ALL=(ALL)                NOPASSWD: ALL
		第一行:允许用户youuser执行sudo命令(需要输入密码).
		第二行:允许用户组youuser里面的用户执行sudo命令(需要输入密码).
		第三行:允许用户youuser执行sudo命令,并且在执行的时候不输入密码.
		第四行:允许用户组youuser里面的用户执行sudo命令,并且在执行的时候不输入密码.
	//撤销sudoers文件写权限
	chmod u-w /etc/sudoers
	这样普通用户就可以使用sudo了

//添加分组
sudo groupadd docker
//普通用户添加到分组
sudo gpasswd -a yuanyu  docker
docker version
//重启docker,并且重启shell
sudo service docker restart
//测试
docker image ls

华为开发者空间,是为全球开发者打造的专属开发空间,汇聚了华为优质开发资源及工具,致力于让每一位开发者拥有一台云主机,基于华为根生态开发、创新。
更多推荐


 4
4 0
0- 0


 已为社区贡献7条内容

所有评论(0)