pytest
参考链接:安装和入门 — pytest documentation一、关于pytest0.安装pip install -U pytest 或者 在pycharm中安装pytest查看版本pytest --version1.关于pytest按照一定顺序执行文件和类、方法((小写英文--->大写英文--->0-9数字))测试文件以test_开头(以_test结尾也可以)测试类以Test开头
参考链接:安装和入门 — pytest documentation
一、关于pytest
0.安装
pip install -U pytest 或者 在pycharm中安装pytest
-u代表如果安装了升级到最新版
查看版本
pytest --version
1.关于pytest
按照一定顺序执行文件和类、方法((小写英文--->大写英文--->0-9数字))
- 测试文件以test_开头(以_test结尾也可以)
- 测试类以Test开头,并且不能带有 init 方法
- 测试函数以test_开头
- 断言使用基本的assert即可
2.运行方式
运行一个方法(pycharm点击方法或者类前面的运行按钮,选择pytest run。。。)

1)通过主函数启动,可以在运行的文件中写主函数,像这样
主函数启动需要引入pytest包,不然找不到pytest方法)
import pytest

class TestClass:
    def test_one(self):
        x = "this"
        assert "h" in x

    def test_two(self):
        x = "hello"
        assert hasattr(x, "check")

if __name__ == '__main__':
#    pytest.main()
    pytest.main("test_study.py")
pytest.main()会自动读取当前目录下的所有test开头的.py文件,运行test方法或者类
可以传入不同的参数,让运行更加定制化
pytest.main(['./'])               # 运行./目录下所有(test_*.py  和 *_test.py)
pytest.main (['./subpath1'])    # 运行./subpath1 目录下用例
pytest.main (['./subpath1/test_module1.py'])    # 运行指定模块
pytest.main (['./subpath1/test_module1.py::test_m1_1'])  # 运行模块中的指定用例
pytest.main (['./subpath2/test_module2.py::TestM2::test_m2_02'])  # 运行类中的指定用例
pytest.main (['-k','pp'])         # 匹配包含pp的用例(匹配目录名、模块名、类名、用例名)
pytest.main(['-k','spec','./subpath1/test_module1.py'])     # 匹配test_module1.py模块下包含spec的用例
pytest.main(['-k','pp','./subpath2/test_module2.py::TestM2'])   # 匹配TestM2类中包含pp的用例
值得注意的一点,如果main中传入的参数没生效,右键运行的时候,默认运行了当前文件的所有用例,这是因为程序识别到了pytest框架,默认pytest运行,要main主函数运行,需要修改陈python解释器
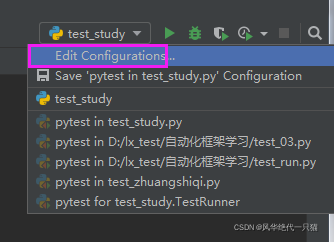
第一步:编辑解释器
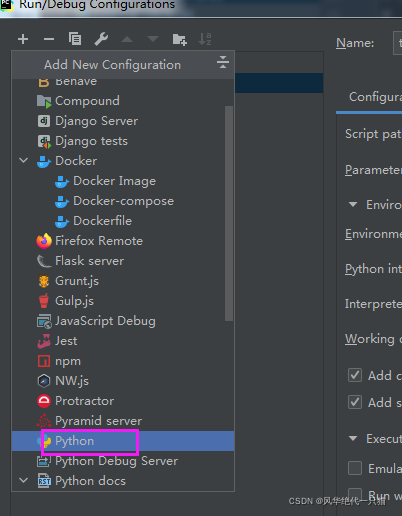
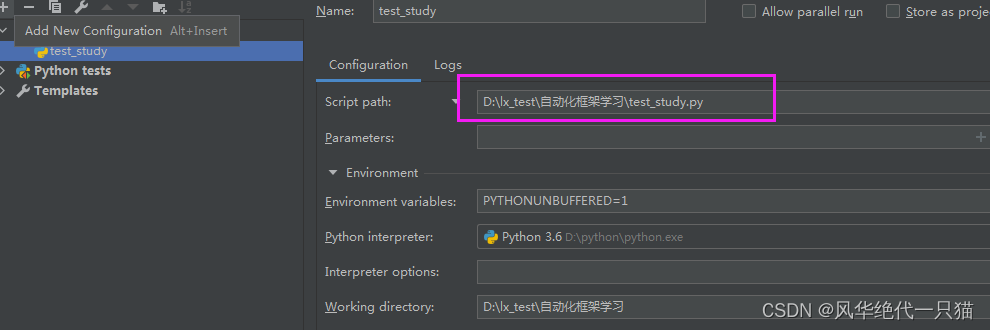
第二步:如果列表中没有python解释器,新增一个python解释器,选择要执行的文件
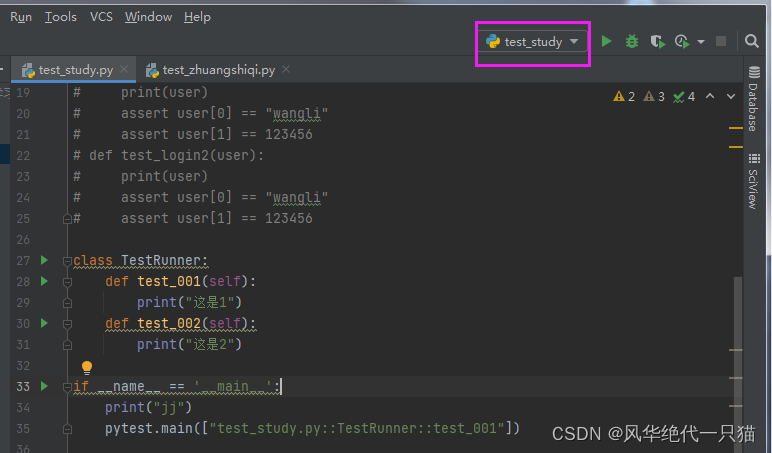
第三步:确定后,查看右上角运行,变为了普通运行,这时候运行文件会运行main函数
另外一种 :可以直接在控制台使用python xx.py 指定用python解释器运行main主函数
再另外一种: python -m pytest 调用pytest框架
2)通过控制台启动(推荐)
选择pycharm>terminal
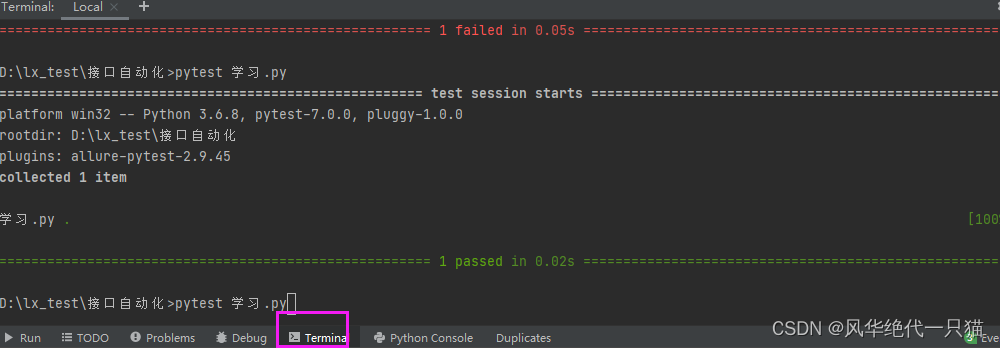
pytest test_mod.py执行该模块下的测试类测试方法pytest testing执行该文件夹下的所有模块pytest test_cgi.py::test_answer,执行test_answer方法pytest test_cgi.py::TestMyClass::test_one,执行TestMyClass类下的test_one方法产- 查看详细的输出:-r随意拼接下方字符 例如-rfp -fa (展示全部的用例情况)pytest -ra study.py
- -x 用例一旦失败,就立刻停止执行
- --maxfile=num 用例达到多少停止执行
- -m 标记用例
- -k 执行包含某个关键字的测试用例
- -v 打印详细日志
- -s 打印输出日志 和v连用
- --lf 只重新运行失败的用例
- --ff 先运行失败的用例再运行正常的用例
3.查看详细情况
通过-vv查看每个用例通过的时长和详细情况
pytest -vv test_study.py
获取长度超过1s的最慢10个测试用例持续时间的列表
pytest --durations=10 --durations-min=1.0 -vv test_study.py
4.断言
pytest 允许您使用标准的python assert 用于验证Python测试中的期望和值,pytest 支持显示最常见的子表达式的值
def f():
    return 3


def test_function():
    assert f() == 4
5.套件
# -*-coding:utf-8-*-
import pytest

# module一个模块只会执行一次,最开头和最结尾调用
def setup_module():
    print('每个模块执行一次 开始')

def teardown_module():
    print('每个模块执行一次 结束')

# function 每个用例执行一次,不会对类中的用例生效
def setup_function():
    print("每个类外用例前执行")

def teardown_function():
    print("每个类外用例后执行")


def test_case2():
    print("2")

class TestDemo:
    def setup_class(self):
        print("当前类之前执行")
    def teardown_class(self):
        print("当前类之后执行")
    def setup(self):
        print("类里的每个方法调用  前")
    def teardown(self):
        print("类里的每个方法调用  后")

    def test_case3(self):
        print("我是测试用例")
6.装饰器(常用)
skip : 跳过这个用例 reason是解释
# 跳过这个用例skip装饰器
@pytest.mark.skip(reason = "暂时不执行")
def test_case5():
    print("test5")

def test_case6():
    return  4

# 可以在用例里面做判断,判断结果为真跳过这条用例
def test_case7():
    if 4 == test_case6():
        pytest.skip("跳过原因case6等于4")
    print("case7")

# 可以直接在外面做判断skipif
@pytest.mark.skipif(test_case6() == 4 ,reason="跳过因为是windows系统")
def test_case8():
    print("case8")
装饰器都已pytest.mark开头,可以自定义装饰器,相当于分组
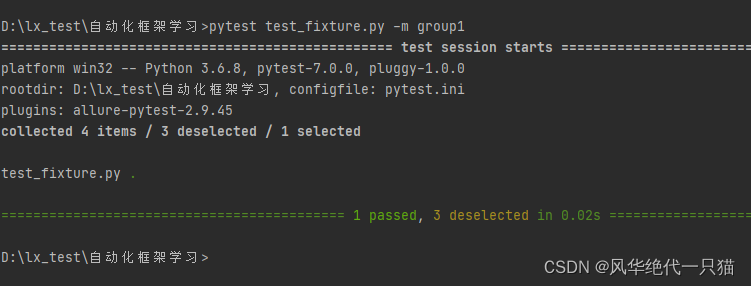
运行pytest xx.py -m group2
运行所有带有这个装饰器的用例,没有则显示为 deselected
@pytest.mark.group2
def test_case4():
    print("test4")
7.ini配置文件
它是一个固定的文件pytest.ini文件,读取配置信息,按指定的方式去运行。pytest.ini的位置:一般放在项目工程的根目录(即当前项目的顶级文件夹下)
注意ini中最好不要写入中文,运行 会报错'gbk' codec can't decode byte 0x80 in position 92: illegal multibyte sequence
配置项解释:
1) markers: 默认分组,将标记的用例加入自定义分组,添加到ini中,启动后将忽略非自定义分组带来的warnings
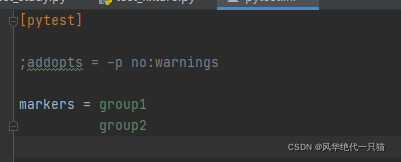

运行:pytest run.py -m group1
2) addopts:可以添加指定的OPTS命令行参数集,在执行命令时,不用再每次都输入长串命令
addopts:-p no:warning (忽略warning)
7.2 conftest+fixture
conftest.py配置脚本名称是固定的,不能改名称
conftest.py文件不能被其他文件导入
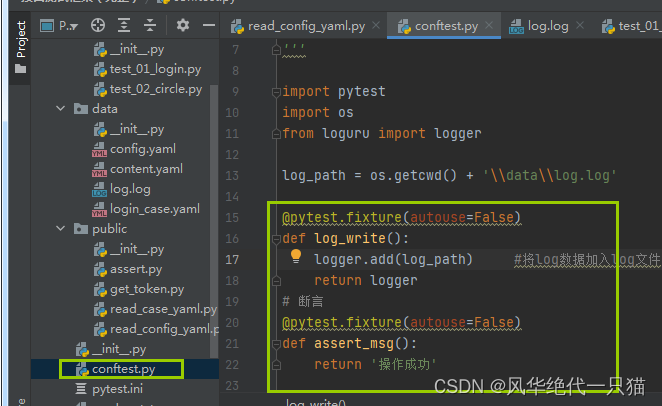
conftest.py 的文件名称是固定的, pytest 会自动识别该文件,conftest对当前目录下和子目录生效,一般放在主目录下,我们也可以在不同的子目录下放 conftest.py ,这样作用范围只能在该层级的子目录下生效。
fixture是一个装饰器,可以把一个方法当做参数传给另外一个方法,传入之后自动调用,可以替换setup teardown。也可以定义生效范围,
不带参数时默认scope="function",可以定义是否自动生效
import pytest
@pytest.fixture(scope='function',autouse=True)
def my_t1():
    print("jj")


def my_t2(my_t1):
    print('vv')

将fixture装饰器的数据写到conftest文件中,就可以全局调用不需要引入文件了
8.读取yaml文件
# 直接读出来是字典
    def read_y(self):
        last_filename = "yamlfile/" + self.filename+".yaml"
        print(last_filename)
        f = yaml.safe_load(open(last_filename,encoding="utf-8"))
        print(f)
        print(type(f))
        return f
对应的yaml文件数据长这样:
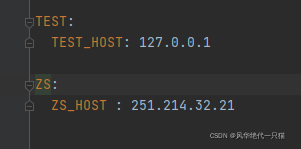
读取出来的数据为: {'TEST': {'TEST_HOST': '127.0.0.1'}, 'ZS': {'ZS_HOST': '251.214.32.21'}}
如果想要传入一个列表到用例中,需要在TEST和ZS前面加上-
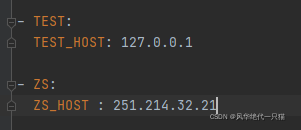
读取出来的数据为: [{'TEST': None, 'TEST_HOST': '127.0.0.1'}, {'ZS': None, 'ZS_HOST': '251.214.32.21'}]
装饰器传入数据的时候必须是个列表,才能按照列表下标传入数据,列表中有几个数据,测试用例有几条
    # 传入的argnames必须是列表,yaml文件在key前加上- 读取为列表,不然会自动读取字典的key;
    # 传入一个值
    @pytest.mark.parametrize(("env"),yaml.safe_load(open("./env.yml")))
    def test_demo(self,env):
        print(env)
    def test_read_yaml(self):
        a = yaml.safe_load(open("./env.yml"))
        print(type(a),a)
    # 传入多个值
    @pytest.mark.parametrize('user, pwd', [('root', '123'), ('admin', '456')])
    def test_03(self,user, pwd):
        print(user,pwd)
二、allure
0.安装java1.8
1、安装alluer+ allure-pytest
1)下载allure 的zip包,下载后放到python文件夹lib下
https://repo.maven.apache.org/maven2/io/qameta/allure/allure-commandline/2)进入allure 的bin目录下,复制路径,放到path环境变量
3)安装alluer-pytest
pip install allure-pytest
2、生成报告(terminal)
1)terminal启动用例,指定数据存在什么文件夹下(目前是存在当前文件夹下的tmp文件夹)
pytest --alluredir=tmp test_study.py
2)查看报告
2.1) 直接打开生成数据图表:allure serve 生成数据文件目录
注意:如果直接在pycharm中启动命令行,需要定位到allure.bat的详细位置
D:\python\Lib\allure-2.9.0\bin\ allure serve 生成的数据文件路径
2.2)生成一个文件夹,存储html,进入report打开html查看报告
D:\python\Lib\allure-2.9.0\bin\allure generate 生成的数据文件路径 -o html的路径 --clean
3、生成报告(main)
运行用例的时候生成原始数据到tmp文件夹下,再使用allure自带的命令生成一个可以存储的文件夹,里面包含index.html报告
if __name__=="__main__":

# --alluredir  生成allure报告需要的数据文件,--clean保证每次生成的数据都是最新的
    pytest.main(['test_01.py', '-vs', '--alluredir', './tmp', '--clean-alluredir'])

# allure generate 生成allure测试报告默认生成一个文件夹allure-result; --clean保证每一次生成的html是最新的数据
    os.system("allure generate tmp --clean")
4.打开报告
allure-result文件夹下的index.html在pycharme中打开
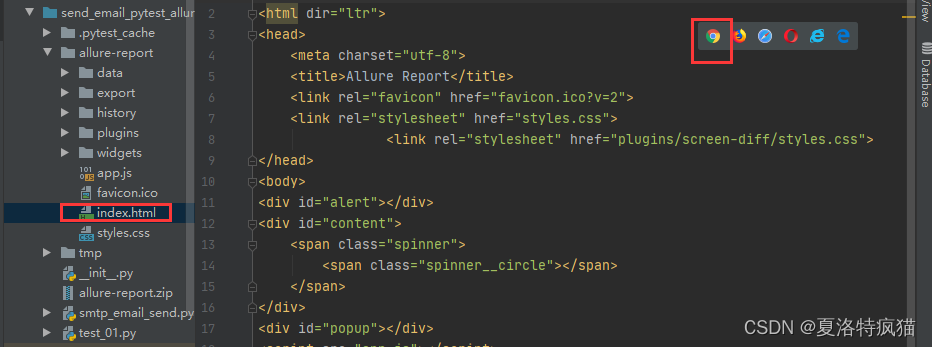
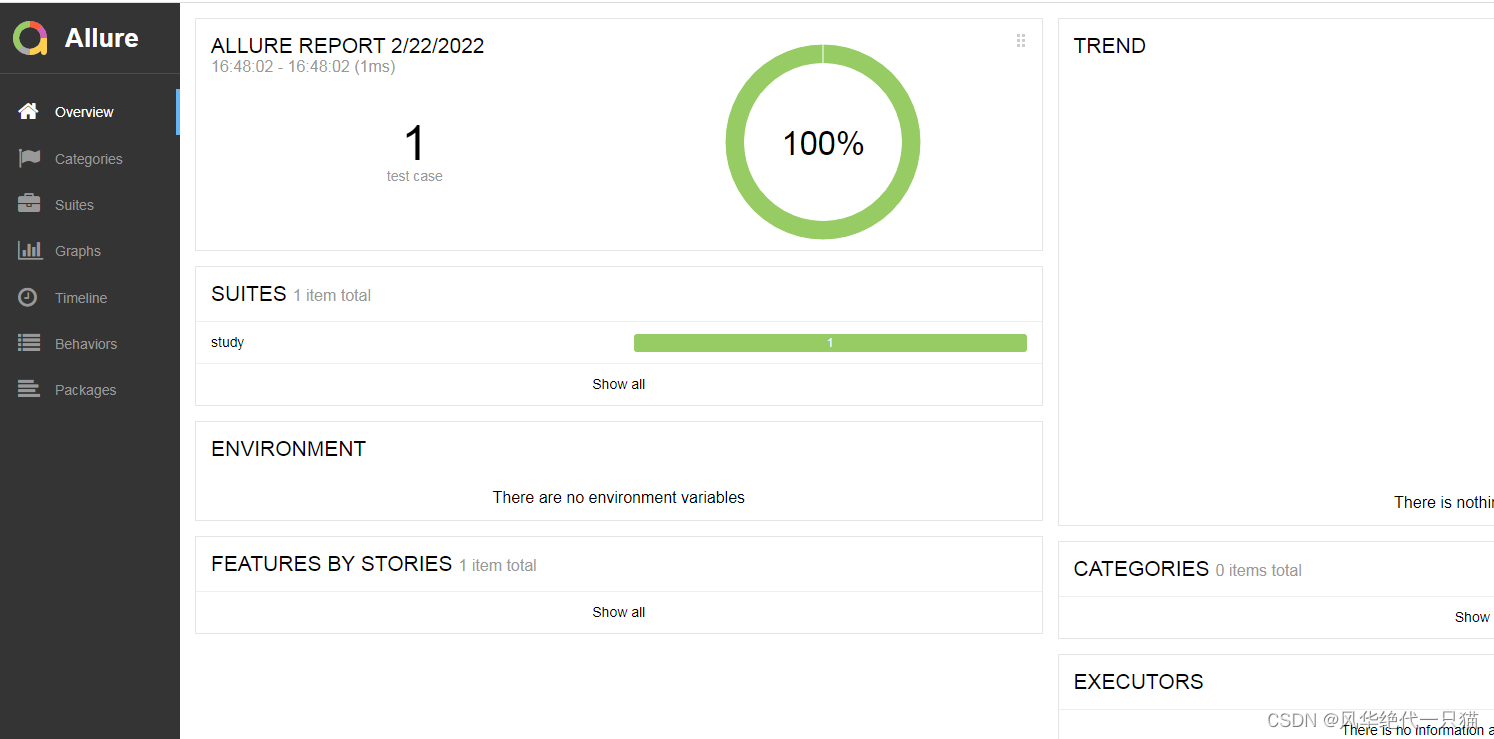
4.1当我们发现在非pycharme中打开allure-report的index文件的时候,或者发送文件夹给别人,打开index是加载的loading,没有数据
- 其实在allure-report下index.html文件是不能直接打开的,出现页面都是loading的情况,这是因为直接allure报告用浏览器是打不开的,需要用allure命令渲染之后打开才能展示效果(allure常识)。
- allure使用了两种方式来渲染页面。分别是 allure open 和 allure serve。前者用于在本地渲染和查看结果,后者用于在本地渲染后对外展示结果。这里我们使用allure open。

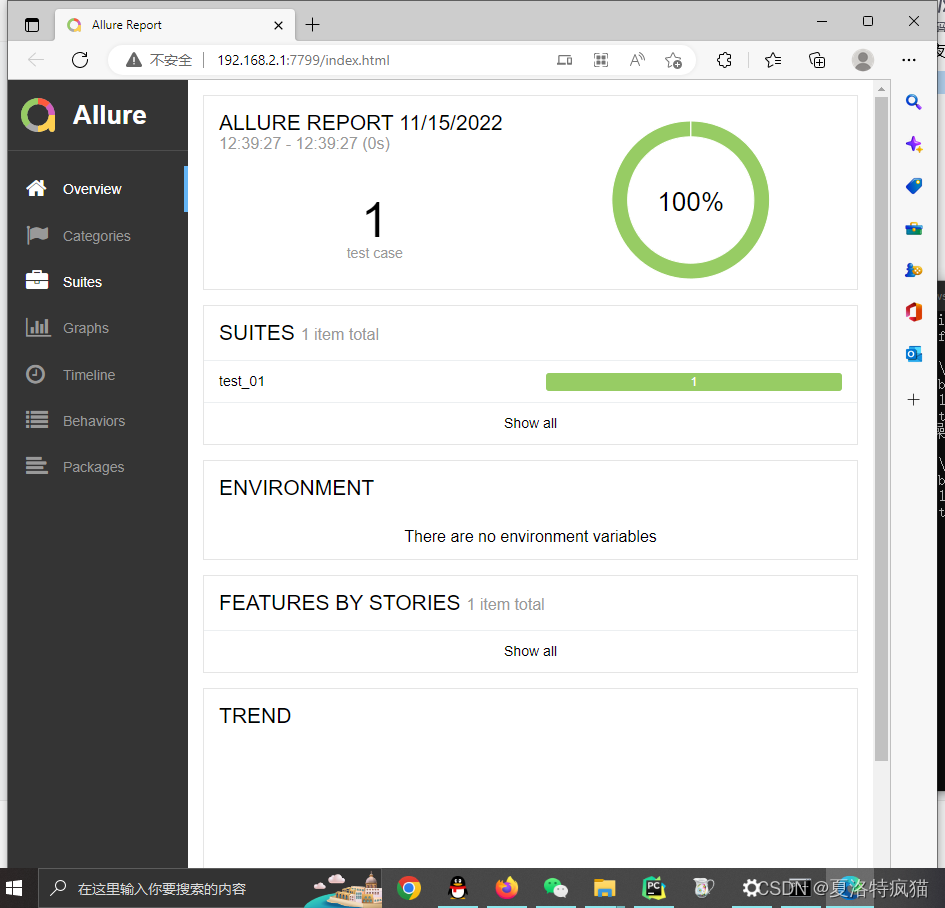
这时候我们可以运行allure open allure-report文件夹,会自动启动一个服务,即可自动打开浏览器展示渲染好的结果
allure open allure-report

更多推荐
 已为社区贡献2条内容


所有评论(0)