LINUX设备驱动开发前准备
今天起开始学习LINUX设备驱动,在此更新博客与大家分享学习的经验及收获。很多人和我一样应该都是从应用开发,想着手开始驱动的学习,我现在也是在做嵌入式这方面的开发,但对于驱动的掌握也不太好,我现在手上有本《LINUX设备驱动程序》第三版的书,我通过这本书及网上资源的学习,尽量每天都把学习的内容及编写的代码贴出来,下面就开始了。首先必须要有LINUX操作系统的环境,建议在虚拟机上装,
今天起开始学习LINUX设备驱动,在此更新博客与大家分享学习的经验及收获。

内核树构建过程
安装编译内核所需要的软件(也可不装,除非你要用 make menuconfig,用make oldconfig不要)
sudo apt-get install build-essential kernel-package libncurses5-dev fakeroot
下载内核源码
先查看linux内核版本:$uname -r
网上说用apt-cache search linux-source命令, 会列出一些可选源码包,对准你的内核版本号,选择“with Ubuntu patche”的那个
最后用apt-get install linux-source-2.6.35下载之。解压缩源码包,进入解压后的源码目录。
可是我试了,搜不到,但是还是可以直接用上面的apt-get 命令下载的,但是我下载,也可以直接到这个网址下源代码,这里面有各个版本的内核,从1.0到2.6的,都有。
在编译之前我们需要Ubuntu原来内核的一个配置文件,这是我/usr/src目录下的文件预览:ls -al
drwxr-xr-x 4 root root 4096 2010-09-04 21:31 fglrx-8.723.1
drwxr-xr-x 24 root root 4096 2010-09-04 20:35 linux-headers-2.6.35-22
drwxr-xr-x 7 root root 4096 2010-09-04 20:35 linux-headers-2.6.35-22-generic
drwxr-xr-x 25 root root 4096 2010-09-16 21:39 linux-source-2.6.35
-rw-r--r-- 1 root root 65846876 2010-09-01 22:41 linux-source-2.6.35.tar.bz2
现在我们需要/boot目录下的config-2.6.35-22-generic文件,我们把它拷贝到我们刚下好解压的目录,也就是linux-source-2.6.35
sudo cp /boot/config-2.6.35-22-generic /usr/src/linux-source-2.6.35/.config
接下来切换到root用户
sudo -i
cd /usr/src/linux-source-2.6.35
make menuconfig或者直接make oldconfig(无需拷贝.config)
终端会弹出一个配置界面
最后有两项:load a alternative kernel configuration...
save a alternative configuration...
选择load a kernel configuration保存,然后在选择save akernel configuration再保存退出,并退出配置环境。
接下来我们就要开始编译了。
#cd /usr/src/linux-source-2.6.35
#make
记住一定要是管理员帐号运行,这个过程很久,如果你的cpu是双核的可以在make后面加个参数,make -j4.
#make bzImage 执行结束后,可以看到在当前目录下生成了一个新的文件: vmlinux, 其属性为-rwxr-xr-x。
2、构建完内核树,就可以开始驱动程序的编写及运行了。
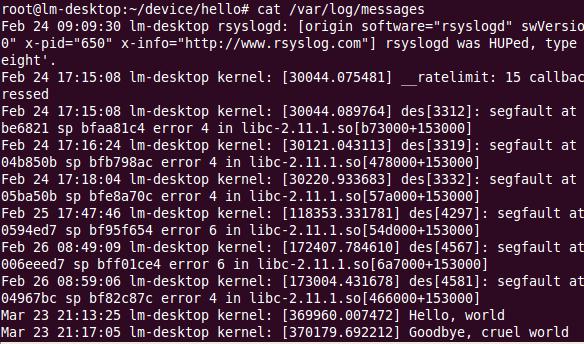
以下通过实现打印Hello,world。来编写第一个驱动程序
hello.c#include <linux/init.h> #include <linux/module.h> MODULE_LICENSE("Dual BSD/GPL"); static int hello_init(void) { printk(KERN_ALERT "Hello, world\n"); return 0; } static void hello_exit(void) { printk(KERN_ALERT "Goodbye, cruel world\n"); } module_init(hello_init); module_exit(hello_exit);Makefileifeq ($(KERNELRELEASE),) # Assume the source tree is where the running kernel was built # You should set KERNELDIR in the environment if it's elsewhere KERNELDIR ?= /lib/modules/$(shell uname -r)/build # The current directory is passed to sub-makes as argument PWD := $(shell pwd) modules: $(MAKE) -C $(KERNELDIR) M=$(PWD) modules modules_install: $(MAKE) -C $(KERNELDIR) M=$(PWD) modules_install clean: rm -rf *.o *~ core .depend .*.cmd *.ko *.mod.c .tmp_versions .PHONY: modules modules_install clean else # called from kernel build system: just declare what our modules are obj-m := hello.o endif
以上为hello.c及Makefile文件,通过make即可得到hello.ko文件,该文件即为将要加载如内核的模块。hello_init(void)函数将在模块被装载入内核时调用。
hello_exit(void)函数将在模块被移除时调用。
printk()函数类似于printf函数,用于信息打印。
Makefile看不懂的话,不急,先把程序Make下,接下来会专门把makefile的知识进行一次解读的,务必做到简单,每个人都会用,现在先跳过。

printk(KERN_ALERT "Hello, world\n");
更多推荐
 已为社区贡献1条内容


所有评论(0)