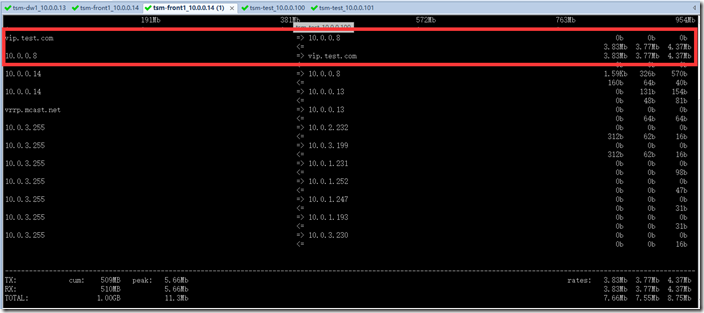
Keepalived+nginx造成流量异常
1、使用虚拟机搭建环境也是A、B 2台机器,使用一样的配置和软件。环境:CentOS6.5 2台虚拟机keepalived版本1.2.19tengine版本2.1.2节点A :[root@A keepalived]# cat keepalived.conf! Configuration File for keepalivedglobal_defs {
1、使用虚拟机搭建环境
也是A、B 2台机器,使用一样的配置和软件。
环境:CentOS6.5 2台虚拟机
keepalived版本1.2.19
tengine版本2.1.2
节点A :
[root@A keepalived]# cat keepalived.conf
! Configuration File for keepalived
global_defs {
notification_email {
admin@localhost.com #设置报警邮件地址,可以设置多个,每行一个。 需开启本机的sendmail服务
}
notification_email_from admin@lvtao.net #设置邮件的发送地址
smtp_server 127.0.0.1 #设置smtp server地址
smtp_connect_timeout 30 #设置连接smtp server的超时时间
router_id LVS_DEVEL #表示运行keepalived服务器的一个标识。发邮件时显示在邮件主题的信息
}
vrrp_script check_nginx {
script "/etc/keepalived/check_http_port"
interval 2 #检查间隔
weight 5 #权重
}
vrrp_instance VI_1 {
state BACKUP #指定keepalived的角色,MASTER表示此主机是主服务器,BACKUP表示此主机是备用服务器
interface eth0 #指定HA监测网络的接口
virtual_router_id 51 #虚拟路由标识,这个标识是一个数字,同一个vrrp实例使用唯一的标识。即同一vrrp_instance下,MASTER和BACKUP必须是一致的
priority 100 #定义优先级,数字越大,优先级越高,在同一个vrrp_instance下,MASTER的优先级必须大于BACKUP的优先级
advert_int 1 #设定MASTER与BACKUP负载均衡器之间同步检查的时间间隔,单位是秒
nopreempt #设置 nopreempt 防止抢占资源,只生效BACKUP节点
authentication { #设置验证类型和密码
auth_type PASS #设置验证类型,主要有PASS和AH两种
auth_pass 1111 #设置验证密码,在同一个vrrp_instance下,MASTER与BACKUP必须使用相同的密码才能正常通信
}
virtual_ipaddress { #设置虚拟IP地址,可以设置多个虚拟IP地址,每行一个
10.0.0.15
}
track_script {
check_nginx
}
}
virtual_server 10.0.0.15 80 {
delay_loop 6
lb_algo wrr
lb_kind DR
persistence_timeout 50
protocol TCP
real_server 10.0.0.13 80 {
weight 1
TCP_CHECK {
connect_port 80
connect_timeout 3
delay_before_retry 3
}
}
real_server 10.0.0.14 80 {
weight 1
TCP_CHECK {
connect_port 80
connect_timeout 3
delay_before_retry 3
}
}
}
节点B:
[root@B keepalived]# cat keepalived.conf
! Configuration File for keepalived
global_defs {
notification_email {
admin@localhost.com #设置报警邮件地址,可以设置多个,每行一个。 需开启本机的sendmail服务
}
notification_email_from admin@lvtao.net #设置邮件的发送地址
smtp_server 127.0.0.1 #设置smtp server地址
smtp_connect_timeout 30 #设置连接smtp server的超时时间
router_id LVS_DEVEL #表示运行keepalived服务器的一个标识。发邮件时显示在邮件主题的信息
}
vrrp_script check_nginx {
script "/etc/keepalived/check_http_port"
interval 2 #检查间隔
weight 5 #权重
}
vrrp_instance VI_1 {
state BACKUP #指定keepalived的角色,MASTER表示此主机是主服务器,BACKUP表示此主机是备用服务器
interface eth0 #指定HA监测网络的接口
virtual_router_id 51 #虚拟路由标识,这个标识是一个数字,同一个vrrp实例使用唯一的标识。即同一vrrp_instance下,MASTER和BACKUP必须是一致的
priority 99 #定义优先级,数字越大,优先级越高,在同一个vrrp_instance下,MASTER的优先级必须大于BACKUP的优先级
advert_int 1 #设定MASTER与BACKUP负载均衡器之间同步检查的时间间隔,单位是秒
nopreempt #设置 nopreempt 防止抢占资源,只生效BACKUP节点
authentication { #设置验证类型和密码
auth_type PASS #设置验证类型,主要有PASS和AH两种
auth_pass 1111 #设置验证密码,在同一个vrrp_instance下,MASTER与BACKUP必须使用相同的密码才能正常通信
}
virtual_ipaddress { #设置虚拟IP地址,可以设置多个虚拟IP地址,每行一个
10.0.0.15
}
track_script {
check_nginx
}
}
virtual_server 10.0.0.15 80 {
delay_loop 6
lb_algo wrr
lb_kind DR
persistence_timeout 50
protocol TCP
real_server 10.0.0.13 80 {
weight 1
TCP_CHECK {
connect_port 80
connect_timeout 3
delay_before_retry 3
}
}
real_server 10.0.0.14 80 {
weight 1
TCP_CHECK {
connect_port 80
connect_timeout 3
delay_before_retry 3
}
}
}
[root@A keepalived]# cat relserver.sh
#!/bin/bash
#description: Config realserver
VIP=10.0.0.15
. /etc/rc.d/init.d/functions
case "$1" in
start)
/sbin/ifconfig lo:0 $VIP netmask 255.255.255.255 broadcast $VIP
/sbin/route add -host $VIP dev lo:0
echo "1" >/proc/sys/net/ipv4/conf/lo/arp_ignore
echo "2" >/proc/sys/net/ipv4/conf/lo/arp_announce
echo "1" >/proc/sys/net/ipv4/conf/all/arp_ignore
echo "2" >/proc/sys/net/ipv4/conf/all/arp_announce
sysctl -p >/dev/null 2>&1
echo "RealServer Start OK"
;;
stop)
/sbin/ifconfig lo:0 down
/sbin/route del $VIP >/dev/null 2>&1
echo "0" >/proc/sys/net/ipv4/conf/lo/arp_ignore
echo "0" >/proc/sys/net/ipv4/conf/lo/arp_announce
echo "0" >/proc/sys/net/ipv4/conf/all/arp_ignore
echo "0" >/proc/sys/net/ipv4/conf/all/arp_announce
echo "RealServer Stoped"
;;
*)
echo "Usage: $0 {start|stop}"
exit 1
esac
exit 0
[root@A keepalived]#
[root@A keepalived]# cat check_http_port
#!/bin/bash
#思路:1、使用curl检查本地nginx可用性
# 2、检查失败尝试启动nginx
# 3、仍失败,则关闭本地keepalived
NGINX=/usr/local/nginx/sbin/nginx
PORT="80"
#curl -v -I -m 10 -o /dev/null -s -w %{http_code}"\n" http://127.0.0.1/
curl http://127.0.0.1:$PORT
if [ $? -ne 0 ]; then
#重启nginx
/etc/init.d/nginx restart
# $NGINX -s stop
# $NGINX
sleep 3
curl http://127.0.0.1/
[ $? -ne 0 ] && /etc/init.d/keepalived stop
fi
exit 0
[root@A keepalived]#
2、3个客户端,依次访问。就能重现流量异常。
[root@tsm-test-centos6 ~]# curl 10.0.0.15
<!DOCTYPE html>
<html>
<head>
<title>Welcome to tengine!</title>
<style>
body {
35em;
margin: 0 auto;
font-family: Tahoma, Verdana, Arial, sans-serif;
}
</style>
</head>
<body>
Welcome to tengine! B
If you see this page, the tengine web server is successfully installed and
working. Further configuration is required.
For online documentation and support please refer to
<a href="http://tengine.taobao.org/">tengine.taobao.org.
<em>Thank you for using tengine.</em>
</body>
</html>
[root@tsm-test-centos6 ~]#
[root@tsm-app-dev1 ~]# curl 10.0.0.15
<!DOCTYPE html>
<html>
<head>
<title>Welcome to tengine!</title>
<style>
body {
35em;
margin: 0 auto;
font-family: Tahoma, Verdana, Arial, sans-serif;
}
</style>
</head>
<body>
Welcome to tengine! A
If you see this page, the tengine web server is successfully installed and
working. Further configuration is required.
For online documentation and support please refer to
<a href="http://tengine.taobao.org/">tengine.taobao.org.
<em>Thank you for using tengine.</em>
</body>
</html>
[root@tsm-app-dev1 ~]#
10.0.0.8(我的笔记本)
原因不得而知,在此记录。便日后寻得原因。
更多推荐
 已为社区贡献1条内容


所有评论(0)