ovirt自承载引擎安装配置
必须为管理引擎和宿主机准备一个FQDN,DNS中设置转发和解析关于自承载引擎自承载(self-hosted)引擎就是一个虚拟化环境,它的引擎(Manager)运行在由这个引擎所管理的一台主机的虚拟机上。虚拟机会作为主机配置的一部分被创建,引擎的安装和配置过程会在主机配置的过程中同时进行。运行引擎的虚拟机会...
·
必须为管理引擎和宿主机准备一个FQDN,DNS中设置转发和解析
关于自承载引擎
自承载(self-hosted)引擎就是一个虚拟化环境,它的引擎(Manager)运行在由这个引擎所管理的一台主机的虚拟机上。虚拟机会作为主机配置的一部分被创建,引擎的安装和配置过程会在主机配置的过程中同时进行。
运行引擎的虚拟机会被配置为高可用性虚拟机。当运行这个虚拟机的主机进入维护模式,或出现计划外的故障时,这个虚拟机会被自动迁移到另外一台主机上运行。
使用自承载引擎的主要优点是减少了部署 Red Hat Enterprise Virtualization 对硬件的需求(引擎只需要在虚拟机上运行,而不需要额外的物理机器)。另外,引擎被自动配置为高可用性,而不需要一个独立的集群。
自承载引擎当前只能在 Red Hat Enterprise Linux 6.5、6.6 或 7 主机上运行。我们不推荐您在 Red Hat Enterprise Virtualization Hypervisor 或其它老版本的 Red Hat Enterprise Linux 上运行自承载引擎。被配置为 Red Hat Enterprise Virtualization Manager 的虚拟机必须运行在 Red Hat Enterprise Linux 6.6 上。
安装软件:
1.下载ovirt3.6版本的官方源rpm安装包
[root@192-168-1-2 ~]# yum install http://resources.ovirt.org/pub/yum-repo/ovirt-release36.rpm
2.下载CentOS 7.2版本的操作系统安装镜像,选择最小化版本.
[root@192-168-1-2 ~]# wget http://mirrors.aliyun.com/centos/7.2.1511/isos/x86_64/CentOS-7-x86_64-Minimal-1511.iso
3.安装自承载引擎配置脚本
[root@192-168-1-2 ~]# yum install -y ovirt-hosted-engine-setup
[root@192-168-1-2 ~]# yum install -y ovirt-engine-appliance
使用ovirt-engine-appliance安装engine,/tmp目录必须大于60GB的容量
安装过程中会断开网络,为了保证网络断开后程序安装不受影响,使用screen管理安装
[root@192-168-1-2 ~]# yum install screen -y
3.创建glusterfs逻辑卷
每一台host上都安装glusterfs
yum install glusterfs gluserterfs-server -y
只支持 replica 3 Gluster 存储. 并确定下面的配置已经被添加到所有的Gluster servers,/etc/glusterfs/glusterd.vol :
option rpc-auth-allow-insecure on
[root@192-168-174-42 glusterfs]# vim glusterd.vol
volume management
type mgmt/glusterd
option working-directory /var/lib/glusterd
option transport-type socket,rdma
option transport.socket.keepalive-time 10
option transport.socket.keepalive-interval 2
option transport.socket.read-fail-log off
option ping-timeout 0
option event-threads 1
# option base-port 49152
option rpc-auth-allow-insecure on
end-volume
~
启动服务
systemctl start glusterd
systemctl start glusterfsd.service
添加防火墙规则
-A INPUT -m state --state NEW -m tcp -p tcp --dport 24007 -j ACCEPT
-A INPUT -m state --state NEW -m tcp -p tcp --dport 49152 -j ACCEPT
# systemctl restart iptables
[root@192-168-174-36 opt]# cd
[root@192-168-174-36 ~]# gluster peer probe 192.168.184.11
peer probe: success.
[root@192-168-174-36 ~]# gluster peer probe 192.168.184.13
peer probe: success.
[root@192-168-174-36 ~]# gluster peer probe 192.168.184.15
peer probe: success.
[root@192-168-174-36 ~]# gluster peer probe 192.168.184.17
peer probe: success.
[root@192-168-174-36 ~]# gluster peer probe 192.168.184.14
peer probe: success.
[root@192-168-174-36 ~]# gluster peer probe 192.168.184.18
peer probe: success. Probe on localhost not needed
[root@192-168-174-36 ~]# gluster volume create Govirt stripe 2 replica 3 192.168.184.11:/opt/gv1 192.168.184.13:/opt/gv1 192.168.184.15:/opt/gv1 192.168.184.17:/opt/gv1 192.168.184.14:/opt/gv1 192.168.184.18:/opt/gv1
volume create: Govirt: success: please start the volume to access data
gluster> volume start Govirt
volume start: Govirt: success
gluster> volume quota Govirt enable
volume quota : success
gluster volume set Govirt network.ping-timeout 10
gluster volume set Govirt auth.allow \*
gluster volume set Govirt group virt
gluster volume set Govirt storage.owner-uid 36
gluster volume set Govirt storage.owner-gid 36
gluster volume set Govirt server.allow-insecure on


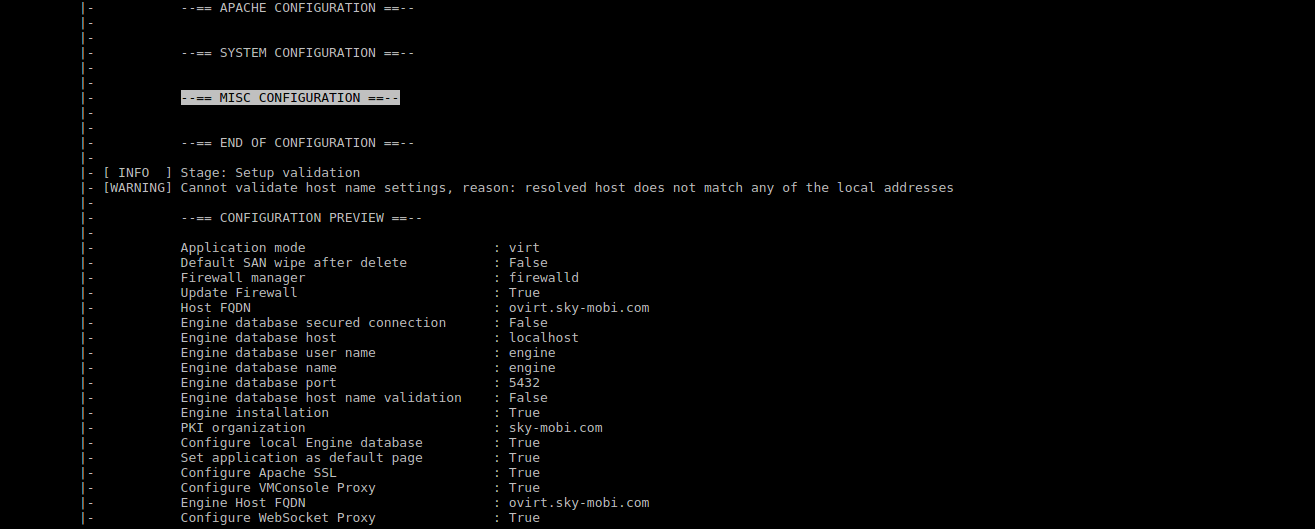
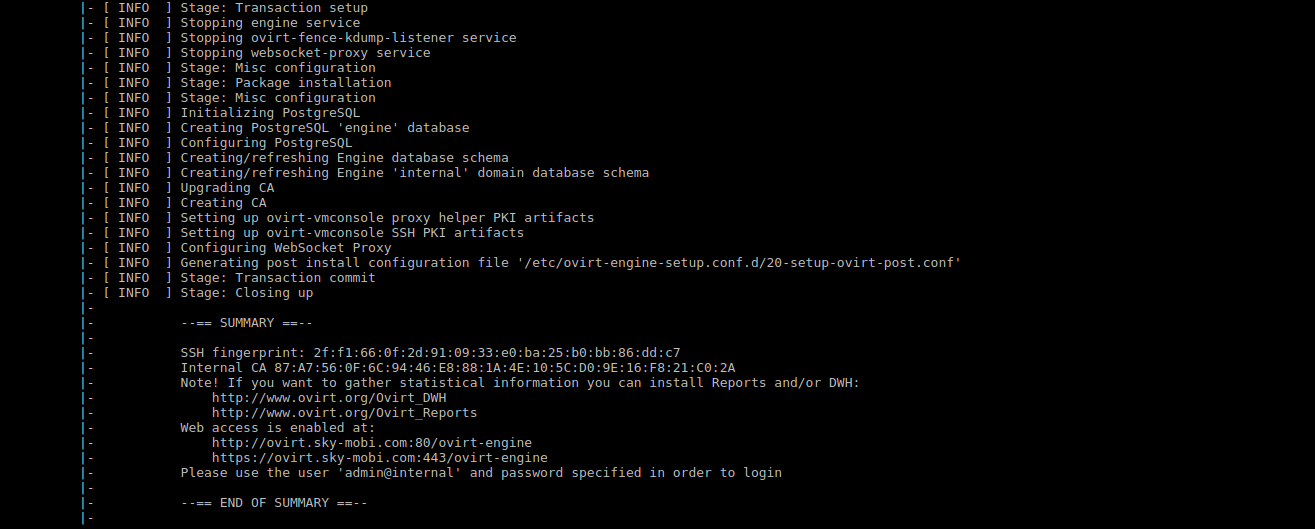


检测自承载engine的虚拟机状态
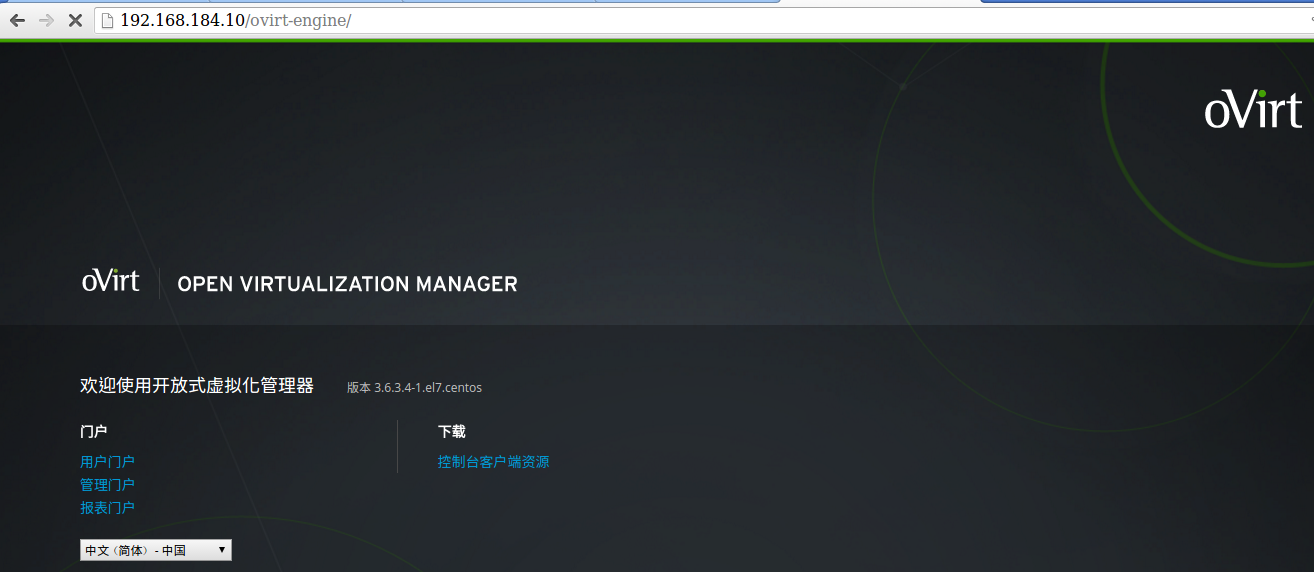
启动自承载engine
安装过程中的一些内存磁盘IO情况
procs -----------memory---------- ---swap-- -----io---- -system-- ------cpu-----
r b swpd free buff cache si so bi bo in cs us sy id wa st
2 0 0 45290744 1920 3124408 0 0 0 53252 1369 200 11 1 87 0 0
1 0 0 45207092 1920 3208080 0 0 4 426012 1460 707 11 2 86 0 0
1 0 0 45131644 1920 3283320 0 0 0 0 2451 207 12 1 87 0 0
1 0 0 45046508 1920 3367816 0 0 4 0 1248 709 11 2 87 0 0
1 0 0 44955780 1920 3458508 0 0 0 0 1198 204 11 1 88 0 0
1 0 0 44848484 1920 3563156 0 0 4 0 1383 1007 11 2 87 0 0
1 0 0 44724904 1920 3686064 0 0 4 106512 1643 352 11 2 87 0 0
1 2 0 44559836 1928 3836144 0 0 1028 971161 2643 920 11 4 79 6 0
1 2 0 44412972 1928 3983240 0 0 0 0 2252 205 11 2 63 25 0
1 0 0 44305020 1928 4091348 0 0 4 7 2294 803 11 2 71 15 0
1 0 0 44221004 1928 4175480 0 0 0 4 1238 196 11 1 87 0 0
1 0 0 44139972 1928 4256604 0 0 4 0 1303 748 12 1 87 0 0
2 0 0 44065836 1928 4330860 0 0 0 0 1371 587 12 1 86 0 0
1 0 0 43989160 1928 4407412 0 0 4 0 1265 1974 12 1 87 0 0
1 0 0 43915592 1928 4481636 0 0 0 0 1223 208 12 1 87 0 0
1 0 0 43835200 1928 4560628 0 0 4 0 1383 923 12 2 87 0 0
1 0 0 43759580 1928 4636592 0 0 4 0 1257 358 11 1 87 0 0
1 0 0 43684260 1928 4711948 0 0 4 53264 1534 707 11 2 87 0 0
1 0 0 43596184 1928 4799984 0 0 0 102412 1323 189 11 2 87 0 0
1 0 0 43506184 1928 4889772 0 0 4 49156 1517 767 11 2 87 0 0
1 0 0 43418852 1928 4977452 0 0 0 98316 1433 206 11 2 87 0 0
1 0 0 43330876 1928 5065860 0 0 4 98316 1519 708 11 2 87 0 0
1 0 0 43241420 1928 5154884 0 0 0 98296 1330 210 11 1 87 0 0
1 0 0 43164744 1928 5231816 0 0 4 49159 1505 755 11 2 87 0 0
0 1 0 43114340 1928 5282196 0 0 0 980204 1383 223 6 2 87 5 0
0 1 0 43117148 1928 5279384 0 0 4 0 1476 937 0 0 87 12 0
0 1 0 43120284 1928 5276256 0 0 4 0 12718 55243 0 2 86 11 0
0 0 0 43082340 1928 5300040 0 0 2056 18 11558 32099 7 8 80 4 0
0 0 0 43017472 1936 5365796 0 0 1024 40 19835 32590 11 12 77 0 0
0 0 0 42949860 1936 5432552 0 0 4 16 19561 31394 10 12 78 0 0
1 0 0 42889424 1936 5491716 0 0 0 0 21073 42454 11 12 77 0 0
1 0 0 42827168 1936 5557984 0 0 4 0 20131 37314 10 11 78 0 0
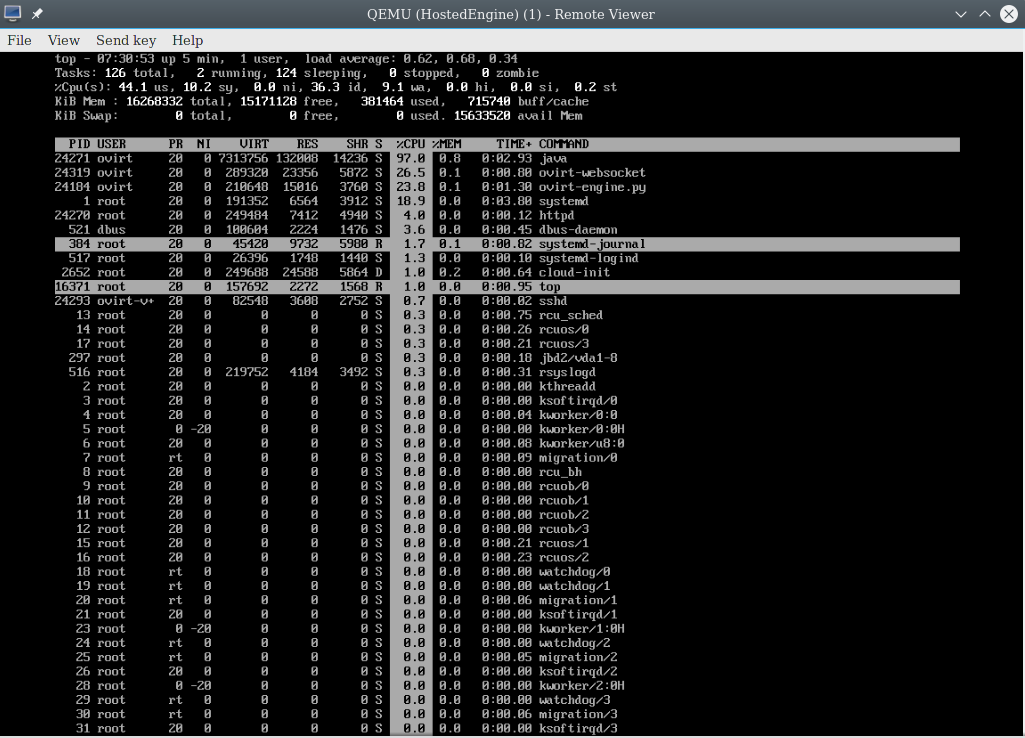
安装完虚拟机engine后可以通过VNC查看状态,也可以直接登陆虚拟机
[root@ovirthost18 ha_agent]# pwd
/rhev/data-center/mnt/glusterSD/192.168.184.17:_Govirt/1b618315-0622-4b10-846b-6903776c13ec/ha_agent
[root@ovirthost18 ha_agent]# ll
total 1
lrwxrwxrwx 1 vdsm kvm 132 Mar 10 16:10 hosted-engine.lockspace -> /var/run/vdsm/storage/1b618315-0622-4b10-846b-6903776c13ec/38543009-27ee-4c8d-878d-cd044b93a3b1/b0ae75b6-6c70-478a-a35f-d6a2972aa708
lrwxrwxrwx 1 vdsm kvm 132 Mar 10 16:10 hosted-engine.metadata -> /var/run/vdsm/storage/1b618315-0622-4b10-846b-6903776c13ec/6127b7b6-7ed7-466f-9818-90c564e6f71d/b44e0552-ca0b-417e-85a9-b49fe7816d52
安装完自承载engine后由于原来的iptables被重写,还要添加回glusterfs的端口
-A INPUT -m state --state NEW -m tcp -p tcp --dport 24007 -j ACCEPT
-A INPUT -m state --state NEW -m tcp -p tcp --dport 49152 -j ACCEPT
故障排除:
如果硬件支持虚拟化,在BOIS中启用CPU虚拟化.
参考:
http://www.ibm.com/developerworks/cn/cloud/library/1209_xiawc_ovirt/index.html
http://www.ovirt.org/
先决条件:
请确认您已经满足了以下先决条件:
-
您全新安装了 Red Hat Enterprise Linux 6.5、6.6 或 7 系统作为虚拟主机。
-
您需要准备为 Manger 安装操作系统所需的安装介质(CD-ROM、磁盘或 PXE)。物理的 CD-ROM 驱动器不被支持,如果您选择使用 CD-ROM 选项,则需要使用一个 ISO 文件。对于磁盘选项,您可以下载 RHEV-M Virtual Appliance 用于 Manager 的安装。RHEV-M Virtual Appliance 的下载地址是 https://rhn.redhat.com/rhn/software/channel/downloads/Download.do?cid=24821。
-
为您的自承载引擎环境准备 NFS 或 iSCSI 存储。
-
您需要设置好 Manager 的完全限定域名(FQDN),DNS 中需要有它的正向和反向查询记录。
-
如果您使用 RHEV-M Virtual Appliance,/tmp 目录需要不小于 50 GB。
这里所介绍的所有操作都需要以 root 用户的身份进行。
安装流程:
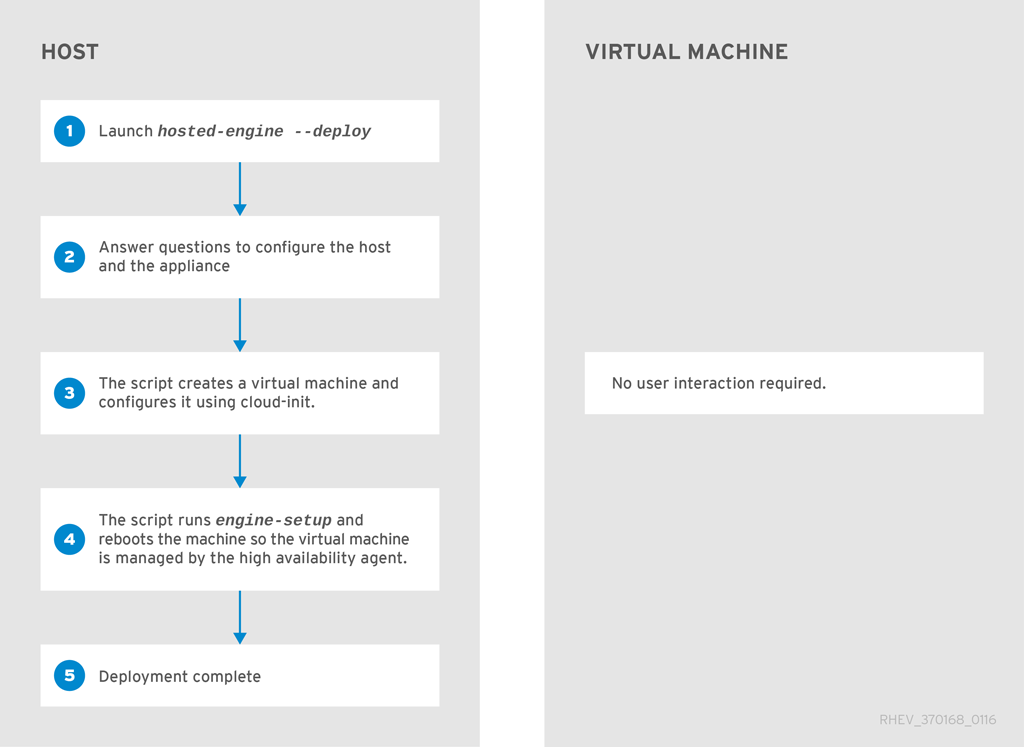
安装流程:

安装软件:
1.下载ovirt3.6版本的官方源rpm安装包
[root@192-168-1-2 ~]# yum install http://resources.ovirt.org/pub/yum-repo/ovirt-release36.rpm
2.下载CentOS 7.2版本的操作系统安装镜像,选择最小化版本.
[root@192-168-1-2 ~]# wget http://mirrors.aliyun.com/centos/7.2.1511/isos/x86_64/CentOS-7-x86_64-Minimal-1511.iso
3.安装自承载引擎配置脚本
[root@192-168-1-2 ~]# yum install -y ovirt-hosted-engine-setup
[root@192-168-1-2 ~]# yum install -y ovirt-engine-appliance
使用ovirt-engine-appliance安装engine,/tmp目录必须大于60GB的容量
安装过程中会断开网络,为了保证网络断开后程序安装不受影响,使用screen管理安装
[root@192-168-1-2 ~]# yum install screen -y
3.创建glusterfs逻辑卷
每一台host上都安装glusterfs
yum install glusterfs gluserterfs-server -y
只支持 replica 3 Gluster 存储. 并确定下面的配置已经被添加到所有的Gluster servers,/etc/glusterfs/glusterd.vol :
option rpc-auth-allow-insecure on
[root@192-168-174-42 glusterfs]# vim glusterd.vol
volume management
type mgmt/glusterd
option working-directory /var/lib/glusterd
option transport-type socket,rdma
option transport.socket.keepalive-time 10
option transport.socket.keepalive-interval 2
option transport.socket.read-fail-log off
option ping-timeout 0
option event-threads 1
# option base-port 49152
option rpc-auth-allow-insecure on
end-volume
~
启动服务
systemctl start glusterd
systemctl start glusterfsd.service
添加防火墙规则
-A INPUT -m state --state NEW -m tcp -p tcp --dport 24007 -j ACCEPT
-A INPUT -m state --state NEW -m tcp -p tcp --dport 49152 -j ACCEPT
# systemctl restart iptables
[root@192-168-174-36 opt]# cd
[root@192-168-174-36 ~]# gluster peer probe 192.168.184.11
peer probe: success.
[root@192-168-174-36 ~]# gluster peer probe 192.168.184.13
peer probe: success.
[root@192-168-174-36 ~]# gluster peer probe 192.168.184.15
peer probe: success.
[root@192-168-174-36 ~]# gluster peer probe 192.168.184.17
peer probe: success.
[root@192-168-174-36 ~]# gluster peer probe 192.168.184.14
peer probe: success.
[root@192-168-174-36 ~]# gluster peer probe 192.168.184.18
peer probe: success. Probe on localhost not needed
[root@192-168-174-36 ~]# gluster volume create Govirt stripe 2 replica 3 192.168.184.11:/opt/gv1 192.168.184.13:/opt/gv1 192.168.184.15:/opt/gv1 192.168.184.17:/opt/gv1 192.168.184.14:/opt/gv1 192.168.184.18:/opt/gv1
volume create: Govirt: success: please start the volume to access data
gluster> volume start Govirt
volume start: Govirt: success
gluster> volume quota Govirt enable
volume quota : success
gluster volume set Govirt cluster.quorum-type auto
gluster volume set Govirt network.ping-timeout 10
gluster volume set Govirt auth.allow \*
gluster volume set Govirt group virt
gluster volume set Govirt storage.owner-uid 36
gluster volume set Govirt storage.owner-gid 36
gluster volume set Govirt server.allow-insecure on
点击(此处)折叠或打开
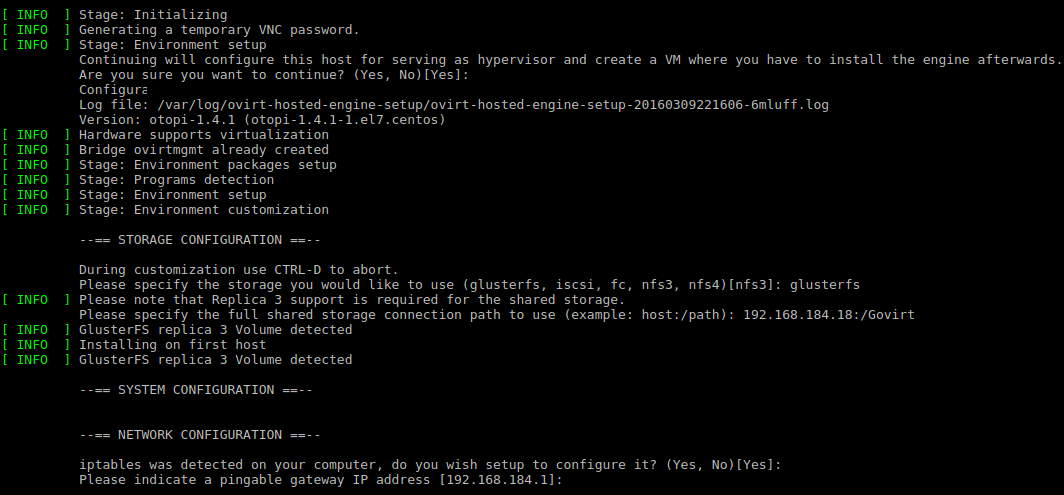
- [root@ovirthost18 glusterSD]# screen hosted-engine --deploy
- [ INFO ] Stage: Initializing
- [ INFO ] Generating a temporary VNC password.
- [ INFO ] Stage: Environment setup
- Continuing will configure this host for serving as hypervisor and create a VM where you have to install the engine afterwards.
- Are you sure you want to continue? (Yes, No)[Yes]:
- Configuration files: []
- Log file: /var/log/ovirt-hosted-engine-setup/ovirt-hosted-engine-setup-20160310151405-1ukhce.log
- Version: otopi-1.4.1 (otopi-1.4.1-1.el7.centos)
- [ INFO ] Hardware supports virtualization
- [ INFO ] Bridge ovirtmgmt already created
- [ INFO ] Stage: Environment packages setup
- [ INFO ] Stage: Programs detection
- [ INFO ] Stage: Environment setup
- [ INFO ] Stage: Environment customization
-
- --== STORAGE CONFIGURATION ==--
-
- During customization use CTRL-D to abort.
- Please specify the storage you would like to use (glusterfs, iscsi, fc, nfs3, nfs4)[nfs3]: glusterfs
- [ INFO ] Please note that Replica 3 support is required for the shared storage.
- Please specify the full shared storage connection path to use (example: host:/path): 192.168.184.17:/Govirt
- [ INFO ] GlusterFS replica 3 Volume detected
- [ INFO ] Installing on first host
- [ INFO ] GlusterFS replica 3 Volume detected
-
- --== SYSTEM CONFIGURATION ==--
-
-
- --== NETWORK CONFIGURATION ==--
-
- iptables was detected on your computer, do you wish setup to configure it? (Yes, No)[Yes]:
- Please indicate a pingable gateway IP address [192.168.184.1]:
-
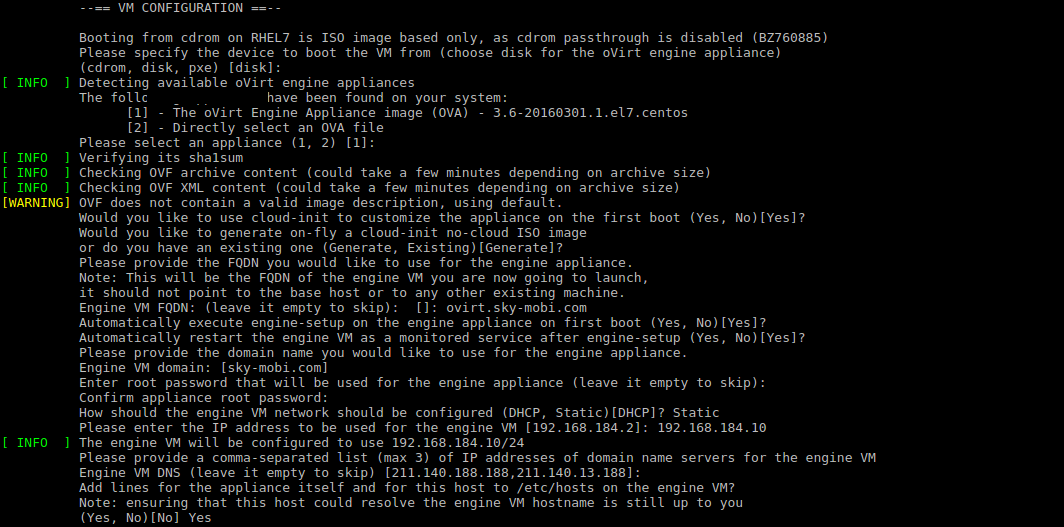
- --== VM CONFIGURATION ==--
-
- Booting from cdrom on RHEL7 is ISO image based only, as cdrom passthrough is disabled (BZ760885)
- Please specify the device to boot the VM from (choose disk for the oVirt engine appliance)
- (cdrom, disk, pxe) [disk]:
- [ INFO ] Detecting available oVirt engine appliances
- The following appliance have been found on your system:
- [1] - The oVirt Engine Appliance image (OVA) - 3.6-20160301.1.el7.centos
- [2] - Directly select an OVA file
- Please select an appliance (1, 2) [1]:
- [ INFO ] Verifying its sha1sum
- [ INFO ] Checking OVF archive content (could take a few minutes depending on archive size)
- [ INFO ] Checking OVF XML content (could take a few minutes depending on archive size)
- [WARNING] OVF does not contain a valid image description, using default.
- Would you like to use cloud-init to customize the appliance on the first boot (Yes, No)[Yes]?
- Would you like to generate on-fly a cloud-init no-cloud ISO image
- or do you have an existing one (Generate, Existing)[Generate]?
- Please provide the FQDN you would like to use for the engine appliance.
- Note: This will be the FQDN of the engine VM you are now going to launch,
- it should not point to the base host or to any other existing machine.
- Engine VM FQDN: (leave it empty to skip): []: ovirt.skyovirt.com
- Automatically execute engine-setup on the engine appliance on first boot (Yes, No)[Yes]?
- Automatically restart the engine VM as a monitored service after engine-setup (Yes, No)[Yes]?
- Please provide the domain name you would like to use for the engine appliance.
- Engine VM domain: [skyovirt.com]
- Enter root password that will be used for the engine appliance (leave it empty to skip):
- Confirm appliance root password:
- How should the engine VM network should be configured (DHCP, Static)[DHCP]? Static
- Please enter the IP address to be used for the engine VM [192.168.184.2]: 192.168.184.10
- [ INFO ] The engine VM will be configured to use 192.168.184.10/24
- Please provide a comma-separated list (max 3) of IP addresses of domain name servers for the engine VM
- Engine VM DNS (leave it empty to skip) [192.168.184.11,211.140.188.188,211.140.13.188]: 192.168.184.11,223.5.5.5,8.8.8.8
- Add lines for the appliance itself and for this host to /etc/hosts on the engine VM?
- Note: ensuring that this host could resolve the engine VM hostname is still up to you
- (Yes, No)[No] Yes
- The following CPU types are supported by this host:
- - model_Nehalem: Intel Nehalem Family
- - model_Penryn: Intel Penryn Family
- - model_Conroe: Intel Conroe Family
- Please specify the CPU type to be used by the VM [model_Nehalem]:
- Please specify the number of virtual CPUs for the VM [Defaults to appliance OVF value: 4]:
- [WARNING] Minimum requirements for disk size not met
- You may specify a unicast MAC address for the VM or accept a randomly generated default [00:16:3e:6b:0c:ca]:
- Please specify the memory size of the VM in MB [Defaults to appliance OVF value: 16384]:
- Please specify the console type you would like to use to connect to the VM (vnc, spice) [vnc]:
-
- --== HOSTED ENGINE CONFIGURATION ==--
-
- Enter the name which will be used to identify this host inside the Administrator Portal [hosted_engine_1]: ovirthost18.skyovirt.com
- Enter 'admin@internal' user password that will be used for accessing the Administrator Portal:
- Confirm 'admin@internal' user password:
- Please provide the name of the SMTP server through which we will send notifications [localhost]:
- Please provide the TCP port number of the SMTP server [25]:
- Please provide the email address from which notifications will be sent [root@localhost]:
- Please provide a comma-separated list of email addresses which will get notifications [root@localhost]:
- [ INFO ] Stage: Setup validation
-
- --== CONFIGURATION PREVIEW ==--
-
- Bridge interface : eth0
- Engine FQDN : ovirt.skyovirt.com
- Bridge name : ovirtmgmt
- Host address : ovirthost18.skyovirt.com
- SSH daemon port : 22
- Firewall manager : iptables
- Gateway address : 192.168.184.1
- Host name for web application : ovirthost18.skyovirt.com
- Host ID : 1
- Image size GB : 10
- GlusterFS Share Name : hosted_engine_glusterfs
- GlusterFS Brick Provisioning : False
- Storage connection : 192.168.184.17:/Govirt
- Console type : vnc
- Memory size MB : 16384
- MAC address : 00:16:3e:6b:0c:ca
- Boot type : disk
- Number of CPUs : 4
- OVF archive (for disk boot) : /usr/share/ovirt-engine-appliance/ovirt-engine-appliance-3.6-20160301.1.el7.centos.ova
- Restart engine VM after engine-setup: True
- CPU Type : model_Nehalem
-
- Please confirm installation settings (Yes, No)[Yes]:
- [ INFO ] Stage: Transaction setup
- [ INFO ] Stage: Misc configuration
- [ INFO ] Stage: Package installation
- [ INFO ] Stage: Misc configuration
- [ INFO ] Configuring libvirt
- [ INFO ] Configuring VDSM
- [ INFO ] Starting vdsmd
- [ INFO ] Waiting for VDSM hardware info
- [ INFO ] Waiting for VDSM hardware info
- [ INFO ] Creating Storage Domain
- [ INFO ] Creating Storage Pool
- [ INFO ] Connecting Storage Pool
- [ INFO ] Verifying sanlock lockspace initialization
- [ INFO ] Creating Image for 'hosted-engine.lockspace' ...
- [ INFO ] Image for 'hosted-engine.lockspace' created successfully
- [ INFO ] Creating Image for 'hosted-engine.metadata' ...
- [ INFO ] Image for 'hosted-engine.metadata' created successfully
- [ INFO ] Creating VM Image
- [ INFO ] Extracting disk image from OVF archive (could take a few minutes depending on archive size)
- [ INFO ] Validating pre-allocated volume size
- [ INFO ] Uploading volume to data domain (could take a few minutes depending on archive size)
- [ INFO ] Image successfully imported from OVF
- [ INFO ] Destroying Storage Pool
- [ INFO ] Start monitoring domain
- [ INFO ] Configuring VM
- [ INFO ] Updating hosted-engine configuration
- [ INFO ] Stage: Transaction commit
- [ INFO ] Stage: Closing up
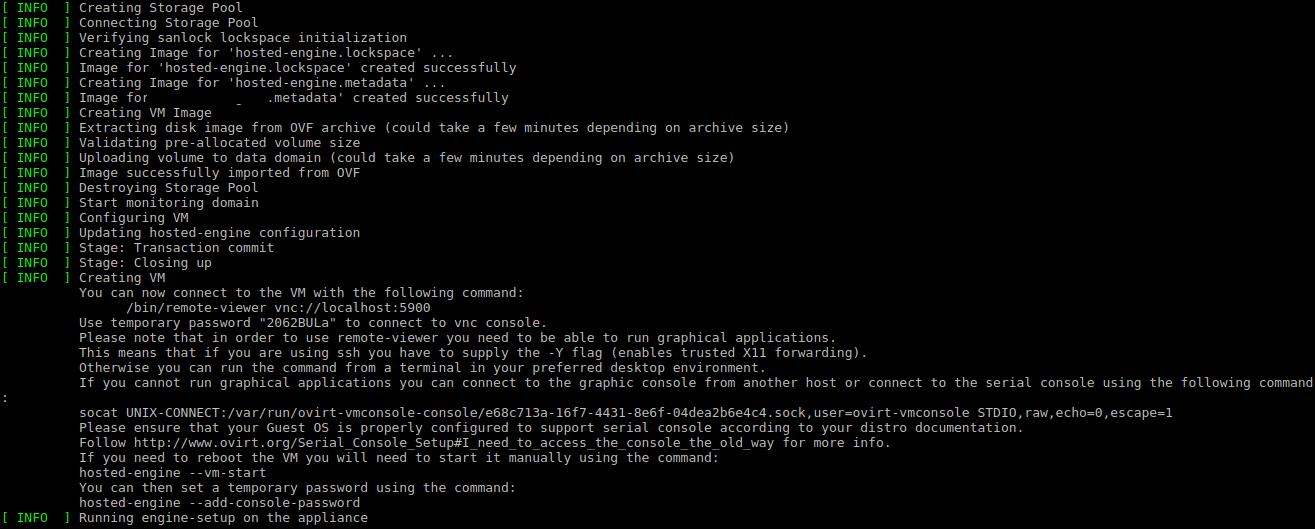
- [ INFO ] Creating VM
- You can now connect to the VM with the following command:
- /bin/remote-viewer vnc://localhost:5900
- Use temporary password "6099dSEA" to connect to vnc console.
- Please note that in order to use remote-viewer you need to be able to run graphical applications.
- This means that if you are using ssh you have to supply the -Y flag (enables trusted X11 forwarding).
- Otherwise you can run the command from a terminal in your preferred desktop environment.
- If you cannot run graphical applications you can connect to the graphic console from another host or connect to the serial console using the following command:
- socat UNIX-CONNECT:/var/run/ovirt-vmconsole-console/eb9cd5b4-553e-4b8d-99ee-899aaffb4297.sock,user=ovirt-vmconsole STDIO,raw,echo=0,escape=1
- Please ensure that your Guest OS is properly configured to support serial console according to your distro documentation.
- Follow http://www.ovirt.org/Serial_Console_Setup#I_need_to_access_the_console_the_old_way for more info.
- If you need to reboot the VM you will need to start it manually using the command:
- hosted-engine --vm-start
- You can then set a temporary password using the command:
- hosted-engine --add-console-password
- [ INFO ] Running engine-setup on the appliance
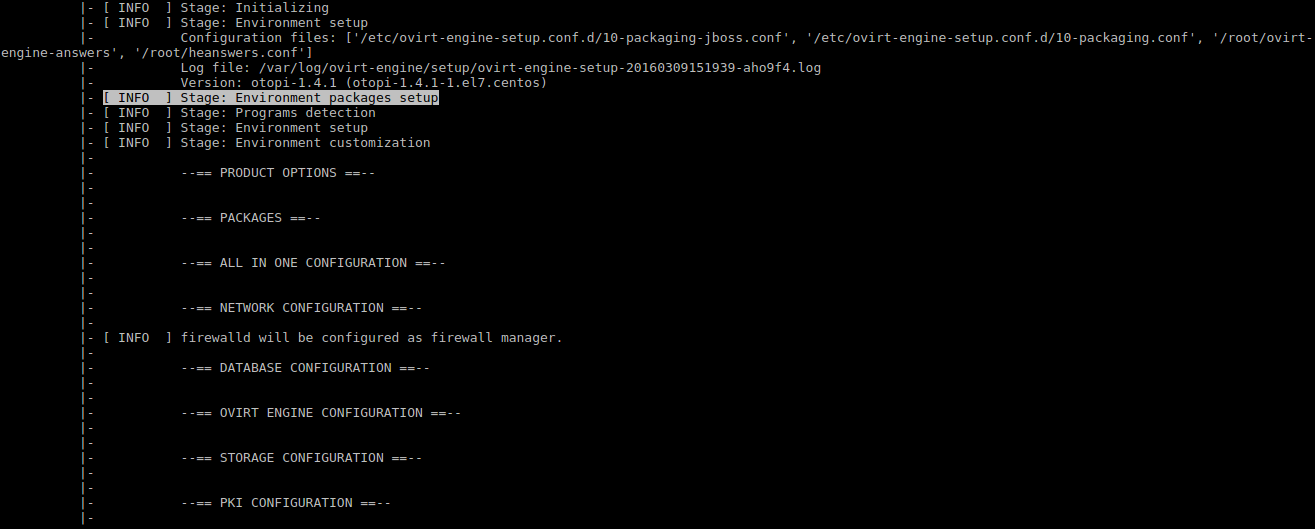
- |- [ INFO ] Stage: Initializing
- |- [ INFO ] Stage: Environment setup
- |- Configuration files: ['/etc/ovirt-engine-setup.conf.d/10-packaging-jboss.conf', '/etc/ovirt-engine-setup.conf.d/10-packaging.conf', '/root/ovirt-engine-answers', '/root/heanswers.conf']
- |- Log file: /var/log/ovirt-engine/setup/ovirt-engine-setup-20160310072540-vbzmx5.log
- |- Version: otopi-1.4.1 (otopi-1.4.1-1.el7.centos)
- |- [ INFO ] Stage: Environment packages setup
- |- [ INFO ] Stage: Programs detection
- |- [ INFO ] Stage: Environment setup
- |- [ INFO ] Stage: Environment customization
- |-
- |- --== PRODUCT OPTIONS ==--
- |-
- |-
- |- --== PACKAGES ==--
- |-
- |-
- |- --== ALL IN ONE CONFIGURATION ==--
- |-
- |-
- |- --== NETWORK CONFIGURATION ==--
- |-
- |- [ INFO ] firewalld will be configured as firewall manager.
- |-
- |- --== DATABASE CONFIGURATION ==--
- |-
- |-
- |- --== OVIRT ENGINE CONFIGURATION ==--
- |-
- |-
- |- --== STORAGE CONFIGURATION ==--
- |-
- |-
- |- --== PKI CONFIGURATION ==--
- |-
- |-
- |- --== APACHE CONFIGURATION ==--
- |-
- |-
- |- --== SYSTEM CONFIGURATION ==--
- |-
- |-
- |- --== MISC CONFIGURATION ==--
- |-
- |-
- |- --== END OF CONFIGURATION ==--
- |-
- |- [ INFO ] Stage: Setup validation
- |-
- |- --== CONFIGURATION PREVIEW ==--
- |-
- |- Application mode : virt
- |- Default SAN wipe after delete : False
- |- Firewall manager : firewalld
- |- Update Firewall : True
- |- Host FQDN : ovirt.skyovirt.com
- |- Engine database secured connection : False
- |- Engine database host : localhost
- |- Engine database user name : engine
- |- Engine database name : engine
- |- Engine database port : 5432
- |- Engine database host name validation : False
- |- Engine installation : True
- |- PKI organization : skyovirt.com
- |- Configure local Engine database : True
- |- Set application as default page : True
- |- Configure Apache SSL : True
- |- Configure VMConsole Proxy : True
- |- Engine Host FQDN : ovirt.skyovirt.com
- |- Configure WebSocket Proxy : True
- |- [ INFO ] Stage: Transaction setup
- |- [ INFO ] Stopping engine service
- |- [ INFO ] Stopping ovirt-fence-kdump-listener service
- |- [ INFO ] Stopping websocket-proxy service
- |- [ INFO ] Stage: Misc configuration
- |- [ INFO ] Stage: Package installation
- |- [ INFO ] Stage: Misc configuration
- |- [ INFO ] Initializing PostgreSQL
- |- [ INFO ] Creating PostgreSQL 'engine' database
- |- [ INFO ] Configuring PostgreSQL
- |- [ INFO ] Creating/refreshing Engine database schema
- |- [ INFO ] Creating/refreshing Engine 'internal' domain database schema
- |- [ INFO ] Upgrading CA
- |- [ INFO ] Creating CA
- |- [ INFO ] Setting up ovirt-vmconsole proxy helper PKI artifacts
- |- [ INFO ] Setting up ovirt-vmconsole SSH PKI artifacts
- |- [ INFO ] Configuring WebSocket Proxy
- |- [ INFO ] Generating post install configuration file '/etc/ovirt-engine-setup.conf.d/20-setup-ovirt-post.conf'
- |- [ INFO ] Stage: Transaction commit
- |- [ INFO ] Stage: Closing up
- |-
- |- --== SUMMARY ==--
- |-
- |- SSH fingerprint: df:a8:c2:71:c7:e9:b0:75:85:50:49:6e:85:5c:5c:67
- |- Internal CA 62:4A:B8:AF:6F:AB:7F:7D:5A:B5:6B:FF:A6:80:B1:1F:6F:2C:DD:BE
- |- If you want to gather statistical information you can install Reports and/or DWH:
- |- http://www.ovirt.org/Ovirt_DWH
- |- http://www.ovirt.org/Ovirt_Reports
- |- Web access is enabled at:
- |- http://ovirt.skyovirt.com:80/ovirt-engine
- |- https://ovirt.skyovirt.com:443/ovirt-engine
- |- Please use the user 'admin@internal' and password specified in order to login
- |-
- |- --== END OF SUMMARY ==--
- |-
- |- [ INFO ] Starting engine service
- |- [ INFO ] Restarting httpd
- |- [ INFO ] Restarting ovirt-vmconsole proxy service
- |- [ INFO ] Stage: Clean up
- |- Log file is located at /var/log/ovirt-engine/setup/ovirt-engine-setup-20160310072540-vbzmx5.log
- |- [ INFO ] Generating answer file '/var/lib/ovirt-engine/setup/answers/20160310073052-setup.conf'
- |- [ INFO ] Stage: Pre-termination
- |- [ INFO ] Stage: Termination
- |- [ INFO ] Execution of setup completed successfully
- |- HE_APPLIANCE_ENGINE_SETUP_SUCCESS
- [ INFO ] Engine-setup successfully completed
- [ INFO ] Engine is still unreachable
- [ INFO ] Engine is still not reachable, waiting...
- [ INFO ] Engine is still unreachable
- [ INFO ] Engine is still not reachable, waiting...
- [ INFO ] Engine replied: DB Up!Welcome to Health
- [ INFO ] Acquiring internal CA cert from the engine
- [ INFO ] The following CA certificate is going to be used, please immediately interrupt if not correct:
- [ INFO ] Issuer: C=US, O=skyovirt.com, CN=ovirt.skyovirt.com.28351, Subject: C=US, O=skyovirt.com, CN=ovirt.skyovirt.com.28351, Fingerprint (SHA-1): 624AB8AF6FAB7F7D5AB56BFFA680B11F6F2CDDBE
- [ INFO ] Connecting to the Engine
- [ INFO ] Waiting for the host to become operational in the engine. This may take several minutes...
- [ INFO ] The VDSM Host is now operational
- [ INFO ] Saving hosted-engine configuration on the shared storage domain
- [ INFO ] Shutting down the engine VM
- [ INFO ] Enabling and starting HA services
- [ INFO ] Stage: Clean up
- [ INFO ] Generating answer file '/var/lib/ovirt-hosted-engine-setup/answers/answers-20160310153524.conf'
- [ INFO ] Generating answer file '/etc/ovirt-hosted-engine/answers.conf'
- [ INFO ] Stage: Pre-termination
- [ INFO ] Stage: Termination
- [ INFO ] Hosted Engine successfully set up
- [screen is terminating]


检测自承载engine的虚拟机状态
点击(此处)折叠或打开
- [root@ovirthost18 ~]# hosted-engine --vm-status
-
-
- --== Host 1 status ==--
-
- Status up-to-date : True
- Hostname : ovirthost18.skyovirt.com
- Host ID : 1
- Engine status : {"reason": "vm not running on this host", "health": "bad", "vm": "down", "detail": "unknown"}
- Score : 0
- stopped : False
- Local maintenance : True
- crc32 : c00bb160
- Host timestamp : 2069
- [root@ovirthost18 ~]#
点击(此处)折叠或打开
- [root@ovirthost18 ~]# hosted-engine --vm-start
-
- eb9cd5b4-553e-4b8d-99ee-899aaffb4297
- Status = WaitForLaunch
- nicModel = rtl8139,pv
- statusTime = 4297005950
- emulatedMachine = pc
- pid = 0
- vmName = HostedEngine
- devices = [{'index': '2', 'iface': 'ide', 'specParams': {}, 'readonly': 'true', 'deviceId': 'e8a5d960-c22e-46c1-a23a-550859990368', 'address': {'bus': '1', 'controller': '0', 'type': 'drive', 'target': '0', 'unit': '0'}, 'device': 'cdrom', 'shared': 'false', 'path': '', 'type': 'disk'}, {'index': '0', 'iface': 'virtio', 'format': 'raw', 'bootOrder': '1', 'poolID': '00000000-0000-0000-0000-000000000000', 'volumeID': '80a84266-4267-47e1-b14d-bfc3b600c09f', 'imageID': '700e39e3-7b31-4154-a9d8-ac6caa6eadb4', 'specParams': {}, 'readonly': 'false', 'domainID': '1b618315-0622-4b10-846b-6903776c13ec', 'optional': 'false', 'deviceId': '700e39e3-7b31-4154-a9d8-ac6caa6eadb4', 'address': {'slot': '0x06', 'bus': '0x00', 'domain': '0x0000', 'type': 'pci', 'function': '0x0'}, 'device': 'disk', 'shared': 'exclusive', 'propagateErrors': 'off', 'type': 'disk'}, {'device': 'scsi', 'model': 'virtio-scsi', 'type': 'controller'}, {'nicModel': 'pv', 'macAddr': '00:16:3e:6b:0c:ca', 'linkActive': 'true', 'network': 'ovirtmgmt', 'filter': 'vdsm-no-mac-spoofing', 'specParams': {}, 'deviceId': '443757e2-a735-41d1-ac05-6c15e8217f99', 'address': {'slot': '0x03', 'bus': '0x00', 'domain': '0x0000', 'type': 'pci', 'function': '0x0'}, 'device': 'bridge', 'type': 'interface'}, {'device': 'console', 'specParams': {}, 'type': 'console', 'deviceId': '09abe9c6-41bb-42c1-b8d3-efe85379fd7b', 'alias': 'console0'}]
- guestDiskMapping = {}
- vmType = kvm
- clientIp =
- displaySecurePort = -1
- memSize = 16384
- displayPort = -1
- cpuType = Nehalem
- spiceSecureChannels = smain,sdisplay,sinputs,scursor,splayback,srecord,ssmartcard,susbredir
- smp = 4
- displayIp = 0
- display = vnc

安装过程中的一些内存磁盘IO情况
procs -----------memory---------- ---swap-- -----io---- -system-- ------cpu-----
r b swpd free buff cache si so bi bo in cs us sy id wa st
2 0 0 45290744 1920 3124408 0 0 0 53252 1369 200 11 1 87 0 0
1 0 0 45207092 1920 3208080 0 0 4 426012 1460 707 11 2 86 0 0
1 0 0 45131644 1920 3283320 0 0 0 0 2451 207 12 1 87 0 0
1 0 0 45046508 1920 3367816 0 0 4 0 1248 709 11 2 87 0 0
1 0 0 44955780 1920 3458508 0 0 0 0 1198 204 11 1 88 0 0
1 0 0 44848484 1920 3563156 0 0 4 0 1383 1007 11 2 87 0 0
1 0 0 44724904 1920 3686064 0 0 4 106512 1643 352 11 2 87 0 0
1 2 0 44559836 1928 3836144 0 0 1028 971161 2643 920 11 4 79 6 0
1 2 0 44412972 1928 3983240 0 0 0 0 2252 205 11 2 63 25 0
1 0 0 44305020 1928 4091348 0 0 4 7 2294 803 11 2 71 15 0
1 0 0 44221004 1928 4175480 0 0 0 4 1238 196 11 1 87 0 0
1 0 0 44139972 1928 4256604 0 0 4 0 1303 748 12 1 87 0 0
2 0 0 44065836 1928 4330860 0 0 0 0 1371 587 12 1 86 0 0
1 0 0 43989160 1928 4407412 0 0 4 0 1265 1974 12 1 87 0 0
1 0 0 43915592 1928 4481636 0 0 0 0 1223 208 12 1 87 0 0
1 0 0 43835200 1928 4560628 0 0 4 0 1383 923 12 2 87 0 0
1 0 0 43759580 1928 4636592 0 0 4 0 1257 358 11 1 87 0 0
1 0 0 43684260 1928 4711948 0 0 4 53264 1534 707 11 2 87 0 0
1 0 0 43596184 1928 4799984 0 0 0 102412 1323 189 11 2 87 0 0
1 0 0 43506184 1928 4889772 0 0 4 49156 1517 767 11 2 87 0 0
1 0 0 43418852 1928 4977452 0 0 0 98316 1433 206 11 2 87 0 0
1 0 0 43330876 1928 5065860 0 0 4 98316 1519 708 11 2 87 0 0
1 0 0 43241420 1928 5154884 0 0 0 98296 1330 210 11 1 87 0 0
1 0 0 43164744 1928 5231816 0 0 4 49159 1505 755 11 2 87 0 0
0 1 0 43114340 1928 5282196 0 0 0 980204 1383 223 6 2 87 5 0
0 1 0 43117148 1928 5279384 0 0 4 0 1476 937 0 0 87 12 0
0 1 0 43120284 1928 5276256 0 0 4 0 12718 55243 0 2 86 11 0
0 0 0 43082340 1928 5300040 0 0 2056 18 11558 32099 7 8 80 4 0
0 0 0 43017472 1936 5365796 0 0 1024 40 19835 32590 11 12 77 0 0
0 0 0 42949860 1936 5432552 0 0 4 16 19561 31394 10 12 78 0 0
1 0 0 42889424 1936 5491716 0 0 0 0 21073 42454 11 12 77 0 0
1 0 0 42827168 1936 5557984 0 0 4 0 20131 37314 10 11 78 0 0
安装完虚拟机engine后可以通过VNC查看状态,也可以直接登陆虚拟机

[root@ovirthost18 ha_agent]# pwd
/rhev/data-center/mnt/glusterSD/192.168.184.17:_Govirt/1b618315-0622-4b10-846b-6903776c13ec/ha_agent
[root@ovirthost18 ha_agent]# ll
total 1
lrwxrwxrwx 1 vdsm kvm 132 Mar 10 16:10 hosted-engine.lockspace -> /var/run/vdsm/storage/1b618315-0622-4b10-846b-6903776c13ec/38543009-27ee-4c8d-878d-cd044b93a3b1/b0ae75b6-6c70-478a-a35f-d6a2972aa708
lrwxrwxrwx 1 vdsm kvm 132 Mar 10 16:10 hosted-engine.metadata -> /var/run/vdsm/storage/1b618315-0622-4b10-846b-6903776c13ec/6127b7b6-7ed7-466f-9818-90c564e6f71d/b44e0552-ca0b-417e-85a9-b49fe7816d52
安装完自承载engine后由于原来的iptables被重写,还要添加回glusterfs的端口
-A INPUT -m state --state NEW -m tcp -p tcp --dport 24007 -j ACCEPT
-A INPUT -m state --state NEW -m tcp -p tcp --dport 49152 -j ACCEPT
故障排除:
点击(此处)折叠或打开
- [root@192-168-166-119 ~]# hosted-engine --deploy
- [ INFO ] Stage: Initializing
- [ INFO ] Generating a temporary VNC password.
- [ INFO ] Stage: Environment setup
- Continuing will configure this host for serving as hypervisor and create a VM where you have to install oVirt Engine afterwards.
- Are you sure you want to continue? (Yes, No)[Yes]:
- Configuration files: []
- Log file: /var/log/ovirt-hosted-engine-setup/ovirt-hosted-engine-setup-20151230101541-9ppzo8.log
- Version: otopi-1.4.0 (otopi-1.4.0-1.el7.centos)
- It has been detected that this program is executed through an SSH connection without using screen.
- Continuing with the installation may lead to broken installation if the network connection fails.
- It is highly recommended to abort the installation and run it inside a screen session using command "screen".
- Do you want to continue anyway? (Yes, No)[No]: Yes
- [ ERROR ] Failed to execute stage 'Environment setup': Hardware does not support virtualization
- [ INFO ] Stage: Clean up
- [ INFO ] Generating answer file '/var/lib/ovirt-hosted-engine-setup/answers/answers-20151230101630.conf'
- [ INFO ] Stage: Pre-termination
- [ INFO ] Stage: Termination
参考:
http://www.ibm.com/developerworks/cn/cloud/library/1209_xiawc_ovirt/index.html
http://www.ovirt.org/
更多推荐
 已为社区贡献34条内容


所有评论(0)