VMware虚拟机安装redis并配置redis主从
- 首先打开VMware,在我的计算机下方空白右击点击新建虚拟机

- 保持默认就行,直接下一步。

- 接着下一步

- 接着下一步

- 接着下一步,下一步


- 最后点击完成,就新建好了一台虚拟机。

- 在这里选择虚拟网络编辑器,再点击更改设置

- 再点击右边的DHCP设置

- 在虚拟机页面,点击user creation
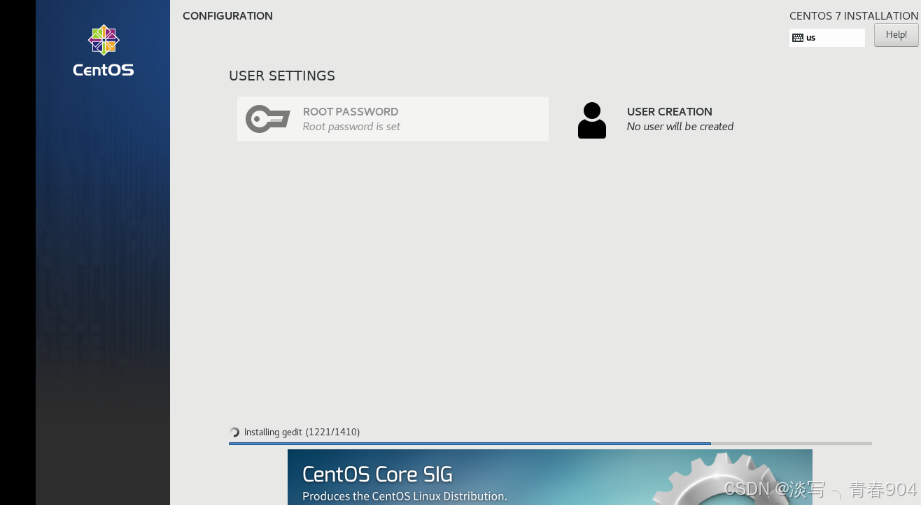

- 等待虚拟机下载好配置就行。

- 下载yum仓库
-
首先打开虚拟机的终端(桌面右击)
-
输入su 更改权限为管理员

-
测试网络连通性 ping www.baidu.com,按ctrl+c退出
-
切换到本地仓库, cd /etc/yum.repos.d/
-
创建备份,mkdir yum.repos.d.backup
-
将所有的仓库文件移动到备份中,mv *.repo yum.repos.d.backup
-
下载yum,输入这个:curl -o /etc/yum.repos.d/CentOS-Base.repo http://mirrors.aliyun.com/repo/Centos-7.repo
-
清理缓存,yum clean all
-
在输入:yum makecache
-
将软件升级,yum update
-
升级完后,输入y下载软件包
-
配置redis
- 打开终端切换到管理员输入:yum install -y gcc tcl
- 将redis的安装包传到vmware中,我用的工具是Mobaxterm,可以实现主机和虚拟机互传文件。

- 我的就在/home/test/reids/
- 切换到/home/test/reids/目录下,输入命令:tar -zxvf redis-6.2.6.tar.gz 解压
- 解压后进入到redis-6.2.6目录:cd redis-6.2.6
- 运行编译命令:make && make install
- 将配置文件(redis.conf)做备份:cp redis.conf redis.conf.bck
- 进入配置文件修改配置:vi redis.conf
- # 绑定地址,默认是127.0.0.1,会导致只能在本地访问。修改为0.0.0.0则可以在任意IP访问
bind 0.0.0.0
# 保护模式,关闭保护模式
protected-mode no
# 数据库数量,设置为1
databases 1
redis主从集群
- 切换到/home/test/reids/目录下:cd /home/test/reids
- 创建目录7001、7002、7003 :mkdir 7001 7002 7003
拷贝配置文件到每个实例目录,然后将redis-6.2.6/redis.conf文件拷贝到三个目录中(在/home/test/reids目录执行下列命令):echo 7001 7002 7003 | xargs -t -n 1 cp redis-6.2.6/redis.conf
修改每个实例的端口、工作目录,修改每个文件夹内的配置文件,将端口分别修改为7001、7002、7003,将rdb文件保存位置都修改为自己所在目录(在/home/test/reids目录执行下列命令):
sed -i -e 's/6379/7001/g' -e 's/dir .\//dir \/home\/test\/redis\/7001\//g' 7001/redis.conf
sed -i -e 's/6379/7002/g' -e 's/dir .\//dir \/home\/test\/redis\/7002\//g' 7002/redis.conf
sed -i -e 's/6379/7003/g' -e 's/dir .\//dir \/home\/test\/redis\/7003\//g' 7003/redis.conf修改每个实例的声明IP
虚拟机本身有多个IP,为了避免将来混乱,我们需要在redis.conf文件中指定每一个实例的绑定ip信息,格式如下:
printf '%s\n' 7001 7002 7003 | xargs -I{} -t sed -i '1a replica-announce-ip 192.168.57.132' {}/redis.conf- 启动,为了方便查看日志,我们打开3个ssh窗口,分别启动3个redis实例,启动命令:# 第1个
redis-server 7001/redis.conf
# 第2个
redis-server 7002/redis.conf
# 第3个
redis-server 7003/redis.conf- 如果出现这个问题:MISCONF Redis is configured to save RDB snapshots, but it is currently not able to persist on disk. Commands that may modify the data set are disabled, because this instance is configured to report errors during writes if RDB snapshotting fails (stop-writes-on-bgsave-error option),Please check the Redis logs for details about the RDB error.这个是redis快照被强制关闭了导致不能持久化的问题,通过stop-writes-on-bgsave-error值设置为no即可避免这种问题。
- 解决方法:vi打开redis-server配置的redis.conf文件,然后使用快捷匹配模式:/stop-writes-on-bgsave-error定位到stop-writes-on-bgsave-error字符串,接着把后面的yes改为no就可以了。
- 开启主从关系
- 首先连接7002:
redis-cli -p 7002
# 执行slaveof
slaveof 192.168.57.132 7001- # 连接 7003
redis-cli -p 7003
# 执行slaveof
slaveof 192.168.57.132 7001- # 连接 7001
redis-cli -p 7001
# 查看状态
info replication //查看集群状态好了,redis主从关系的建立就完成了。
注意:在连接redis是要将防火墙关闭:
永久关闭防火墙:systemctl disable firewalld
关闭防火墙:systemctl stop firewalld

华为AI开发者空间,是为全球开发者打造的专属开发空间,汇聚了华为优质开发资源及工具,致力于让每一位开发者拥有一台云主机,基于华为根生态开发、创新。
更多推荐


 44
 0
- 0


 已为社区贡献1条内容

所有评论(0)