图文操作--PXE批量网络装机项目
文章目录PXE批量网络装机1、系统装机的三种引导方式2、系统安装过程:3、什么是PXE?4、实现过程:PXE批量装机项目实验:1、添加一块网卡,设置双网卡,网卡ens33 为NAT模式,网卡ens37 为仅主机模式。2、用yum安装dhcp,TFTP,ftp和syslinux服务;配置其内容:3、将配置文件模板复制到dhcp目录下:4、新建一个虚拟机,测试PXE装机:实现kickstart 无人值
PXE批量网络装机
1、系统装机的三种引导方式
硬盘,光驱,网络
2、系统安装过程:
- 加载boot loader
- 加载启动安装菜单
- 加载内核和initrd系统
- 加载根系统
- 运行anaconda的安装向导
3、什么是PXE?
PXE 是Intel在很久以前提出来的一项用于通过网络来引导系统的标准。允许客户机通过网络从远程服务器上下载引导镜像,并加载安装文件或者整个操作系统。
pxe是通过网卡引导启动;
PXE批量部著的优点:
(1)规模化:同时装配多台服务器
(2)自动化:安装系统、配置各种服务
(3)远程实现:不需要光盘、U盘等安装介质
实现的硬件支持:
(1)BIOS支持;
(2)网卡支持(现在基本都已支持);
(3)需要在bios中开启开关,服务器一般没打开(bmc界面里打开);
(4)网络中有一台 DHCP 服务器以便为客户机自动分配地址、指定引导文件位置;
(5)服务器通过 tftp服务(简单文件传输协议)来提供系统内核和引导镜像的下载;
4、实现过程:
(1)网卡需要查找相关的dhcp服务器(获取地址时间);
(2)找到后dhcp服务器提供ip地址,和引导程序(boot loader)的地址 还提供给客户机TFTPserver地址(dhcp本身不提供tftp服务);
(3)网卡使用tftp客户端吧引导程序加载到内存中来;
(4)bios执行引导程序;
(5)引导程序会去TFTP去查找配置文件;
(6)根据配置文件去引导安装系统;
(7)系统安装过程;

PXE 远程安装服务器集成了 CentOS 7 安装源、TFTP 服务、DHCP 服务,能 够向客户机裸机发送 PXE 引导程序、Linux 内核、启动菜单等数据,以及提供安装文件。
PXE批量装机项目实验:
1、添加一块网卡,设置双网卡,网卡ens33 为NAT模式,网卡ens37 为仅主机模式。
注意:内存最好是2G 以上;


#配置ens37网卡
[root@localhost ~]# cd /etc/sysconfig/network-scripts/   //cd到网卡配置文件目录
[root@localhost network-scripts]# ls  //查看一部分,主要看ens33
ifcfg-ens33  ifdown-ppp       ifup-ib      ifup-Team
[root@localhost network-scripts]# cp ifcfg-ens33 ifcfg-ens37   //复制ens33网卡配置到ens37网卡
[root@localhost network-scripts]# vim ifcfg-ens37  //配置ens37网卡
TYPE=Ethernet
PROXY_METHOD=none
BROWSER_ONLY=no
BOOTPROTO=static
DEFROUTE=yes
IPV4_FAILURE_FATAL=no
IPV6INIT=yes
IPV6_AUTOCONF=yes
IPV6_DEFROUTE=yes
IPV6_FAILURE_FATAL=no
IPV6_ADDR_GEN_MODE=stable-privacy
NAME=ens37
DEVICE=ens37
ONBOOT=yes
IPADDR=192.168.159.100   //IP地址
NETMASK=255.255.255.0   //子网掩码
GATEWAY=192.168.159.1   //网关
DNS=8.8.8.8   //dns
[root@localhost network-scripts]# systemctl restart network  //重启网卡

2、用yum安装dhcp,TFTP,ftp和syslinux服务;配置其内容:
#安装dhcp服务
[root@localhost network-scripts]# yum install dhcp -y

3、将配置文件模板复制到dhcp目录下:
#将配置文件模板复制到dhcp目录下
[root@localhost network-scripts]# cp /usr/share/doc/dhcp-4.2.5/dhcpd.conf.example /etc/dhcp/dhcpd.conf
cp:是否覆盖"/etc/dhcp/dhcpd.conf"? y

#修改dhcp配置文件
[root@localhost network-scripts]# vim /etc/dhcp/dhcpd.conf
subnet 192.168.159.0 netmask 255.255.255.0 {
  range 192.168.159.10 192.168.159.50;
  option routers 192.168.159.1;
  next-server 192.168.159.100;
  filename "pxelinux.0";
}
#安装TFTP服务
[root@localhost network-scripts]# yum install tftp-server
#查看各个配置文件位置
[root@localhost network-scripts]# rpm -ql tftp-server
#/etc/xinetd.d/tftp   //配置文件
/usr/lib/systemd/system/tftp.service
/usr/lib/systemd/system/tftp.socket
/usr/sbin/in.tftpd
/usr/share/doc/tftp-server-5.2
/usr/share/doc/tftp-server-5.2/CHANGES
/usr/share/doc/tftp-server-5.2/README
/usr/share/doc/tftp-server-5.2/README.security
/usr/share/man/man8/in.tftpd.8.gz
/usr/share/man/man8/tftpd.8.gz
/var/lib/tftpboot
主要文件:
#/etc/xinetd.d/tftp    //配置文件
#/var/lib/tftpboot    //站点

[root@localhost network-scripts]# vim /etc/xinetd.d/tftp
disable                 = no

#引导程序文件需要先安装此服务
[root@localhost network-scripts]# yum install syslinux -y

#安装完成后找到该文件的地址
[root@localhost network-scripts]# rpm -ql syslinux | grep 0
#拷贝到站点文件里
[root@localhost network-scripts]# cp /usr/share/syslinux/pxelinux.0 /var/lib/tftpboot/

#安装vsftp服务
[root@localhost network-scripts]# yum install vsftpd -y
#查看vsftp服务的配置文件
[root@localhost network-scripts]# rpm -ql vsftpd
/var/ftp
[root@localhost network-scripts]# cd /var/ftp/
[root@localhost ftp]# ls
pub
[root@localhost ftp]# mkdir centos7
[root@localhost ftp]# ls
centos7  pub
[root@localhost ftp]# mount /dev/sr0 centos7/
mount: /dev/sr0 写保护,将以只读方式挂载
[root@localhost ftp]# cd centos7/
[root@localhost centos7]# ls
CentOS_BuildTag  GPL       LiveOS    RPM-GPG-KEY-CentOS-7
EFI              images    Packages  RPM-GPG-KEY-CentOS-Testing-7
EULA             isolinux  repodata  TRANS.TBL
[root@localhost centos7]# cd images/
[root@localhost images]# ls
efiboot.img  pxeboot  TRANS.TBL
[root@localhost images]# cd pxeboot/
[root@localhost pxeboot]# ls
initrd.img  TRANS.TBL  vmlinuz
#将这两个配置文件复制到站点
[root@localhost pxeboot]# cp initrd.img vmlinuz /var/lib/tftpboot/
[root@localhost pxeboot]# cd /var/lib/tftpboot/
[root@localhost tftpboot]# ls
initrd.img  pxelinux.0  vmlinuz
[root@localhost tftpboot]# mkdir pxelinux.cfg
[root@localhost tftpboot]# cd pxelinux.cfg/
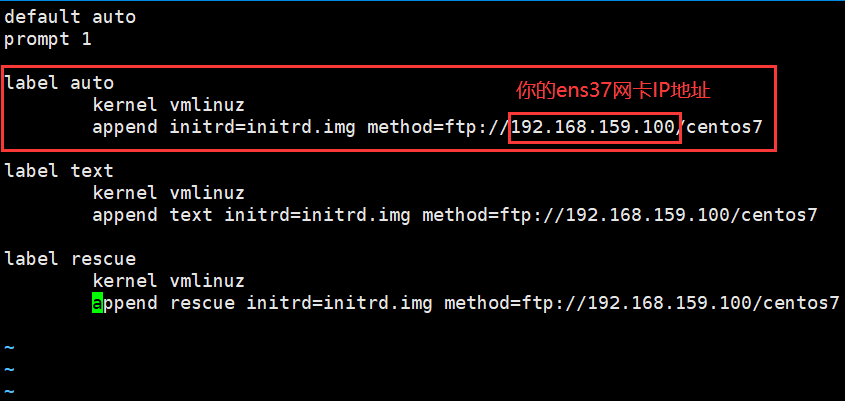
[root@localhost pxelinux.cfg]# vim default
default auto
prompt 1

label auto
        kernel vmlinuz
        append initrd=initrd.img method=ftp://192.168.159.100/centos7

label text
        kernel vmlinuz
        append text initrd=initrd.img method=ftp://192.168.159.100/centos7

label rescue
        kernel vmlinuz
        append rescue initrd=initrd.img method=ftp://192.168.159.100/centos7

#重启服务和关闭防火墙
[root@localhost pxelinux.cfg]# systemctl stop firewalld.service
[root@localhost pxelinux.cfg]# systemctl start dhcpd
[root@localhost pxelinux.cfg]# systemctl start tftp
[root@localhost pxelinux.cfg]# systemctl start vsftpd
[root@localhost pxelinux.cfg]# setenforce 0
4、新建一个虚拟机,测试PXE装机:
注意:新建虚拟机的内存要大于2G,网卡为仅主机模式。


实现kickstart 无人值守安装:
kickstart文件主要包括三个部分:命令段,程序包段,脚本段;
#安装图形化工具
[root@localhost ~]# yum install system-config-kickstart -y

在没安装图形化工具之前是没有kickstart的工具;如图:

安装后有了图形化工具,接下来我们对图形化工具进行设置:

1、基本配置:

2、安装方法:

3、引导装载程序:

4、分区信息:

添加分区布局:


5、配置网卡:(添加ens33网卡)

6、验证和防火墙设置:(防火墙全部禁用)


7、预安装脚本和安装后脚本:


8、保存配置到文件系统的 /var/ftp 下:


9、回到命令行界面添加配置文件:
#cd 到 /var/ftp下,查看fs.cfg文件
[root@localhost ~]# cd /var/ftp
[root@localhost ftp]# ls
centos7  ks.cfg  pub
[root@localhost ftp]# vim ks.cfg

#回到家目录,查看anaconda-ks.cfg文件
[root@localhost ~]# ls
anaconda-ks.cfg       公共  视频  文档  音乐
initial-setup-ks.cfg  模板  图片  下载  桌面
[root@localhost ~]# vim anaconda-ks.cfg

#复制这些包到 /var/ftp/ks.cfg下
%packages
@^gnome-desktop-environment
@base
@core
@desktop-debugging
@dial-up
@directory-client
@fonts
@gnome-apps
@gnome-desktop
@guest-agents
@guest-desktop-agents
@input-methods
@internet-browser
@java-platform
@multimedia
@network-file-system-client
@networkmanager-submodules
@print-client
@x11
chrony
kexec-tools

%end

#接下来到 /var/lib/tftpboot/ 下的 default 文件中修改配置
[root@localhost ftp]# cd /var/lib/tftpboot/
[root@localhost tftpboot]# ls
initrd.img  pxelinux.0  pxelinux.cfg  vmlinuz
[root@localhost tftpboot]# cd pxelinux.cfg/
[root@localhost pxelinux.cfg]# ls
default
[root@localhost pxelinux.cfg]# vim default
label auto
        kernel vmlinuz
        append initrd=initrd.img method=ftp://192.168.159.100/centos7 ks=ft
p://192.168.159.100/ks.cfg     #将应答文件 位置指明
10、实现批量自动装机:
新建虚拟机,注意内存大于2G,网卡为仅主机模式;


接下来只需安静的喝杯咖啡,静静的等待即可,一切都交给PXE工具;

到这里我们PXE工具批量网络装机完成。

总结:
实验要多动手做,才会印象深刻,光看和听实际效果不大,不要害怕困难,哪怕实验三四次都出不来结果,但还是要坚持做下去,要细心和要有耐心,实验结果一定会出来。
俗话说:世上无难事,只怕有心人。
更多推荐
 已为社区贡献12条内容


所有评论(0)