华为云PaaS平台微服务治理8Mesher
8Mesher8.1微服务落地困难随着互联网、移动互联网的发展,微服务在国内从2015年兴起,2017/2018微服务热度很高,因为它解决了企业的实际问题,企业将一个系统的业务处理拆分成一个一个微小的服务,服务与服务之间的耦合度非常低,大大提高了系统开发的生产力,借助云计算的能力,可自动化管理微服务开发、容器化部署、监控,并完在服务容错、限流、降低等微服务治理。当前很多传统企业...
8Mesher
8.1微服务落地困难
随着互联网、移动互联网的发展,微服务在国内从2015年兴起,2017/2018微服务热度很高,因为它解决了企业的实际问题,企业将一个系统的业务处理拆分成一个一个微小的服务,服务与服务之间的耦合度非常低,大大提高 了系统开发的生产力,借助云计算的能力,可自动化管理微服务开发、容器化部署、监控,并完在服务容错、限 流、降低等微服务治理。
当前很多传统企业慢慢向互联网技术转型,其中微服务就是技术转型的核心,微服务在落地时遇到了很大的困难! 微服务落地是什么意思?
微服务落地就是企业的软件系统采用微服务技术构建,开发成为云原生应用。
什么是云原生(Cloud Native)应用?
CNCF是一个开源Linux基金会(https://www.cncf.io/),它致力于推进云端原生应用和服务的开发,由CNCF孵化 的项目目前达到20多个,其中包括当前热门的Kubernetes、Prometheus等;CNCF的成员包括:google、IBM、英特尔、阿里巴巴、华为、思科、Docker、eBay、红帽等一百多家。
CNCF定义的云原生应用包括以下特征:
1、面向微服务:面向微服务开发、测试、运维。
2、容器化封装:在容器中运行应用程序,并作为应用程序部署的独立单元,最终应用程序运行在公有云或私有云 中。
3、自动化管理:使用自动化的管理平台对容器部署、运维进行统一调度,提高系统的资源利用率,降低运维成 本。
传统企业微服务落地困难的原因有哪些?
1、技术门槛高
当前流行的微服务框架的技术门槛过高,如SpringCloud,SpringCloud出于名门望族的Spring家族,如果要使用Spring Cloud构建微服务需要掌握Zuul、Hystrix、Ribbon、Feign、Eureka、Zipkin、Turbine等组件,并且需要深入学习每个组件的特性,对于一个新手来说需要投入的学习成本是很高的。
2、缺人才
传统企业中缺乏互联网技术人才,比如:他们对微服务、容器等知识匮乏,这就是微服务落地难的最大问题。
3、旧系统改造困难
对于老系统改造为微服务方式存在问题,老系统开发语言多种多样,如果采用统一的微服务框架重新开发则成本巨 大。
面对以上问题企业如何构建微服务系统?
1、对员工进行技术培训。
成本高。
2、挖人
互联网公司做事的态度,财大气粗,你呢?
3、外包
将软件项目外包给第三方的微服务开发团队。这个项目做完,下一个项目呢?
8.2Service Mesh
8.2.1什么是Service Mesh
要彻底解决微服务落地的问题需要转换思路,Service Mesh给出了答案,Service Mesh翻译为“服务网格”,它是一种微服务开发的理念。
微服务开发要支持代码0侵入则可大大降低了微服务开发的难度,提高微服务落地的速度,即不必使用统一的微服 务框架进行开发,对于一些老系统不论开发语言是什么0代码侵入则可以改为微服务。
Service Mesh采用Sidecar模式,由一系列轻量级的网络代理组成,Sidecar翻译为边车模式,可以想象为在摩托车旁边加装座椅,如下图:
加装了坐骑此摩托车的功能就增强了,开车的人专心开车,坐车的人可以专心照相,欣赏风景。
Sidecar在Service Mesh中如何应用?
下边是一个服务消费方采用service mesh的例子: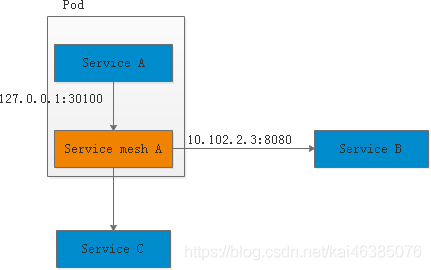
Service Mesh与Service A处于同一个Pod,Pod是Kubernetes中的概念,pod是一个容器环境下的“逻辑主机”,上图说明Service Mesh与Service A处于同一个主机,Service Mesh与Service A通过127.0.0.1本地地址通信。
上图Service A请求Service B的流程如下:
1、service A请求Service mesh A。
2、Service mesh A请求Service mesh B。
3、Service mesh A请求Service mesh C。
下边是一个服务提供方采用service mesh的例子: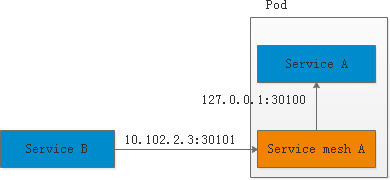
下边是一个服务消费方请求服务提供方都采用service mesh的例子:
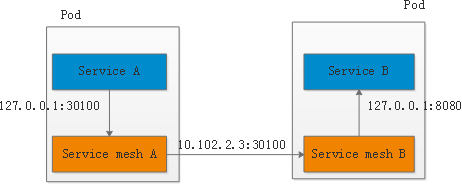
上图Service A请求Service B的流程如下:
1、service A请求Service mesh A。
2、Service mesh A请求Service mesh B。
3、Service mesh B 请求 Service B。
Service Mesh作为TCP/IP之上的一个抽象层,微服务只负责业务逻辑,Sidecar来负责微服务的通信、容错、限流、降低等功能,Sidecar就是把微服务层面的功能抽取了出来,应用程序之间通过Service Mesh进行通信,如下图:
Service Mesh翻译为“服务网格”,Willian Morgan(Linkerd的CEO)对Service Mesh的定义是:Service Mesh是一个基础设施层,用于处理服务间通信。云原生应用有着复杂的服务拓扑,Service Mesh保证请求可以在这些拓扑中可靠地传输。在实际应用当中,Service Mesh 通常是由一系列轻量级的网络代理组成的,它们与应用程序部署在一起,但应用程序不需要知道它们的存在。
当该Sidecar在微服务中大量部署时,这些 sidecar 节点自然就形成了一个网格: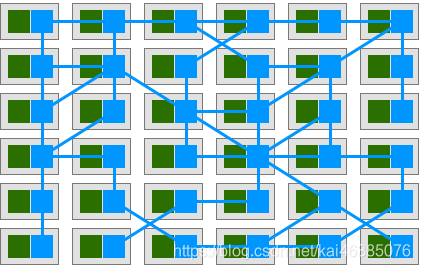
为什么要使用Service Mesh:
1、作为基础设施层,抽取微服务通信、治理功能。
2、老系统0代码侵入改造为微服务。
3、Service Mesh负责微服务通信、治理功能,这样微服务专注业务开发。
8.2.2Service Mesh发展
业界将Spring Cloud称为第一代微服务技术,即侵入式微服务框架,将Service Mesh称为下一代的微服务技术。
Service Mesh起源于2016年,2017年越来越多的企业开始知道Service Mesh,业界将2018年称为Service Mesh元年,预示着Service Mesh将从2018年开始发展。
Service Mesh发展至今已有如下开源项目:
Linkerd 、Envoy、 Istio 、Conduit、华为mesher、新浪Motan Mesh。
8.2Mesher介绍
Mesher是华为公司自研的Service Mesh的具体实现,它是一个轻量的代理服务,以Sidecar的模式与微服务一起运行,使用Mesher可以实现异构系统快速改为微服务,成为云原生应用。
Mesher 属于微服务引擎CSE的一个组件,Mesher在CSE中的结构图如下: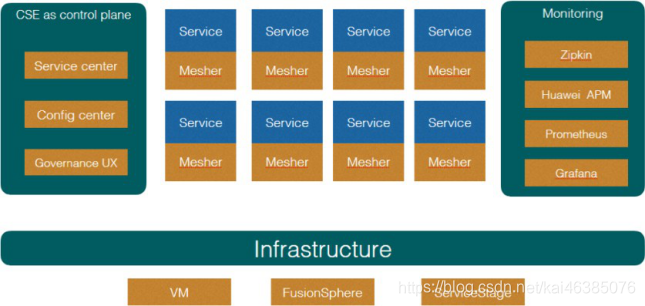
Mesher是L7层协议代理,Mesher以Sidecar模式运行在应用所在的Pod内,与Pod共享网络与存储:
1.Pod中的应用使用Mesher作为http代理,可以自动发现其他服务。
2.Mesher会代替Pod中的应用向注册中心注册应用相关信息,以便让其他应用发现。
发起一次网络请求的过程中存在微服务消费者和提供者,场景如下: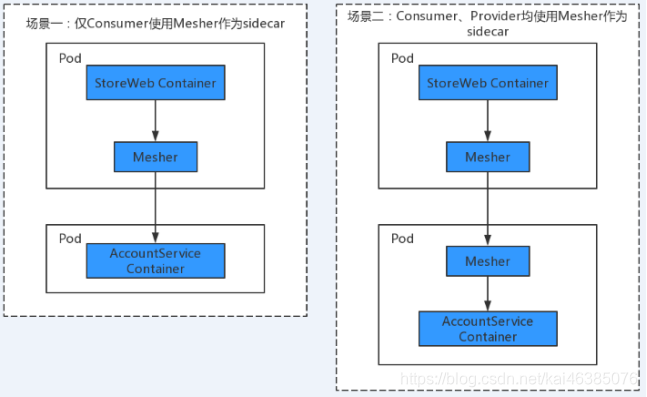
1、场景一:
仅消费者使用Mesher作为Sidecar。
提供者需要自己实现服务注册发现,或者使用Java或GO chassis开发框架,否则无法发现AccountService。应用间的网络请求如下:
Store web -> Mesher -> Account service 2、场景二:
消费者提供者均使用Mesher作为Sidecar。
此场景无需再使用微服务开发框架。应用间的网络请求如下:
Store web -> Mesher -> Mesher -> Account service 3、场景三:
仅提供者使用Mesher作为SideCar
消费者采用CSE微服务框架开发,通过mesher请求服务提供者。 应用间的网络请求如下:
Store web -> Mesher -> Account service
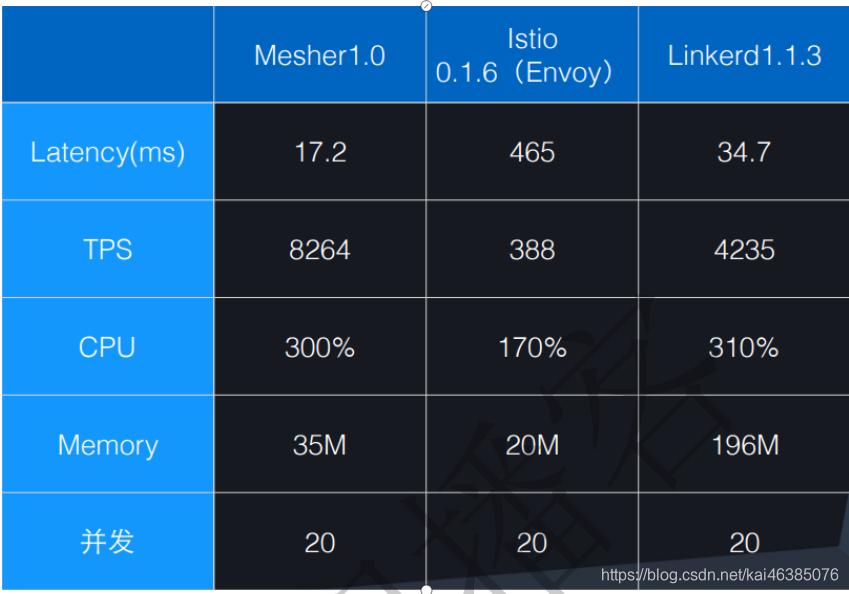
Mesher性能如何?
Mesher与Istio、Linkerd性能对比如下:
与普通服务的性能对比:
	使用前	使用后
TPS	1749	1496
Latency	2.8ms	3.34ms
CPU	50%	100%
Concurrency	5	5
为什么使用了Mesher比普通服务的性能低还这么流行?
相比微服务开发、运维的成本来说这点性能损耗是可以接受的!
8.3快速体验
8.3.1功能介绍
将weathermap的web前端weathermapweb工程接入CSE,weathermapweb前端基于Node.js运行,没有采用 CSE开发框架,如果要将weathermapweb接入CSE可以使用mesher来实现,通过mesher接入CSE后weathermapweb就可以调用CSE中的微服务,如下图: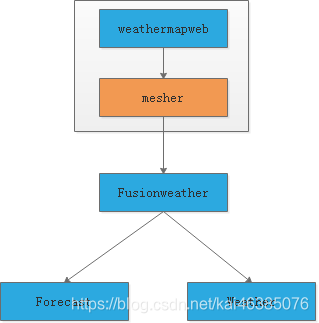
weathermapweb通过mesher向CSE服务注册中心进行注册,并通过mesher调用服务中心的微服务。
8.3.2环境准备
下载mesher,进入应用开发–》微服务开发–》工具下载界面,下载mesher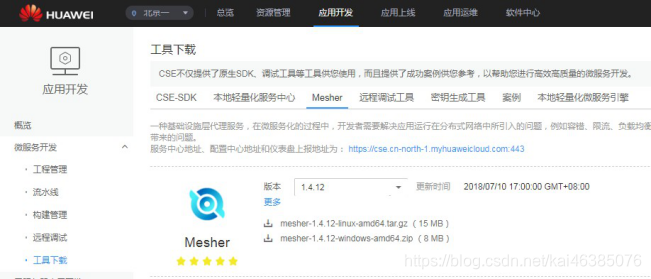
本教程使用1.4.12版本,链接如下:
https://cse-bucket.obs.myhwclouds.com/Mesher/mesher-1.4.12-windows-amd64.zip
1.解压Mesher安装包。
2.配置服务监听和服务发布地址。
打开conf/chassis.yaml文件,修改地址。
listenAddress配置为:{本机实际IP地址}:30101
‐‐‐ cse:
service:
registry:
address: https://cse.cn‐north‐1.myhuaweicloud.com # uri of service center scope: full #set full to be able to discover other app's service
watch: false # set if you want to watch instance change event
autoIPIndex: true # set to true if u want to resolve source IP to microservice api:
version: config:
client:
serverUri: https://cse.cn‐north‐1.myhuaweicloud.com #uri of config center refreshMode: 1 # 1: only pull config. 2: watch config change events refreshInterval: 30 # unit is second
autodiscovery: false api:
version: protocols:
http:
listenAddress: 192.168.1.104:30101
3、配置AK/SK。
打开conf/auth.yaml文件进行配置AK/SK
## Huawei Public Cloud ak/sk cse:
credentials:
accessKey: 9AKR38RXJG48XMDDIUUA
secretKey: 2MEIV4VhNzRausA3tLOsN1s7nWw66SSp9hVXBJrl project:
akskCustomCipher: default #used to decrypt sk when it is encrypted
4、打开conf目录下的microservice.yaml文件,修改用于描述微服务的信息,配置如下:
APPLICATION_ID修改为weathermap。
service_description.name修改为weathermapweb,该名字将作为Mesh注册到weathermap应用中的服务 名。
其他内容不作修改。
APPLICATION_ID: weathermap service_description:
name: weathermapweb
version: 0.0.1 properties:
allowCrossApp: true
5、启动Mesher的start.bat。
6、进入前台“应用开发 > 微服务管理 > 服务目录”页面查看,可以看到名为weathermapweb微服务,其“所属应用”为weathermap。
8.3.3weathermapweb接入CSE
1、修改weathermap-1.0.0/weathermapweb/routes/目录下的weathermapweb.js文件。 修改端口号为Mesh监听端口,即30101。
将原来的IP:Port替换为fusionweather服务名,通过mesher请求微服务通过服务名进行请求。
其他内容不作修改。
示例如下:
router.get('/', function (req, res, next) {
var proxy_host = process.env.HTTP_PROXY_HOST || '127.0.0.1'; var proxy_port = process.env.HTTP_PROXY_PORT || '30101'; console.log(proxy_host + ':' + proxy_port); console.log(req.query.city + ", " + req.query.type);
var opt = {
host: proxy_host, port: proxy_port, method: 'GET',
path: 'http://fusionweather/fusionweather/show?city=' + req.query.city, headers: {}
};
2、在weathermapweb目录下启动startup.bat。
3、访问http://localhost:3000/,即可看到天气预报界面。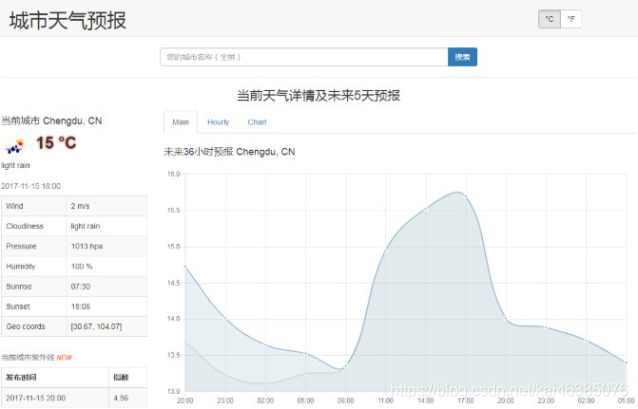
4、在“应用开发 > 微服务管理 > 服务治理”页面也可以看到weathermapweb与Fusionweather之间的调用关系。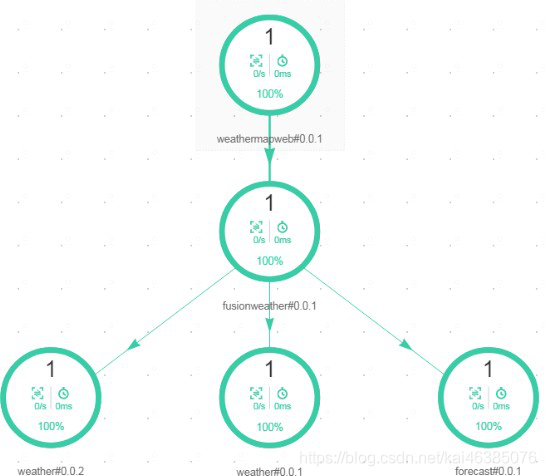
8.4mesher研究
8.4.1mesher作为消费方
8.4.1.1方法介绍
本章节测试mesher的场景一,即mesher作为消费者调用其它微服务(提供者),如下图: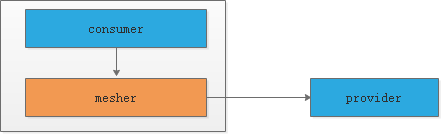
mesher作为消费者调用其它微服务的流程如下:
1、consumer将请求发给mesher,请求地址为 “http://微服务名称/url”
2、mesher从服务注册中心查找provider微服务信息
3、mesher调用微服务provider
4、mesher将调用provider的结果返回给consumer
mesher作为消费者调用其它微服务的实现步骤如下: 1、在消费方设置http代理
通过代理发起Http请求,代理地址为mesher的地址(本机地址)
2、通过服务名消费服务
将原来的通过IP:Port请求方式改为 通过服务名请求。
8.4.1.2服务提供方
服务提供方使用学成在线 的portalview服务。项目介绍略。
8.4.1.3服务消费方
本章节编写一个消费客户端用于通过mesher请求微服务,本客户端使用springBoot开发,不使用微服务框架, 创建服务消费方工程:
1、pom.xml
<?xml version="1.0" encoding="UTF‐8"?>
<project xmlns="http://maven.apache.org/POM/4.0.0" xmlns:xsi="http://www.w3.org/2001/XMLSchema‐instance" xsi:schemaLocation="http://maven.apache.org/POM/4.0.0 http://maven.apache.org/xsd/maven‐
4.0.0.xsd">
<modelVersion>4.0.0</modelVersion>
<groupId>com.xuecheng</groupId>
<artifactId>xc‐meshertest01‐consumer</artifactId>
<version>1.0‐SNAPSHOT</version>
<dependencies>
<dependency>
<groupId>org.springframework.boot</groupId>
<artifactId>spring‐boot‐starter‐web</artifactId>
</dependency>
<dependency>
<groupId>com.alibaba</groupId>
<artifactId>fastjson</artifactId>
<version>1.2.30</version>
</dependency>
</dependencies>
<dependencyManagement>
<dependencies>
<dependency>
<groupId>org.springframework.boot</groupId>
<artifactId>spring‐boot‐dependencies</artifactId>
<version>1.5.9.RELEASE</version>
<type>pom</type>
<scope>import</scope>
</dependency>
</dependencies>
</dependencyManagement>
</project>
2、application.yml
server:
port: ${PORT:40000}
context‐path: / spring:
application:
name: xc‐meshertest01‐consumer
3、启动类
package com.xuecheng.meshertest;

import org.springframework.boot.SpringApplication;
import org.springframework.boot.autoconfigure.SpringBootApplication; import org.springframework.context.annotation.Bean;
import org.springframework.http.client.SimpleClientHttpRequestFactory; import org.springframework.web.client.RestTemplate;

import java.net.InetSocketAddress; import java.net.Proxy;
import java.net.SocketAddress;

@SpringBootApplication public class ConsumerMain {
public static void main(String[] args) { SpringApplication.run(ConsumerMain.class, args);
}

}
4、controller
package com.xuecheng.meshertest.controller;

import org.springframework.beans.factory.annotation.Autowired; import org.springframework.web.bind.annotation.GetMapping; import org.springframework.web.bind.annotation.RequestParam; import org.springframework.web.bind.annotation.RestController; import org.springframework.web.client.RestTemplate;

@RestController
public class ConsumerController {

@GetMapping("/query")
public Object query(@RequestParam("id") String id) { return null;
}
}
8.4.1.4mesher配置
1、配置服务监听和服务发布地址。配置方法同 快速体验。
2、配置AK/SK。
配置方法同 快速体验。
3、打开conf目录下的microservice.yaml文件,修改用于描述微服务的信息,配置如下:
APPLICATION_ID: xc‐edu‐cloud1.0 service_description:
name: xc‐meshertest01‐consumer version: 0.0.1
properties: allowCrossApp: true
8.4.1.5通过mesher消费
目前服务消费方只能通过IP和端口的方式调用CSE中的微服务,其实是没有通过服务注册中心取微服务,消费过程无法参与微服务治理,通过mesher进行消费则可以以服务名方式调用微服务,并且可以使用CSE微服务治理的功能。
1、配置Http代理
本项目使用RestTemplate 发起Http请求,基于RestTemplate配置http代理如下: 在启动类中定义RestTemplate
@Bean
public RestTemplate restTemplate(SimpleClientHttpRequestFactory httpClientFactory) { return new RestTemplate(httpClientFactory);
}
@Bean
public SimpleClientHttpRequestFactory httpClientFactory() {
SimpleClientHttpRequestFactory httpRequestFactory = new SimpleClientHttpRequestFactory(); SocketAddress address = new InetSocketAddress("127.0.0.1", 30101);
Proxy proxy = new Proxy(Proxy.Type.HTTP, address); httpRequestFactory.setProxy(proxy);

return httpRequestFactory;
}
2、通过服务名消费服务
@RestController
public class ConsumerController {

@Autowired
RestTemplate restTemplate;

@GetMapping("/query")
public Object query(@RequestParam("id") String id) {
String url = "http://xc‐service‐portalview/portalview/course/get/"+id; Object body = restTemplate.getForEntity(url,Object.class).getBody(); return body;
}
}
8.4.1.6测试
通过postman发起get请求:http://localhost:40000/query?id=4028e581617f945f01617f9dabc40000
8.4.2mesher作为提供方
8.4.2.1方法介绍
本章节测试mesher的场景三,即mesher作为提供者被其它微服务调用,如下图: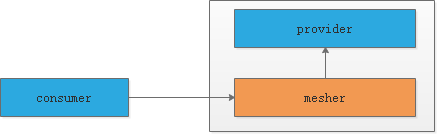
mesher作为提供者被其它微服务调用的流程如下: 注意:这里的consumer使用CSE框架开发。
1、consumer请求 “cse://微服务名称/url”
2、consumer从服务注册中心查找provider微服务信息,找到了mesher的地址 3、consumer调用mesher
4、mesher调用provider
5、mesher将调用provider的结果返回给consumer
mesher作为提供者被其它微服务调用的步骤如下:
1、consumer是CSE微服务,调用微服务请求“cse://微服务名称/url”地址
2、mesher监听本地服务提供方的地址,设置环境变量 SPECIFIC_ADDR=127.0.0.1:本地服务端口
3、编写本地服务提供方的契约
8.4.2.2服务提供方
服务提供方未使用微服务框架,需要使用mesher接入CSE。
服务提供方代码在上一章节的服务消费方工程中编写,创建ProviderController如下:
@RestController @RequestMapping("/")
public class ProviderController {

@GetMapping(value="/hello",produces = "application/json;charset=utf‐8") public String query(@RequestParam("id") String id) {

return "{\"id\":\""+id+"\"}";
}
}
8.4.2.3服务消费方
服务消费方使用学成在线的portalview工程,编写一个测试方法如下:
@RequestMapping("/portalview/consumer") @RestSchema(schemaId = "consumer") public class ConsumerController {

private final RestTemplate restTemplate = RestTemplateBuilder.create();

@GetMapping("/get/{id}")
public String consumer(@PathVariable("id") String id) {
String url = "cse://xc‐meshertest01‐consumer/hello?id="+id;

final Object result = restTemplate.exchange(url, HttpMethod.GET,null,Object.class).getBody();
return result.toString();
}
}
8.4.2.4mesher配置
1、mesher监听本地服务提供方的地址,在mesher目录下的“start.bat”中设置环境变量SPECIFIC_ADDR=127.0.0.1:40000
@echo off
SET SPECIFIC_ADDR=127.0.0.1:40000
start /B /WAIT mesher.exe pause
2、配置微服务的信息
打开conf目录下的microservice.yaml文件,修改用于描述微服务的信息,配置如下:
APPLICATION_ID: xc‐edu‐cloud1.0 service_description:
name: xc‐meshertest01‐consumer version: 0.0.1
properties: allowCrossApp: true
3、编写契约
mesher作为服务提供方需要为服务提供方编写契约,契约格式采用OpenApi规范,下边是/hello的契约:
swagger: '2.0' info:
title: consumer version: 1.0.0
basePath: / produces:
‐ application/json

paths:
/hello:
get:
operationId: "hello" produces:
‐"application/json" parameters:
‐name: "id" in: "query"
required: false type: "string"
responses:
200:
description: "response of 200" schema:
type: "object"
将契约内容以mesher代理的微服务名称命名,并保存在mesher目录下的 conf/微服务名/schema/下。比如:本教程设置的mesher代理的微服务名称为 xc-meshertest01-consumer,则此契约文件保存在: onf\xc-meshertest01-consumer\schema下,契约文件名为:xc-meshertest01-consumer.yaml
8.4.2.5通过mesher消费
由于本例子消费方采用CSE框架实现微服务,所以可以直接采用CSE调用微服务方法,如下:
@RequestMapping("/portalview/consumer") @RestSchema(schemaId = "consumer") public class ConsumerController {

private final RestTemplate restTemplate = RestTemplateBuilder.create();

@GetMapping("/get/{id}")
public String consumer(@PathVariable("id") String id) {
String url = "cse://xc‐meshertest01‐consumer/hello?id="+id;

final Object result = restTemplate.exchange(url, HttpMethod.GET,null,Object.class).getBody();
return result.toString();
}
}
8.4.2.6测试
请求portalview的消费方法:
get:http://localhost:40200/portalview/consumer/get/fd
8.5学成在线使用mesher
8.5.1需求分析
本章节使用mesher接入学成在线令牌系统,此令牌系统使用Java开发,没有采用CSE开发,此系统基于Spring Security开发考虑改造微服务框架的成本决定采用mesher接入认证系统,认证系统与其它微服务的关系如下: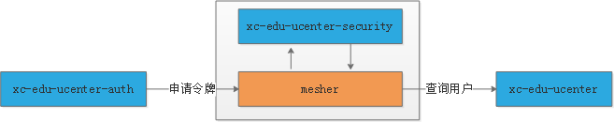
1、微服务介绍
xc-edu-ucenter-auth:认证系统,采用serviceComb开发。
xc-edu-ucenter-security: 令牌系统,非微服务框架开发,使用mesher接入cse。
xc-edu-ucenter:用户中心服务,提供用户信息管理、查询功能。 2、认证流程
1)用户登录,输入账号和密码
2)请求xc-edu-ucenter-auth,校验账号和密码
3)xc-edu-ucenter-auth请求xc-edu-ucenter-security申请令牌4)xc-edu-ucenter-security请求xc-edu-ucenter查询用户信息。
3、mesher接入分析
根据上边的流程涉及到mesher交互的业务如下:
1)xc-edu-ucenter-auth请求xc-edu-ucenter-security申请令牌
微服务xc-edu-ucenter-auth是通过mesher请求xc-edu-ucenter-security
2)xc-edu-ucenter-security请求xc-edu-ucenter查询用户信息。
xc-edu-ucenter-security是通过mesher请求微服务xc-edu-ucenter。 4、目标
通过本次xc-edu-ucenter-security接入CSE,可以学习到mesher作为服务消费方及服务提供方的开发方法。
8.5.2导入工程
解压“资料”-》“学成在线”-》xc-edu-ucenter.zip,将解压得到的xc-edu-ucenter-auth、xc-edu-ucenter-security、
xc-edu-ucenter三个工程导入IDEA,导入成功如下图: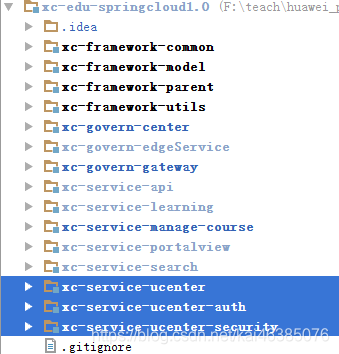
8.5.3mesher配置
本次测试在本地运行mesher,将服务向公网云平台服务中心注册。
8.5.3.1配置微服务信息
xc-edu-ucenter-security通过mesher向服务中心注册为微服务。 修改mesher目录下的"conf/microservice.yaml"文件
APPLICATION_ID: xc‐edu‐cloud1.0 service_description:
name: xc‐service‐security version: 1.0.0 properties:
allowCrossApp: true
8.5.3.2配置认证信息
配置ak/sk,作业向公网服务中心注册的凭证。
修改mesher目录下的"conf/auth.yaml"文件。注意:ak/sk需与自己账号匹配。
## Huawei Public Cloud ak/sk cse:
credentials:
accessKey: 9AKR38RXJG48XMDDIUUA
secretKey: 2MEIV4VhNzRausA3tLOsN1s7nWw66SSp9hVXBJrl project:
akskCustomCipher: default #used to decrypt sk when it is encrypted
8.5.3.3对接服务中心和配置中心
修改mesher目录下的"conf/chassis.yaml"文件
‐‐‐ cse:
protocols:
http:
listenAddress: 192.168.1.104:30101 service:
registry:
# address: http://127.0.0.1:30100 # uri of service center
address: https://cse.cn‐north‐1.myhuaweicloud.com # uri of service center scope: full #set full to be able to discover other app's service
watch: false # set if you want to watch instance change event
autoIPIndex: false # set to true if u want to resolve source IP to microservice config:
client:
serverUri: https://cse.cn‐north‐1.myhuaweicloud.com #uri of config center refreshMode: 1 # 1: only pull config.
refreshInterval: 30 # unit is second
8.5.4查询用户信息
8.5.4.1方法介绍
本章节实现xc-edu-ucenter-security是通过mesher请求微服务xc-edu-ucenter查询用户信息,即mesher作为服 务消费方的开发方法。
通过mesher调用微服务的方法如下:
1、设置http代理
xc-edu-ucenter-security发起的请求全部通过mesher,代理地址为mesher的地址(本机地址) 2、通过服务名请求
将原来的通过IP:Port请求方式改为 通过服务名请求。
8.5.4.2设置http代理
xc-edu-ucenter-security是通过RestTemplate发起http请求,这里向RestTemplate对象设置http代理地址,方法 如下:
在SpringBoot启动类中定义RestTemplate
@Bean
public RestTemplate restTemplate(SimpleClientHttpRequestFactory httpClientFactory) { return new RestTemplate(httpClientFactory);
}

@Bean
public SimpleClientHttpRequestFactory httpClientFactory() { SimpleClientHttpRequestFactory httpRequestFactory = new
SimpleClientHttpRequestFactory();
SocketAddress address = new InetSocketAddress("127.0.0.1", 30101); Proxy proxy = new Proxy(Proxy.Type.HTTP, address); httpRequestFactory.setProxy(proxy);

return httpRequestFactory;
}
8.5.4.3通过服务名请求
修改原来的UserDetailsServiceImpl类,使用RestTemplate通过mesher代理请求xc-service-ucenter,代码如下:
@Service
public class UserDetailsServiceImpl implements UserDetailsService { @Autowired
RestTemplate restTemplate;
//	@Autowired
//	UserService userService;

@Override
public UserDetails loadUserByUsername(String username) throws UsernameNotFoundException { if (StringUtils.isEmpty(username)) {
return null;
}
Map<String,String> map = null;
String path = "http://xc‐service‐ucenter/ucenter/getuserext?username="+username; try {
Object result = restTemplate.exchange(path, HttpMethod.GET, null, Object.class).getBody();
map = (Map<String, String>) result;
} catch (Exception e) { e.printStackTrace(); return null;
}
if(map == null){ return null;
}
XcUserExt userext = new XcUserExt();

/**
{
"id": "49",
"username": "itcast",
"password": "$2a$10$TJ4TmCdK.X4wv/tCqHW14.w70U3CC33CeVncD3SLmyMXMknstqKRe", "salt": null,
"name": "test02",
"utype": "101002",
"birthday": null, "userpic": null, "sex": "1",
"email": "",
"phone": "12345",
"status": "1",
"createTime": "2018‐03‐07T08:27:47.000Z",
"updateTime": null,
*/ userext.setId(map.get("id"));
userext.setName(map.get("name")); userext.setUsername(map.get("username")); userext.setPassword(map.get("password"));
//		XcUserExt userext = userService.getUserExt(username); if(userext == null){
return null;
}
//取出正确密码(hash值)
String password = userext.getPassword();
//这里暂时使用静态密码
//	String password ="123";
//用户权限,这里暂时使用静态数据,最终会从数据库读取
//从数据库获取权限
List<XcMenu> permissions = userext.getPermissions(); if(permissions == null){
permissions = new ArrayList<>();
}
List<String> user_permission = new ArrayList<>(); permissions.forEach(item‐> user_permission.add(item.getCode()));
//	user_permission.add("course_get_baseinfo");
//	user_permission.add("course_find_pic");
String user_permission_string = StringUtils.join(user_permission.toArray(), ","); UserJwt userDetails = new UserJwt(username,
password, AuthorityUtils.commaSeparatedStringToAuthorityList(user_permission_string));
userDetails.setId(userext.getId()); userDetails.setUtype(userext.getUtype());//用户类型userDetails.setCompanyId(userext.getCompanyId());//所属企业userDetails.setName(userext.getName());//用户名称userDetails.setUserpic(userext.getUserpic());//用户头像
/* UserDetails userDetails = new org.springframework.security.core.userdetails.User(username,
password, AuthorityUtils.commaSeparatedStringToAuthorityList(""));*/
//	AuthorityUtils.createAuthorityList("course_get_baseinfo","course_get_list"));
return userDetails;
}
}
8.5.4.4测试
直接请求xc-edu-ucenter-security申请令牌的Url进行测试,观察通过mesher请求是否正常。
post:http://localhost:40401/oauth/token
参数如下:
grant_type:密码模式授权填写password username:账号
password:密码
并且此链接需要使用 http Basic认证。
8.5.5申请令牌
8.5.5.1方法介绍
本章节实现微服务xc-edu-ucenter-auth是通过mesher请求xc-edu-ucenter-security申请令牌,即mesher作为服 务提供方的开发方法。
mesher作为提供者被其它微服务调用的方法如下:
1、xc-edu-ucenter-auth调用微服务请求“cse://xc-edu-security/url”地址
2、mesher监听本地服务提供方的地址,设置环境变量 SPECIFIC_ADDR=127.0.0.1:40401
3、编写契约
8.5.5.2服务消费方
xc-edu-ucenter-auth调用微服务的方法修改为请求“cse://xc-edu-ucenter-security/url”地址
修改:com.xuecheng.auth.service.AuthService的public AuthToken applyToken(String username,String password,String clientId,String clientSecret)方法:
......
String path = "cse://xc‐service‐security/oauth/token"; Map<String,String> map = null;
Object obj = null;
RestTemplate restTemplate = RestTemplateBuilder.create(); try {
Object result = restTemplate.exchange(path, HttpMethod.POST,
new HttpEntity<MultiValueMap<String, String>>(formData, headers), Object.class).getBody();
System.out.println(result);
map = (Map<String, String>) result;
} catch (Exception e) {
LOGGER.error("request oauth_token_password error: {}",e.getMessage()); e.printStackTrace();
ExceptionCast.cast(AuthCode.AUTH_LOGIN_ERROR);
}
......
8.5.5.3mesher配置
1、mesher监听本地服务提供方的地址,在mesher目录下的“start.bat”中设置环境变量SPECIFIC_ADDR=127.0.0.1:40401
@echo off
SET SPECIFIC_ADDR=127.0.0.1:pause40401
start /B /WAIT mesher.exe
2、编写契约
mesher作为服务提供方需要为服务提供方编写契约,契约格式采用OpenApi规范,下边是/oauth/token的契约:
swagger: '2.0' info:
title: hello version: 1.0.0
basePath: / produces:
‐ application/json

paths:
/oauth/token:
post:
operationId: "postAccessToken" produces:
‐"application/json" parameters:
‐name: "grant_type" in: "formData" required: false type: "string"
‐name: "username" in: "formData" required: false type: "string"
‐name: "password" in: "formData" required: false type: "string"
responses:
200:
description: "response of 200" schema:
type: "object"
8.5.5.4测试
请求xc-edu-ucenter-auth的认证方法:Post http://localhost:40400/auth/userlogin
参 数 : username:账号password:密码

华为开发者空间,是为全球开发者打造的专属开发空间,汇聚了华为优质开发资源及工具,致力于让每一位开发者拥有一台云主机,基于华为根生态开发、创新。
更多推荐


 2
2 0
0- 0


 已为社区贡献2条内容

所有评论(0)