[SharePoint教程系列] 1.SharePoint 2016安装
SharePoint 2016安装标签(空格分隔): SharePoint2016 入门 安装本章我们将介绍如何安装配置一个最小的SharePoint 2016环境。供后续学习使用。要学习如何配置更复杂的环境。请参考后续 SharePoint进阶部分推荐使用使用虚拟环境Hyper-V###推荐使用Hyper-V,因为这是Windows自带的虚拟机软件,不需要再单独安装。我的Host主机选择的是Wi
SharePoint 2016安装
标签(空格分隔): SharePoint2016 入门 安装
本章我们将介绍如何安装配置一个最小的SharePoint 2016环境。供后续学习使用。
要学习如何配置更复杂的环境。请参考后续 SharePoint进阶部分
推荐使用使用虚拟环境Hyper-V###
推荐使用Hyper-V,因为这是Windows自带的虚拟机软件,不需要再单独安装。我的Host主机选择的是Windows 10 企业版。如果是家庭版,不具备Hyper-V功能。可以升级系统,或者改用其他虚拟软件。
使用之前,首先检查Hyper-V是否已经开启
-
打开控制面板,控制和功能

-
打开“启用或关闭Windows功能”

-
在Windows功能中找到“Hyper-V”,将其全部勾选,然后点击确定进行安装。

-
安装结束后,开始菜单搜索Hyper-V,可以找到Hyper-V控制台

也可以使用其他虚拟机也可以,例如VirtualBox。具体步骤这里不再详细介绍,这方面的资料比较容易查找
SharePoint 2016 的软硬件要求###
我们这里安装的是SharePoint 2016测试环境,最简单的SharePoint Server 2016环境包含3台服务器,1台为域控服务器(DC,Domain Controler),负责提供域管理,DNS管理等服务。1台为SharePoint服务器,安装数据库和SharePoint服务器。还有一台为客户端测试机,安装客户端软件,例如Office以供测试使用。域控和SharePoint服务器使用Windows Server服务器,这里使用Windows Server 2016。客户端机器使用Windows 10,安装Office 2016。
我们这个场环境的结构如下所示:
![![image_1ca5urrgf1pu0s9r28s1c9f1vli9.png-32.6kB][5]](https://i-blog.csdnimg.cn/blog_migrate/ca9edfe6a4133a6b360fddb3cdea7039.png#pic_center)
同时,所有服务器需要处于一个本地域中,同时所有服务器还需要方便的连接互联网。因此我们在测试环境中每台机器有2个网卡,连接2个网络,1个为Private网络,负责本地域内通信。1个为外部网,用于连接互联网。Private网络对外不开放,不支持连接互联网。IP地址范围192.168.1.1/24。DNS为域控。
修改后的场结构如下:
![![image_1ca5vdvflqg46p1k38gqpvsjm.png-49.9kB][6]](https://i-blog.csdnimg.cn/blog_migrate/2fe14d46316c28b48d5afcf2c23b070d.png#pic_center)
-
DC的硬件需求1:
DC只需要满足Windows Server 2016的基本需求即可,其任务不重。不需要分配太多。- 处理器:1.4GHz 64位处理器
- 内存:最低2GB。推荐4GB
- 硬盘空间:至少32GB,推荐分配40GB或者更多
-
SQL Server的软硬件需求2
硬件
- 处理器:1.4GHz,推荐2.0GHz
- 内存:1GB,推荐4GB以及上
- 硬盘空间:6GB
软件
- .net framwork 3.5 SP1 4.0
- 网络连接
- PowerShell
- 推荐Windows Server 2012 R2或2016
至少2008 SP2 Web版本以上
-
SharePoint Server的软硬件需求3:
硬件
- 内存:16GB
- 处理器:64位 4核
- 硬盘空间: 系统盘80GB
其他盘100GB
软件
数据库服务器最低要求:
- Microsoft SQL Server 2014 Service Pack 1 (SP1) 的 64 位版本
- Microsoft SQL Server 2016 RTM
Windows操作系统最低要求:
Microsoft SharePoint 产品准备工具会为服务器场中的前端 Web 服务器和应用程序服务器安装以下必备软件:
- Microsoft .NET Framework 4.6 版
- Microsoft SQL Server 2012 Service Pack 1 Native Client
- Microsoft WCF Data Services 5.6
- Microsoft Information Protection and Control 客户端 (MSIPC)
- Microsoft Sync Framework Runtime v1.0 SP1 (x64)
- Windows Server AppFabric 1.1
- Microsoft AppFabric 1.1 for Windows Server 累积更新包 7 (KB 3092423)
- Microsoft ODBC Driver 11 for SQL Server
- 适用于 Visual Studio 2012 的Visual C++ 可再发行组件包
- 适用于 Visual Studio 2015 的Visual C++ 可再发行组件包
Microsoft SharePoint 产品准备工具可以安装以上必备软件。其中某些必备软件需要下载,请确保具有 Internet 连接。
整合SQL Server和SharePoint Server需求,本次安装SharePoint服务器推荐设置
硬件
- 处理器:64位 4核
- 内存:16GB
- 硬盘:系统盘80GB
其他盘 100GB
软件
- Windows Server 2016 Datacenter
- SharePoint预支条件
- 客户端测试机的软硬件需求4
这里以Windows 10+Office 2016 MSI版本 64位(非Office365)为准,另如果使用虚拟机且Host主机可以访问虚拟机,则可以省略客户端测试机,而使用Host主机做测试机。
- 处理器:至少1Ghz
- 内存:至少4GB
- 硬盘空间:至少23GB,建议30或40GB
关于其他应用场景的软硬件需求,可以参照如下链接
https://technet.microsoft.com/en-us/library/cc262485(v=office.16).aspx
小结:
-
DC
处理器:1.4GHz 64位处理器 >* 内存:最低2GB。推荐4GB >* 硬盘空间:至少32GB,推荐分配40GB或者更多 -
SharePoint
- 处理器:64位 4核
- 内存:16GB
- 硬盘:系统盘80GB
其他盘 100GB - Windows Server 2016 Datacenter
- SharePoint预支条件
-
客户端
- 处理器:至少1Ghz
- 内存:至少4GB
- 硬盘空间:至少23GB,建议30或40GB
主要步骤
安装SharePoint 2016 主要可以分成以下几步:
1. 配置Hyper-V
首先在Hyper-V中新建2个虚拟交换机,1个内部交换机,对应Private网络。1个外部交换机,对应外部网络。
-
打开Hyper-V管理器
-
右上角 虚拟交换机管理器
![![image_1ca5vh8uda5tjrg1jak13j019ds13.png-17.9kB][7]](https://i-blog.csdnimg.cn/blog_migrate/cf9dd6f6290a7ce03e96eb770a8445d9.png#pic_center)
-
“新建虚拟网络交换机”,选择“内部”,点击“创建虚拟交换机”


-
输入名字“InternalNetwork",其他不变,点击“应用”,点击“确定”
![![image_1ca618lfdoul9lr1oege3kvj52a.png-39.9kB][9]](https://i-blog.csdnimg.cn/blog_migrate/83130743c1f1be83372a7fd1fa5ac41a.png#pic_center)
-
再次打开 虚拟交换机管理器,可以看到刚建立的InternalNetwork
![![image_1ca61afjc464a2a14381jhi1ct334.png-8.3kB][10]](https://i-blog.csdnimg.cn/blog_migrate/4a92615a060d783e3ddfb06e804d9752.png#pic_center)
同样的步骤,建立外部网络 虚拟交换机,步骤3时选择外部,步骤4时显示如下

其中外部网络选择最常用的网卡
点击确定后会弹出如下对话框,点击确定
![![image_1ca61cgr718gc8fd1l6o1l4i1gtn3h.png-36.9kB][11]](https://i-blog.csdnimg.cn/blog_migrate/7ef7110a0a155989a9db012051e83cdd.png#pic_center)
2. 建立所需虚拟机
-
新建虚拟机
![![image_1ca61ifjall1aua3ca1f4e8pb4o.png-9.9kB][13]](https://i-blog.csdnimg.cn/blog_migrate/ff1b0e1c9d504fba267cb9bc8d253d85.png#pic_center)
-
输入名字 “DC”
![![image_1ca61gua51p5k1rmi13sk1cdpobc4b.png-33.4kB][14]](https://i-blog.csdnimg.cn/blog_migrate/26fafddba71fe3d72db9a2976b4c1826.png#pic_center)
-
选择虚拟机代数“Generation 1"即可
![![image_1ca61m9jh1nck6cp4lki33cdf5i.png-24.6kB][15]](https://i-blog.csdnimg.cn/blog_migrate/b80f9f24e5ef222534df0e91fd1618f3.png#pic_center)
-
内存分配4000MB,使用动态内存
![![image_1ca61nb4s1stt1oku7b07cp15ej5v.png-22.8kB][16]](https://i-blog.csdnimg.cn/blog_migrate/007476e89f27419f05a5cb73883fdcbe.png#pic_center)
-
网络选择InternalNetwork为第一张网卡
![![image_1ca61p3c4cr410sl174m1dok150q6c.png-15.6kB][17]](https://i-blog.csdnimg.cn/blog_migrate/f5aa7b876ed8fc0a050dd95635f5f8ba.png#pic_center)
-
硬盘大小为40GB,动态大小。位置可以修改,也可以不改
![![image_1ca61qpbm1eqit6l198e9km1hes6p.png-46.5kB][18]](https://i-blog.csdnimg.cn/blog_migrate/559f63dc3fd9a31044b5bfff52aa5569.png#pic_center)
-
安装选项根据实际情况选择,我这里是有操作系统iso镜像,因此选择使用本地镜像。
![![image_1ca61sftic98n2cvhd1p9812f676.png-39.1kB][19]](https://i-blog.csdnimg.cn/blog_migrate/70d026db8c2a358ebd8fe18ac9f7a73f.png#pic_center)
-
点击下一步,点击完成,创建虚拟机
![![image_1ca61uee8188lt3tq061f8db527j.png-8.9kB][20]](https://i-blog.csdnimg.cn/blog_migrate/0b71cc41981b87b321f5fea13c0a8df9.png#pic_center)
-
选中虚拟机,右键->设置
![![image_1ca61vo971oem1ufv1ah0p7l13gk80.png-14.1kB][21]](https://i-blog.csdnimg.cn/blog_migrate/7878862788b569119ab19b9883c1bc90.png#pic_center)
-
接下来为虚拟机添加第2块网卡,连接外部网络。选择“添加硬件”->“网络适配器”,点击添加
![![image_1ca62197t18hr1u3k1r76ecs1ahl8d.png-26.7kB][22]](https://i-blog.csdnimg.cn/blog_migrate/35842bdb42591c4f38b32a24d406da96.png#pic_center)
-
弹出对话框中,虚拟交换机选择Outernewtork,点击确定
![![image_1ca623v3j1me3f3ho75k871ld98q.png-53.7kB][23]](https://i-blog.csdnimg.cn/blog_migrate/3a41e860b09247e8ba72863dc08c618c.png#pic_center)
-
如果步骤7 未选择ISO镜像,这个时候也可以在设置里选择设置DVD驱动器,然后选择目标ISO镜像。
![![image_1ca627tr4i5uvf410vqujr1bcn97.png-41.9kB][24]](https://i-blog.csdnimg.cn/blog_migrate/aa20f8566b207a2f78de7485119adc1b.png#pic_center)
同样的步骤,建立另外2个虚拟机。硬件设置参考之前的说明。
![![image_1ca62r1e3d4q1vc8tamd5k1vcvcs.png-11.2kB][25]](https://i-blog.csdnimg.cn/blog_migrate/88049e0189f4e9c9a55816a660e91d91.png#pic_center)
其中SharePoint服务器需要添加第2台硬盘,步骤如下:
-
选中虚拟机,右键->设置
![![image_1ca61vo971oem1ufv1ah0p7l13gk80.png-14.1kB][26]](https://i-blog.csdnimg.cn/blog_migrate/7878862788b569119ab19b9883c1bc90.png#pic_center)
-
选择“IDE控制器”,选择“硬盘驱动器”
![![image_1ca62e428buke6hrs1v1k1s3f9k.png-35.5kB][27]](https://i-blog.csdnimg.cn/blog_migrate/28d5ffc50085b7eb9f23a59ab976b4b7.png#pic_center)
-
点击“添加”
![![image_1ca62fkinp8t1aea14obnrf1ikja1.png-47kB][28]](https://i-blog.csdnimg.cn/blog_migrate/f017b0d208f52e73e7b5a64fcdfb0bc0.png#pic_center)
-
点击“新建”,弹出新建硬盘对话框
![![image_1ca62h00d1hq6afk1tdan83kqeae.png-15.7kB][29]](https://i-blog.csdnimg.cn/blog_migrate/98971e109818b0f629e0ea2d49142f0d.png#pic_center)
-
点击“下一步”
-
选择磁盘格式,使用VHDX
![![image_1ca62ks9k1ch711bt1elo1thm280ar.png-26.2kB][30]](https://i-blog.csdnimg.cn/blog_migrate/de247f739033b7a1e310874c3881b858.png#pic_center)
-
选择磁盘类型,选择“动态扩展"
![![image_1ca62lv2hvf91oid1d16k836a8b8.png-31.3kB][31]](https://i-blog.csdnimg.cn/blog_migrate/1882a4f81ea98d6483f30fc7ebd8e7d2.png#pic_center)
-
指定名称和位置
![![image_1ca62mpnf1mu116pddub19fa172ibl.png-16.4kB][32]](https://i-blog.csdnimg.cn/blog_migrate/8f4d09be6c61a36accb189e76e55088b.png#pic_center)
-
设置磁盘大小为100GB
![![image_1ca62nide15a01jvausr1dudagnc2.png-24kB][33]](https://i-blog.csdnimg.cn/blog_migrate/eb3b4897238a6013b7fcb43081b0d125.png#pic_center)
-
点击下一步,点击完成。完成新建磁盘,返回设置页面,可以看到新建的磁盘
![![image_1ca62on1tktas00vbhceck1bcf.png-51.5kB][34]](https://i-blog.csdnimg.cn/blog_migrate/32d1eae06ddc099c609a7ba5abe4eb7e.png#pic_center)
-
点击“确定”,退出设置
3. 安装DC和SharePoint服务器系统
-
选中刚刚建立的虚拟机,右键,弹出菜单中选择 Connect
![![图像 001.png-6.5kB][35]](https://i-blog.csdnimg.cn/blog_migrate/3d61dffda58e0368f6190a09723caab2.png#pic_center)
-
打开连接界面
![![图像 002.png-5.5kB][36]](https://i-blog.csdnimg.cn/blog_migrate/40d97f160a2be54c52f14f53c3c1515b.png#pic_center)
-
启动虚拟机,Action->Start。后续安装结束后,如果暂时要关闭虚拟机,可以使用Save,Save会保存当前虚拟机状态,而不会彻底关闭。下次使用时,可以快速恢复。
![![图像 003.png-7.2kB][37]](https://i-blog.csdnimg.cn/blog_migrate/6a1ed8e1be24739051472e0c02bcf1d6.png#pic_center)
-
虚拟机启动,进入安装界面
![![图像 005.png-4.8kB][38]](https://i-blog.csdnimg.cn/blog_migrate/ccef365f8ed1b93289a2187185f710a2.png#pic_center)
-
选择语言和键盘,语言默认为英文(安装盘为英文),时区选择中国
![![图像 006.png-16.7kB][39]](https://i-blog.csdnimg.cn/blog_migrate/a49237c65909b562f52b624235d13d8a.png#pic_center)
-
点击“Install Now"
![![图像 007.png-12kB][40]](https://i-blog.csdnimg.cn/blog_migrate/6bcedea0c6bf871d6b7e375bba2765cc.png#pic_center)
-
输入密钥
![![图像 008.png-18.4kB][41]](https://i-blog.csdnimg.cn/blog_migrate/c2f6971eb84cc2d11509855453e6834e.png#pic_center)
Hyper-V此时无法直接拷贝。
![![图像 009.png-30.1kB][42]](https://i-blog.csdnimg.cn/blog_migrate/be1f5c39d6572391ff96026fcf975178.png#pic_center)
如果外部有密钥想粘贴到内部,请在外部先Ctrl+C拷贝密钥。然后使用Hyper-V的Type clipboard text将内容输入
![![图像 011.png-2.9kB][43]](https://i-blog.csdnimg.cn/blog_migrate/1bbf08caef2be69589b2240d3dfdde31.png#pic_center)
-
选择Server with Desktop Experience,第一个不带桌面。点击Next
![![图像 012.png-19.8kB][44]](https://i-blog.csdnimg.cn/blog_migrate/a40627e9ce9ede75085df13a5bff54f7.png#pic_center)
-
等待安装完成
![![图像 016.png-10.8kB][45]](https://i-blog.csdnimg.cn/blog_migrate/1a6d76369691da790d7598d3ae1bd8a2.png#pic_center)
-
系统重启后,设置Administrator的密码
![![图像 017.png-12.3kB][46]](https://i-blog.csdnimg.cn/blog_migrate/708bd1918c8ff2ab89e82bdd6d67895c.png#pic_center)
-
设置完密码后,进入登录界面
![![图像 018.png-629.4kB][47]](https://i-blog.csdnimg.cn/blog_migrate/06afbb762188534432b58830ea89185d.png#pic_center)
-
在菜单中使用如下按键输入Ctrl+Alt+Del,进入密码输入界面
![![图像 020.png-170.2kB][48]](https://i-blog.csdnimg.cn/blog_migrate/826d5e2c445f7b65841b57233f3943ec.png#pic_center)
至此 服务器安装结束。
用相同的方法安装SharePoint Server所需Windows Server
4. 安装客户端测试机系统
步骤跟安装服务器相同,唯一的区别是系统选择Windows 10,而不是服务器操作系统。
5. 配置DC
所有虚拟机安装结束后,我们开始配置DC
首先设置IP地址
-
接步骤3最后1步,登录到DC,等待一会,看到Server Manager自动加载
![![图像 005.png-70.5kB][49]](https://i-blog.csdnimg.cn/blog_migrate/6f3823156ebe89addae6433f337d94ee.png#pic_center)
-
开始->齿轮标志 进入设置
![![图像 007.png-28kB][50]](https://i-blog.csdnimg.cn/blog_migrate/0c03f786c6c92b11f7bc4fd587f12ef3.png#pic_center)
![![图像 008.png-21.6kB][51]](https://i-blog.csdnimg.cn/blog_migrate/b54536ddecd08c53f4bb7b3eaacd0b05.png#pic_center)
-
找到Network & Internet,点击 Change Adapter Settings
![![图像 009.png-25.1kB][52]](https://i-blog.csdnimg.cn/blog_migrate/b877719b98d6191566e94cbe5f43b319.png#pic_center)
-
找到第一张网卡
![![图像 006.png-13.2kB][53]](https://i-blog.csdnimg.cn/blog_migrate/39968811aa268fbb85123d0ce520f1d4.png#pic_center)
-
右键->属性,打开属性设置
![![图像 023.png-11.8kB][54]](https://i-blog.csdnimg.cn/blog_migrate/9d1d603806c29d397dd7b6580823349e.png#pic_center)
-
双击设置IPV4
![![图像 011.png-17.3kB][55]](https://i-blog.csdnimg.cn/blog_migrate/36f708e5738a71579a7877cfbe15df00.png#pic_center)
-
设置IP地址,DC设置如下。不要用192.168.1.1。设置之后,点击OK保存。
![![图像 012.png-13.4kB][56]](https://i-blog.csdnimg.cn/blog_migrate/ed7bcd284de0f4d020e1fa26bc01ee57.png#pic_center)
-
设置成功后,cmd ipconfig返回正确的IP地址
![![图像 013.png-7.9kB][57]](https://i-blog.csdnimg.cn/blog_migrate/98d6ac5964b8e0b53867d646cb2efa35.png#pic_center)
接下来修改机器名
-
开始->齿轮标志 进入设置
![![图像 007.png-28kB][58]](https://i-blog.csdnimg.cn/blog_migrate/0c03f786c6c92b11f7bc4fd587f12ef3.png#pic_center)
![![图像 008.png-21.6kB][59]](https://i-blog.csdnimg.cn/blog_migrate/b54536ddecd08c53f4bb7b3eaacd0b05.png#pic_center)
-
找到System,找到About
-
选择Rename PC
![![图像 029.png-43.8kB][60]](https://i-blog.csdnimg.cn/blog_migrate/554e606f9c32fb697c81df04a7249600.png#pic_center)
-
输入新的名字
![![图像 030.png-10.1kB][61]](https://i-blog.csdnimg.cn/blog_migrate/8499d1f01f4e6f8008c1e70d0787970c.png#pic_center)
-
点击next,设置后重启机器。
![![图像 031.png-7.6kB][62]](https://i-blog.csdnimg.cn/blog_migrate/8a937dbf12296985228f98263a998dcd.png#pic_center)
后续请按照相同的步骤,设置SharePoint Server和Client机器。其中SharePoint Server IP地址为192.168.1.3 客户端为192.168.1.4
安装DC
-
进入Server Manager,点击Add roles and Features
![![图像 005.png-70.5kB][63]](https://i-blog.csdnimg.cn/blog_migrate/9942f511b3adb59ceea433e2f363ac31.png#pic_center)
-
进入开始界面,点击Next
![![图像 027.png-31.7kB][64]](https://i-blog.csdnimg.cn/blog_migrate/030440946109819ddc492e80de140579.png#pic_center)
-
选择Role-based or feature-based installation,点击Next
![![图像 028.png-24.6kB][65]](https://i-blog.csdnimg.cn/blog_migrate/dbd95edc9d7c0db70ceba8b5352b9fc4.png#pic_center)
-
选择当前服务器,点击Next
![![图像 033.png-26.5kB][66]](https://i-blog.csdnimg.cn/blog_migrate/265cfd39936483cd0ba68e4b0d1822c5.png#pic_center)
-
选择“Active Directory Domain Services"
![![图像 034.png-25.3kB][67]](https://i-blog.csdnimg.cn/blog_migrate/1bf9560190089a3d078846db558a1e6e.png#pic_center)
-
弹出框,选择“Add Features”
![![图像 035.png-14.2kB][68]](https://i-blog.csdnimg.cn/blog_migrate/bb2861bca1c8161917564fc62b9b10a2.png#pic_center)
-
Features 默认不动,点击下一步
![![图像 036.png-42kB][69]](https://i-blog.csdnimg.cn/blog_migrate/8eb33c9661d41cfc36f0bf1688600d92.png#pic_center)
-
AD DS也直接下一步,选择Install
![![图像 037.png-29.1kB][70]](https://i-blog.csdnimg.cn/blog_migrate/bea2ed62e30578d3c829074af344a06a.png#pic_center)
-
等待安装完成
![![图像 038.png-38.3kB][71]](https://i-blog.csdnimg.cn/blog_migrate/7ef0654b3ef430b63be16b6c10df6cfc.png#pic_center)
安装完成之后,开始设置DC
-
打开Server Manager,右上角有一个黄色叹号,点击弹出菜单,选择“Post-deployment Configuration”
![![图像 039.png-47.1kB][72]](https://i-blog.csdnimg.cn/blog_migrate/b9cb2632550027de79c0298f1de92e54.png#pic_center)
-
弹出如下对话框,选择"Add a new forest",输入域的名字。点击下一步,等待一会
![![图像 040.png-24.8kB][73]](https://i-blog.csdnimg.cn/blog_migrate/211b4ec803f4233d008ab823ce080d1e.png#pic_center)
-
设置不动,输入密码。这个是后续修改DC设置要用的,一定要记住
![![图像 041.png-32.7kB][74]](https://i-blog.csdnimg.cn/blog_migrate/91fd33c8bad30d1b3321a747b3c06c70.png#pic_center)
-
进入DNS这是,这个因为是单独域,不需要跟上级DNS关联,直接next
![![图像 042.png-24.2kB][75]](https://i-blog.csdnimg.cn/blog_migrate/2fa3401fb14ce8fbf0537a0e9c0e9f88.png#pic_center)
-
设置与的NetBiOS名字,这个根据情况输入
![![图像 043.png-22kB][76]](https://i-blog.csdnimg.cn/blog_migrate/0458aceb651604346abc1c3ad2e88d9f.png#pic_center)
-
Paths 设置不变,直接下一步
![![图像 044.png-21.8kB][77]](https://i-blog.csdnimg.cn/blog_migrate/748cf54bded03e8c8c7caf69b7e3775e.png#pic_center)
-
Review Options,直接下一步
![![图像 045.png-31.3kB][78]](https://i-blog.csdnimg.cn/blog_migrate/5bfd423938faaa9fdf2c3bb3d889c80d.png#pic_center)
-
等待安装结束
![![图像 046.png-25.9kB][79]](https://i-blog.csdnimg.cn/blog_migrate/ff610e9d6ecf30f03144faa9d8197dd7.png#pic_center)
-
结束之后,再进入Server Manager,就可以看到AD DS和DNS已经在了
![![图像 048.png-35.2kB][80]](https://i-blog.csdnimg.cn/blog_migrate/55f489b630cb831b0a19bd8d990e5269.png#pic_center)
选中AD DS中的当前服务器,右键可以看到很多功能项。其中Active Directory Administrative Center,Active Directory Uses and Computers用的比较多。
![![图像 049.png-24.5kB][81]](https://i-blog.csdnimg.cn/blog_migrate/cdcc18b1527698faed7468b9430c4c44.png#pic_center)
右上角Manage 点击 也可以看到很多工具,这里就是包括当前服务器上所有可用工具,不只是AD DS的
![![图像 050.png-67.4kB][82]](https://i-blog.csdnimg.cn/blog_migrate/af95173faf3b40bea75bed7d92c96f8e.png#pic_center)
6. 将SharePoint服务器和客户端加入域
将SharePoint服务器和客户端修改好IP地址后,需要将他们加入域。
-
开始->齿轮标志 进入设置
![![图像 007.png-28kB][83]](https://i-blog.csdnimg.cn/blog_migrate/0c03f786c6c92b11f7bc4fd587f12ef3.png#pic_center)
![![图像 008.png-21.6kB][84]](https://i-blog.csdnimg.cn/blog_migrate/b54536ddecd08c53f4bb7b3eaacd0b05.png#pic_center)
-
找到System,找到About
-
选择Rename PC,执行Rename PC,SharePoint Server改为SP16.客户端改为Client
-
重启后,再次重复步骤 1 2,这次执行Join a Domain
![![图像 051.png-24.5kB][85]](https://i-blog.csdnimg.cn/blog_migrate/5c6879dad7ca18b9fb0429edcbd524c5.png#pic_center)
-
弹出窗口中输入Domain(域)名字,点击Next
![![图像 056.png-16.9kB][86]](https://i-blog.csdnimg.cn/blog_migrate/174b9626fd8d261efc9c9ff81afec073.png#pic_center)
-
输入域管理员账号和密码,点击确定
![![图像 057.png-10kB][87]](https://i-blog.csdnimg.cn/blog_migrate/789e604ed43c6135362107ade2e54cfc.png#pic_center)
-
选择域管理员CONTOSO\Administrator加入本地管理员组。点击Next
![![图像 058.png-12.2kB][88]](https://i-blog.csdnimg.cn/blog_migrate/011f0769c939f99255b4f93cff961c5d.png#pic_center)
-
等待加入成功,重启服务器
![![图像 059.png-12.6kB][89]](https://i-blog.csdnimg.cn/blog_migrate/050d8e3b9d140ab6de7d95064591e5d1.png#pic_center)
-
重启之后,就可以用域管理员账号登录机器
![![图像 060.png-153.3kB][90]](https://i-blog.csdnimg.cn/blog_migrate/b0a04aef217e83de1f4e2656f737a689.png#pic_center)
7. 创建所需账号###
SharePoint使用过程中,按照标准要求,需要为其配置多个账号用于不同的目录。一般来说,建议在AD中创建如下账号
| 账号名 | 说明 | 是否本地管理员 | 推荐名称 |
|---|---|---|---|
| 安装账号 | 用于安装SharePoint和SQL Server 时使用,后续添加新的账号也需要此账号 | 是 | spsetup |
| Farm管理员 | 整个SharePoint场的管理员 | 是 | spadmin |
| 服务账号 | 用于管理SharePoint场中的各个服务 | 是 | spsvc |
| SQL 管理员 | 用于管理SQL Server | 是 | sqladmin |
在AD创建账号的步骤如下
-
以DC管理员身份登录域控服务器,打开服务器管理器,点击Tools。下拉菜单中选择Active Directory Uses and Computers
![![QQ图片20180426224148.png-20.7kB][91]](https://i-blog.csdnimg.cn/blog_migrate/976ef2cd7029f2bd9b432cbb97d6a452.png#pic_center)
-
选中Users,右键->New User
![![图像 002.png-26.9kB][92]](https://i-blog.csdnimg.cn/blog_migrate/b5f8dd4f7d4bf891b1b7d207aaf2e399.png#pic_center)
-
输入账号名称,这里创建的是Farm管理员,所以这里名字填的是spadmin
![![图像 003.png-12.6kB][93]](https://i-blog.csdnimg.cn/blog_migrate/611ba4a8f8447184ec69c755f5fdf4c9.png#pic_center)
-
输入密码,可以选择密码永不过期(一般来说,定期修改密码是好习惯,不过SharePoint修改密码影响范围非常大,可以暂时设置为不修改,等后续学会如何修改密码,再改这里的设置)
![![图像 004.png-10.9kB][94]](https://i-blog.csdnimg.cn/blog_migrate/1ef17124bad20e6838b7ee753796eb0b.png#pic_center)
5.查看摘要信息,点击Finish,创建账号
![![图像 005.png-10kB][95]](https://i-blog.csdnimg.cn/blog_migrate/99047412d7d9d6737192970d84cca115.png#pic_center)
-
新账号已经被创建了
-
同样的步骤创建其他账号
![![图像 006.png-3.9kB][96]](https://i-blog.csdnimg.cn/blog_migrate/be30e7c855f510528199b42638b1a1b5.png#pic_center)
8. 配置SharePoint 所在服务器操作系统
####账号加入本地管理员组
-
进入控制面板
-
管理工具(Administrative tools)->计算机管理(Computer Management)
![![image_1cenf91vo1dkj7oah47p4c13o29.png-24.9kB][97]](https://i-blog.csdnimg.cn/blog_migrate/796f8ca4bca0f69ee44c1b3267873ea3.png#pic_center)
-
Computer Managment->System Tools->Local Users and Groups->Groups,找到Administrators
![![image_1cenfcp3cj0j1ovd69htu21jlo16.png-39.6kB][98]](https://i-blog.csdnimg.cn/blog_migrate/48ad1f6cd308c4c7b855014b6b91c23b.png#pic_center)
-
双击打开,点击Add, 输入spadmin,点击Check Names,等名字能够正确识别后,点击OK。
![![image_1cenffpd5sdn1rrkce1g74106i1j.png-37.7kB][99]](https://i-blog.csdnimg.cn/blog_migrate/a5de98ad768fca988836015df35725bd.png#pic_center)
-
同样步骤添加spsvc到此组
![![image_1cenfi10saob19is1bqu10kmk5j2g.png-24.6kB][100]](https://i-blog.csdnimg.cn/blog_migrate/862d503508671482e4ec6af75c8138fc.png#pic_center)
####开放端口
生产环境中,需要打开所有防火墙,然后在防火墙中开启如下端口。
测试环境里,可以直接关闭防火墙。因为我们这里是All In One环境,可以不设置。但这里介绍下相关端口和方法,后续可能用到。
| Protocol | Port | Usage | Comment |
|---|---|---|---|
| TCP | 80 http | Client to SharePoint web server traffic | (SharePoint – Office Online Server/Office Web Apps communication) |
| TCP | 443 https/ssl | Encrypted client to SharePoint web server traffic | (Encrypted SharePoint – Office Online Server/Office Web Apps communication) |
| TCP | 1433 | SQL Server default communication port. | May be configured to use custom port for increased security |
| UDP | 1434 | SQL Server default port used to establish connection | May be configured to use custom port for increased security |
| TCP | 445 | SQL Server using named pipes | When SQL Server is configured to listen for incoming client connections by using named pipes over a NetBIOS session, SQL Server communicates over TCP port 445 |
| TCP | 25 | SMTP for e-mail integration | Cannot in 2016 be configured (Use SMTP ports other than the default (25).) |
| TCP | 16500-16519 | Ports used by the search index component | Intra-farm only Inbound rule Added to Windows firewall by SharePoint. (GPO may override this change) |
| TCP | 22233-22236 | Ports required for the AppFabric Caching Service | Used by the Distributed Cache… |
| TCP | 808 | Search – Query processing component | Windows Communication Foundation communication Search – Query processing component(WCF) |
| TCP | 32843 | Communication between Web servers and service applications http (default) To use custom port, see references section | Inbound rule Added to Windows firewall by SharePoint |
| TCP | 32844 | Communication between Web servers and service applications https | Inbound rule Added to Windows firewall by SharePoint |
| TCP | 32845 | net.tcp binding: TCP 32845 (only if a third party has implemented this option for a service application) Custom Service Applications | Inbound rule Added to Windows firewall by SharePoint |
| TCP | 32846 | Microsoft SharePoint Foundation User Code Service (for sandbox solutions) Inbound on all Web Servers | Inbound rule Added to Windows firewall by SharePoint Outbound on all Web and App servers with service enabled. |
| TCP | 636 | User Profile Synchronization Service/Active Directory Import | Synchronizing profiles between SharePoint 2016 and AD using SLDAP (Secure LDAP) |
| TCP | 5725 | User Profile Synchronization Service | Synchronizing profiles between SharePoint 2016 and Active Directory Domain Services (AD DS) |
| TCP + UDP | 389 | User Profile Synchronization Service | LDAP Service |
| TCP + UDP | 88 | User Profile Synchronization Service | Kerberos |
| TCP + UDP | 53 | User Profile Synchronization Service | DNS |
| UDP | 464 | User Profile Service | Kerberos change password |
| TCP | 809 | Office Online Server/Office Web Apps | Office Online Server/Office Web Apps intra-farm communication. |
禁用防火墙步骤
-
控制面板->Windows Firewall
-
Turn Windows Firewall on or off
![![image_1cengvo7c1jv31rcf1b8hh591phq2t.png-13.9kB][101]](https://i-blog.csdnimg.cn/blog_migrate/22a053b06e0b59fcff8b22eaa4c35e2e.png#pic_center)
-
全部勾选Turn off,点击OK
![![image_1cenh1tobk2adlrmvh717ro3a.png-39.8kB][102]](https://i-blog.csdnimg.cn/blog_migrate/45cdeea277bad79d1ebb53d646b13453.png#pic_center)
添加防火墙规则步骤
防火墙规则主要是2种,Inbound Rule和Outbound Rule,前者决定外部如何连接本地。后者决定本地如何连接外部。
这里以添加Inbound Rule,允许外部连接80端口为例,说明如何添加防火墙规则,Outbound类似。
-
控制面板->Windows Firewall
-
Advanced settings
![![image_1cenhdn52187i1djnoun1okkdbt47.png-13.9kB][103]](https://i-blog.csdnimg.cn/blog_migrate/4b6c11c4de00c0d81a46911f1b3fa07f.png#pic_center)
-
点击Inbound Rule,右侧Actions,点击New Rule
![![图像 24.png-6.8kB][104]](https://i-blog.csdnimg.cn/blog_migrate/abe2c1cb9d1f5d70ed4a80f4bcd28b86.png#pic_center)
-
Rule Type选择Port,即设置针对特定端口的规则,点击下一步
![![image_1cenhnerj9lr1n831kvgd2r16r86g.png-32.9kB][105]](https://i-blog.csdnimg.cn/blog_migrate/8993eb4f73b0bb1a96d6d4d2a8473663.png#pic_center)
-
协议选择TCP,端口号输入80,点击下一步
![![图像 27.png-17.3kB][106]](https://i-blog.csdnimg.cn/blog_migrate/cfb8ae60a859a0fd611ad3e40a41237e.png#pic_center)
-
Action选择允许连接
![![图像 28.png-19.4kB][107]](https://i-blog.csdnimg.cn/blog_migrate/9d359e316fd6b6f9977f16aed7f16e8c.png#pic_center)
-
Profile选择默认,点击下一步
![![图像 29.png-16.5kB][108]](https://i-blog.csdnimg.cn/blog_migrate/1b75dbacdae66e707db9684b87981142.png#pic_center)
-
输入名字,点击Finish保存
![![image_1cenhverrs2rb8levf9oo1cpq1a.png-21.8kB][109]](https://i-blog.csdnimg.cn/blog_migrate/63cad7f27a7136308e4f3c3951f5bb0f.png#pic_center)
9. 安装SQL Server
-
SQL Server账号加入到本地管理员组
步骤参考上一步设置系统 -
以sqladmin登录系统
虚拟机Action->Ctrl+Alt+Del,进入登录页面
![![图像 009.png-22.4kB][110]](https://i-blog.csdnimg.cn/blog_migrate/4227c7edca386cb1cbbb29d1f63f2d1a.png#pic_center)
重新输入sqladmin账号密码登录
![![图像 010.png-175.8kB][111]](https://i-blog.csdnimg.cn/blog_migrate/27c84524d06b75ce6a7768f7c9da7995.png#pic_center)
-
挂载SQL Server 安装盘
![![image_1ceq0v9uk1954fuv3f65c1h149.png-20.1kB][112]](https://i-blog.csdnimg.cn/blog_migrate/bd7af24b5df0785516cd94d282e3e1b9.png#pic_center)
-
双击打开光盘,点击setup
![![图像 011.png-41.5kB][113]](https://i-blog.csdnimg.cn/blog_migrate/f8585ead45f8c869148839a0bb891abc.png#pic_center)
-
选择New SQL Server stand-alone installation or add features to an existing inistallation
这里是安装单台SQL Server,理想情况下是应该安装配置SQL Server Cluster,这个后续会介绍。实验环境 单台服务器足够使用。
![![图像 012.png-35.2kB][114]](https://i-blog.csdnimg.cn/blog_migrate/5111d5fcc7f4ef378bc387d212e0694e.png#pic_center)
-
弹出一个新的窗口,开始安装。输入产品Key,点击下一步
![![图像 013.png-32.3kB][115]](https://i-blog.csdnimg.cn/blog_migrate/3ff7f02f35d0234a71128290378295dd.png#pic_center)
-
选择同意协议,点击下一步
![![图像 014.png-38.3kB][116]](https://i-blog.csdnimg.cn/blog_migrate/4b2fd5ed3f3c10a3c032a156a61f9ad7.png#pic_center)
-
运行全局检查,如果通过,则点击下一步。否则点击Failed,会弹出失败原因。
![![图像 015.png-44.2kB][117]](https://i-blog.csdnimg.cn/blog_migrate/5405e54ae05d2cdb8637ebe9f3cef367.png#pic_center)
比较常见的是 账号不是管理员,这里我们之前已经把sqladmin加入本地管理员,因此没有这个问题。
.net framework 2.0或3.5 SP1 on Windows 2008 R2 ,这个是Windows 2008 R2的问题,我们这里不存在。
执行完之前的操作没重启服务器,重启服务器即可。 -
确认是否需要使用Windows Update来更新SQL Server。一般不选,后续根据需要下载并安装SQL Server更新。服务器软件以保持稳定为先。点击下一步。
![![图像 016.png-37.5kB][118]](https://i-blog.csdnimg.cn/blog_migrate/67a29f611f7cd7209b0e9acc28dd9261.png#pic_center)
-
产品更新检查。SQL Server会尝试联网检查是否有新的更新,如果联网失败则会直接报错。可以忽略报错,直接点击下一步。如果联网成功,会下载更新到本地。
![!\[图像 017.png-37.3kB\]\[119\]](https://img-blog.csdnimg.cn/img_convert/00b506264d31600427dcbd2be9bc9ac8.png#pic_center)
- 再次检查Install Rules。成功则直接跳过,失败则检查失败原因。
![!\[图像 018.png-43kB\]\[120\]](https://img-blog.csdnimg.cn/img_convert/b69a56abacb6bf1e032aab01747e2025.png#pic_center)
这里有2个警告。可以直接忽略,也可以处理。
.NET Application Security。这个可以直接忽略。
![!\[图像 031.png-8.9kB\]\[121\]](https://img-blog.csdnimg.cn/img_convert/0baca66d1eabf18229b54990539d6b10.png#pic_center)
Windows Firewall,这个就是之前提到的防火墙设置。如果按照之前的步骤设置了防火墙,则这里不会报这个警告。如果报错,请回到前面按照之前的步骤检查防火墙设置。
- Setup Role,选择默认,安装SQL Server Feature Installation.
![!\[图像 032.png-39.2kB\]\[122\]](https://img-blog.csdnimg.cn/img_convert/f7e9c3d87197705897d55d5acd78272f.png#pic_center)
- 选择要安装的Feature。SharePoint Server理论上安装Database Engine Services即可,但是为了管理方便,建议同时安装SQL Server管理工具。安装路径根据磁盘实际情况选择。
![!\[图像 033.png-47.5kB\]\[123\]](https://img-blog.csdnimg.cn/img_convert/68f979350e984e8b8ccb3f4593a2c436.png#pic_center)
![!\[图像 034.png-2.9kB\]\[124\]](https://img-blog.csdnimg.cn/img_convert/c15418427ab4aef04378a575f9ecf058.png#pic_center)
- SQL Server会再次检查,看是否有需要的Feature(Windows或其他等安装需要的)未安装。
![!\[图像 035.png-36.1kB\]\[125\]](https://img-blog.csdnimg.cn/img_convert/f72f16799549b0addbfc52d681ceefc3.png#pic_center)
检查提示.NET Framework 3.5 SP1未安装。
这个要到Server Manager中安装此Feature。
14.1 打开Server Manager
![![图像 036.png-12.7kB][126]](https://i-blog.csdnimg.cn/blog_migrate/1f52896b52196cb1626acd4bef5d13dd.png#pic_center)
14.2 点击Add roles and features
![![图像 037.png-49.8kB][127]](https://i-blog.csdnimg.cn/blog_migrate/dfce3d5ac5d94d6325df4407697d1ec7.png#pic_center)
14.3 点击下一步
![![图像 038.png-34.5kB][128]](https://i-blog.csdnimg.cn/blog_migrate/ab79a5ef8a5efeb7fce1278ce4b6f2ed.png#pic_center)
14.4 Installation Type选择默认,Role-based or feature installation。安装本机。Remote Desktop Service Installation是配置VDI的。
![![图像 38.png-8.9kB][129]](https://i-blog.csdnimg.cn/blog_migrate/9aab65ea2e900e3487a9ad4089f10e1d.png#pic_center)
14.5 选择当前机器,点击下一步
![![图像 040.png-27.8kB][130]](https://i-blog.csdnimg.cn/blog_migrate/87503a6da71c29bd3eddd9c9a78acc28.png#pic_center)
14.6 点击下一步,跳过Role选择。
![![图像 041.png-39.4kB][131]](https://i-blog.csdnimg.cn/blog_migrate/737192e4f9b7b3bdc6ec2d2989e174f2.png#pic_center)
14.6 选中.NET Framework 3.5 Features,点击Next
![![图像 042.png-44.1kB][132]](https://i-blog.csdnimg.cn/blog_migrate/6bae75148de9dc03849af63056bca101.png#pic_center)
14.7 确认安装信息,点击Install,开始安装
![![图像 043.png-27.6kB][133]](https://i-blog.csdnimg.cn/blog_migrate/480742f28434ab72212e0c9eaabd8fd5.png#pic_center)

安装结束,回到SQL Server 安装工具,重新运行检查,检查通过。点击下一步

- 输入SQL Server实例名。建议为SQL Server起实例名,方便后续管理和在一台服务器上安装多个SQL Server实例。点击下一步。

- 设置账号,这里可以选择默认。

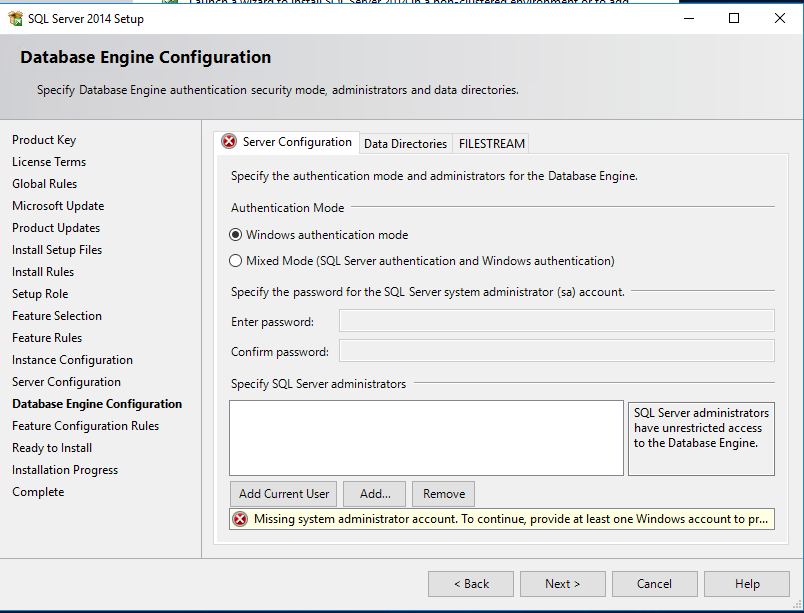
- 点击Add Current User将当前账号(sqladmin)添加为SQL 管理员。认证模式建议选择Windows Authentication。点击下一步。


- 再次检查当前安装设置是否正确。检查无误,点击下一步

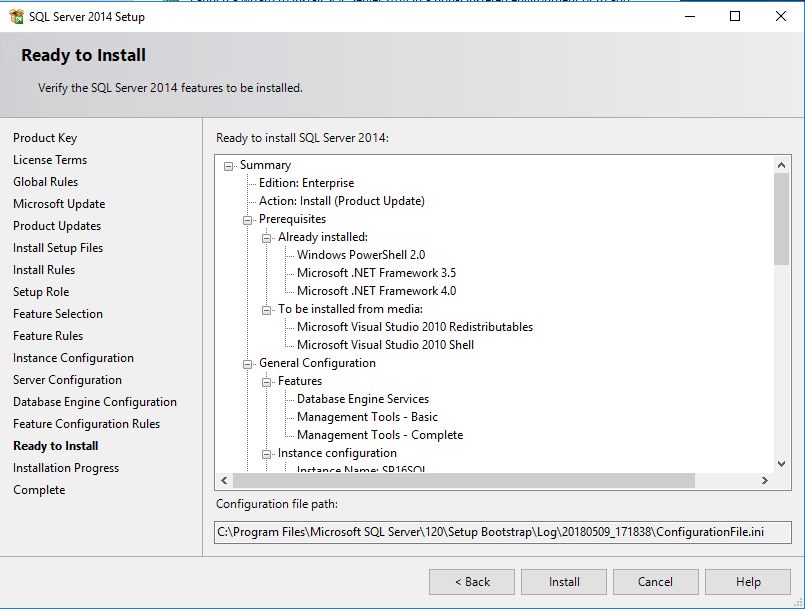
- 最终检查。检查所有的安装设置是否正确,如果无误,点击下一步开始安装。

-
开始安装

-
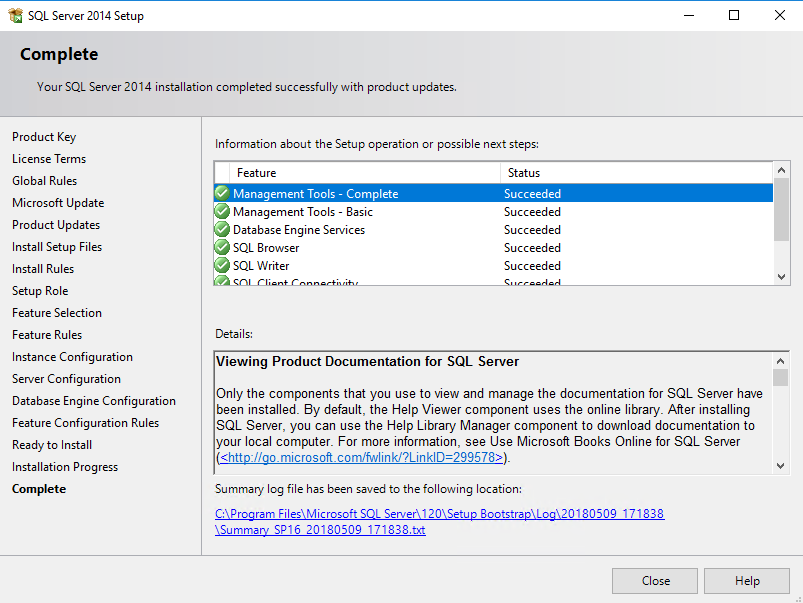
安装成功如下图所示

安装之后,开始菜单中看到SQL Server相关软件

点击SQL Server 2014 Management Studio,查看是否可以正常连接

输入sqladmin,点击连接
![![图像 056.png-21.9kB][13]](https://i-blog.csdnimg.cn/blog_migrate/80596560d9195f6ed85f401c79f997f6.png#pic_center)
正常连接则如下所示
![![image_1ceq4uap887oc8h1h2v1blv11goeu.png-24.7kB][14]](https://i-blog.csdnimg.cn/blog_migrate/ccc1f164d8a2e0b0425d557566cbc951.png#pic_center)
后续需要添加SharePoint账号spadmin和spsvc到SQL Server,并赋予足够权限
1.打开SQL Server 2014 Management Studio
2.打开Security->Logins
![![图像 001.png-11.9kB][15]](https://i-blog.csdnimg.cn/blog_migrate/e37c26facbdb609249fbc8769c80bbbe.png#pic_center)
-
右键->New Login
![![图像 002.png-15.3kB][16]](https://i-blog.csdnimg.cn/blog_migrate/4881f1e6afd5bb360b97c224e4beb21b.png#pic_center)
-
点击search,找到spadmin账号。注意搜索范围选择域
![![图像 004.png-11.3kB][17]](https://i-blog.csdnimg.cn/blog_migrate/4ee3799f4704bfb90dd5c48c355db528.png#pic_center)
![![图像 005.png-35.5kB][18]](https://i-blog.csdnimg.cn/blog_migrate/06812a63782b236ab9c9aae7b0c9d51d.png#pic_center)
-
Server Roles可以直接全部选中
![![图像 003.png-25.1kB][19]](https://i-blog.csdnimg.cn/blog_migrate/1b6107e6d41b42a6c899a9b5b059da9c.png#pic_center)
-
点击OK保存。同样的方法添加spsvc
![![图像 006.png-24.5kB][20]](https://i-blog.csdnimg.cn/blog_migrate/49679224beccb80af00eaf067467dba7.png#pic_center)
10. 安装SharePoint 前置软件
SharePoint作为一个综合性平台,软件本身基于一批微软平台框架构造。安装SharePoint之前,需要先安装这批软件。
安装SharePoint前置条件有2种情况,服务器可以联网和服务器不可联网。
服务器可以联网时,直接用安装工具安装。如果不联网时,则需要先把相关软件下载到本地并拷贝到服务器上,然后使用SharePoint前置软件安装工具prerequisiteinstaller安装。
![![image_1cfms4uii1utbch3oi61cic1hgu19.png-17.3kB][21]](https://i-blog.csdnimg.cn/blog_migrate/a4812ae9403ad6626741eb7e18df28b3.png#pic_center)
服务器无法联网时
主要分为3步,安装Windows Feature,下载SharePoint相关软件,使用工具安装。
- 安装Windows Feature
1.1 挂载Windows安装盘
1.2 以账号spadmin登录服务器,以本地管理员身份执行PowerShell。执行如下指令
Import-Module ServerManager
Add-WindowsFeature Net-Framework-Features,Web-Server,Web-WebServer,Web-Common-Http,Web-Static-Content,Web-Default-Doc,Web-Dir-Browsing,Web-Http-Errors,Web-App-Dev,Web-Asp-Net,Web-Net-Ext,Web-ISAPI-Ext,Web-ISAPI-Filter,Web-Health,Web-Http-Logging,Web-Log-Libraries,Web-Request-Monitor,Web-Http-Tracing,Web-Security,Web-Basic-Auth,Web-Windows-Auth,Web-Filtering,Web-Digest-Auth,Web-Performance,Web-Stat-Compression,Web-Dyn-Compression,Web-Mgmt-Tools,Web-Mgmt-Console,Web-Mgmt-Compat,Web-Metabase,Application-Server,AS-Web-Support,AS-TCP-Port-Sharing,AS-WAS-Support,AS-HTTP-Activation,AS-TCP-Activation,AS-Named-Pipes,AS-Net-Framework,WAS,WAS-Process-Model,WAS-NET-Environment,WAS-Config-APIs,Web-Lgcy-Scripting,Windows-Identity-Foundation,Server-Media-Foundation,Xps-Viewer -verbose -source 'D:\sources\sxs’
https://gallery.technet.microsoft.com/office/SharePoint-2016-Prerequisit-17912ad2
最后的Source部分修改为安装盘盘符
1.3 下载所有的前置软件,下载地址如下
-
Application Server Role, Web Server (IIS) Role. You can enable the Web Server (IIS) role and the Application Server role in Server Manager. However if the server is not connected to the Internet, the http://support.microsoft.com/en-us/kb/2765260 article has an Offline method that explains how to use several Window PowerShell cmdlets to add and enable these roles.
-
Microsoft SQL Server 2012 Native Client. Installs with the Microsoft SQL Server 2012 Feature Pack [http://www.microsoft.com/en-us/download/details.aspx?id=29065]
-
The Microsoft® SQL Server® 2012 Feature Pack is a collection of stand-alone packages which provide additional value for Microsoft® SQL Server® 2012. It includes the latest versions of:
-
Tool and components for Microsoft® SQL Server® 2012.
Add-on providers for Microsoft® SQL Server® 2012.
Microsoft ODBC Driver 11 for SQL Server [http://www.microsoft.com/en-us/download/details.aspx?id=36434] -
Microsoft ODBC Driver 11 for SQL Server is a single dynamic-link library (DLL) containing run-time support for applications using native-code APIs to connect to Microsoft SQL Server 2005, 2008, 2008 R2, SQL Server 2012, SQL Server 2014 and Windows Azure SQL Database. This redistributable installer for Microsoft ODBC Driver 11 for SQL Server installs the client components needed during run time to take advantage of new SQL Server 2012 features, and optionally installs the header files needed to develop an application that uses the ODBC API.
-
Microsoft Sync Framework Runtime v1.0 SP1 (x64) [http://www.microsoft.com/en-us/download/details.aspx?id=17616]
-
Microsoft Sync Framework is a comprehensive synchronization platform that enables collaboration and offline scenarios for applications, services, and devices. Developers can build synchronization ecosystems that integrate any application and any type of data, using any protocol over any network. This service pack is intended to fix a handful of bugs as well as to transition to a public-facing change tracking API that is new in SQL Compact 3.5 SP2.
-
Windows Server AppFabric 1.1 [http://www.microsoft.com/en-us/download/details.aspx?id=27115]
AppFabric is a set of integrated technologies that make it easier to build, scale, and manage Web and composite applications that run on IIS. AppFabric targets applications built using ASP.NET, Windows Communication Foundation (WCF), and Windows Workflow Foundation (WF).
It provides out-of-the-box capabilities for you to easily build and manage composite applications, including:
Enhanced design and development tools in Visual Studio to build rich composite applications
Management and monitoring of services and workflows via integration with IIS Manager and Windows PowerShell
Distributed in-memory application cache to improve application performance
-
Cumulative Update Package 1 for Microsoft AppFabric 1.1 for Windows Server (KB2671763) [http://support.microsoft.com/en-us/kb/2671763]
-
Cumulative update package 1 for Microsoft AppFabric 1.1 for Windows Server. This hotfix package resolves several issues and adds several features that are described at https://support.microsoft.com/en-us/kb/2671763.
-
Microsoft Identity Extensions [http://go.microsoft.com/fwlink/?LinkID=252368]
Microsoft Federation Extensions for SharePoint 3.0 enables interoperable federated access to SharePoint 3.0 sites using the WS-Federation standard. It is built using the Windows Identity Foundation and supports use of ADFS 2.0 as an identity provider.
- Microsoft Information Protection and Control Client [http://go.microsoft.com/fwlink/?LinkID=528177]
The Active Directory Rights Management Services (AD RMS) Client 2.x is software designed for your computers to help protect access to and usage of information flowing through applications that use AD RMS.
- Microsoft WCF Data Services 5.0 [http://www.microsoft.com/en-us/download/details.aspx?id=29306]
WCF Data Services 5.0 enables creation and consumption of data services for the Web according to version 3 of the Open Data Protocol (OData), which facilitates data access and change via standard HTTP verbs. WCF Data Services 5.0 includes .NET Framework server and client libraries as well as Silverlight client libraries.
- Microsoft WCF Data Services 5.6 [https://www.microsoft.com/en-us/download/details.aspx?id=39373]
This installer will update the NuGet packages referenced by the WCF Data Services item templates to version 5.6 This installer also makes the code generation (the “Add Service Reference”) for consuming OData V3 endpoints available for all current and future .Net 4.5.X versions.
- Microsoft .NET Framework 4.5.2 [http://support.microsoft.com/en-us/kb/2934520]
The Microsoft .NET Framework 4.5.2 is a highly compatible, in-place update to the .NET Framework 4.5.1, the .NET Framework 4.5, and the .NET Framework 4. However, it can run side by side with the .NET Framework 3.5 Service Pack 1 (SP1) and earlier versions of the .NET Framework.
The .NET Framework 4.5.2 for Windows 8.1, Windows RT 8.1, and Windows Server 2012 R2 is available on Windows Update and on Windows Server Update Service (WSUS).
- Update for Microsoft .NET Framework to disable RC4 in Transport Layer Security (KB2898850) [http://www.microsoft.com/en-us/download/details.aspx?id=42883]
Resolved a security issue that has been identified that could allow an unauthenticated remote attacker to compromise a system and gain access to information.
- Visual C++ Redistributable Package for Visual Studio 2013 [http://www.microsoft.com/en-us/download/details.aspx?id=40784]
The Visual C++ Redistributable Packages install run-time components that are required to run applications that are developed by using Visual Studio 2013, on computers that don’t have Visual Studio 2013 installed. These packages install run-time components of these libraries: C Runtime (CRT), Standard C++, ATL, MFC, C++ AMP, and OpenMP.
1.4 使用如下命令安装,将所有的安装文件拷贝到C:\Prereqs。D:\PrerequisiteInstaller.exe修改为光盘所在盘符
`KaTeX parse error: Undefined control sequence: \Prereqs at position 28: …16SP1Path = “C:\̲P̲r̲e̲r̲e̲q̲s̲” Start-Process…SharePoint2016SP1Path\sqlncli.msi
/IDFX:KaTeX parse error: Undefined control sequence: \Windows at position 22: …oint2016SP1Path\̲W̲i̲n̲d̲o̲w̲s̲6.1-KB974405-x6…SharePoint2016SP1Path\MicrosoftIdentityExtensions-64.msi
/Sync:$SharePoint2016SP1Path\Synchronization.msi
/AppFabric:$SharePoint2016SP1Path\WindowsServerAppFabricSetup_x64.exe
/KB2671763:$SharePoint2016SP1Path\AppFabric1.1-RTM-KB2671763-x64-ENU.exe
/MSIPCClient:$SharePoint2016SP1Path\setup_msipc_x64.exe
/WCFDataServices56:$SharePoint2016SP1Path\WcfDataServices56.exe
/DotNet452:$SharePoint2016SP1Path\NDP452-KB2901907-x86-x64-AllOS-ENU.exe
/MSVCRT12:$SharePoint2016SP1Path\vcredist_x64.exe
/KB2898850:$SharePoint2016SP1Path\Windows8.1-KB2898850-x64.msu·
服务器可以联网时
2.1 挂载SharePoint安装盘。双击光盘或者打开后双击splash
2.2 打开如下画面
![![图像 46.png-17.8kB][22]](https://i-blog.csdnimg.cn/blog_migrate/8739e57ed3e3df1fba6967fd9847323f.png#pic_center)
2.3 点击 Install software prerequisites,弹出如下画面。点击Next
![![图像 47.png-51.9kB][23]](https://i-blog.csdnimg.cn/blog_migrate/8abc1fac181bc8972cfff5dce71c3fbb.png#pic_center)
2.4 选择接受,点击Next
![![图像 48.png-18.5kB][24]](https://i-blog.csdnimg.cn/blog_migrate/b9375da29f3649afd92c0812af316d84.png#pic_center)
2.5 开始安装
![![图像 49.png-10kB][25]](https://i-blog.csdnimg.cn/blog_migrate/c07c88fac4d2a21633aa02ea9f867f20.png#pic_center)
2.6 安装成功后画面如下
![![图像 50.png-57.3kB][26]](https://i-blog.csdnimg.cn/blog_migrate/72fdfde72a06cdbfe0d5cb7deac26e0b.png#pic_center)
推荐服务器联网安装,过程非常简单。手工安装的话比较复杂。
安装之后,重启服务器,否则后续安装SharePoint时会报错提示服务器需要重启。
11. 安装SharePoint
SharePoint前置软件安装结束后,后续安装SharePoint就比较简单了,
-
点击SharePoint安装启动界面中的Install SharePoint Server即可。
![![图像 46.png-17.8kB][27]](https://i-blog.csdnimg.cn/blog_migrate/74ced1012ecfee7e2f274c4ac0cf6b5f.png#pic_center)
-
输入密钥
![![图像 51.png-13kB][28]](https://i-blog.csdnimg.cn/blog_migrate/df6807d137ed96ce9b080844cbdf96b9.png#pic_center)
-
同意协议
![![图像 52.png-27.6kB][29]](https://i-blog.csdnimg.cn/blog_migrate/e262a3fcb7a23cd41c625f6d048c2306.png#pic_center)
-
选择安装路径。注意这里的index文件路径。此路径后续修改起来非常麻烦。如果C盘空间不足,最好一开始安装的时候就将这个路径设置到其他空间足够的磁盘上。
![![图像 53.png-20.1kB][30]](https://i-blog.csdnimg.cn/blog_migrate/c00cc2fb42f7f0e62c7307e90313b7c9.png#pic_center)
-
点击开始安装
![![图像 54.png-7.7kB][31]](https://i-blog.csdnimg.cn/blog_migrate/f882dbcf55eb15bc43cc2286ab5d74fc.png#pic_center)
-
安装结束
![![图像 55.png-8.5kB][32]](https://i-blog.csdnimg.cn/blog_migrate/7918e36ec79a0792e45126eb2591772b.png#pic_center)
12. 运行SharePoint配置向导
SharePoint安装结束后,还需要运行配置向导,才能够正式创建SharePoint Farm,否则只是安装了软件本身,任何内容都没有。
-
安装结束后,默认选中后续运行配置向导。直接点击Close。弹出运行配置向导开始界面
![![图像 56.png-16kB][33]](https://i-blog.csdnimg.cn/blog_migrate/1339bbffaf3386170f897b2b391c5bb0.png#pic_center)
-
弹出警告框,提示会关闭部分服务。点击Yes即可。
![![图像 57.png-7.3kB][34]](https://i-blog.csdnimg.cn/blog_migrate/cb1f296fd7d3b33580c0422a44c49ed8.png#pic_center)
-
目前还没有Farm,选择创建新的Farm。如果后续在这个Farm里再安装新的服务器,则这里选择连接到现有Farm
![![图像 58.png-13.6kB][35]](https://i-blog.csdnimg.cn/blog_migrate/046aae1509fe7d020cfd04e8fb468678.png#pic_center)
-
输入数据库实例名,下面的账号用spadmin和密码
![![图像 007.png-28.1kB][36]](https://i-blog.csdnimg.cn/blog_migrate/73730b5f3f402440d7e642f97b3f4ef0.png#pic_center)
-
输入密码,此密码仅用于后续添加新的服务器到场里。
![![图像 008.png-17.3kB][37]](https://i-blog.csdnimg.cn/blog_migrate/5f78db6720fdc9eb5a9756813bb67df1.png#pic_center)
-
选择服务器类型,我们这里只有一台服务器,仅供测试,因此可以选择 Single Server Farm。后续如果想要添加新的服务器到场里,则选择其他类型。
![![图像 009.png-26kB][38]](https://i-blog.csdnimg.cn/blog_migrate/03a39879b4cc06e21ca4142643ed81ad.png#pic_center)
Front-end 前端服务器,主要负载SharePoint 中的前端请求,运行所有Web Application的IIS站点。
Application 应用服务器,主要运行各个Service Application和Service。
Distributed Cache 分布式缓存服务器。 主要运行分布式缓存。
Search 搜素服务器。负载SharePoint搜索功能
Custom 自定义服务器。 可以根据需求设置。前四者为SharePoint 2016 Mini Role定位。更多信息可以参考
https://docs.microsoft.com/en-us/sharepoint/install/overview-of-minrole-server-roles-in-sharepoint-server-2016 -
是否修改管理中心站点设置,可以保持不改
![![图像 010.png-31.1kB][39]](https://i-blog.csdnimg.cn/blog_migrate/c32cc30ff02f9f1fadddcd25c2fa0ef1.png#pic_center)
-
点击继续,开始执行安装
![![图像 011.png-18.5kB][40]](https://i-blog.csdnimg.cn/blog_migrate/de679a9353bfce7da9b67e55de2161e5.png#pic_center)
-
安装结束。
如果后续需要单独运行配置向导,请到开始菜单中搜索SharePoint 2016 Product Configuration Wizard执行即可。
13. 进入管理中心,运行SharePoint向导
配置向导运行成功后,点击确认,会自动启动管理中心,进入SharePoint向导。
SharePoint Farm配置向导建立了场级别的配置数据库,建立了一个空白的场。SharePoint配置向导则会创建SharePoint使用的各个Service Application。
-
管理中心打开后,首先弹出如下画面,问是否提供反馈给微软,默认可以选择不提供
![![image_1cfpnao1p1utq11e8s9hbes1utb9.png-38.7kB][41]](https://i-blog.csdnimg.cn/blog_migrate/64c90b2707cc967cf7d4739a36295d5b.png#pic_center)
-
提示是否执行配置SharePoint Farm,选择yes
![![image_1cfpnd3mtb4n139eig89i61s6vm.png-24.8kB][42]](https://i-blog.csdnimg.cn/blog_migrate/907578ad842d5979ddd2427a06b29936.png#pic_center)
-
Service Account选择spsvc。Service Application选择默认选中的即可。点击Next
![![image_1cfpngc1adfg4o61nrahpll1s13.png-28kB][43]](https://i-blog.csdnimg.cn/blog_migrate/b4d195b7fdd219551a7e5019d198fb8f.png#pic_center)
-
提示开始配置
![![image_1cfpnhhgk1r4q1ulb1vnu1448144m1g.png-5.6kB][44]](https://i-blog.csdnimg.cn/blog_migrate/ecbf65e650871bf19efb8fddf88f83f4.png#pic_center)
-
可以等这里提示框跑完,也可以重新进入管理中心,观察Service Application创建进展。方法如下
开始菜单->All Apps->找到SharePoint 2016 Central Administration(后续打开管理中心都是这个步骤)
![![image_1cfpnjuq0q1j1dvj168js9j1g061t.png-52.4kB][45]](https://i-blog.csdnimg.cn/blog_migrate/6648a098443b267065c7ebe1ea0f5978.png#pic_center)
可能会弹框让你确认是否执行配置向导,选择是即可。
(每次打开管理中心时,都会运行配置向导。配置向导负责进行一些配置,并从本地注册表中提取管理中心站点的URL地址并调用IE打开)
然后找到Manage Service Applications,点击进入
![![image_1cfpo4g7b1oqs77b1rc6fmn8c2q.png-15.6kB][46]](https://i-blog.csdnimg.cn/blog_migrate/8d3b9824c61809666315f40ad6a85d3e.png#pic_center)
检查右侧的Status,当所有的状态都是Started的时候,表示Service Application都成功创建了
![![image_1cfpo6ear1ajpt9o8r41b9o1huc37.png-70.2kB][47]](https://i-blog.csdnimg.cn/blog_migrate/dfd7b36ee25d6da9d085f9d2f083eb2c.png#pic_center)
不断按F5刷新这个页面获取最新状态
![![image_1cfrcjcdt1n0e1n0l12sf153ct6c3k.png-60kB][48]](https://i-blog.csdnimg.cn/blog_migrate/4746387ad33e1f86ca0581452c98acd5.png#pic_center)
14. 创建并访问第一个站点
以上步骤爬网之后,整个SharePoint场已经创建完毕,接下来SharePoint配置向导会弹出界面让我们创建一个新的Site Collection。我们可以跳过,也可以在这里直接创建一个。
一般直接创建1个Team Site,这是最常用的站点。
-
如下图,名字写Team Site,别的默认
![![image_1cfrcn56onlm14st1evi5knu8441.png-34.3kB][49]](https://i-blog.csdnimg.cn/blog_migrate/f3bc0b47b58f69611de2f7ec01b12447.png#pic_center)
-
点击OK,开始创建
-
创建成功后,弹出以下配置小结
![![image_1cfrcthud1lklfk1n3nlijac84e.png-36.5kB][50]](https://i-blog.csdnimg.cn/blog_migrate/4d06de8706a15455f007be2a2c84239b.png#pic_center)
这里还一个Configure Hybird,这个是On Prem SharePoint和云端O365结合的,可以暂时不配
![![image_1cfrcv23occ0q641ael16m51kuc4r.png-31.3kB][51]](https://i-blog.csdnimg.cn/blog_migrate/a9c773d48de40920f57db69c843e19c3.png#pic_center)
点击FInish结束配置。
地址栏里输入http://sp16 进入刚创建的Team Site站点
![![image_1cfrdc7lnut2vevcel1ih6153m5o.png-64.8kB][52]](https://i-blog.csdnimg.cn/blog_migrate/3c51410587f0691af00cc1751978075a.png#pic_center)
更多推荐
 已为社区贡献1条内容


所有评论(0)