qemu,kvm,vir-manager,virsh,libvirt相关内容
1 KVM KVM 是指基于 Linux 内核的虚拟机(Kernel-based Virtual Machine)。KVM 本身不执行任何模拟,一个用户空间程序会使用/dev/kvm 接口设置一个 Guest 虚拟服务器的地址空间,向它提供模拟的 I/O,并将它的视频显示映射回宿主的显示屏。在 KVM 架构中,虚拟机实现为常规的 Linux 进程,由标准 Linux
1 KVM
KVM 是指基于 Linux 内核的虚拟机(Kernel-based Virtual Machine)。
KVM 本身不执行任何模拟,一个用户空间程序会使用/dev/kvm 接口设置一个 Guest 虚拟服务器的地址空间,向它提供模拟的 I/O,并将它的视频显示映射回宿主的显示屏。
在 KVM 架构中,虚拟机实现为常规的 Linux 进程,由标准 Linux 调度程序进行调度。事实上,每个虚拟 CPU 显示为一个常规的 Linux 进程。这使 KVM 能够享受 Linux 内核的所有功能。
设备模拟由提供了模拟的 BIOS、PCI 总线、USB 总线和一组标准的设备(比如 IDE 和 SCSI 磁盘控制器、网络卡等)的修改的 qemu 版本来模拟。
一个典型的 KVM 安装包括以下部件:
- 一个管理虚拟硬件的设备驱动,这个驱动通过一个字符设备 /dev/kvm 导出它的功能。通过 /dev/kvm 每一个客户机拥有其自身的地址空间,这个地址空间与内核的地址空间相分离或与任何一个正运行着的客户机相分离。
- 一个模拟硬件的用户空间部件,它是一个稍微改动过的 QEMU 进程。从客户机操作系统执行 I/O 会拥有 QEMU 。 QEMU 是一个平台虚拟化方案,它允许整个 PC 环境(包括磁盘、显示卡(图形卡)、网络设备)的虚拟化。任何客户机操作系统所发出的 I/O 请求都被拦截,并被路由到用户模式用以被 QEMU 过程模拟仿真。
2 管理您的虚拟机
有多个虚拟机管理器可用,包括:
- Univention Virtual Manager。
- qemu/KVM:您可以在 KVM 机器中直接从命令行运行。
- Virsh:管理 VM 的最简单的 shell。
- Virtual Machine Manager:也称为 virt-manager,一个管理 VM 的桌面用户接口。
KVM 和 Xen 的常见管理工具
1 Xen 提供了一组专门的管理命令,最著名的是 xm 命令行套件。
2 KVM 很大一部分初始管理基础架构继承自 QEMU,这是一个已被广泛接受的 Linux 仿真和虚拟化包。
3 越来越多的虚拟化技术让 Linux 供应商开始寻求一个管理接口 libvirt 虚拟化应用编程接口 (API) 来运行它们。libvirt API 支持 KVM、Xen、LXC 容器、OpenVZ、User-mode Linux、VirtualBox、Microsoft® Hyper-V® 和许多 VMware 技术等虚拟化技术。
3 QEMU
安装:
sudo apt-get install qemu
# ls /usr/bin/qemu-*
/usr/bin/qemu-aarch64       /usr/bin/qemu-mipsn32
/usr/bin/qemu-system-alpha         /usr/bin/qemu-system-ppc64
/usr/bin/qemu-alpha         /usr/bin/qemu-mipsn32el
/usr/bin/qemu-system-arm           /usr/bin/qemu-system-ppc64le
/usr/bin/qemu-arm           /usr/bin/qemu-nbd
/usr/bin/qemu-system-cris          /usr/bin/qemu-system-ppcemb
/usr/bin/qemu-armeb         /usr/bin/qemu-or32
/usr/bin/qemu-system-i386          /usr/bin/qemu-system-s390x
/usr/bin/qemu-cris          /usr/bin/qemu-ppc
/usr/bin/qemu-system-lm32          /usr/bin/qemu-system-sh4
/usr/bin/qemu-i386          /usr/bin/qemu-ppc64
/usr/bin/qemu-system-m68k          /usr/bin/qemu-system-sh4eb
/usr/bin/qemu-img           /usr/bin/qemu-ppc64abi32
/usr/bin/qemu-system-microblaze    /usr/bin/qemu-system-sparc
/usr/bin/qemu-io            /usr/bin/qemu-ppc64le
/usr/bin/qemu-system-microblazeel  /usr/bin/qemu-system-sparc64
/usr/bin/qemu-m68k          /usr/bin/qemu-s390x
/usr/bin/qemu-system-mips          /usr/bin/qemu-system-tricore
/usr/bin/qemu-microblaze    /usr/bin/qemu-sh4
/usr/bin/qemu-system-mips64        /usr/bin/qemu-system-unicore32
/usr/bin/qemu-microblazeel  /usr/bin/qemu-sh4eb
/usr/bin/qemu-system-mips64el      /usr/bin/qemu-system-x86_64
/usr/bin/qemu-mips          /usr/bin/qemu-sparc
/usr/bin/qemu-system-mipsel        /usr/bin/qemu-system-xtensa
/usr/bin/qemu-mips64        /usr/bin/qemu-sparc32plus
/usr/bin/qemu-system-moxie         /usr/bin/qemu-system-xtensaeb
/usr/bin/qemu-mips64el      /usr/bin/qemu-sparc64
/usr/bin/qemu-system-or32          /usr/bin/qemu-unicore32
/usr/bin/qemu-mipsel        /usr/bin/qemu-system-aarch64
/usr/bin/qemu-system-ppc           /usr/bin/qemu-x86_64
[root@x86 ~]# ls /usr/bin/qemu-*
/usr/bin/qemu-ga  /usr/bin/qemu-img  /usr/bin/qemu-io  /usr/bin/qemu-nbd  /usr/bin/qemu-system-x86_64
[root@x86 ~]# ll /usr/bin/qemu-system-x86_64
lrwxrwxrwx 1 root root 21 Oct 26 16:21 /usr/bin/qemu-system-x86_64 -> /usr/libexec/qemu-kvm
4 virt-manager
图形化的、基于 libvirt 的
The virt-manager application is a desktop user interface for managing virtual machines through libvirt. It primarily targets KVM VMs, but also manages Xen and LXC (linux containers). It presents a summary view of running domains, their live performance & resource utilization statistics. Wizards enable the creation of new domains, and configuration & adjustment of a domain’s resource allocation & virtual hardware. An embedded VNC and SPICE client viewer presents a full graphical console to the guest domain.
Install it from your OS distribution (others coming soon)
# yum install virt-manager (Fedora)
# apt-get install virt-manager (Debian)
# emerge virt-manager (Gentoo)
# pkg_add virt-manager (OpenBSD)
About virt-manager’s supporting tools
4.1 virt-install
The virt-install tool is a command line tool which provides an easy way to provision operating systems into virtual machines.4.2 virt-clone
The virt-clone tool is a command line tool for cloning existing inactive guests. It copies the disk images, and defines a config with new name, UUID and MAC address pointing to the copied disks.4.3 virt-viewer
The virt-viewer application is a lightweight interface for interacting with the graphical display of virtualized guest OS. It can display VNC or SPICE, and uses libvirt to lookup the graphical connection details.
5 libvirt和virsh
libvirt是一个中间层专门用于管理虚拟化的函数库,将底层不同的虚拟化驱动如qemu+kvm, XEN等都用统一的接口封装。这样对用户而言,只需要知道libvirt的接口就能使用虚拟机,而不用关心底层的各种驱动的细节。
virsh和virt-manager等软件都是调用libvirt来实现虚拟机的管理。用户通常是直接使用
To install the necessary packages, from a terminal prompt enter:
sudo apt-get install qemu-kvm libvirt-bin
After installing libvirt-bin, the user used to manage virtual machines will need to be added to the
libvirtdgroup. Doing so will grant the user access to the advanced networking options.
In a terminal enter:
sudo adduser $USER libvirtd
virsh:The virsh utility can be used from the command line. Some examples:
• To list running virtual machines:
virsh -c qemu:///system list
• To start a virtual machine:
virsh -c qemu:///system start web_devel
• Similarly, to start a virtual machine at boot:
virsh -c qemu:///system autostart web_devel
• Reboot a virtual machine with:
virsh -c qemu:///system reboot web_devel
• The stateof virtual machines can be saved to a file in order to be restored later. The following will
save the virtual machine state into a file named according to the date:
virsh -c qemu:///system save web_devel web_devel-022708.state
Once saved the virtual machine will no longer be running.
• A saved virtual machine can be restored using:
virsh -c qemu:///system restore web_devel-022708.state
• To shutdown a virtual machine do:
virsh -c qemu:///system shutdown web_devel
• A CDROM device can be mounted in a virtual machine by entering:
virsh -c qemu:///system attach-disk web_devel /dev/cdrom /media/cdrom
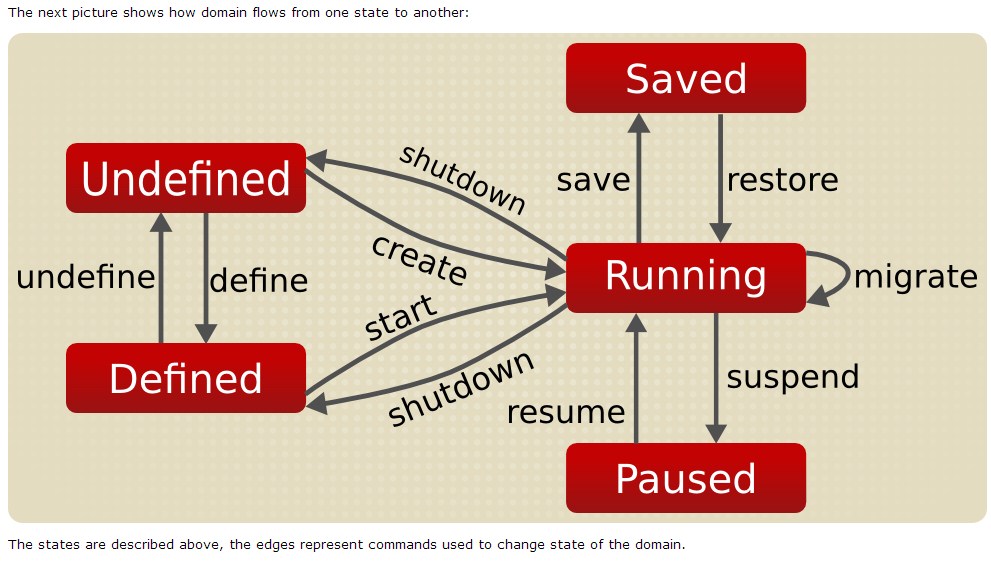
状态图:
参考:http://blog.csdn.net/b_h_l/article/details/17299583
6 qemu-img和qemu-kvm
root@power:~# ps -ef | grep virt
libvirt+ 16340     1  0 Mar22 ?        00:34:39 qemu-system-ppc64 -enable-kvm -name instance-000058e7 -S -machine pseries-2.3,accel=kvm,usb=off -m 2048 -realtime mlock=off -smp 1,sockets=1,cores=1,threads=1 -uuid 859466af-3da2-4b44-9620-cb131ef2c1b3 -no-user-config -nodefaults -chardev socket,id=charmonitor,path=/var/lib/libvirt/qemu/instance-000058e7.monitor,server,nowait -mon chardev=charmonitor,id=monitor,mode=control -rtc base=utc,driftfix=slew -no-shutdown -boot strict=on -device pci-ohci,id=usb,bus=pci.0,addr=0x2 -device spapr-vscsi,id=scsi0,reg=0x2000 -drive file=/var/lib/nova/instances/859466af-3da2-4b44-9620-cb131ef2c1b3/disk,if=none,id=drive-scsi0-0-0-0,format=qcow2,cache=none -device scsi-hd,bus=scsi0.0,channel=0,scsi-id=0,lun=0,drive=drive-scsi0-0-0-0,id=scsi0-0-0-0,bootindex=1 -netdev tap,fd=23,id=hostnet0,vhost=on,vhostfd=35 -device virtio-net-pci,netdev=hostnet0,id=net0,mac=fa:16:3e:45:3f:ce,bus=pci.0,addr=0x1 -chardev file,id=charserial0,path=/var/lib/nova/instances/859466af-3da2-4b44-9620-cb131ef2c1b3/console.log -device spapr-vty,chardev=charserial0,reg=0x30000000 -chardev pty,id=charserial1 -device spapr-vty,chardev=charserial1,reg=0x30001000 -device usb-tablet,id=input0 -device usb-kbd,id=input1 -device usb-mouse,id=input2 -vnc 0.0.0.0:11 -k en-us -device VGA,id=video0,vgamem_mb=16,bus=pci.0,addr=0x4 -device virtio-balloon-pci,id=balloon0,bus=pci.0,addr=0x3 -msg timestamp=on
[root@x86 ~]# ps -ef | grep qemu
qemu 3635 1 0 Mar18 ? 00:10:26 /usr/libexec/qemu-kvm -name instance-00000789 -S -machine pc-i440fx-rhel7.0.0,accel=kvm,usb=off -cpu SandyBridge,+pdpe1gb,+osxsave,+dca,+pcid,+pdcm,+xtpr,+tm2,+est,+smx,+vmx,+ds_cpl,+monitor,+dtes64,+pbe,+tm,+ht,+ss,+acpi,+ds,+vme -m 2048 -realtime mlock=off -smp 1,sockets=1,cores=1,threads=1 -uuid ce9eba67-1f70-409b-bc90-2010535590c3 -smbios type=1,manufacturer=IBM,product=OpenStack Nova,version=2015.1.1-201508132343.ibm.el7.139,serial=97e2fe10-2e0f-464c-a0f8-be39dc7bd8c5,uuid=ce9eba67-1f70-409b-bc90-2010535590c3 -no-user-config -nodefaults -chardev socket,id=charmonitor,path=/var/lib/libvirt/qemu/instance-00000789.monitor,server,nowait -mon chardev=charmonitor,id=monitor,mode=control -rtc base=utc,driftfix=slew -global kvm-pit.lost_tick_policy=discard -no-hpet -no-shutdown -boot strict=on -device piix3-usb-uhci,id=usb,bus=pci.0,addr=0x1.0x2 -drive file=/gpfs/gpfs_enterprise/openstack/instance/ce9eba67-1f70-409b-bc90-2010535590c3/disk,if=none,id=drive-virtio-disk0,format=qcow2,cache=none -device virtio-blk-pci,scsi=off,bus=pci.0,addr=0x4,drive=drive-virtio-disk0,id=virtio-disk0,bootindex=1 -netdev tap,fd=25,id=hostnet0,vhost=on,vhostfd=32 -device virtio-net-pci,netdev=hostnet0,id=net0,mac=fa:16:3e:7a:6a:80,bus=pci.0,addr=0x3 -chardev file,id=charserial0,path=/gpfs/gpfs_enterprise/openstack/instance/ce9eba67-1f70-409b-bc90-2010535590c3/console.log -device isa-serial,chardev=charserial0,id=serial0 -chardev pty,id=charserial1 -device isa-serial,chardev=charserial1,id=serial1 -device usb-tablet,id=input0 -vnc 192.168.16.18:6 -k en-us -vga std -global VGA.vgamem_mb=16 -device virtio-balloon-pci,id=balloon0,bus=pci.0,addr=0x5 -msg timestamp=on安装ubuntu 10.10
- 首先创建虚拟磁盘 qemu-img create -f qcow2 ubuntu-vm.img 15G ;我的主机 是ubuntu
- 然后就是 安装系统了 kvm -m 740 -cdrom /media/linuxSwap/ubuntu-10.10-desktop-i386.iso ./ubuntu-vm.img ; -m是为虚拟机分配的内存的大小 -cdrom 使用iso 文件的路径 最后的是虚拟磁盘的路径。 和 一般的安装操作系统的步骤一样
- 安装完了 启动 qemu-kvm -m 740 -smp 1 -hda ./ubuntu-vm.img 。-smp 是指分配几个CPU
- 我选择 用VNC 登入桌面,在ubuntu 程序里 网络 有远程桌面连接 ,上一步会生成一个localhost 的端口号 。我使用的端口是5901 ,连接就行。此时只要主机能上网,虚拟机也就能上
7 Virtual box
VirtualBox 等虚拟化环境是作为客户端应用程序在桌面或服务器系统上运行的。企业计算环境需要更接近物理硬件(“裸机”)的高性能、面向服务器的虚拟化环境,支持用少得多的操作系统开销来执行虚拟机。裸机虚拟化机制可更好地管理硬件资源,也可最佳地利用对内置于大多数 64 位 x86 和 PowerPC 处理器中的虚拟化硬件支持。
两种最流行的裸机开源虚拟化技术是 Kernel Virtual Machine (KVM) 和 Xen。
参考:
1 kvm, qemu-kvm以及libvirt之间的关系图:http://blog.csdn.net/zhaihaifei/article/details/51018113
2 虚拟机管理程序、虚拟化和云: 深入剖析 KVM 虚拟机管理程序: http://www.ibm.com/developerworks/cn/cloud/library/cl-hypervisorcompare-kvm/
3 使用 KVM 虚拟化技术: http://www.ibm.com/developerworks/cn/linux/l-using-kvm/index.html?ca=drs-
4 KVM 虚拟机在 IBM System x 上应用: http://www.ibm.com/developerworks/cn/linux/l-cn-kvm/
5 kvm doc: http://www.linux-kvm.org/page/Documents#Documentation
6 kvm FAQ: http://www.linux-kvm.org/page/FAQ
7 QEMU: http://wiki.qemu.org/Main_Page
更多推荐
 已为社区贡献25条内容


所有评论(0)