linux WordPress安装
现在网络中,有非常多的自建网站,大多数都是采用了wordpress(wordpress是使用PHP语言开发的博客平台,用户可以在支持PHP和MySQL数据库的服务器上架设属于自己的网站。)。以下内容为记录在VM虚拟机环境中安装wordpress。......
前言
现在网络中,有非常多的自建网站,大多数都是采用了wordpress(wordpress是使用PHP语言开发的博客平台,用户可以在支持PHP和MySQL数据库的服务器上架设属于自己的网站。)。以下内容为记录在VM虚拟机环境中安装wordpress。
准备工作:
虚拟主机IP地址192.168.1.1
centos发行版本号
[root@localhost ~]# cat /etc/redhat-release
CentOS Linux release 7.9.2009 (Core)
关闭firewall、selinux
[root@localhost ~]# iptables -F        #关闭防火墙
[root@localhost ~]# setenforce 0     #临时关闭selinux
一、http安装
1、安装及启动服务
[root@localhost /]# yum install httpd -y
[root@localhost /]# systemctl start httpd
2、测试服务是否正常

二、php安装
1、安装及配置服务
查看官网,wordpressPHP需要版本7.4及以上版本,Centos7提供的php达不到要求。配置第三方rpm安装源
[root@localhost /]# yum install epel-release    #配置源
[root@localhost /]# yum  install https://rpms.remirepo.net/enterprise/remi-release-7.rpm
[root@localhost /]# yum install php74-php-fpm php74-php-gd php74-php-pdo php74-php-mbstring php74-php-cli php74-php-mysqlnd    #安装
[root@localhost /]# systemctl restart php74-php-fpm    #重启php服务
2、测试php服务
[root@localhost /]# touch /var/www/html/123.php   #创建测试文件
[root@localhost /]# vi /var/www/html/123.php      #编辑
<?php
phpinfo();
?>
在浏览器中输入

三、mariadb安装
安装及配置数据库
[root@localhost /]# yum install  mariadb-server -y    #安装数据库
[root@localhost /]# systemctl start mariadb      #启动数据库
[root@localhost /]# mysqladmin -u root -p password      #第一次修改密码,由于没有老密码,第一下直接按回车,在连续输入2次新密码
[root@localhost /]# mysql -uroot -p        #登陆数据库
MariaDB [(none)]> create database wordpress;     #创建数据库,名称为wordpress
MariaDB [(none)]> show databases;     #检查是否创建
+--------------------+
| Database           |
+--------------------+
| information_schema |
| mysql              |
| performance_schema |
| test               |
| wordpress          |
+--------------------+
5 rows in set (0.01 sec)
MariaDB [(none)]> create user test@localhost identified by 'password';   #创建数据库账号test,密码password
MariaDB [(none)]> grant all privileges on wordpress.* to test@localhost;    #给test对数据库wordpress权限
MariaDB [(none)]> flush privileges;       #刷新配置
MariaDB [(none)]> exit;         #退出数据库
四、wordpress安装
1、安装及配置服务
https://cn.wordpress.org/download 官网下载,用smb上传到服务器中,也可以用wget下载
[root@localhost /]# cd /home/samba/
[root@localhost samba]# unzip wordpress-6.0.1.zip  -d /var/www/html/   #解压到指定文件夹
[root@localhost /]# cp /var/www/html/wordpress/wp-config-sample.php /var/www/html/wordpress/wp-config.php  #复制+修文件名
[root@localhost /]# vim /etc/httpd/conf/httpd.conf
[root@localhost /]# vi /var/www/html/wordpress/wp-config.php
/** The name of the database for WordPress */
define( 'DB_NAME', 'database_name_here ' );     #修改成创建的数据库名称 wordpress

/** Database username */
define( 'DB_USER', 'username_here ' );          #修改成数据库用户名 test

/** Database password */
define( 'DB_PASSWORD', 'password_here’  );      #修改成数据库密码 password

/** Database hostname */
define( 'DB_HOST', 'localhost' );           #数据库主机名
2、修改路径
[root@localhost /]# vi /etc/httpd/conf/httpd.conf
DocumentRoot "/var/www/html “   #修改成/var/www/html/wordpress
<Directory "/var/www/html"      #修改成/var/www/html/wordpress
#进入vim编辑后,按/输入DocumentRoot,可以快捷查找该目录,n是往下翻
[root@localhost /]# systemctl restart httpd   #重启http服务
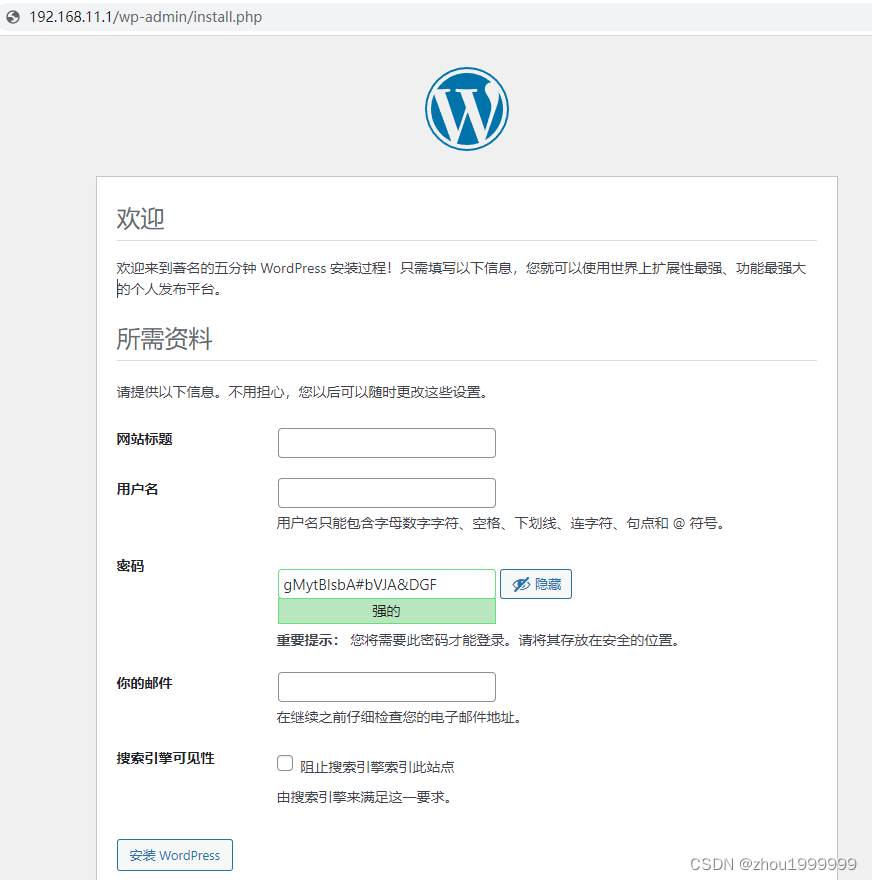
http://192.168.1.1/wp-admin/install.php #浏览器输入

五、总结
1、服务内容
http:web服务
php:语言
mariadb:数据库
wordpress:前端框架
2、遇到的问题
全部安装完毕后,登陆进去发现是英文。查看是没有选择cn.wordpress.org下载,所以没中文选项。再去下载一次中文版wordpress,将wp-content目录下的languages文件全部拷贝到服务器/var/www/html/wordpress/wp-content/下。更新服务后在后台首页settings选项里,选择中文。

3.下载插件提示需要FTP
vim  /var/www/html/wordpress/wp-config.php        #新增
if ( !defined('ABSPATH') )
        define('ABSPATH', dirname(__FILE__) . '/');
define('WP_TEMP_DIR', ABSPATH.'wp-content/tmp');
define("FS_METHOD", "direct");
define("FS_CHMOD_DIR", 0777);
define("FS_CHMOD_FILE", 0777);
修改完毕后重启HTTP服务
更多推荐
 已为社区贡献2条内容


所有评论(0)