vue 屏幕大小的监听与VUE中的使用
监听屏幕尺寸,vue举例,根据屏幕尺寸替换页面变量
·
0、监听屏幕大小函数
window.onresize = () => (() => {
      this.screenWidth = document.body.clientWidth;
    })();
    if (this.screenWidth < 768) {
     // 当屏幕小于768时,执行代码段(手机端)
    } else {
     // 其他时候,执行(比如电脑端)
    }
1、VUE2 中的使用
1、声明屏幕尺寸变量
data(props) {
return {
 screenWidth: document.body.clientWidth,
}
}
2、根据vue声明周期,显然写在mounted比较合适
 mounted() {
    window.onresize = () => (() => {
      this.screenWidth = document.body.clientWidth;
    })();
    if (this.screenWidth < 768) {
      // 屏幕宽度小于768
      this.timelineHeight = '42vh';

    } else {
      // 其余尺寸
      this.timelineHeight = '700px';

    }
  },
3、再加个监听可以
watch: {
    screenWidth(val) {
      this.screenWidth = val;
      if (this.screenWidth < 768) {
        // 宽度小于768
        this.timelineHeight = '42vh';
      } else {
        // 其余尺寸
        this.timelineHeight = '700px';
      }
    },
  },
2、vue3中应用
vue3中没有data,换成setup(),同时方法添加到setup中,下面是一个图片随屏幕大小更换的栗子
<template>
  <div class="health">
    <img :src="data.headerImg" alt="health_banner" />
    <div class="content">
    </div>
  </div>
</template>
1、引入vue方法
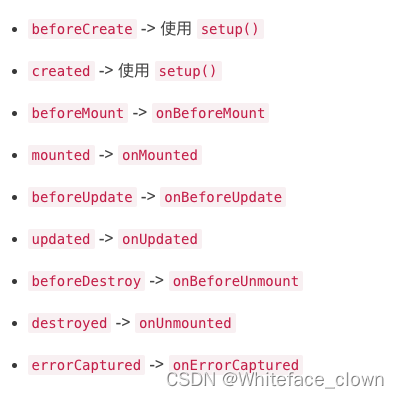
import { defineComponent, reactive, onMounted } from "vue";生命周期的名称有所变动,值得注意一下

2、在setup中声明图片变量
3、onMounted中获得屏幕宽度,并替换图片
export default defineComponent({
  components: {
  },
  props: {
  },

  setup(props) {
    const data = reactive({
      headerImg: require('@/assets/images/xxx.jpg')
    });

    onMounted(() => {
      let screenWidth = document.body.clientWidth;
      if (screenWidth < 768) {
        data.headerImg = require('@/assets/images/xxx_phone.jpg');
      } else {
        data.headerImg = require('@/assets/images/xxx.jpg');
      }
    });
    return {
      data
    }
  },
});
更多推荐
 已为社区贡献5条内容


所有评论(0)