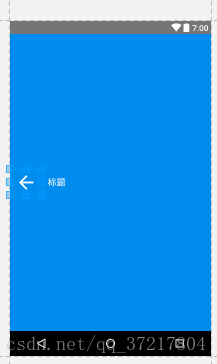
在个人学习的情况下可能很少使用自定义布局去实现大量复用的情况下,但是在一个开发工作的环境下就会使用到大量复用的自定义控件。
实现思维:
-
1.写一个xml的布局,用于标题栏的样式,并且添加在标题栏中你想要的其他控件Button、TextView、Image
-
View 等等
- 2.单独写一个class去继承LinearLayout 或者 View 等等其他布局都行。(下面代码中我使用的是继承LinearLayout,其他布局可能需要复写的方法都有所不同)
-
3.将写好的xml布局到class中用LayoutInflater 布局膨胀器获得布局。
-
4.隐藏原来系统的标题栏(两种办法:代码实现和AndroidManifest中实现)
-
5.在其他布局中导入这个class的布局路径,实现标题栏的导入。
-
6.自定义标题栏内容,比如标题栏名称(两种办法:代码实现和添加自定义布局属性实现)
-
7.添加点击事件,在布局类中添加布局控件的点击事件,一次添加就可以不用后续复写需要重复使用的点击事件
1.写一个xml的布局,用于标题栏的样式,并且添加在标题栏中你想要的其他控件Button、TextView、Image
View 等等
<?xml version="1.0" encoding="utf-8"?>
<LinearLayout xmlns:android="http://schemas.android.com/apk/res/android"
    android:orientation="horizontal"
    android:layout_width="match_parent"
    android:layout_height="match_parent"
    android:background="@color/colorBlue">
    <ImageView
        android:id="@+id/title_left_Image"
        android:layout_width="0dp"
        android:layout_weight="1"
        android:layout_height="wrap_content"
        android:src="@mipmap/ic_left"
        android:layout_gravity="center"/>
    <TextView
        android:id="@+id/title_text"
        android:layout_width="0dp"
        android:layout_weight="5"
        android:layout_height="wrap_content"
        android:text="标题"
        android:textColor="@color/colorWhite"
        android:textSize="@dimen/BigTextSize"
        android:gravity="left"
        android:layout_gravity="center"
        android:layout_marginLeft="10dp"/>
    <ImageView
        android:id="@+id/title_add"
        android:layout_width="0dp"
        android:layout_weight="1"
        android:layout_height="wrap_content"
        android:src="@mipmap/ic_add"
        android:layout_gravity="center"
        android:visibility="gone"/>
</LinearLayout>
备注:在上面的xml中在id是title_add的这ImageView控件里,我写了隐藏此控件。说明一下为什么隐藏,因为在个别的activity里标题栏需要一些不同的控件出现,比如菜单栏图标或者加号图标,这些图标可以预先添加到布局中,在不使用的情况下隐藏它(android:visibility="gone" 其他:visible 显示 gone不显示且取消布局站位 invisible 不显示但是依然在布局上占据位置),在需要使用的时候在代码上或者自定义属性里显示这个控件。
效果图:

2.单独写一个class去继承LinearLayout 或者 View 等等其他布局都行。(下面代码中我使用的是继承LinearLayout,其他布局可能需要复写的方法都有所不同)
3.将写好的xml布局到class中用LayoutInflater 布局膨胀器获得布局。
package com.example.lenovo.mydemoapp.myLayout;

import android.app.Activity;
import android.content.Context;
import android.content.res.TypedArray;
import android.support.annotation.Nullable;
import android.util.AttributeSet;
import android.view.LayoutInflater;
import android.view.View;
import android.widget.ImageView;
import android.widget.LinearLayout;
import android.widget.TextView;

import com.example.lenovo.mydemoapp.R;

/**
 * Created by lenovo on 2018/5/17.
 */

public class TitleLayout extends LinearLayout {
    public TitleLayout(Context context, @Nullable AttributeSet attrs) {
        super(context, attrs);
        LayoutInflater.from(context).inflate(R.layout.title_layout,this);

        }
    }
4.隐藏原来系统的标题栏(两种办法:代码实现和AndroidManifest中实现)
4.1首先是代码上实现隐藏:
若是继承Activity,则使用:
requestWindowFeature(Window.FEATURE_NO_TITLE);
public class Main2Activity extends Activity {

    @Override
protected void onCreate(Bundle savedInstanceState) {
        super.onCreate(savedInstanceState);
/***
         * 若是继承Activity,那么此时requestWindowFeature(Window.FEATURE_NO_TITLE);有效;
* 此时的Activity是不支持getSupportActionBar().hide()这个方法的;
* **/
requestWindowFeature(Window.FEATURE_NO_TITLE);
setContentView(R.layout.activity_main2);
}
}
若是继承AppCompatActivity,则只需加入一条语句:
getSupportActionBar().hide();
示例如下:
public class MainActivity extends AppCompatActivity {
 protected void onCreate(Bundle savedInstanceState) {
    super.onCreate(savedInstanceState);
    setContentView(R.layout.activity_main);
        ActionBar actionBar = getSupportActionBar();
        if (actionBar!=null){
            //隐藏标题栏
            actionBar.hide();
        }
    }
 }
4.2.在布局文件中进行设置整个应用都不显示标题栏:
如果是想让标题栏在整个应用中都不显示,那么,则可在AndroidManifest.xml中的<application>节点上
设定其属性android:theme为带有NoActionBar的值,这样所创建的所有activity都不会带有标题栏了;如:
<?xml version="1.0" encoding="utf-8"?>
<manifest xmlns:android="http://schemas.android.com/apk/res/android"
    package="com.example.lenovo.mydemoapp">

    <!-- 此处添加静态权限 -->
    <uses-permission android:name="android.permission.WRITE_EXTERNAL_STORAGE" />
    <uses-permission android:name="android.permission.READ_EXTERNAL_STORAGE" />
    <uses-permission android:name="android.permission.CAMERA" />
    <!--隐藏标题栏 android:theme="@style/Theme.AppCompat.Light.NoActionBar"-->
    <application
        android:name=".myAppCompatActivity.MyApplication"
        android:allowBackup="true"
        android:icon="@mipmap/ic_launcher"
        android:label="@string/app_name"
        android:roundIcon="@mipmap/ic_launcher_round"
        android:supportsRtl="true"
        android:theme="@style/Theme.AppCompat.Light.NoActionBar">
注:由于<application>节点的android:theme指定为了@style/Theme.AppCompat.Light.NoActionBar,
与此同时,又由于其所有的子节点<activity>的属性android:theme都并未指定,这样所有的activity就都不会带有标题栏
4.3某一个activity不显示标题栏:
若是想让应用中的某一个activity不显示标题栏,则可设定对应的activity的属性android:theme为带有NoActionBar的值,如:
<application
android:allowBackup="true"
android:icon="@mipmap/ic_launcher"
android:label="@string/app_name"
android:supportsRtl="true"
android:theme="@style/Theme.AppCompat">
    <activity android:name=".MainActivity">
        <intent-filter>
            <action android:name="android.intent.action.MAIN" />            <category android:name="android.intent.category.LAUNCHER" />
        </intent-filter>
    </activity>
    <activity android:name=".Main2Activity"
android:theme="@style/Theme.AppCompat.Light.NoActionBar"
></activity>
</application>
5.解决了标题栏隐藏的问题,现在我们在其他布局中导入这个class的布局路径,实现自定义标题栏的使用。
<?xml version="1.0" encoding="utf-8"?>
<LinearLayout xmlns:android="http://schemas.android.com/apk/res/android"
    android:orientation="vertical"
    android:layout_width="match_parent"
    android:layout_height="match_parent">
    <com.example.lenovo.mydemoapp.myLayout.TitleLayout
        android:id="@+id/ManualBinding_title"
        android:layout_width="match_parent"
        android:layout_height="wrap_content">
    </com.example.lenovo.mydemoapp.myLayout.TitleLayout>
导入很简单只需要在布局里直接写全路径就行,注意以下标题栏的位置就行。
6.自定义标题栏内容,比如标题栏名称(两种办法:代码实现和添加自定义布局属性实现)
6.1 代码上实现修改标题栏中指定控件的内容修改
在代码上实现修改标题栏内容,一定要给我们我们添加布局中的标题栏布局一个id,我们需要这个id去定位想要修改的标题栏是那一个
<com.example.lenovo.mydemoapp.myLayout.TitleLayout
        android:id="@+id/ManualBinding_title"
        android:layout_width="match_parent"
        android:layout_height="wrap_content">
    </com.example.lenovo.mydemoapp.myLayout.TitleLayout>
然后是代码上:
public class ManualBinding extends AppCompatActivity {
    private TitleLayout mTitleLayout;
    private TextView mTitle;
    @Override
    protected void onCreate(Bundle savedInstanceState) {
        super.onCreate(savedInstanceState);
        setContentView(R.layout.activity_manual_binding);
        mTitleLayout = (TitleLayout)findViewById(R.id.ManualBinding_title);
        mTitle = (TextView)mTitleLayout.findViewById(R.id.title_text);
        mTitle.setText("手动绑定");
    }
}
可以看到很简单,找到布局里的标题栏控件,在用标题栏控件找到要修改的TextView,当然代码上实现不单单只有这些,还可以修改ImageView 等等其他控件的属性参数,这个请自行查找更详细的代码修改布局的方式。
6.2 用自定义布局属性的方法实现标题栏自定义内容的修改:
6.2.1 第一步我们先要实现自定义属性的注册,进入values项目创建一个attrs.xml文件
<resources>

    <!-- Declare custom theme attributes that allow changing which styles are
         used for button bars depending on the API level.
         ?android:attr/buttonBarStyle is new as of API 11 so this is
         necessary to support previous API levels. -->
    <declare-styleable name="ButtonBarContainerTheme">
        <attr name="metaButtonBarStyle" format="reference" />
        <attr name="metaButtonBarButtonStyle" format="reference" />
    </declare-styleable>
    <!--注意下面的name写的TitleLayout 类名,另外注意添加属性之间的空格-->
    <declare-styleable name="TitleLayout">
        <!--字符串-->
        <attr name="titleNameText" format="string"/>
        <!--颜色-->
        <attr name="a" format="color"/>
        <!--尺寸-->
        <attr name="b" format="dimension"/>
        <!--枚举-->
        <attr name="c" format="enum"/>
        <!--常量或者变量值-->
        <attr name="d" format="flag"/>
        <!--分数-->
        <attr name="e" format="fraction"/>
        <!--整数int值-->
        <attr name="f" format="integer"/>
        <!--参数值-->
        <attr name="g" format="reference"/>
        <!--浮点小数-->
        <attr name="h" format="float"/>
        <!--布尔值-->
        <attr name="i" format="boolean"/>
    </declare-styleable>
</resources>
请关注<declare-styleable name="TitleLayout"> 的内容,首先要注意name="TitleLayout" 的名称要与我们布局class的名称一致。
然后就是添加自定义布局的属性,属性名称 与 值的属性,我现在只需要一个string的自定义布局属性,不过为了节约看官们的时间,我标准了其他值的属性。大家可以参考参考
6.2.2 以上添加完成后,我们要回到布局的class中,去添加自定义属性的调用
public class TitleLayout extends LinearLayout {
    private ImageView mTitleLeftImage,mTitle;
    private TextView mTitleText;
    private String mTitleName = "标题";
    public TitleLayout(Context context, @Nullable AttributeSet attrs) {
        super(context, attrs);
        LayoutInflater.from(context).inflate(R.layout.title_layout,this);
        mTitleText = (TextView)findViewById(R.id.title_text);
        /*
        添加自定义标题
         */
        //TypedArray键入数组    obtainStyledAttributes获取样式属性 得到attrs.xml里的name名称
        TypedArray typedArray = context.obtainStyledAttributes(attrs,R.styleable.TitleLayout);
        //从对应name名称的数组下面得到自定义属性
        mTitleName = typedArray.getText(R.styleable.TitleLayout_titleNameText).toString();
        //将自定义属性与布局匹配
        mTitleText.setText(mTitleName);
    }
}
6.2.2 最后是标题栏布局里添加需要的属性参数
PS:这里需要注意的一点!在父类布局中一定要添加xmlns:app="http://schemas.android.com/apk/res-auto" 这条属性 我们才能使用自定义属性前关键字app:
<?xml version="1.0" encoding="utf-8"?>
<LinearLayout xmlns:android="http://schemas.android.com/apk/res/android"
    android:orientation="vertical"
    xmlns:tools="http://schemas.android.com/tools"
    xmlns:app="http://schemas.android.com/apk/res-auto"
    android:layout_width="match_parent"
    android:layout_height="match_parent"
    tools:context="com.example.lenovo.mydemoapp.AboutUs">
    <com.example.lenovo.mydemoapp.myLayout.TitleLayout
        app:titleNameText="关于我们"
        android:layout_width="match_parent"
        android:layout_height="wrap_content">
    </com.example.lenovo.mydemoapp.myLayout.TitleLayout>
    <LinearLayout
        android:orientation="vertical"
        android:layout_width="match_parent"
        android:layout_height="match_parent"></LinearLayout>

</LinearLayout>
运行效果:

7.添加点击事件,在布局类中添加布局控件的点击事件,一次添加就可以不用后续复写需要重复使用的点击事件
package com.example.lenovo.mydemoapp.myLayout;

import android.app.Activity;
import android.content.Context;
import android.content.res.TypedArray;
import android.support.annotation.Nullable;
import android.util.AttributeSet;
import android.view.LayoutInflater;
import android.view.View;
import android.widget.ImageView;
import android.widget.LinearLayout;
import android.widget.TextView;

import com.example.lenovo.mydemoapp.R;

/**
 * Created by lenovo on 2018/5/17.
 */

public class TitleLayout extends LinearLayout {
    private ImageView mTitleLeftImage,mTitle;
    private TextView mTitleText;
    private String mTitleName = "标题";
    public TitleLayout(Context context, @Nullable AttributeSet attrs) {
        super(context, attrs);
        LayoutInflater.from(context).inflate(R.layout.title_layout,this);
        mTitleText = (TextView)findViewById(R.id.title_text);
        /*
        添加自定义标题
         */
        //TypedArray键入数组    obtainStyledAttributes获取样式属性 得到attrs.xml里的name名称
        TypedArray typedArray = context.obtainStyledAttributes(attrs,R.styleable.TitleLayout);
        //从对应name名称的数组下面得到自定义属性
        mTitleName = typedArray.getText(R.styleable.TitleLayout_titleNameText).toString();
        //将自定义属性与布局匹配
        mTitleText.setText(mTitleName);
        /*
        添加返回键点击事件
         */
        mTitleLeftImage = (ImageView)findViewById(R.id.title_left_Image);
        mTitleLeftImage.setOnClickListener(new OnClickListener() {
            @Override
            public void onClick(View v) {
                ((Activity)getContext()).finish();
            }
        });
    }
}


 已为社区贡献2条内容

所有评论(0)