前后端分离项目VUE使用axios调用微服务SpringBoot后端接口无法获取参数
前言首先这是一个很简单却又很恶心的问题,简单就是只需要根据服务端的入参规则传参就行了,恶心就是在写前端时,大多数是只知道入参和请求方式的,但是这里就会涉及到一些小的知识点,而且只写前端的或者只写后端的会存在一些知识盲区,那么本文就会详细的介绍后端微服务入参的基本常用类型和前端入参形式!作为一个工程师不能只会前端或者后端,还需要了解运维,测试等其他技能,不谋全局中,不足谋一域!!!后端入参这里使用S
前言
首先这是一个很简单却又很恶心的问题,简单就是只需要根据服务端的入参规则传参就行了,恶心就是在写前端时,大多数是只知道入参和请求方式的,但是这里就会涉及到一些小的知识点,而且只写前端的或者只写后端的会存在一些知识盲区,那么本文就会详细的介绍后端微服务入参的基本常用类型和前端入参形式!
作为一个工程师不能只会前端或者后端,还需要了解运维,测试等其他技能,不谋全局者,不足谋一域!!!
后端入参
这里使用SpringBoot做后端服务,大致上SpringBoot常见的入参格式一般文章都是写的七中,但是还一种文件上传的方式,那么下面就开始详细介绍每种入参规则
方式1
	@RequestMapping("/test1")
    public String test1(String username,String password) {
        System.out.println("test1");
        System.out.println("username is:"+username);
        System.out.println("password is:"+password);
        return "test1";
    }
这种方式支持GET,POST,但是这里虽然两种请求方式都支持,但是和参数形式有关,在GET请求时支持URL拼接和from-data两种形式,在POST时支持URL参数拼接,from-data和’Content-Type’: ‘application/x-www-form-urlencoded’, 类型
方式2
 	@RequestMapping("/test2")
    public String test2(HttpServletRequest request) {
        System.out.println("test2");
        String username=request.getParameter("username");
        String password=request.getParameter("password");
        System.out.println("username is:"+username);
        System.out.println("password is:"+password);
        return "test2";
    }
这种方式和第一种的差不多,只是可以额外获取Cookie、Header、Session等请求信息
方式3
	@RequestMapping(value="/test3")
    public String test3(@RequestParam(value = "username" ,required = false,defaultValue = "tao") String username,@RequestParam("password") String password) {
        System.out.println("test3");
        System.out.println("username is:"+username);
        System.out.println("password is:"+password);
        return "test3";
    }
这种方式和前两种也是差不多的,只是使用@RequestParam来映射请求参数和方法形参的关系,这里无法获取Cookie、Header、Session等请求信息,如果需要获取这些信息,那么只需要在形参中添加方式二中的HttpServletRequest request即可,当然了这种方式支持GET,POST,但是这里虽然两种请求方式都支持,但是也和参数形式有关,在GET请求时支持URL拼接和from-data两种形式,在POST时支持URL参数拼接,from-data和’Content-Type’: ‘application/x-www-form-urlencoded’, 类型
value:代表请求参数的名字
required:代表当前参数是否必传
defaultValue:代表没传时的默认值
方式4
 	@RequestMapping(value="/test4/{username}/{password}")
    public String test4(@PathVariable String username,@PathVariable String password) {
        System.out.println("test4");
        System.out.println("username is:"+username);
        System.out.println("password is:"+password);
        return "test4";
    }
这种方式是直接取访问路径中的值作为入参注意这里是路径,并不是请求路径?后面的拼接参数,http://xxx.xxx.x.xxx:8888/test4/tao/111这个就是用这种方式入参的,这里不分GET和POST如果非要区分那么在@RequestMapping中加入method=RequestMethod.GET指定一下请求方式,当前这种方式GET和POST都支持,这里需要有些人可能会质疑,但是这是事实,原因很简单,这里是取路径,是路径,是路径,GET和POST都有请求路径,所以都能使用这种方式请求!
方式5
    @RequestMapping(value="/test5/{username}/{password}")
    public String test5(@PathVariable String username,@PathVariable String password,String url1,String url2,String body1,String body2) {
        System.out.println("test5");
        System.out.println("username is:"+username);
        System.out.println("password is:"+password);
        System.out.println("url1 is:"+url1);
        System.out.println("url2 is:"+url2);
        System.out.println("body1 is:"+body1);
        System.out.println("body2 is:"+body2);
        return "test5";
    }
方式5是有上面的方式4演变过来的,但是这种不常见,这种即结合了方式4的路径取参,还有URL取参,同时也能取body中的参数,在GET情况下能同时在路径中放值,URL中放值,也能在body中放值,且同时生效,如果在URL中的参数和body的参数同时存在且参数名都一样时,那么后端就会将参数拼接起来,这里注意在body传参的时候还是需要区分类型的,同样只支持from-data,并不支持application/x-www-form-urlencoded,在POST情况下则都支持,这个光用文字描述可能不是特别清楚,这里我就弄几张截图吧!
------------------------------------------------------GET----------------------------------------------------------------
1.设置访问路径和url拼接参数
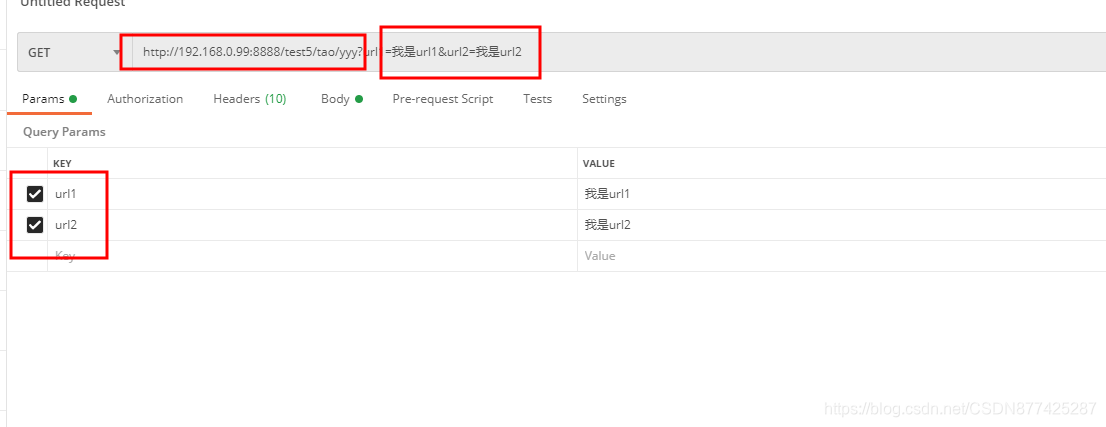
2.设置body参数格式为from-data
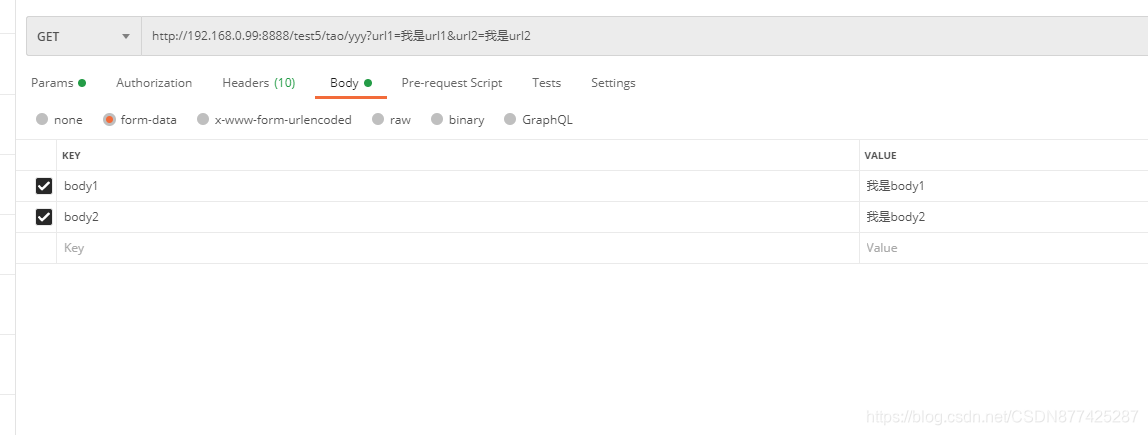
3.发送请求

这里不管是路径、URL还是from-data中的数据这种方式5都能接收!
-----------------------------------------------------------POST----------------------------------------------------------------
1.切换请求方式为POST,其他不变


2.请求测试

同样能获取,那么这里在演示一下前面几种方式中提到GET情况下不支持application/x-www-form-urlencoded,而POST支持这种方式的区别。
----------------------------------------------------------------GET--------------------------------------------------------------------------------
1.请求路径和URL不变,改变body中from-data为application/x-www-form-urlencoded

2.访问测试

这里在GET请求时使用application/x-www-form-urlencoded是无法传参的!
----------------------------------------------------------------POST--------------------------------------------------
1.其他都不变切换请求方式

2.访问测试
 完美获取!
完美获取!
方式6
	@RequestMapping("/test6")
    public String test6(UserModel user) {
        System.out.println("test6");
        System.out.println("username is:"+user.getUsername());
        System.out.println("password is:"+user.getPassword());
        return "test5";
    }
这种方式是直接就收实例类对象的,这里会将请求的入参对应映射到实体类的字段中,这种方式在GET请求时支持URL传参、from-data这两种,不支持application/x-www-form-urlencoded,但是在POST请求时是支持URL传参、from-data、application/x-www-form-urlencoded
方式7
	@RequestMapping(value="/test7")
    public String test7(@ModelAttribute("user") UserModel user) {
        System.out.println("test7");
        System.out.println("username is:"+user.getUsername());
        System.out.println("password is:"+user.getPassword());
        return "addUser7";
    }
这种方式其实和方式6是一样的,也就是多了一个@ModelAttribute注解,这里他的作用其实就和多参数时使用@RequestParam来指定人参映射关系的,这里后端接口上可能也会同时接收多个实体类的入参,那么这里的@ModelAttribute就是起到这个作用的!当然里这里GET和POST的特性也是个方式6一样这里就不过多解释了!
方式8
	@RequestMapping(value="/test8",method=RequestMethod.POST)
    public String test8(@RequestBody UserModel userDTO) {
        System.out.println("test8");
        System.out.println("username is:"+userDTO.getUsername());
        System.out.println("password is:"+userDTO.getPassword());
        return "test8";
    }
这种方式对于前端的话就和前面的有点不同了在GET和POST请求是都不支持URL,路径,from-data、以及application/x-www-form-urlencoded,这种情况只支持Content-Type为application/json类型,如下!

这种就比较适合用于传输复杂的数据对象如数据批量上传由多个嵌套数据构成的那种!
方式9
	@RequestMapping(value="/test9")
    public String test9(MultipartFile file) {
        String fileName = file.getOriginalFilename();
        System.out.println(fileName);
        return "test9";
    }

这里GET和POST其实是都行的,但是需要使用from-data类型!其他类型都不行!
这里大家看完上面的几种入参方式后可能会有一些疑惑,这里比较大的疑惑就是GET请求也可以使用body传参,不是说好的只能将参数放在URL后面么,其实我们对GET请求的是存在片面性的认知的,我们的普遍认知都是GET使用URL传参或Cookie传参,而POST将数据放在body中,GET的URL会有长度限制,这POST则可以非常大,POST比GET安全,因为数据在地址栏上不可见!,但是很不幸这些区别全是错误的,更不幸的是,这个答案还是Google搜索的头版头条!
1. GET和POST与数据如何传递没有关系
GET和POST是由HTTP协议定义的。在HTTP协议中,Method和Data(URL, Body, Header)是正交的两个概念,也就是说,使用哪个Method与应用层的数据如何传输是没有相互关系的。
HTTP没有要求,如果Method是POST数据就要放在BODY中。也没有要求,如果Method是GET,数据(参数)就一定要放在URL中而不能放在BODY中。
那么,网上流传甚广的这个说法是从何而来的呢?我在HTML标准中,找到了相似的描述。这和网上流传的说法一致。但是这只是HTML标准对HTTP协议的用法的约定。怎么能当成GET和POST的区别呢?
而且,现代的Web Server都是支持GET中包含BODY这样的请求。虽然这种请求不可能从浏览器发出,但是现在的Web Server又不是只给浏览器用,已经完全地超出了HTML服务器的范畴了。
2. HTTP协议对GET和POST都没有对长度的限制
HTTP协议明确地指出了,HTTP头和Body都没有长度的要求。而对于URL长度上的限制,有两方面的原因造成:
浏览器。据说早期的浏览器会对URL长度做限制。据说IE对URL长度会限制在2048个字符内(流传很广,而且无数同事都表示认同)。但我自己试了一下,我构造了90K的URL通过IE9访问live.com,是正常的。网上的东西,哪怕是Wikipedia上的,也不能信。
服务器。URL长了,对服务器处理也是一种负担。原本一个会话就没有多少数据,现在如果有人恶意地构造几个几M大小的URL,并不停地访问你的服务器。服务器的最大并发数显然会下降。另一种攻击方式是,把告诉服务器Content-Length是一个很大的数,然后只给服务器发一点儿数据,嘿嘿,服务器你就傻等着去吧。哪怕你有超时设置,这种故意的次次访问超时也能让服务器吃不了兜着走。有鉴于此,多数服务器出于安全啦、稳定啦方面的考虑,会给URL长度加限制。但是这个限制是针对所有HTTP请求的,与GET、POST没有关系。
这里结合官网佐证一下
[RFC7231] A payload within a GET request message has no defined
semantics; sending a payload body on a GET request might cause some
existing implementations to reject the request.
意思是你往GET请求里加body是不符合规范的,不保证所有的实现都支持(主要是以前的实现,因为以前曾经有相应的规定),要是出了啥问题别怪我没提醒你。而且据说老版本的postman是不支持在GET请求里加body的,也是最近才加上的支持;所以要放在以前也就没这些问题了,以前的postman根本发不了带body的GET请求。
但是这一条并不是强制规定。我看很多人都强调一点,GET请求不应携带请求体,服务器应忽略(或者说丢弃)GET请求的请求体。这一条的确是有依据的,来源如下:
[RFC2616] A server SHOULD read and forward a message-body on any request; if the request method does not include defined semantics for an entity-body, then the message-body SHOULD be ignored when handling the request.
当然,官方也只是说SHOULD,没有像前文一样措辞严厉地强调类似HEAD这种的请求MUST NOT have a message body:
[RFC2616] A message-body MUST NOT be included in a request if the specification of the request method does not allow sending an entity-body in requests.
但是很可惜的是,RFC2616已经过时了。现在的说法变成了这样,连SHOULD都直接去掉了,要求更加宽松:
[RFC7230] Request message framing is independent of method semantics, even if the method does not define any use for a message body.
难道是因为错的人多了,错的也变成了对的?不过即使是这样,也并不是在GET请求里加上body的理由
这个问题算是解决了。但是我看到网上各路大神说到GET加body的时候,还提到一个,就是往GET里加body会导致缓存机制失效。“GET 被设计来用 URI 来识别资源,如果让它的请求体中携带数据,那么通常的缓存服务便失效了,URI 不能作为缓存的 Key。”我一开始以为是在服务器上配置的缓存,比如Nginx的cache之类的机制,后来发现好像并非如此。这个缓存,大概是指那种预加载和后存储,会涉及到一个网络请求的“安全性”。如果不安全,显然是不能缓存的。
那么,GET和POST的区别和应用?这问题挺复杂。简而言之,就是“安全”和“不安全”的区别。什么是安全?不用承担责任。什么是不安全?可能需要承担责任。举个例子,点击某个链接以同意某个协议,这个请求明显就是不安全的,因为需要承担责任。如果采用GET,就违反了GET应该用于安全请求的规范。因为浏览器可能在你不知情的情况下预加载这个页面(因为是“安全”的GET请求),这样相当于你在不知情的情况下同意了某个协议,这显然是我们不希望看到的。在契约式的设计里,违反契约的行为是会带来严重的后果的。浏览器按照契约预加载了安全的GET请求,但这本身是不安全的,带来的后果自然要由打破契约的人承担(将这个请求设计成GET的人出来挨打)。
之所以强调“安全”,而不是按照常规的说法强调副作用,因为有副作用的请求不代表不安全;举例来说,服务器有一个显示访问人数的功能,这个功能就可以用GET来做。虽然每次访问都会发送改变服务器状态(计数器)的请求,但用户不会因为这个请求承担责任,这个请求是安全的。至于什么GET请求的URL有长度限制(后来事实证明其实没有),什么GET请求的URL里不能有中文(或者说非ASCII吧),都只是实现上的区别;从最初的设计上来说区别并不在这里。
当然,这些都是纯粹的理论层面的东西。如果遵守RESTful的规范,采用语义化的GET/POST请求,自然也就不会有这些问题了。因为通常来说,查询是安全的;这也是GET的主要作用。
这些问题的产生是由于大多是面向HTML协议开发的,并非是正统的HTTP协议如果一个人一开始就做Web开发,很可能把HTML对HTTP协议的使用方式,当成HTTP协议的唯一的合理使用方式。从而犯了以偏概全的错误。
那么我们现在已经详细的知道GET请求和POST请求最正确的理解了,接下来我们就来看看前端调用时的代码怎么写了!
前端传参
前端这里使用比较常用的VUE来编写代码使用Ajiox来发送请求!为了写一个前端完整的请求工具需要修改一下后端的返回参数
添加R返回数据类
public class R extends HashMap<String, Object> {
    private static final long serialVersionUID = 1L;

    //返回成功
    /**
     * @return
     * {
     *     "msg": "success",
     *     "code": 0
     * }
     */
    public R() {
        put("code", 0);
        put("msg", "success");
    }
    /**
     * @return
     * {
     *     "msg": "success",
     *     "code": 0
     * }
     */
    public static R ok() {
        return new R();
    }

    /**
     * @param msg
     * @return
     * {
     *     "msg": "oth",
     *     "code": 0
     * }
     */
    public static R ok(String msg) {
        R r = new R();
        r.put("msg", msg);
        return r;
    }

    /**
     * @param map
     * @return
     * {
     *     "msg": "success",
     *     "code": 0,
     *     "name": "TAO",
     *     "age": 12
     * }
     */
    public static R ok(Map<String, Object> map) {
        R r = new R();
        r.putAll(map);
        return r;
    }

    public R setData(Object data) {
        put("data", data);
        return this;
    }


    public  Integer getCode() {
        return (Integer) this.get("code");
    }

    //返回失败

    public static R error(int code, String msg) {
        R r = new R();
        r.put("code", code);
        r.put("msg", msg);
        return r;
    }

    public static R error() {
        return error(500, "未知异常,请联系管理员");
    }
    public static R error(String msg) {
        return error(500, msg);
    }


}
修改返回数据格式为R
	@RequestMapping(value="/test8",method=RequestMethod.POST)
    public R test8(@RequestBody UserModel userDTO) {
        System.out.println("test8");
        System.out.println("username is:"+userDTO.getUsername());
        System.out.println("password is:"+userDTO.getPassword());
        JSONObject r=new JSONObject();
        r.put("username",userDTO.getUsername());
        r.put("password",userDTO.getPassword());
        return R.ok().setData(r);
    }
其他的也修改成这种返回格式!
1.封装请求配置
config.js
const devApiUrl = 'http://192.168.0.99:8888';//本地开发环境
const buildDevApiUrl = 'http://192.168.0.99:8025';//打包开发环境
const buildTestApiUrl = 'http://192.168.0.99:8025';//打包测试环境
const buildProApiUrl = 'http://47.56.15.123:8025';//打包正式环境


let useApiUrl;

switch (process.env.NODE_ENV) {
    case 'development':
        useApiUrl = devApiUrl;
        break;
    case 'buildDev':
        useApiUrl = buildDevApiUrl;
        break;
    case 'buildTest':
        useApiUrl = buildTestApiUrl;
        break;
    case 'production':
        useApiUrl = buildProApiUrl;
        break;
}

export default {
    nodeDevEnv: process.env.NODE_ENV == 'development',
    apiUrl: useApiUrl,
    apiPrefix: "",
    timeout: 3000,
    cookiesExpires: 7,

}
2.请求工具
import Axios from 'axios'
import Config from './config'
import {
    Notification,
    Loading
} from 'element-ui';


//创建请求
const request = Axios.create({
    baseURL: Config.apiUrl + '/' + Config.apiPrefix,
    headers: {
        'Accept': '*/*',
        'Content-Type': 'application/json; charset=utf-8'
    },
    timeout: Config.timeout,
})

//请求
request.interceptors.request.use(config => {
        if (!config.closeLoading) {//是否开启请求耗时遮罩
            window.loadingInstance = Loading.service({
                fullscreen: true
            });
        }
        return config
    },
    error => {
        return Promise.reject(error)
    }
);

//响应
request.interceptors.response.use(
    response => {
        const res = response;
        if (!response.config.closeLoading) {
            window.loadingInstance.close();
        }

        if (res.status !== 200) {//请求失败
            Notification({
                title: '数据返回出错',
                message: "请稍后重试",
                type: 'warning'
            });
            return Promise.reject('error')
        }


        if (res.data.code != 0) {//所有请求成功返回的状态码code为0  如果不等于0请求失败,提示错误信息
            Notification({
                title: res.data.msg,
                type: 'warning'
            });
            return Promise.reject('error');
        }

        //请求成功只返回data数据  前端只处理data数据,无需管理msg,code
        return res.data.data;

    },
    error => {
        console.log("error:" + error)
        if (error == 'Error: Request failed with status code 403') {
            Notification({
                title: '请求失败',
                message: "身份验证失效,请重新登录",
                type: 'warning'
            });
            window.loadingInstance.close();
            router.push("/");
        } else {
            setTimeout(_ => {
                window.loadingInstance.close();
            }, 300)
            Notification({
                title: "请求未响应",
                message: "服务器可能出了点问题",
                type: 'warning'
            });
            return Promise.reject(error) //千万不能去掉,,,否则请求超时会进入到then方法,导致逻辑错误。
        }
    }
)
export default request
3.请求方法
import request from './request'

//test1-get
export function test1_get(data) {
    return request({
        url: '/test1',
        method: 'get',
        params: data
    })
}
//test1-post
export function test1_post(data) {
    return request({
        url: '/test1',
        method: 'post',
        params: data
    })
}
//test2-get
export function test2_get(data) {
    return request({
        url: '/test2',
        method: 'get',
        params: data
    })
}
//test2_post
export function test2_post(data) {
    return request({
        url: '/test2',
        method: 'post',
        params: data
    })
}

//test3-get
export function test3_get(data) {
    return request({
        url: '/test3',
        method: 'get',
        params: data
    })
}
//test3_post
export function test3_post(data) {
    return request({
        url: '/test3',
        method: 'post',
        params: data
    })
}

//test4-get
export function test4_get(data) {
    return request({
        url: '/test4/tao/yyy',
        method: 'get',
        params: data
    })
}
//test4_post
export function test4_post(data) {
    return request({
        url: '/test4/tao/yyy',
        method: 'post',
        params: data
    })
}
//test5-get-这种方式使用get入参路径、URL传参可以,但是from-data将值放入body中浏览器是无法发送出去的
export function test5_get(data) {
    return request({
        url: '/test5/tao/yyy',
        method: 'get',
        params: data,
        headers: {
            'Content-Type': 'application/x-www-form-urlencoded'
        },
        transformRequest: [function (data) {
            let ret = ''
            for (let it in data) {
                console.log(it)
                ret += encodeURIComponent(it) + '=' + encodeURIComponent(data[it]) + '&'
            }
            return ret
        }],
        data:{
            body1:"这是body1",
            body2:"这是body2"
        }
    })
}
//test5_post
export function test5_post(data) {
    return request({
        url: '/test5/tao/yyy',
        method: 'post',
        params: data,
        headers: {//特殊情况下可以设置请求头
            'Content-Type': 'application/x-www-form-urlencoded'
        },
        transformRequest: [function (data) {//这种请求头需要将数据格式转换为&拼接模式
            let ret = ''
            for (let it in data) {
                console.log(it)
                ret += encodeURIComponent(it) + '=' + encodeURIComponent(data[it]) + '&'
            }
            return ret
        }],
        data:{
            body1:"这是body1",
            body2:"这是body2"
        }
    })
}


//test6-get
export function test6_get(data) {
    return request({
        url: '/test6',
        method: 'get',
        params: data
    })
}
//test6_post
export function test6_post(data) {
    return request({
        url: '/test6',
        method: 'post',
        params: data
    })
}

//test7-get
export function test7_get(data) {
    return request({
        url: '/test7',
        method: 'get',
        params: data
    })
}
//test7_post
export function test7_post(data) {
    return request({
        url: '/test7',
        method: 'post',
        params: data
    })
}


//test8_post
export function test8_post(data) {
    return request({
        url: '/test8',
        method: 'post',
        data: data,//这种是专门发送json数据的data,普通情况使用params
    })
}
4.测试代码
<template>
    <div>
        <h1>http请求测试</h1>
        <hr>
        <button @click="test1_get">test1_get</button>
        <button @click="test1_post">test1_post</button>
        <hr>
        <button @click="test2_get">test2_get</button>
        <button @click="test2_post">test2_post</button>
        <hr>
        <button @click="test3_get">test3_get</button>
        <button @click="test3_post">test3_post</button>
        <hr>
        <button @click="test4_get">test4_get</button>
        <button @click="test4_post">test4_post</button>
        <hr>
        <button @click="test5_get">test5_get</button>
        <button @click="test5_post">test5_post</button>
        <hr>
        <button @click="test6_get">test6_get</button>
        <button @click="test6_post">test6_post</button>
        <hr>
        <button @click="test7_get">test7_get</button>
        <button @click="test7_post">test7_post</button>
        <hr>
        <button @click="test8_get">test8_get</button>
        <button @click="test8_post">test8_post</button>
    </div>
</template>

<script>
    import {
        test1_get, test1_post,
        test2_get, test2_post,
        test3_get, test3_post,
        test4_get, test4_post,
        test5_get, test5_post,
        test6_get, test6_post,
        test7_get, test7_post,
         test8_post,
    } from "../../server/test";

    export default {
        name: "test",
        data() {
            return {}
        },
        methods: {
            test1_get() {
                test1_get({
                    username: "tao",
                    password: "yyy"
                }).then(data => {
                    console.log(data);
                })
            },
            test1_post() {
                test1_post({
                    username: "tao",
                    password: "yyy"
                }).then(data => {
                    console.log(data);
                })
            },
            test2_get() {
                test2_get({
                    username: "tao",
                    password: "yyy"
                }).then(data => {
                    console.log(data);
                })
            },
            test2_post() {
                test2_post({
                    username: "tao",
                    password: "yyy"
                }).then(data => {
                    console.log(data);
                })
            },
            test3_get() {
                test3_get({
                    username: "tao",
                    password: "yyy"
                }).then(data => {
                    console.log(data);
                })
            },
            test3_post() {
                test3_post({
                    username: "tao",
                    password: "yyy"
                }).then(data => {
                    console.log(data);
                })
            },
            test4_get() {
                test4_get().then(data => {
                    console.log(data);
                })
            },
            test4_post() {
                test4_post().then(data => {
                    console.log(data);
                })
            },
            test5_get() {
                test5_get({
                    url1: "这是url1",
                    url2: "这是url2"
                }).then(data => {
                    console.log(data);
                })
            },
            test5_post() {
                test5_post({
                    url1: "这是url1",
                    url2: "这是url2",
                }).then(data => {
                    console.log(data);
                })
            },
            test6_get() {
                test6_get({
                    username: "tao",
                    password: "yyy"
                }).then(data => {
                    console.log(data);
                })
            },
            test6_post() {
                test6_post({
                    username: "tao",
                    password: "yyy"
                }).then(data => {
                    console.log(data);
                })
            },
            test7_get() {
                test7_get({
                    username: "tao",
                    password: "yyy"
                }).then(data => {
                    console.log(data);
                })
            },
            test7_post() {
                test7_post({
                    username: "tao",
                    password: "yyy"
                }).then(data => {
                    console.log(data);
                })
            },
            test8_get() {
                test8_get({
                    username: "tao",
                    password: "yyy"
                }).then(data => {
                    console.log(data);
                })
            },
            test8_post() {
                test8_post({
                    username: "tao",
                    password: "yyy"
                }).then(data => {
                    console.log(data);
                })
            }
        }
    }
</script>

<style scoped>

</style>
这里需要注意的是Axios提供两种数据入参,一种是params,另一种是data,这两种是有明显区别的,在后端请求非json的请求情况下params可以完全搞定,但是在后端使用json格式是必须存放在data中并且Content-Type=application/json; charset=utf-8
如果使用params先后端发送且设置Content-Type=application/json; charset=utf-8后端shi无法接收参数的!这里特别需要注意
这里关于vue的axios有疑问的可以看看这篇文章axios介绍与使用说明 axios中文文档
本文参考一下文章
不再以讹传讹,GET和POST的真正区别
关于在GET请求中使用body【不建议在GET请求中使用body】
multipart/form-data与application/octet-stream的区别、application/x-www-form-urlencoded
postman中 form-data、x-www-form-urlencoded、raw、binary的区别
springboot(服务端接口)获取URL请求参数的几种方法
http中post请求x-www-form-urlencoded与form-data的区别

为开发者提供学习成长、分享交流、生态实践、资源工具等服务,帮助开发者快速成长。
更多推荐


 1
1 0
0- 0


 已为社区贡献6条内容

所有评论(0)