Android 日期时间选择器
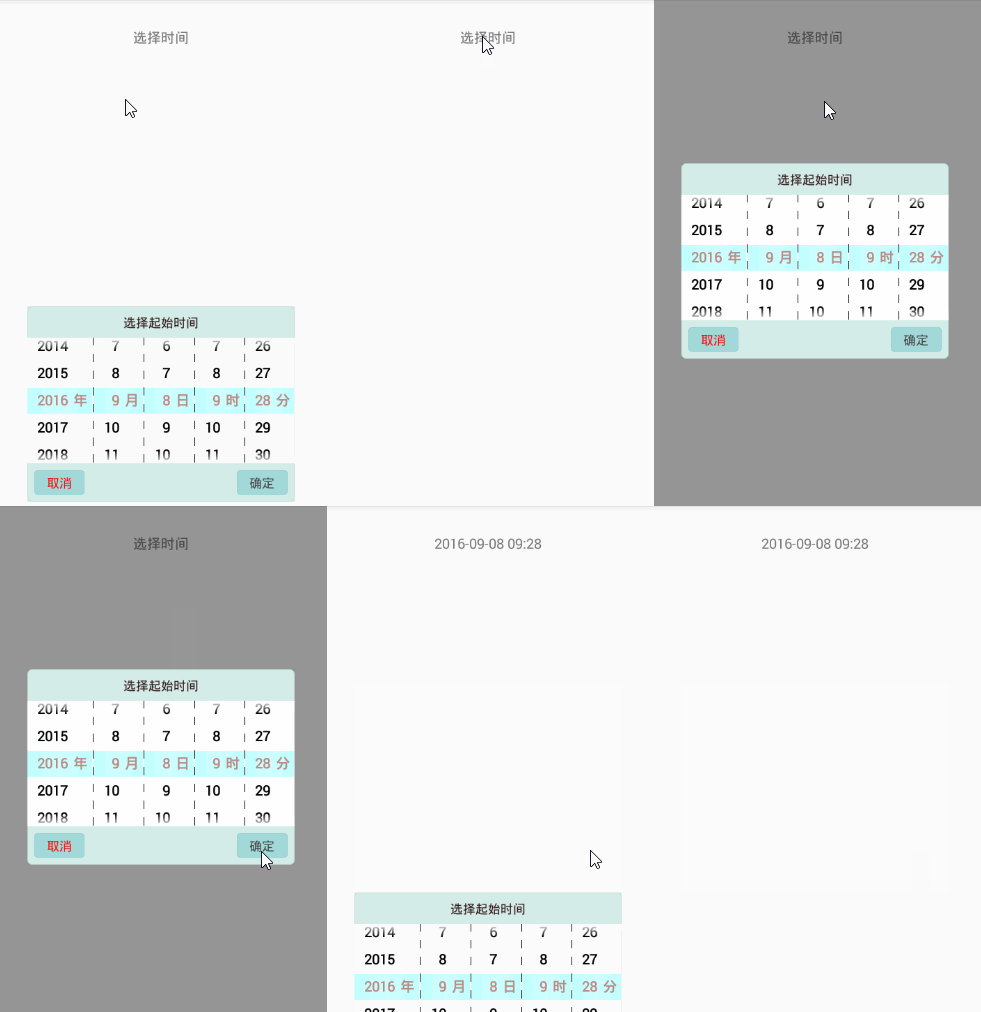
日期选择器是很多应用所具备的,比如设置一些任务的开始和结束时间。为了方便用户的同时也为了界面的好看,很多都是采用日期选择器,我在网上看了一下。很多的日期选择器个人感觉不是很好看,但是修改起来也有点麻烦,于是自己就写了一个demo。至于界面效果个人感觉也是很low,毕竟鄙人不是搞UI的,所以也就凑合着看吧。这些都不重要,因为这些是可以修改的。如果想实现具有年月日的请看下面的注意里面的内容,下图是实现
日期选择器是很多应用所具备的,比如设置一些任务的开始和结束时间。为了方便用户的同时也为了界面的好看,很多都是采用日期选择器,我在网上看了一下。很多的日期选择器个人感觉不是很好看,但是修改起来也有点麻烦,于是自己就写了一个demo。至于界面效果个人感觉也是很low,毕竟鄙人不是搞UI的,所以也就凑合着看吧。这些都不重要,因为这些是可以修改的。
如果想实现具有年月日的请看下面的注意里面的内容,下图是实现的分钟为00 15 30 45的如果想要0-59的请看下面的注意里面的内容
如果需要的是仿iOS的带有星期几的
点击此处查看带有星期几的博客

首先界面弹出PopupWindow动画的实现,具体的代码如下
进入动画
<?xml version="1.0" encoding="utf-8"?>
<set xmlns:android="http://schemas.android.com/apk/res/android" >

    <translate
        android:duration="500"
        android:fromYDelta="100.0%p"
        android:toYDelta="45" />

</set>
退出动画
<?xml version="1.0" encoding="utf-8"?>
<set xmlns:android="http://schemas.android.com/apk/res/android" >

    <translate
        android:duration="500"
        android:fromYDelta="0.0"
        android:toYDelta="100.0%p" />

</set>
主要界面的内容
public class MainActivity extends Activity implements View.OnClickListener{
    private TextView tv_house_time;
    private TextView tv_center;
    private WheelMain wheelMainDate;
    private String beginTime;

    @Override
    protected void onCreate(Bundle savedInstanceState) {
        // TODO Auto-generated method stub
        super.onCreate(savedInstanceState);
        setContentView(R.layout.activity_main);
        initView();
        initEvent();
    }

    private void initEvent() {
        tv_house_time.setOnClickListener(this);
    }

    private void initView() {
        tv_house_time = (TextView) findViewById(R.id.tv_house_time);
        tv_center = (TextView) findViewById(R.id.tv_center);
    }

    private java.text.DateFormat dateFormat = new SimpleDateFormat("yyyy-MM-dd");
    public void showBottoPopupWindow() {
        WindowManager manager = (WindowManager)getSystemService(Context.WINDOW_SERVICE);
        Display defaultDisplay = manager.getDefaultDisplay();
        DisplayMetrics outMetrics = new DisplayMetrics();
        defaultDisplay.getMetrics(outMetrics);
        int width = outMetrics.widthPixels;
                View menuView = LayoutInflater.from(this).inflate(R.layout.show_popup_window,null);
        final PopupWindow mPopupWindow = new PopupWindow(menuView, (int)(width*0.8),
                ActionBar.LayoutParams.WRAP_CONTENT);
        ScreenInfo screenInfoDate = new ScreenInfo(this);
        wheelMainDate = new WheelMain(menuView, true);
        wheelMainDate.screenheight = screenInfoDate.getHeight();
        String time = DateUtils.currentMonth().toString();
        Calendar calendar = Calendar.getInstance();
        if (JudgeDate.isDate(time, "yyyy-MM-DD")) {
            try {
                calendar.setTime(new Date(time));
            } catch (Exception e) {
                e.printStackTrace();
            }
        }
        int year = calendar.get(Calendar.YEAR);
        int month = calendar.get(Calendar.MONTH);
        int day = calendar.get(Calendar.DAY_OF_MONTH);
        int hours = calendar.get(Calendar.HOUR_OF_DAY);
        int minute = calendar.get(Calendar.MINUTE);
        wheelMainDate.initDateTimePicker(year, month, day, hours,minute);
        final String currentTime = wheelMainDate.getTime().toString();
        mPopupWindow.setAnimationStyle(R.style.AnimationPreview);
        mPopupWindow.setTouchable(true);
        mPopupWindow.setFocusable(true);
        mPopupWindow.setBackgroundDrawable(new BitmapDrawable());
        mPopupWindow.showAtLocation(tv_center, Gravity.CENTER, 0, 0);
        mPopupWindow.setOnDismissListener(new poponDismissListener());
        backgroundAlpha(0.6f);
        TextView tv_cancle = (TextView) menuView.findViewById(R.id.tv_cancle);
        TextView tv_ensure = (TextView) menuView.findViewById(R.id.tv_ensure);
        TextView tv_pop_title = (TextView) menuView.findViewById(R.id.tv_pop_title);
        tv_pop_title.setText("选择起始时间");
        tv_cancle.setOnClickListener(new View.OnClickListener() {
            @Override
            public void onClick(View arg0) {
                mPopupWindow.dismiss();
                backgroundAlpha(1f);
            }
        });
        tv_ensure.setOnClickListener(new View.OnClickListener() {

            @Override
            public void onClick(View arg0) {
                beginTime = wheelMainDate.getTime().toString();
                try {
                    Date begin = dateFormat.parse(currentTime);
                    Date end = dateFormat.parse(beginTime);
                    tv_house_time.setText(DateUtils.currentTimeDeatil(begin));
                } catch (ParseException e) {
                    e.printStackTrace();
                }
                mPopupWindow.dismiss();
                backgroundAlpha(1f);
            }
        });
    }

    public void backgroundAlpha(float bgAlpha) {
        WindowManager.LayoutParams lp = getWindow().getAttributes();
        lp.alpha = bgAlpha;
        getWindow().setAttributes(lp);
    }

    @Override
    public void onClick(View v) {
        switch (v.getId()){
            case R.id.tv_house_time:
                showBottoPopupWindow();
                break;
        }
    }

    class poponDismissListener implements PopupWindow.OnDismissListener {
        @Override
        public void onDismiss() {
            backgroundAlpha(1f);
        }

    }
}
布局内容的
<LinearLayout xmlns:android="http://schemas.android.com/apk/res/android"
    android:id="@+id/rel_select"
    android:layout_width="wrap_content"
    android:layout_height="wrap_content"
    android:layout_centerInParent="true"
    android:layout_margin="10dp"
    android:background="@drawable/border_circle_radius"
    android:orientation="vertical" >
<TextView
    android:background="#2F0F9980"
    android:padding="10dp"
    android:id="@+id/tv_pop_title"
    android:textSize="18sp"
    android:gravity="center"
    android:textColor="#301616"
    android:layout_width="match_parent"
    android:layout_height="wrap_content" />
    <LinearLayout
        android:id="@+id/timePicker1"
        android:layout_width="match_parent"
        android:layout_height="wrap_content"
        android:orientation="horizontal" >
        <liuyongxiang.robert.com.testtime.wheelview.WheelView
            android:id="@+id/year"
            android:layout_width="wrap_content"
            android:layout_weight="1"
            android:layout_height="wrap_content" />
        <liuyongxiang.robert.com.testtime.wheelview.DashedLineView
            android:layout_width="1dp"
            android:gravity="center_vertical"
            android:layout_gravity="center"
            android:background="@drawable/dotted_line"
            android:layout_height="match_parent" />
        <liuyongxiang.robert.com.testtime.wheelview.WheelView
            android:id="@+id/month"
            android:layout_width="wrap_content"
            android:layout_weight="1"
            android:layout_height="wrap_content" />
        <liuyongxiang.robert.com.testtime.wheelview.DashedLineView
            android:layout_width="1dp"
            android:gravity="center_vertical"
            android:layout_gravity="center"
            android:background="@drawable/dotted_line"
            android:layout_height="match_parent" />
        <liuyongxiang.robert.com.testtime.wheelview.WheelView
            android:id="@+id/day"
            android:layout_width="wrap_content"
            android:layout_weight="1"
            android:layout_height="wrap_content" />
        <liuyongxiang.robert.com.testtime.wheelview.DashedLineView
            android:layout_width="1dp"
            android:background="@drawable/dotted_line"
            android:layout_height="match_parent" />
        <liuyongxiang.robert.com.testtime.wheelview.WheelView
            android:id="@+id/hour"
            android:layout_width="wrap_content"
            android:layout_weight="1"
            android:layout_height="wrap_content" />
        <liuyongxiang.robert.com.testtime.wheelview.DashedLineView
            android:layout_width="1dp"
            android:background="@drawable/dotted_line"
            android:layout_height="match_parent" />
        <liuyongxiang.robert.com.testtime.wheelview.WheelView
            android:id="@+id/mins"
            android:layout_width="wrap_content"
            android:layout_weight="1"
            android:layout_height="wrap_content" />
    </LinearLayout>
    <LinearLayout
        android:layout_width="match_parent"
        android:layout_height="wrap_content"
        android:background="#2F0F9980"
        android:padding="10dp"
        android:orientation="horizontal" >

        <TextView
            android:id="@+id/tv_cancle"
            android:layout_width="0dp"
            android:layout_height="wrap_content"
            android:gravity="center"
            android:paddingLeft="20dp"
            android:paddingRight="20dp"
            android:padding="5dp"
            android:textSize="18sp"
            android:textColor="#ff0000"
            android:layout_weight="1"
            android:background="@drawable/btn_pop"
            android:text="取消" />

        <TextView
            android:layout_width="0dp"
            android:layout_height="wrap_content"
            android:layout_weight="3" />

        <TextView
            android:id="@+id/tv_ensure"
            android:layout_width="0dp"
            android:layout_height="wrap_content"
            android:gravity="center"
            android:textColor="#414341"
            android:padding="5dp"
            android:paddingLeft="20dp"
            android:paddingRight="20dp"
            android:layout_weight="1"
            android:textSize="18sp"
            android:background="@drawable/btn_pop"
            android:text="确定" />
    </LinearLayout>


</LinearLayout>
请注意
MainActivity里面的显示时间的 tv_house_time.setText(DateUtils.currentTimeDeatil(begin));需要更改为
tv_house_time.setText(DateUtils.formateStringH(beginTime,DateUtils.yyyyMMddHHmm));否则现实的额时间为00:00
修改后的

将WheelMain里面的以下代码
wv_mins.setAdapter(adapter);
wv_mins.setCyclic(true);// 可循环滚动
wv_mins.setLabel(“分”);// 添加文字
int min = setMinute(m);
wv_mins.setCurrentItem(min);
更换为
wv_mins.setAdapter(new NumericWheelAdapter(
0, 59));
wv_mins.setCyclic(true);// 可循环滚动
wv_mins.setLabel(“分”);// 添加文字
wv_mins.setCurrentItem(m);
还需要将
int minute = Integer.valueOf(adapter.getItem(wv_mins.getCurrentItem()));
改为
int minute = wv_mins.getCurrentItem();
会将分钟更改为从0到59
如果不想要时间只想要年月日的话只需要
if (hasSelectTime) {
wv_hours.setVisibility(View.GONE);
wv_mins.setVisibility(View.GONE);
    } else {
        wv_hours.setVisibility(View.GONE);
        wv_mins.setVisibility(View.GONE);
        wv_day.setVisibility(View.GONE);
    }
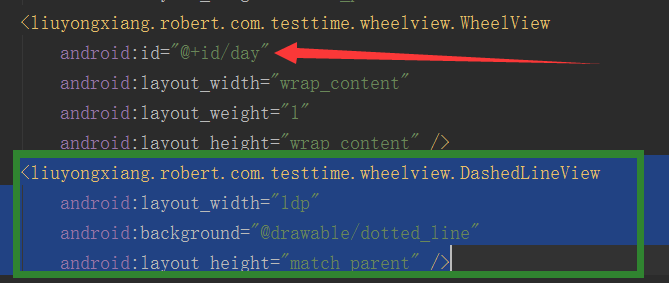
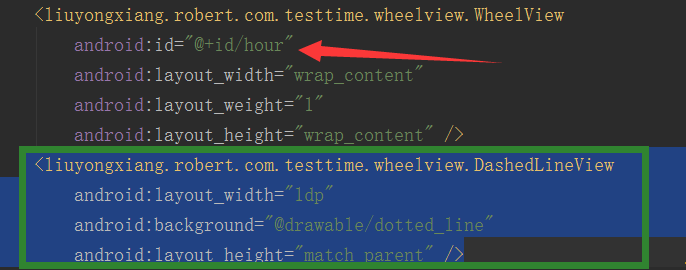
    将这段代码放开就可以了还要将以下绿色区域内的代码去掉
还需要将 MainActivty里的如下代码
wheelMainDate.initDateTimePicker(year, month, day, hours,minute);
更改为
wheelMainDate.initDateTimePicker(year, month, day);
还有 wheelMain里的
if (!hasSelectTime) {
        sb.append((wv_year.getCurrentItem() + START_YEAR)).append("-")
                .append(strMon).append("-")
                .append(strDay).append("  ").append(strHour).append(":").append(strMin);
    }else{
        sb.append((wv_year.getCurrentItem() + START_YEAR)).append("-")
                .append(strMon).append("-")
                .append(strDay).append("  ").append(strHour).append(":").append(strMin);
    }
需要修改为
if (!hasSelectTime) {
        sb.append((wv_year.getCurrentItem() + START_YEAR)).append("-")
                .append(strMon).append("-")
                .append(strDay);
    }else{
        sb.append((wv_year.getCurrentItem() + START_YEAR)).append("-")
                .append(strMon).append("-")
                .append(strDay);
    }
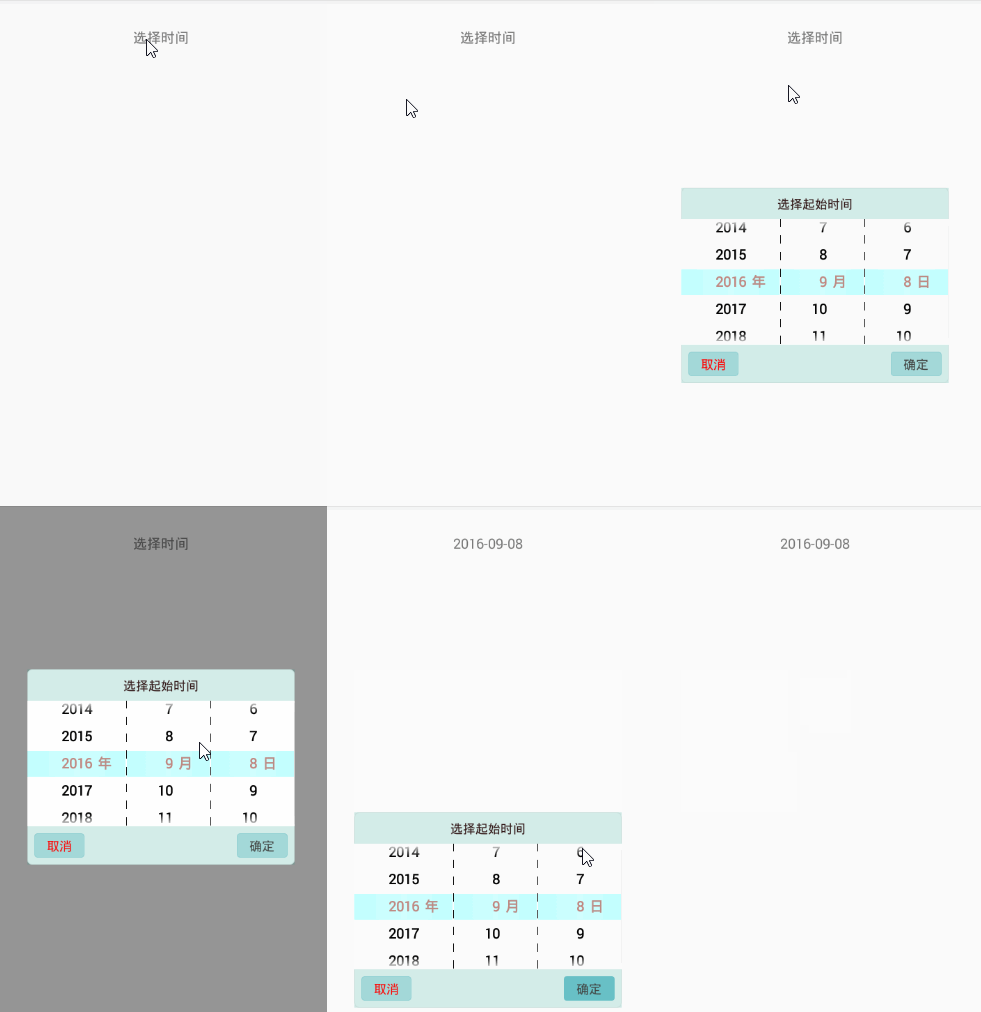
实现效果如下图
最近更新代码到github上面了
Github下载地址
csdn下载地址

如有疑问请留言或请加Android交流群 470707794或Android技术交流群 50208422(此群已满)
扫码关注公众号
更多推荐
 已为社区贡献1条内容






所有评论(0)