【uniapp】 用 view-scroll 实现商品分类页面的 左边滚动右边固定效果
view-scroll 实现商品分类页面的 左边滚动右边固定效果
·
uniapp 用 view-scroll 实现商品分类页面的 左边滚动右边固定效果
view-scroll可滚动视图区域,用于区域滚动,具体看官网:https://uniapp.dcloud.net.cn/component/scroll-view.html
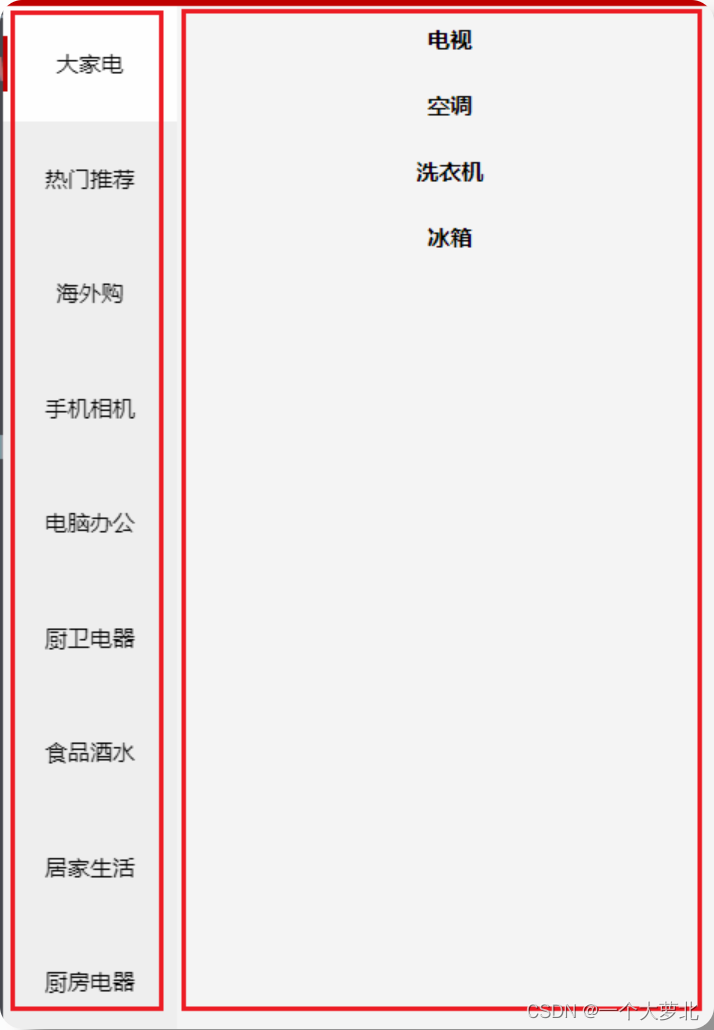
效果:
![[外链图片转存失败,源站可能有防盗链机制,建议将图片保存下来直接上传(img-7xVJg25Z-1677770290445)(C:\Users\28132\AppData\Roaming\Typora\typora-user-images\1677767847253.png)]](https://i-blog.csdnimg.cn/blog_migrate/79f253ff2f04fb4b6b1110904b5d0c41.png)
总体代码实现:
<template>
	<view>
		<!-- 分类页面 -->
		<view class="cate-container">
			<!-- 左边的滚动部分 -->
			<scroll-view class="cate-left" scroll-y :style="{height: wh+'px'}">
				<view :class="['cate-left-item',index===active? 'active' :''] " v-for="(item,index) in cateList"
					:key="item.cat_id" @click="changeActive(index)">{{item.cat_name}}</view>
			</scroll-view>

			<!-- 右边部分 -->
			<scroll-view class="cate-right" scroll-y :style="{height: wh+'px'}">
				<!-- 二级分类 -->
				<view class="cate-right-item" v-for="(item,index) in cateDetail" :key="index">
					<view class="cate-right-item-title">
						{{item.cat_name}}
					</view>
				</view>
			</scroll-view>
		</view>
	</view>
</template>

<script>
	export default {
		data() {
			return {
				// 窗口高度
				wh: 0,
				// 左侧列表数据
				cateList: [],
				// 左侧选中
				active: 0,
				// 右侧内容
				cateDetail: []
			};
		},
		methods: {
			// 获取列表信息
			async getCateList() {
				const {
					data
				} = await uni.$http.get('/categories')
				if (data.meta.status !== 200) return uni.$showMsg()
				console.log(data);
				this.cateList = data.message
				this.cateDetail = data.message[0].children
			},
			// 高亮
			changeActive(index) {
				this.active = index
				// 获取二级分类列表
				this.cateDetail = this.cateList[index].children
			}
		},
		onLoad() {
			this.getCateList()
			// 获取页面可用高度
			// https://uniapp.dcloud.io/api/system/info?id=getsysteminfosync
			uni.getSystemInfo({
				success: (sysInfo) => {
					// 为 wh 赋值(windowHeight,可使用窗口高度)
					this.wh = sysInfo.windowHeight
				}
			})

		}
	}
</script>

<style lang="scss">
	.cate-container {
		display: flex;

		.cate-left {
			width: 240rpx;

			.cate-left-item {
				display: flex;
				justify-content: center;
				align-items: center;
				height: 120rpx;
				background-color: #efefef;
				font-size: 24rpx;

				// 选中样式
				&.active {
					display: flex;
					justify-content: space-between;
					background-color: #fff;

					&::before {
						content: '';
						width: 6rpx;
						height: 60rpx;
						background-color: #c00000;
					}

					// 右边白线
					&::after {
						content: '';
						width: 6rpx;
						height: 60rpx;
						background-color: #fff;
					}
				}

			}
		}

		.cate-right {
			.cate-right-item {
				.cate-right-item-title {
					display: flex;
					justify-content: center;
					font-weight: bold;
					font-size: 24rpx;
					padding: 20rpx 0;
				}
			}
		}
	}
</style>
步骤分析
1. 静态页面分析—最大的盒子
![[外链图片转存失败,源站可能有防盗链机制,建议将图片保存下来直接上传(img-9oaqIq3b-1677770290446)(C:\Users\28132\AppData\Roaming\Typora\typora-user-images\1677767916368.png)]](https://i-blog.csdnimg.cn/blog_migrate/c98ae749f8980933f3686e9786efdedc.png)
大容器左右两边分布===flex
实现代码:
<view class="cate-container">
    <!-- 左边部分 -->
    <scroll-view class="cate-left" scroll-y style="height: 1200px}"> //暂时给个死的数据
	</scroll-view>
    <!-- 右边部分 -->
	<scroll-view class="cate-right" scroll-y style="height: 1200px}">
    </scroll-view>
</view>

//样式 给最大的容器flex,给一个子弹性盒子宽,剩下一个自动适应宽度
.cate-container{
 display:flex
 //给左边的一个固定的宽
 .cate-left {
	width: 240rpx;
 }
}
2.左边的滚动列表
2.1 style动态设置高度
也可以用这个获取窗口的高度:(其实是一样的)
const sysInfo = uni.getSystemInfoSync()
this.wh = sysInfo.windowHeight
!!!注意点:自己也踩了坑
- style里的height的高度要为px不能写rpx哦
![[外链图片转存失败,源站可能有防盗链机制,建议将图片保存下来直接上传(img-cnrRiEOD-1677770290446)(C:\Users\28132\AppData\Roaming\Typora\typora-user-images\1677769002297.png)]](https://i-blog.csdnimg.cn/blog_migrate/3b17ee6d9498c40982ba20da11846851.png)
2.2 获取数据遍历渲染
![[外链图片转存失败,源站可能有防盗链机制,建议将图片保存下来直接上传(img-m6PF5seE-1677770290446)(C:\Users\28132\AppData\Roaming\Typora\typora-user-images\1677769280483.png)]](https://i-blog.csdnimg.cn/blog_migrate/32fc0254e2b59f385e0464de66a1f3c6.png)
记得设置css样式哦!
在上面可以自己cv
2.3 动态添加类名高亮
![[外链图片转存失败,源站可能有防盗链机制,建议将图片保存下来直接上传(img-hgIPsrNp-1677770290447)(C:\Users\28132\AppData\Roaming\Typora\typora-user-images\1677769441688.png)]](https://i-blog.csdnimg.cn/blog_migrate/ca607e4219e3dd705352784e98c35299.png)
动态添加类名: :class=“[‘类名1’,‘类名2’]”
active 高亮处理:通过将点击的那一项的index传过来给active赋值,然后在添加类名的地方判断和当前的index一样,就添加,其他的不一样就不添加
3. 右侧内容展示区域
![[外链图片转存失败,源站可能有防盗链机制,建议将图片保存下来直接上传(img-S0m1ZHW5-1677770290447)(C:\Users\28132\AppData\Roaming\Typora\typora-user-images\1677770053648.png)]](https://i-blog.csdnimg.cn/blog_migrate/d91dd9ddae24d427a54c1cf538557269.png)
大家注意自己获取的数据的格式,适当做出调整
后续还要把右边补上,等我
更多推荐
 已为社区贡献1条内容


所有评论(0)