

开发自己的第二款APP
- 基于网络登陆注册
- 能与后端进行交互的app
【一】引入
- 前面我们已经自己开发出了一款简答的App。
- 但是那个App知识利用的本地的数据,没有和后端进行交互
- 所以只能算是前端
- 接下来我们要开发一款能与后端进行交互通信的App
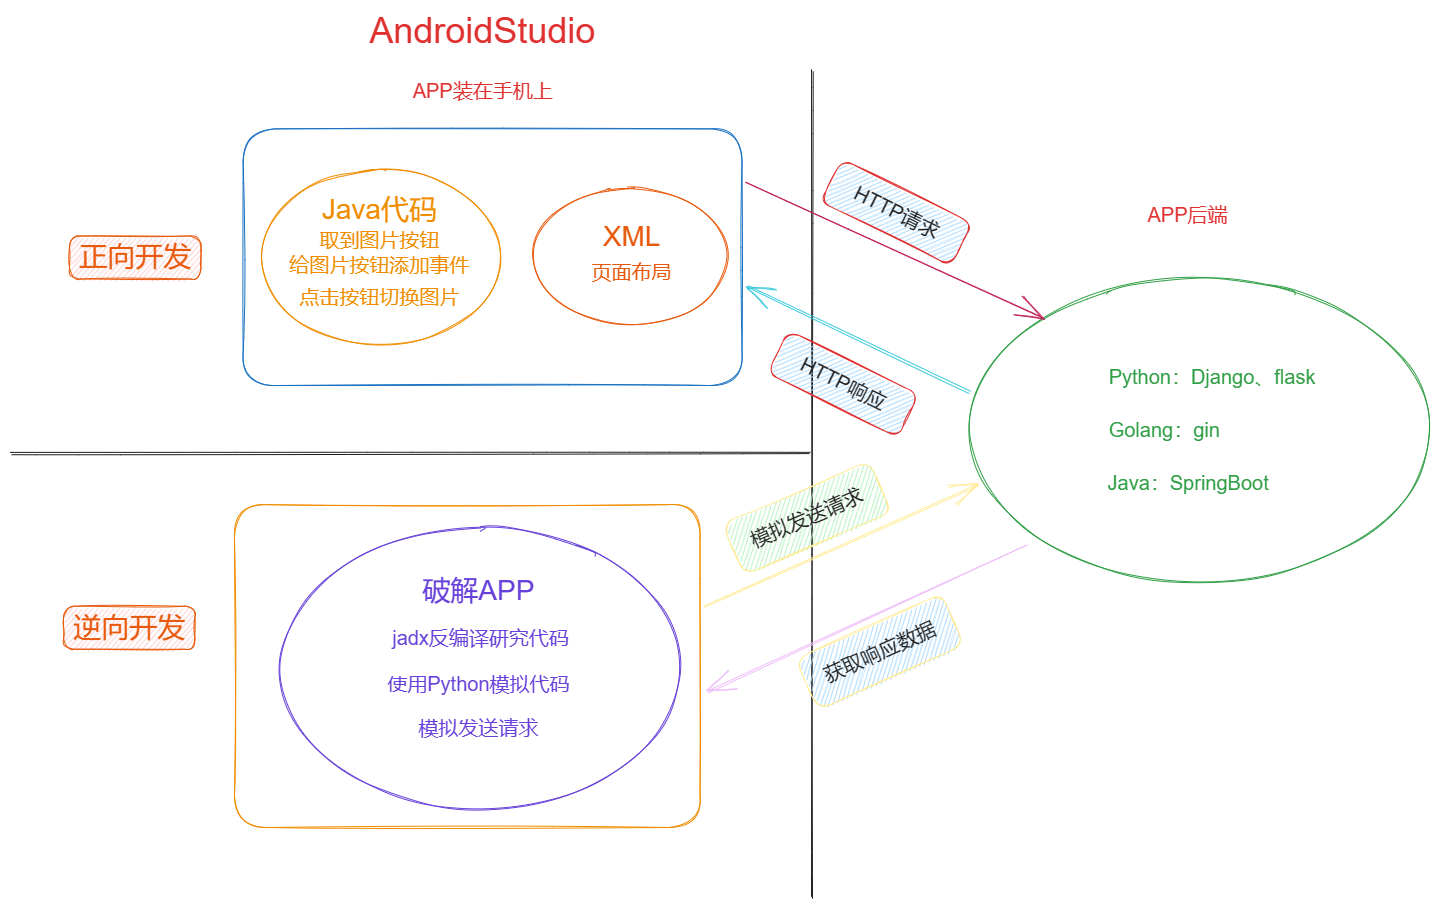
【二】必备知识
-
想跟后端交互
-
能够发送网络请求的库
-
python:
- requests
-
js:
- ajax
- axios
-
java:
- 安卓
- okhttp 第三方库
-
【三】APP开发1.0
【1】activity_main.xml
<?xml version="1.0" encoding="utf-8"?>
<LinearLayout xmlns:android="http://schemas.android.com/apk/res/android"
    xmlns:app="http://schemas.android.com/apk/res-auto"
    xmlns:tools="http://schemas.android.com/tools"
    android:layout_width="match_parent"
    android:layout_height="match_parent"
    tools:context=".MainActivity">

    <LinearLayout
        android:layout_width="match_parent"
        android:layout_height="300dp"
        android:layout_marginTop="200dp"
        android:background="@color/green"
        android:orientation="vertical">

        <TextView
            android:layout_width="match_parent"
            android:layout_height="wrap_content"
            android:text="用户登录"
            android:textAlignment="center"
            android:textSize="25dp">

        </TextView>

        <LinearLayout
            android:layout_width="match_parent"
            android:layout_height="wrap_content"
            android:paddingLeft="15dp"
            android:paddingRight="15dp">

            <TextView
                android:layout_width="60dp"
                android:layout_height="match_parent"
                android:gravity="center"
                android:text="用户名"></TextView>

            <EditText
                android:id="@+id/txt_user"
                android:layout_width="match_parent"
                android:layout_height="match_parent">

            </EditText>

        </LinearLayout>

        <LinearLayout
            android:layout_width="match_parent"
            android:layout_height="wrap_content"
            android:paddingLeft="15dp"
            android:paddingRight="15dp">

            <TextView
                android:layout_width="60dp"
                android:layout_height="match_parent"
                android:gravity="center"
                android:text="密码"></TextView>

            <EditText
                android:id="@+id/txt_pwd"
                android:layout_width="match_parent"
                android:layout_height="match_parent"
                android:inputType="textPassword">

            </EditText>

        </LinearLayout>


        <LinearLayout
            android:layout_width="match_parent"
            android:layout_height="60dp"
            android:gravity="center">

            <Button
                android:id="@+id/btn_login"
                android:layout_width="wrap_content"
                android:layout_height="wrap_content"
                android:layout_marginRight="5dp"
                android:text="登录">

            </Button>

            <Button
                android:id="@+id/btn_reset"
                android:layout_width="wrap_content"
                android:layout_height="wrap_content"
                android:layout_marginLeft="5dp"
                android:text="重置">

            </Button>

        </LinearLayout>


    </LinearLayout>

</LinearLayout>【2】项目的build.gradle
安装 okhttp 模块与后端进行交互
- 注意是下面的那个
build.gradle- 加入
implementation "com.squareup.okhttp3:okhttp:4.9.1"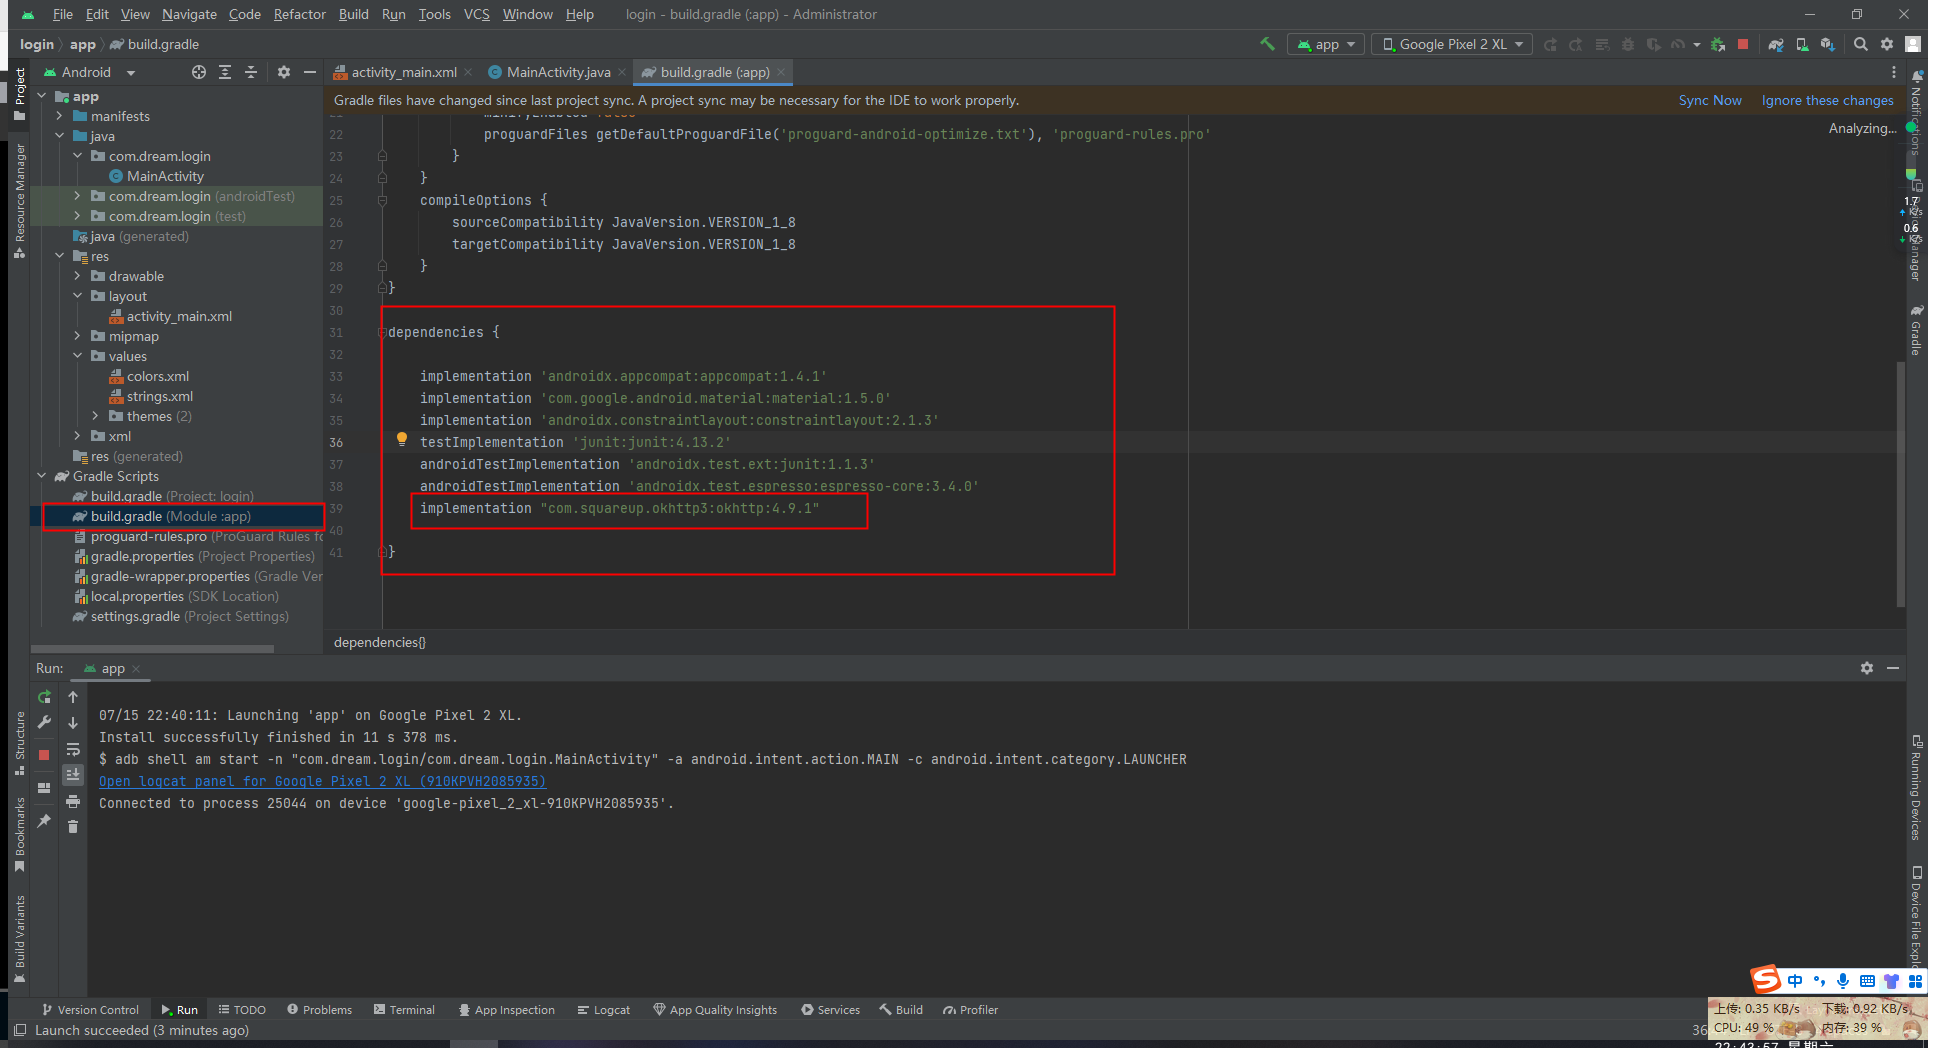
- 然后点击右上角棕色边条上的
sync now- 然后就会自动下载这个库了
implementation "com.squareup.okhttp3:okhttp:4.9.1"
#点击sync now,会去下载
okhttp不能发送http请求,默认发送https请求
但是一会咱们写的后端用python写的,是http的后端
安卓端需要额外加个配置,让okhttp发送http请求
(1)允许app能发送网络请求
app/manifests/AndroidManifest.xml<uses-permission android:name="android.permission.INTERNET"/>(2)允许okhttp默认发送http请求
app/res/xml下新建文件security.xml<?xml version="1.0" encoding="utf-8"?> <network-security-config> <base-config cleartextTrafficPermitted="true" /> </network-security-config>(3)再加入一个配置
app/manifests/AndroidManifest.xml下的application内android:networkSecurityConfig="@xml/security"小结
- 先按上述配置好 security 文件
<?xml version="1.0" encoding="utf-8"?>
        <network-security-config>
            <base-config cleartextTrafficPermitted="true" />
        </network-security-config>
- 这里的文件名要和上面res下的文件名一致
<?xml version="1.0" encoding="utf-8"?> <manifest xmlns:android="http://schemas.android.com/apk/res/android" xmlns:tools="http://schemas.android.com/tools"> <application android:allowBackup="true" android:dataExtractionRules="@xml/data_extraction_rules" android:fullBackupContent="@xml/backup_rules" android:icon="@mipmap/ic_launcher" android:label="@string/app_name" android:roundIcon="@mipmap/ic_launcher_round" android:supportsRtl="true" android:theme="@style/Theme.Login" tools:targetApi="31" android:networkSecurityConfig="@xml/security" > <activity android:name=".MainActivity" android:exported="true"> <intent-filter> <action android:name="android.intent.action.MAIN" /> <category android:name="android.intent.category.LAUNCHER" /> </intent-filter> </activity> </application> <uses-permission android:name="android.permission.INTERNET" /> </manifest>
【3】Python中的flask框架写后端
- 运行起来的时候可能前端的请求发送不到后端并抛出异常
2023-07-16 10:20:14.920 4208-4298 MainActivity com.dream.login E java.net.UnknownServiceException: CLEARTEXT communication to 192.168.1.50 not permitted by network security policy
- 这是因为上面的那个
okhttp没有配置http请求
- 如果在
AndroidStudio的LogCat中报下面的错误2023-07-16 10:46:27.805 8817-8897 MainActivity com.dream.login E java.net.SocketTimeoutException: failed to connect to /192.168.1.50 (port 8888) from /192.168.1.85 (port 47331) after 10000ms
- 打开Charles,原因是没有进行抓包中转
(1.0)基础版
- 没有加任何加密的参数
- 只是实现了基础的登陆通信功能
AndroidManifest.xml
<?xml version="1.0" encoding="utf-8"?>
<manifest xmlns:android="http://schemas.android.com/apk/res/android"
xmlns:tools="http://schemas.android.com/tools">
<application
android:allowBackup="true"
android:dataExtractionRules="@xml/data_extraction_rules"
android:fullBackupContent="@xml/backup_rules"
android:icon="@mipmap/ic_launcher"
android:label="@string/app_name"
android:networkSecurityConfig="@xml/security"
android:roundIcon="@mipmap/ic_launcher_round"
android:supportsRtl="true"
android:theme="@style/Theme.Login"
tools:targetApi="31">
<activity
android:name=".MainActivity"
android:exported="true">
<intent-filter>
<action android:name="android.intent.action.MAIN" />
<category android:name="android.intent.category.LAUNCHER" />
</intent-filter>
</activity>
</application>
<uses-permission android:name="android.permission.INTERNET" />
</manifest>MainActivity
package com.dream.login;
import androidx.appcompat.app.AppCompatActivity;
import android.annotation.SuppressLint;
import android.os.Bundle;
import android.util.Log;
import android.view.View;
import android.widget.Button;
import android.widget.EditText;
import android.widget.Toast;
import java.io.IOException;
import okhttp3.Call;
import okhttp3.FormBody;
import okhttp3.OkHttpClient;
import okhttp3.Request;
import okhttp3.Response;
import okhttp3.ResponseBody;
public class MainActivity extends AppCompatActivity {
// 取出页面中我们需要绑定事件的id
private EditText txt_user, txt_pwd;
private Button btn_login, btn_reset;
@Override
protected void onCreate(Bundle savedInstanceState) {
super.onCreate(savedInstanceState);
setContentView(R.layout.activity_main);
// (1.1)拿到两个按钮
initView();
// (2) 给按钮绑定事件
initListener();
}
public void initView() {
// (1) 取出页面中我们需要绑定事件的id - 绑定事件
txt_user = findViewById(R.id.txt_user);
txt_pwd = findViewById(R.id.txt_pwd);
btn_login = findViewById(R.id.btn_login);
btn_reset = findViewById(R.id.btn_reset);
}
public void initListener() {
// (2.1) 给重置按钮绑定了一个事件,当被点击时会有文字弹出
btn_reset.setOnClickListener(new View.OnClickListener() {
@Override
public void onClick(View view) {
// 给重置按钮绑定了一个事件,当被点击时会有文字弹出
// Toast.makeText(MainActivity.this, "重置按钮被点了", Toast.LENGTH_LONG).show();
// (2.1) 给重置按钮绑定事件,当被点击时清空输入框
txt_user.setText("");
txt_pwd.setText("");
}
});
// (2.2) 给登陆按钮绑定了一个事件,当被点击时会有文字弹出
btn_login.setOnClickListener(new View.OnClickListener() {
@Override
public void onClick(View view) {
// 给登陆按钮绑定了一个事件,当被点击时会有文字弹出
// Toast.makeText(MainActivity.this, "登陆按钮被点了", Toast.LENGTH_LONG).show();
// (2.2) 给登陆按钮绑定事件,当被点击时与后端进行交互
// 发送请求 --- 借助第三方模块 okhttp --- gradle 编译app --- gradle配置文件中加入这个模块的引入 --- 自动下载需要的模块
// 安装 okhttp 包后继续准备与后端进行交互
loginForm();
}
});
}
public void loginForm() {
// 获取输入框的文本内容 - 有可能不是文本类型,保险起见,强转一下数据类型
String username = String.valueOf(txt_user.getText());
String password = String.valueOf(txt_pwd.getText());
// 问题:不能在主线程中执行网络请求 ---- 如果要发送网络请求,必须开启一条新的线程 ---- 主线程是用来刷新 UI 的
// 创建吐司 - 为了下面调用
Toast t = Toast.makeText(MainActivity.this, "登陆成功", Toast.LENGTH_LONG);
// **** 创建新线程,发送网络请求 ****
new Thread() {
@Override
public void run() {
// 【1】 创建一个 client 对象
OkHttpClient client = new OkHttpClient.Builder().build();
// 【2】 发送post请求需要创建 form 表单
FormBody form = new FormBody.Builder().add("username", username).add("password", password).build();
// 【3】 创建请求对象,把 form 放入
Request req = new Request.Builder().url("http://192.168.1.50:8080/login").post(form).build();
// Request 请求会有返回值 ,可以用 Call 接收
Call call = client.newCall(req);
// 【4】 执行call
try {
Response res = call.execute();
// 响应体内容,不是字符串类型,需要强转成字符串类型
ResponseBody body = res.body();
// ResponseBody 类型 强转成字符串类型
String dataString = body.string();
Log.e("MainActivity", "成功返回"); // 打印传入的消息
Log.e("MainActivity", (String) dataString.toString()); // 打印传入的消息
// 打印吐司 --- 因为在别的线程中 ---- 更新 UI ---- **** 吐司创建需要在主线程中,如果子线程中直接写打印吐司会报错****
// 调用上边定义好的吐司 - 定义在主线程中的吐司
t.show();
} catch (IOException e) {
// 在终端打印是不起效果的 - 看不到捕获到的异常
// System.out.println(e);
// 使用另一种方法
Log.e("MainActivity", e.toString()); // 如果出错,打印日志
}
}
}.start();
}
}security.xml
<?xml version="1.0" encoding="utf-8"?>
<network-security-config>
    <base-config cleartextTrafficPermitted="true" />
</network-security-config>flask后端.py
# -*-coding: Utf-8 -*-
# @File : flask后端 .py
# author: Chimengmeng
# blog_url : https://www.cnblogs.com/dream-ze/
# Time:2023/7/16
# 下载 flask 框架 ----> pip install flask

# (1) 导入框架
from flask import Flask, request, jsonify

# (2) 实例化得到对象
app = Flask(__name__)


# (3) 配置路由  - 写视图函数


@app.route('/login', methods=['POST'])
def login():
    print("okhttp 请求 已接收")
    # (3) 取出APP前端传入的用户名和密码
    username_get = request.form.get('username')
    password_get = request.form.get('password')
    if username_get == 'dream' and password_get == '521521':
        # (4) 返回前端给JSON格式数据
        return jsonify({"code": 100, "msg": "登陆成功"})
    else:
        return jsonify({"code": 101, "msg": "登陆失败"})


# (4) 运行 flask app --- 一定要运行在 0.0.0.0 地址上 并且手机和电脑在同一个路由器上,手机才能访问
if __name__ == '__main__':
    IP = '0.0.0.0'
    PORT = 8080
    # 在同一个和局域网内,通过同一个 IP 和 地址就能正常访问
    app.run(IP, PORT)
(2.0)前端登陆参数加密(sign)
-
正常APP,密码一般是加密的,这里模拟md5进行参数加密
-
反编译经常看到请求头中携带 sign 参数
-
反编译经常看到请求头中携带 时间戳
1、创建md5加密的包
app/java/com.dream.login/common/Utils
com.dream.login
- 这个文件夹是和自己的项目有关联的,项目创建的不一样,会有所区别
common
- 这个是自己建的文件夹,自己随意定
Utils
- 这个是写md5加密逻辑的包,是一个 Java 文件 ,也是自己建的
package com.dream.login.common;

import java.security.MessageDigest;

public class Utils {
    // 生成md5的方法 --- 传入字符串 返回 md5 加密值
    // 生成md5的方法,对象方法,需要对象实例化后才能使用
    // 直接改造成类方法,类直接调用
    public static String md5(String dataString) {
        try {
            MessageDigest instance = MessageDigest.getInstance("MD5");
            byte[] nameBytes = instance.digest(dataString.getBytes());
            // 十六进制展示
            StringBuilder sb = new StringBuilder();
            for (int i = 0; i < nameBytes.length; i++) {
                int val = nameBytes[i] & 255;
                if (val < 16) {
                    sb.append("0");
                }
                sb.append(Integer.toHexString(val));
            }
            return sb.toString();
        } catch (Exception e) {
            return null;
        }

    }
}
- 因为我们要使用这个方法
- 所以我们需要在
MainActivity中引入这个包import com.dream.login.common.Utils;
2、密码加密
- 前端 md5 密码加密
// 【2】 发送post请求需要创建 form 表单
// 未加密
// FormBody form = new FormBody.Builder().add("username", username).add("password", password).build();
// md5加密后的写法
FormBody form = new FormBody.Builder().add("username", username).add("password", Utils.md5(password)).build();- 后端比对也需要md5加密
# (3) 配置路由  - 写视图函数
@app.route('/login', methods=['POST'])
def login():
    print("okhttp 请求 已接收")
    # (3) 取出APP前端传入的用户名和密码
    username_get = request.form.get('username')
    password_get = request.form.get('password')
    # 将密码写死 - - 在数据库中的密码是固定的
    password_true = get_md5('521')
    if username_get == 'dream' and password_true == get_md5(password_get):
        # (4) 返回前端给JSON格式数据
        return jsonify({"code": 100, "msg": "登陆成功"})
    else:
        return jsonify({"code": 101, "msg": "登陆失败"})


def get_md5(str):
    md5 = hashlib.md5()
    md5.update(str.encode('utf8'))
    return md5.hexdigest()
3、请求体中携带sign
- 生成sign
// sign生成的逻辑是自己规定的 我目前使用 用户名 + dream 使用md5加密
String sign = Utils.md5(username + "dream");- 请求头中带参数sign
// 请求头中带参数 --- 带在请求体中
FormBody form = new FormBody.Builder().add("username", username).add("password", Utils.md5(password)).add("sign", sign).build();- 请求体中带参数sign
// 请求头中带参数 --- 带在请求体中
Request req = new Request.Builder().url("http://192.168.1.50:8080/login").post(form).addHeader("sign", sign).build();
4、请求体中携带时间戳
- 生成时间戳
// 生成时间戳 --- 字符串类型
String ctime = String.valueOf(System.currentTimeMillis() / 1000);- 请求体中带参数时间戳
// 请求头中带参数 --- 带在请求体中
Request req = new Request.Builder().url("http://192.168.1.50:8080/login").post(form).addHeader("sign", sign).addHeader("ctime",ctime).build();
(2.0)后端登陆参数签名校验
# -*-coding: Utf-8 -*-
# @File : flask后端 .py
# author: Chimengmeng
# blog_url : https://www.cnblogs.com/dream-ze/
# Time:2023/7/16
# 下载 flask 框架 ----> pip install flask

# md5加密
import hashlib

# 时间模块
import time

# (1) 导入框架
from flask import Flask, request, jsonify

# (2) 实例化得到对象
app = Flask(__name__)


# 每一次的请求都会走时间验证
@app.before_request
def before():
    # [1] 验证时间不能耗时太长,废除超时请求
    # 取出当前时间 - 传入的时间 ==> 判定(小于某个区间) ----> 废除当前请求 ----> 请求扩展(写在中间件中)
    c_time = time.time()
    # 请求头中取出 app 传入的时间
    get_ctime = int(request.headers.get('ctime'))
    if c_time - get_ctime > 1000:
        return jsonify({"code": 110, "message": "请求链接失效"})


# (3) 配置路由  - 写视图函数
@app.route('/login', methods=['POST'])
def login():
    # [2] 验证签名是否正确
    sign = request.form.get('sign')

    print("okhttp 请求 已接收")
    # (3) 取出APP前端传入的用户名和密码
    username_get = request.form.get('username')
    # 前端 sign 生成的逻辑是 用户名 + 'dream' 生成 md5
    new_sign = get_md5(username_get + 'dream')
    if sign == new_sign:

        password_get = request.form.get('password')
        # 将密码写死 - - 在数据库中的密码是固定的
        password_true = get_md5('521')
        if username_get == 'dream' and password_true == get_md5(password_get):
            # (4) 返回前端给JSON格式数据
            return jsonify({"code": 100, "msg": "登陆成功"})
        else:
            return jsonify({"code": 101, "msg": "用户名或密码错误"})
    else:
        return jsonify({"code": 102, "msg": "签名不合法"})


def get_md5(str):
    md5 = hashlib.md5()
    md5.update(str.encode('utf8'))
    return md5.hexdigest()


# (4) 运行 flask app --- 一定要运行在 0.0.0.0 地址上 并且手机和电脑在同一个路由器上,手机才能访问
if __name__ == '__main__':
    IP = '0.0.0.0'
    PORT = 8080
    # 在同一个和局域网内,通过同一个 IP 和 地址就能正常访问
    app.run(IP, PORT)
(2.0)小结
-
按照上面已经加了 md5 加密函数
-
前端
MainActivity
package com.dream.login;

import androidx.appcompat.app.AppCompatActivity;

import android.annotation.SuppressLint;
import android.os.Bundle;
import android.util.Log;
import android.view.View;
import android.widget.Button;
import android.widget.EditText;
import android.widget.Toast;

import java.io.IOException;

import okhttp3.Call;
import okhttp3.FormBody;
import okhttp3.OkHttpClient;
import okhttp3.Request;
import okhttp3.Response;
import okhttp3.ResponseBody;

import com.dream.login.common.Utils;


public class MainActivity extends AppCompatActivity {

    // 取出页面中我们需要绑定事件的id
    private EditText txt_user, txt_pwd;
    private Button btn_login, btn_reset;

    @Override
    protected void onCreate(Bundle savedInstanceState) {
        super.onCreate(savedInstanceState);
        setContentView(R.layout.activity_main);

        // (1.1)拿到两个按钮
        initView();

        // (2) 给按钮绑定事件
        initListener();

    }

    public void initView() {
        // (1) 取出页面中我们需要绑定事件的id - 绑定事件
        txt_user = findViewById(R.id.txt_user);
        txt_pwd = findViewById(R.id.txt_pwd);
        btn_login = findViewById(R.id.btn_login);
        btn_reset = findViewById(R.id.btn_reset);
    }

    public void initListener() {
        // (2.1) 给重置按钮绑定了一个事件,当被点击时会有文字弹出
        btn_reset.setOnClickListener(new View.OnClickListener() {
            @Override
            public void onClick(View view) {
                // 给重置按钮绑定了一个事件,当被点击时会有文字弹出
                // Toast.makeText(MainActivity.this, "重置按钮被点了", Toast.LENGTH_LONG).show();
                // (2.1) 给重置按钮绑定事件,当被点击时清空输入框
                txt_user.setText("");
                txt_pwd.setText("");
            }
        });

        // (2.2) 给登陆按钮绑定了一个事件,当被点击时会有文字弹出
        btn_login.setOnClickListener(new View.OnClickListener() {
            @Override
            public void onClick(View view) {
                // 给登陆按钮绑定了一个事件,当被点击时会有文字弹出
                // Toast.makeText(MainActivity.this, "登陆按钮被点了", Toast.LENGTH_LONG).show();
                // (2.2) 给登陆按钮绑定事件,当被点击时与后端进行交互
                // 发送请求 --- 借助第三方模块 okhttp --- gradle 编译app --- gradle配置文件中加入这个模块的引入 --- 自动下载需要的模块
                // 安装 okhttp 包后继续准备与后端进行交互
                loginForm();
            }
        });

    }


    public void loginForm() {
        // 获取输入框的文本内容 - 有可能不是文本类型,保险起见,强转一下数据类型
        String username = String.valueOf(txt_user.getText());
        String password = String.valueOf(txt_pwd.getText());
        // sign生成的逻辑是自己规定的 我目前使用 用户名 + dream 使用md5加密
        String sign = Utils.md5(username + "dream");
        // 生成时间戳 --- 字符串类型
        String ctime = String.valueOf(System.currentTimeMillis() / 1000);

        // 问题:不能在主线程中执行网络请求 ---- 如果要发送网络请求,必须开启一条新的线程 ---- 主线程是用来刷新 UI 的

        // 创建吐司 - 为了下面调用
        Toast t = Toast.makeText(MainActivity.this, "登陆成功", Toast.LENGTH_LONG);

        // **** 创建新线程,发送网络请求 ****
        new Thread() {
            @Override
            public void run() {
                // 【1】 创建一个 client 对象
                OkHttpClient client = new OkHttpClient.Builder().build();

                // 【2】 发送post请求需要创建 form 表单
                // 未加密
                // FormBody form = new FormBody.Builder().add("username", username).add("password", password).build();
                // md5加密后的写法
                // 请求头中带参数 --- 带在请求体中
                FormBody form = new FormBody.Builder().add("username", username).add("password", Utils.md5(password)).add("sign", sign).build();

                // 【3】 创建请求对象,把 form 放入
                // 请求头中带参数 --- 带在请求体中
                Request req = new Request.Builder().url("http://192.168.1.50:8080/login").post(form).addHeader("sign", sign).addHeader("ctime",ctime).build();
                // Request 请求会有返回值 ,可以用 Call 接收
                Call call = client.newCall(req);

                // 【4】 执行call
                try {
                    Response res = call.execute();
                    // 响应体内容,不是字符串类型,需要强转成字符串类型
                    ResponseBody body = res.body();
                    // ResponseBody 类型 强转成字符串类型
                    String dataString = body.string();
                    Log.e("MainActivity", "成功返回"); // 打印传入的消息
                    Log.e("MainActivity", (String) dataString.toString()); // 打印返回的消息 -- 转不出来 返回的是 ResponseBody 对象 -- 需要序列化转成对象才能展示
                    // 打印吐司 --- 因为在别的线程中 ---- 更新 UI ---- **** 吐司创建需要在主线程中,如果子线程中直接写打印吐司会报错****
                    // 调用上边定义好的吐司 - 定义在主线程中的吐司
                    t.show();

                } catch (IOException e) {
                    // 在终端打印是不起效果的 - 看不到捕获到的异常
                    // System.out.println(e);
                    // 使用另一种方法
                    Log.e("MainActivity", e.toString()); // 如果出错,打印日志
                }
            }
        }.start();
    }


}- 后端
# -*-coding: Utf-8 -*-
# @File : flask后端 .py
# author: Chimengmeng
# blog_url : https://www.cnblogs.com/dream-ze/
# Time:2023/7/16
# 下载 flask 框架 ----> pip install flask

# md5加密
import hashlib

# 时间模块
import time

# (1) 导入框架
from flask import Flask, request, jsonify

# (2) 实例化得到对象
app = Flask(__name__)


# 每一次的请求都会走时间验证
@app.before_request
def before():
    # [1] 验证时间不能耗时太长,废除超时请求
    # 取出当前时间 - 传入的时间 ==> 判定(小于某个区间) ----> 废除当前请求 ----> 请求扩展(写在中间件中)
    c_time = time.time()
    # 请求头中取出 app 传入的时间
    get_ctime = int(request.headers.get('ctime'))
    if c_time - get_ctime > 1000:
        return jsonify({"code": 110, "message": "请求链接失效"})


# (3) 配置路由  - 写视图函数
@app.route('/login', methods=['POST'])
def login():
    # [2] 验证签名是否正确
    sign = request.form.get('sign')

    print("okhttp 请求 已接收")
    # (3) 取出APP前端传入的用户名和密码
    username_get = request.form.get('username')
    # 前端 sign 生成的逻辑是 用户名 + 'dream' 生成 md5
    new_sign = get_md5(username_get + 'dream')
    if sign == new_sign:

        password_get = request.form.get('password')
        # 将密码写死 - - 在数据库中的密码是固定的
        password_true = get_md5('521')
        if username_get == 'dream' and password_true == get_md5(password_get):
            # (4) 返回前端给JSON格式数据
            return jsonify({"code": 100, "msg": "登陆成功"})
        else:
            return jsonify({"code": 101, "msg": "用户名或密码错误"})
    else:
        return jsonify({"code": 102, "msg": "签名不合法"})


def get_md5(str):
    md5 = hashlib.md5()
    md5.update(str.encode('utf8'))
    return md5.hexdigest()


# (4) 运行 flask app --- 一定要运行在 0.0.0.0 地址上 并且手机和电脑在同一个路由器上,手机才能访问
if __name__ == '__main__':
    IP = '0.0.0.0'
    PORT = 8080
    # 在同一个和局域网内,通过同一个 IP 和 地址就能正常访问
    app.run(IP, PORT)
【4】Android序列化与反序列化
(1)引入
- python 中有json模块
- 可以把josn格式字符串反序列化成字典对象
- 可以把字典对象序列化成json格式字符串
- java中也有这种操作
- 借助于第三方
- Android开发一般喜欢使用谷歌的Gson
- java 界中有一个 fastjson,阿里工程师开源的,后期有漏洞---》大家不用了
(2)使用步骤
- 1 在gradle中引入
implementation 'com.google.code.gson:gson:2.8.6'- 2 编写java类,实例化得到对象,
- 把json格式转成 类的对象
- 反序列化
- 类的对象,转成 json格式字符串
- 序列化过程
- 把json格式转成 类的对象
- 3 做序列化和反序列化
(3)具体使用
- 返回格式
{'code': 109, 'msg': '该请求已经失效,超时了。。'}- 写类
/app/java/common.dream.login/entity/CommonResponse
class CommonResponse{
    public int code;
    public String msg;
}- 1 序列化案例
CommonResponse testRes=new CommonResponse(100,"成功");
String testString = new Gson().toJson(testRes);
Log.e("justin-main",testString);- 2 反序列化案例
LoginResponse obj = new Gson().fromJson(dataString,CommonResponse.class);
obj.code
obj.msg
【四】APP开发2.0
-
登陆功能已经开发完成了,接下来要添加跳转页面功能
- 跳转页面后显示电影信息
-
APP端
-
从一个页面跳转到另一个页面
- 从
MainActivity跳转到另一个Activity
- 从
-
新建一个 xml 文件
-
新的
Activity页面
-
-
后端
- 返回JSON格式的数据
【1】后端
(1)数据准备
- films.json
{
  "code": 100,
  "films": [
    {
      "name": "八角笼中",
      "poster": "https://pic.maizuo.com/usr/movie/b6be063ea8bb7d4ecd09299b800fe510.jpg",
      "synopsis": "暑期劲燃现实题材佳作!根据真实事件改编,王宝强六年打磨,动情演绎震撼人心!电影讲述了向腾辉(王宝强 饰)倾注心血想把当地无人照料的孩子培养成才,这让生活本没有出路的孩子们看到了一丝通向未来的曙光。然而,随着往日的表演视频被爆出,这些“残忍、血腥”的画面刺激了不明真相的人们的神经。一夜之间,舆论开始发酵。向腾辉的生活、孩子们的前途都陷入到人们以善良为名编织的大网中,让他们难以挣脱,重回泥沼,关于未来,他们的“出路”又将在哪……"
    },
    {
      "name": "消失的她",
      "poster": "https://pic.maizuo.com/usr/movie/149ddb9a7f64e06ed474d963cfc6c405.jpg",
      "synopsis": "何非的妻子李木子在去往东南亚度假岛巴兰迪亚的结婚周年旅行中离奇消失。在何非苦寻无果之时,妻子再次现身,何非却坚持眼前的陌生女人并非妻子。女人拿出了身份证明进行自证,夫妻二人似乎都有不可告人的秘密,随着金牌律师陈麦以及当地警察郑成介入到这起离奇案件中,更多的谜团慢慢浮现……"
    },
    {
      "name": "碟中谍7:致命清算(上)",
      "poster": "https://pic.maizuo.com/usr/movie/825cd3106925b127e6027b300fb01026.jpg",
      "synopsis": "刷新极限的传奇特工系列火线回归,感受今夏最真实震撼的银幕冒险!特工伊森·亨特(汤姆·克鲁斯饰)和他的IMF小组将开启迄今为止最危险的一次任务:追踪一种会危及全人类性命的新型武器,并阻止其落入坏人之手。与此同时,伊森曾对抗过的黑暗势力也正在卷土重来,整个世界的命运岌岌可危。面对神秘而强大的敌人,他不得不面对选择使命还是至爱的终极抉择。"
    },
    {
      "name": "扫毒3:人在天涯",
      "poster": "https://pic.maizuo.com/usr/movie/19c503c9c7df7f75dd3713039b4880e0.jpg",
      "synopsis": "邱礼涛继《扫毒2》《拆弹专家2》后携《扫毒3:人在天涯》强势回归,古天乐郭富城刘青云三大影帝首次同台飙戏荡平金三角!毒枭康素差(刘青云 饰)和手下张建行(郭富城 饰)、欧志远(古天乐 饰)因一次意外有了过命交情,三人情同手足。康素差被香港警方通缉后带领团队逃到金三角发展,却意外发现身边藏有卧底。曾经的生死兄弟如今分崩离析,敌友难辨,何去何从……"
    },
    {
      "name": "封神第一部:朝歌风云",
      "poster": "https://pic.maizuo.com/usr/movie/f57040d1983ab2923e53aedb36a00cd4.jpg",
      "synopsis": "中国国民神话史诗大片,震撼视效燃炸暑期!《封神第一部》讲述商王殷寿勾结狐妖妲己,暴虐无道,引发天谴。昆仑仙人姜子牙携“封神榜”下山,寻找天下共主,以救苍生。西伯侯之子姬发逐渐发现殷寿的本来面目,反出朝歌。各方势力暗流涌动,风云变幻端倪初显……三千年想象成真,恢弘史诗再创新,见证中国神话崛起!"
    },
    {
      "name": "超能一家人",
      "poster": "https://pic.maizuo.com/usr/movie/0ec798637174c1ba4eac7a2438019230.png",
      "synopsis": "开心麻花首部春节档喜剧电影。主人公郑前(艾伦 饰)离家出走漂泊多年,开发了一款“理财神器”APP,不料却被家乡喀西契克市邪恶狡猾的市长乞乞科夫(沈腾 饰)盯上。而此时郑前一家人竟遇到天降陨石获得了超能力,但只要有人离开,超能力便会消失。郑前被迫和不靠谱的家人团结起来,共同抵抗乞乞科夫,上演一场超能力VS钞能力的爆笑故事……"
    },
    {
      "name": "茶啊二中",
      "poster": "https://pic.maizuo.com/usr/movie/9f21bcf792f7b12087c8052be3adea6e.jpg",
      "synopsis": "在“茶啊二中”,有最懂“我们”的中国式青春!当“学渣”王强与“暴力班主任”石妙娜意外灵魂互换,会是怎样“翻身解气”的体验?暑假解压包式强喜剧,7月14日,一起回到笑得最大声的日子!"
    },
    {
      "name": "超级飞侠:乐迪加速",
      "poster": "https://pic.maizuo.com/usr/movie/aa0bd00e9e739e66887dd20fb296a580.jpg",
      "synopsis": "超级飞侠乐迪接到一项新任务!一个神秘的包裹,一次跨越大洲的派送,乐迪却因此偶然介入了一场将世界陷于危机的恶作剧中。面对危机,乐迪和其他超级飞侠将发挥各自的救援能力,争分夺秒合力拯救世界!"
    },
    {
      "name": "我爱你!",
      "poster": "https://pic.maizuo.com/usr/movie/19dbbdc52057e722a4c6d76a788fc417.jpg",
      "synopsis": "你是否想过自己会如何老去?四个花甲老人,两段迟暮之恋,他们的爱善良而纯粹、浪漫又浓烈。在生命这段有限的旅程里,趁还来得及,我要对你说声“我爱你!”。"
    }
  ],
  "msg": "ok"
}
(2)后端接口
# -*-coding: Utf-8 -*-
# @File : flask后端 .py
# author: Chimengmeng
# blog_url : https://www.cnblogs.com/dream-ze/
# Time:2023/7/16
# 下载 flask 框架 ----> pip install flask

# md5加密
import hashlib

# 时间模块
import time

# (1) 导入框架
from flask import Flask, request, jsonify

# (2) 实例化得到对象
app = Flask(__name__)


def get_md5(str):
    md5 = hashlib.md5()
    md5.update(str.encode('utf8'))
    return md5.hexdigest()


# 每一次的请求都会走时间验证
@app.before_request
def before():
    if 'login' in request.path:
        # [1] 验证时间不能耗时太长,废除超时请求
        # 取出当前时间 - 传入的时间 ==> 判定(小于某个区间) ----> 废除当前请求 ----> 请求扩展(写在中间件中)
        c_time = time.time()
        # 请求头中取出 app 传入的时间
        get_ctime = int(request.headers.get('ctime'))
        if c_time - get_ctime > 1000:
            return jsonify({"code": 110, "message": "请求链接失效"})


# (3) 配置路由  - 写视图函数
@app.route('/login', methods=['POST'])
def login():
    # [2] 验证签名是否正确
    sign = request.form.get('sign')

    print("okhttp 请求 已接收")
    # (3) 取出APP前端传入的用户名和密码
    username_get = request.form.get('username')
    # 前端 sign 生成的逻辑是 用户名 + 'dream' 生成 md5
    new_sign = get_md5(username_get + 'dream')
    if sign == new_sign:

        password_get = request.form.get('password')
        # 将密码写死 - - 在数据库中的密码是固定的
        password_true = get_md5('521')
        if username_get == 'dream' and password_true == password_get:
            # (4) 返回前端给JSON格式数据
            return jsonify({"code": 100, "msg": "登陆成功"})
        else:
            return jsonify({"code": 101, "msg": "用户名或密码错误"})
    else:
        return jsonify({"code": 102, "msg": "签名不合法"})


@app.route('/files', methods=['GET'])
def files():
    # 把本地有的 json 文件,打开并返回给前端页面
    # 正常的数据访问应该是从数据库访问数据并返回数据,这里只是做简单的演示
    with open('film.json', 'rb', encoding='utf8') as f:
        data_dict = json.load(f)
    return jsonify(data_dict)


# (4) 运行 flask app --- 一定要运行在 0.0.0.0 地址上 并且手机和电脑在同一个路由器上,手机才能访问
if __name__ == '__main__':
    IP = '0.0.0.0'
    PORT = 8080
    # 在同一个和局域网内,通过同一个 IP 和 地址就能正常访问
    app.run(IP, PORT)
【2】前端
(1)展示页面排版
/app/res/layout/activity_index.xml
<?xml version="1.0" encoding="utf-8"?>
<LinearLayout xmlns:android="http://schemas.android.com/apk/res/android"
    xmlns:app="http://schemas.android.com/apk/res-auto"
    xmlns:tools="http://schemas.android.com/tools"
    android:layout_width="match_parent"
    android:layout_height="match_parent"
    tools:context=".IndexActivity">

    <ListView
        android:id="@+id/listview"
        android:layout_width="fill_parent"
        android:layout_height="wrap_content"
        tools:ignore="MissingConstraints"></ListView>


</LinearLayout>
/app/res/layout/list_item.xml
<?xml version="1.0" encoding="utf-8"?>
<LinearLayout xmlns:android="http://schemas.android.com/apk/res/android"
    android:layout_width="wrap_content"
    android:layout_height="match_parent"
    android:orientation="horizontal"
    android:padding="5dp">

    <ImageView
        android:id="@+id/pic"
        android:layout_width="wrap_content"
        android:layout_height="wrap_content" />

    <LinearLayout
        android:layout_width="match_parent"
        android:layout_height="match_parent"
        android:orientation="vertical">

        <TextView
            android:id="@+id/name"
            android:layout_width="wrap_content"
            android:layout_height="wrap_content"
            android:text="demo"
            android:textColor="#000000"
            android:textSize="20dp" />

        <TextView
            android:id="@+id/synopsis"
            android:layout_width="wrap_content"
            android:layout_height="wrap_content"
            android:text="demo"
            android:textColor="#000000"
            android:textSize="15dp" />

    </LinearLayout>
</LinearLayout>
(2)主逻辑页面书写
前端加载图片需要 Glide
- 需要注册
implementation 'com.github.bumptech.glide:glide:4.11.0'
IndexActivity
app/java/com.dream.login/IndexActivity
package com.dream.login;

import androidx.appcompat.app.AppCompatActivity;

import android.content.Context;
import android.os.Bundle;
import android.util.Log;
import android.view.LayoutInflater;
import android.view.View;
import android.view.ViewGroup;
import android.widget.BaseAdapter;
import android.widget.ImageView;
import android.widget.ListView;
import android.widget.TextView;
import android.widget.Toast;

import com.bumptech.glide.Glide;
import com.dream.login.common.Utils;
import com.dream.login.entity.CommonResponse;
import com.dream.login.entity.FilmResponse;
import com.google.gson.Gson;

import java.io.IOException;

import okhttp3.Call;
import okhttp3.FormBody;
import okhttp3.OkHttpClient;
import okhttp3.Request;
import okhttp3.Response;
import okhttp3.ResponseBody;

public class IndexActivity extends AppCompatActivity {
    // 定义变量类型
    ListView listItem;

    @Override
    protected void onCreate(Bundle savedInstanceState) {
        super.onCreate(savedInstanceState);
        setContentView(R.layout.activity_index);

        // 根据ID找到标签listItem
        listItem = findViewById(R.id.listview);

        // 向后端发送请求,获取电影数据 --- 网络请求必须放在新的线程中
        new Thread() {
            @Override
            public void run() {
                // 【1】 创建一个 client 对象
                OkHttpClient client = new OkHttpClient.Builder().build();

                // 【2】 发送get请求
                // 【3】 创建请求对象,把 form 放入
                Request req = new Request.Builder().url("http://192.168.1.50:8080/films").get().build();
                // Request 请求会有返回值 ,可以用 Call 接收
                Call call = client.newCall(req);

                // 【4】 执行call
                try {
                    Response res = call.execute();
                    // 响应体内容,不是字符串类型,需要强转成字符串类型
                    ResponseBody body = res.body();
                    // ResponseBody 类型 强转成字符串类型
                    // 对象调用 string 方法 把 ResponseBody 对象中的数据字符串拿出来,而不是把对象转成字符串
                    String dataString = body.string();
                    // Log.e("IndexActivity", "成功返回"); // 打印传入的消息

                    // 把JSON格式字符串转成对象,反序列化
                    // 把 字符串对象转成 CommonResponse 对象
                    // 后端返回数据的格式 : {"code": 102, "msg": "签名不合法"}
                    FilmResponse filmObj = new Gson().fromJson(dataString, FilmResponse.class);
                    // 打印后端返回的数据
                    if (filmObj.code == 100) {
                        // 弹出吐司 : 请求成功,得到数据
                        // showToast(filmObj.msg);
                        // 把电影内容渲染到 ListView 上 --- 使用
                        showToast(filmObj.msg);
                        // 创建自定义适配器并设置给 ListView
                        MyAdapter adapter = new MyAdapter(IndexActivity.this, filmObj);
                        listItem.setAdapter(adapter);

                    } else {
                        // 弹出吐司 : 请求失败
                        showToast(filmObj.msg);
                    }
                } catch (IOException e) {
                    // 在终端打印是不起效果的 - 看不到捕获到的异常
                    // System.out.println(e);
                    // 使用另一种方法
                    Log.e("IndexActivity", e.toString()); // 如果出错,打印日志
                }
            }
        }.start();
    }

    private void showToast(final String message) {
        // 在 UI 线程中显示 Toast
        runOnUiThread(new Runnable() {
            @Override
            public void run() {
                Toast.makeText(IndexActivity.this, message, Toast.LENGTH_SHORT).show();
            }
        });
    }
}


class MyAdapter extends BaseAdapter {

    private Context context;
    private FilmResponse dataList;

    // 初始化参数
    public MyAdapter(Context context, FilmResponse dataList) {
        this.context = context;
        this.dataList = dataList;
    }

    @Override
    public int getCount() {
        // 返回总数据的条数
        return dataList.films.size();
    }

    @Override
    public Object getItem(int position) {
        return null;
    }

    @Override
    public long getItemId(int position) {
        return 0;
    }

    @Override
    public View getView(int position, View convertView, ViewGroup parent) {
        // 拿到 list_item 标签
        convertView = LayoutInflater.from(context).inflate(R.layout.list_item, parent, false);
        //  根据布局文件实例化view ---  list_item 文件中
        TextView tv = (TextView) convertView.findViewById(R.id.name);
        TextView synopsis = (TextView) convertView.findViewById(R.id.synopsis);
        ImageView img = (ImageView)convertView.findViewById(R.id.pic);

        // 显示文字
        tv.setText(this.dataList.films.get(position).name);
        synopsis.setText(this.dataList.films.get(position).synopsis);

        //使用Glide加载图片
        Glide.with(context)
                //加载地址
                .load(this.dataList.films.get(position).poster)
                //加载失败时,设置默认的图片
                .placeholder(R.mipmap.ic_launcher)
                //显示的位置
                .into(img);

        return convertView;
    }

}
MainActivity
app/java/com.dream.login/MainActivity
package com.dream.login;

import androidx.appcompat.app.AppCompatActivity;

import android.annotation.SuppressLint;
import android.content.Intent;
import android.os.Bundle;
import android.util.Log;
import android.view.View;
import android.widget.Button;
import android.widget.EditText;
import android.widget.Toast;

import java.io.IOException;

import okhttp3.Call;
import okhttp3.FormBody;
import okhttp3.OkHttpClient;
import okhttp3.Request;
import okhttp3.Response;
import okhttp3.ResponseBody;

import com.dream.login.common.Utils;
import com.dream.login.entity.CommonResponse;
import com.google.gson.Gson;


public class MainActivity extends AppCompatActivity {

    // 取出页面中我们需要绑定事件的id
    private EditText txt_user, txt_pwd;
    private Button btn_login, btn_reset;

    @Override
    protected void onCreate(Bundle savedInstanceState) {
        super.onCreate(savedInstanceState);
        setContentView(R.layout.activity_main);

        // (1.1)拿到两个按钮
        initView();

        // (2) 给按钮绑定事件
        initListener();

    }

    public void initView() {
        // (1) 取出页面中我们需要绑定事件的id - 绑定事件
        txt_user = findViewById(R.id.txt_user);
        txt_pwd = findViewById(R.id.txt_pwd);
        btn_login = findViewById(R.id.btn_login);
        btn_reset = findViewById(R.id.btn_reset);
    }

    public void initListener() {
        // (2.1) 给重置按钮绑定了一个事件,当被点击时会有文字弹出
        btn_reset.setOnClickListener(new View.OnClickListener() {
            @Override
            public void onClick(View view) {
                // 给重置按钮绑定了一个事件,当被点击时会有文字弹出
                // Toast.makeText(MainActivity.this, "重置按钮被点了", Toast.LENGTH_LONG).show();
                // (2.1) 给重置按钮绑定事件,当被点击时清空输入框
                txt_user.setText("");
                txt_pwd.setText("");
            }
        });

        // (2.2) 给登陆按钮绑定了一个事件,当被点击时会有文字弹出
        btn_login.setOnClickListener(new View.OnClickListener() {
            @Override
            public void onClick(View view) {
                // 给登陆按钮绑定了一个事件,当被点击时会有文字弹出
                // Toast.makeText(MainActivity.this, "登陆按钮被点了", Toast.LENGTH_LONG).show();
                // (2.2) 给登陆按钮绑定事件,当被点击时与后端进行交互
                // 发送请求 --- 借助第三方模块 okhttp --- gradle 编译app --- gradle配置文件中加入这个模块的引入 --- 自动下载需要的模块
                // 安装 okhttp 包后继续准备与后端进行交互
                loginForm();
            }
        });

    }


    public void loginForm() {
        // 获取输入框的文本内容 - 有可能不是文本类型,保险起见,强转一下数据类型
        String username = String.valueOf(txt_user.getText());
        String password = String.valueOf(txt_pwd.getText());
        // sign生成的逻辑是自己规定的 我目前使用 用户名 + dream 使用md5加密
        String sign = Utils.md5(username + "dream");
        // 生成时间戳 --- 字符串类型
        String ctime = String.valueOf(System.currentTimeMillis() / 1000);

        // 问题:不能在主线程中执行网络请求 ---- 如果要发送网络请求,必须开启一条新的线程 ---- 主线程是用来刷新 UI 的

        // 创建吐司 - 为了下面调用
        Toast t = Toast.makeText(MainActivity.this, "登陆成功", Toast.LENGTH_LONG);

        // **** 创建新线程,发送网络请求 ****
        new Thread() {
            @Override
            public void run() {
                // 【1】 创建一个 client 对象
                OkHttpClient client = new OkHttpClient.Builder().build();

                // 【2】 发送post请求需要创建 form 表单
                // 未加密
                // FormBody form = new FormBody.Builder().add("username", username).add("password", password).build();
                // md5加密后的写法
                // 请求头中带参数 --- 带在请求体中
                FormBody form = new FormBody.Builder().add("username", username).add("password", Utils.md5(password)).add("sign", sign).build();

                // 【3】 创建请求对象,把 form 放入
                // 请求头中带参数 --- 带在请求体中
                Request req = new Request.Builder().url("http://192.168.1.50:8080/login").post(form).addHeader("sign", sign).addHeader("ctime", ctime).build();
                // Request 请求会有返回值 ,可以用 Call 接收
                Call call = client.newCall(req);

                // 【4】 执行call
                try {
                    Response res = call.execute();
                    // 响应体内容,不是字符串类型,需要强转成字符串类型
                    ResponseBody body = res.body();
                    // ResponseBody 类型 强转成字符串类型
                    // 对象调用 string 方法 把 ResponseBody 对象中的数据字符串拿出来,而不是把对象转成字符串
                    String dataString = body.string();
                    Log.e("MainActivity", "成功返回"); // 打印传入的消息
                    // Log.e("MainActivity", (String) dataString.toString()); // 打印返回的消息 -- 转不出来 返回的是 ResponseBody 对象 -- 需要序列化转成对象才能展示

                    // 把JSON格式字符串转成对象,反序列化
                    // 把 字符串对象转成 CommonResponse 对象
                    // 后端返回数据的格式 : {"code": 102, "msg": "签名不合法"}
                    CommonResponse obj = new Gson().fromJson(dataString, CommonResponse.class);
                    // 打印后端返回的数据
                    // Log.e("MainActivity", String.valueOf(obj.code));
                    // Log.e("MainActivity", obj.msg);
                    if (obj.code == 100) {
                        // 打印吐司 --- 因为在别的线程中 ---- 更新 UI ---- **** 吐司创建需要在主线程中,如果子线程中直接写打印吐司会报错****
                        // 调用上边定义好的吐司 - 定义在主线程中的吐司
                        // t.show();
                        showToast("登陆成功,页面开始跳转");
                        // 跳转
                        Intent intent = new Intent(MainActivity.this, IndexActivity.class);
                        // 启动新的 Activity
                        startActivity(intent);

                    } else {
                        showToast(obj.msg);
                    }

                } catch (IOException e) {
                    // 在终端打印是不起效果的 - 看不到捕获到的异常
                    // System.out.println(e);
                    // 使用另一种方法
                    Log.e("MainActivity", e.toString()); // 如果出错,打印日志
                }
            }
        }.start();
    }

    private void showToast(final String message) {
        // 在 UI 线程中显示 Toast
        runOnUiThread(new Runnable() {
            @Override
            public void run() {
                Toast.makeText(MainActivity.this, message, Toast.LENGTH_SHORT).show();
            }
        });
    }

}
FilmResponse
app/java/com.dream.login/entity/FilmResponse
package com.dream.login.entity;

import java.util.ArrayList;

public class FilmResponse extends CommonResponse {
    // 继承自 CommonResponse 的两个字段
    // public int code;
    // public String msg;
    // films ---- 列表类型
    public ArrayList<Film> films;
}
Film
app/java/com.dream.login/entity/Film
package com.dream.login.entity;

public class Film {
    public String name;
    public String poster;
    public String synopsis;
}
activity_index.xml
app/res/layout/activity_index.xml
<?xml version="1.0" encoding="utf-8"?>
<LinearLayout xmlns:android="http://schemas.android.com/apk/res/android"
    xmlns:app="http://schemas.android.com/apk/res-auto"
    xmlns:tools="http://schemas.android.com/tools"
    android:layout_width="match_parent"
    android:layout_height="match_parent"
    tools:context=".IndexActivity">

    <ListView
        android:id="@+id/listview"
        android:layout_width="fill_parent"
        android:layout_height="wrap_content"
        tools:ignore="MissingConstraints"></ListView>


</LinearLayout>
activity_main.xml
app/res/layout/activity_main.xml
<?xml version="1.0" encoding="utf-8"?>
<LinearLayout xmlns:android="http://schemas.android.com/apk/res/android"
    xmlns:app="http://schemas.android.com/apk/res-auto"
    xmlns:tools="http://schemas.android.com/tools"
    android:layout_width="match_parent"
    android:layout_height="match_parent"
    tools:context=".MainActivity">

    <LinearLayout
        android:layout_width="match_parent"
        android:layout_height="300dp"
        android:layout_marginTop="200dp"
        android:background="@color/green"
        android:orientation="vertical">
        <TextView
            android:layout_width="match_parent"
            android:layout_height="wrap_content"
            android:text="用户登录"
            android:textAlignment="center"
            android:textSize="25dp"></TextView>

        <LinearLayout
            android:layout_width="match_parent"
            android:layout_height="wrap_content"
            android:paddingLeft="15dp"
            android:paddingRight="15dp">

            <TextView
                android:layout_width="60dp"
                android:layout_height="match_parent"
                android:gravity="center"
                android:text="用户名"></TextView>

            <EditText
                android:id="@+id/txt_user"
                android:layout_width="match_parent"
                android:layout_height="match_parent">

            </EditText>

        </LinearLayout>

        <LinearLayout
            android:layout_width="match_parent"
            android:layout_height="wrap_content"
            android:paddingLeft="15dp"
            android:paddingRight="15dp">

            <TextView
                android:layout_width="60dp"
                android:layout_height="match_parent"
                android:gravity="center"
                android:text="密码"></TextView>

            <EditText
                android:id="@+id/txt_pwd"
                android:layout_width="match_parent"
                android:layout_height="match_parent"
                android:inputType="textPassword">

            </EditText>

        </LinearLayout>


        <LinearLayout
            android:layout_width="match_parent"
            android:layout_height="60dp"
            android:gravity="center">

            <Button
                android:id="@+id/btn_login"
                android:layout_width="wrap_content"
                android:layout_height="wrap_content"
                android:layout_marginRight="5dp"
                android:text="登录">

            </Button>

            <Button
                android:id="@+id/btn_reset"
                android:layout_width="wrap_content"
                android:layout_height="wrap_content"
                android:layout_marginLeft="5dp"
                android:text="重置">

            </Button>

        </LinearLayout>


    </LinearLayout>

</LinearLayout>
list_item.xml
app/res/layout/list_item.xml
<?xml version="1.0" encoding="utf-8"?>
<LinearLayout xmlns:android="http://schemas.android.com/apk/res/android"
    android:layout_width="wrap_content"
    android:layout_height="match_parent"
    android:orientation="horizontal"
    android:padding="5dp">

    <ImageView
        android:id="@+id/pic"
        android:layout_width="wrap_content"
        android:layout_height="wrap_content" />

    <LinearLayout
        android:layout_width="match_parent"
        android:layout_height="match_parent"
        android:orientation="vertical">

        <TextView
            android:id="@+id/name"
            android:layout_width="wrap_content"
            android:layout_height="wrap_content"
            android:text="demo"
            android:textColor="#000000"
            android:textSize="20dp" />

        <TextView
            android:id="@+id/synopsis"
            android:layout_width="wrap_content"
            android:layout_height="wrap_content"
            android:text="demo"
            android:textColor="#000000"
            android:textSize="15dp" />

    </LinearLayout>
</LinearLayout>
CommonResponse
app/java/com.dream.login/entity/CommonResponse
package com.dream.login.entity;

public class CommonResponse {
    public int code;
    public String msg;
}
Utils
app/java/com.dream.login/common/Utils
package com.dream.login.common;

import java.security.MessageDigest;

public class Utils {
    // 生成md5的方法 --- 传入字符串 返回 md5 加密值
    // 生成md5的方法,对象方法,需要对象实例化后才能使用
    // 直接改造成类方法,类直接调用
    public static String md5(String dataString) {
        try {
            MessageDigest instance = MessageDigest.getInstance("MD5");
            byte[] nameBytes = instance.digest(dataString.getBytes());
            // 十六进制展示
            StringBuilder sb = new StringBuilder();
            for (int i = 0; i < nameBytes.length; i++) {
                int val = nameBytes[i] & 255;
                if (val < 16) {
                    sb.append("0");
                }
                sb.append(Integer.toHexString(val));
            }
            return sb.toString();
        } catch (Exception e) {
            return null;
        }

    }
}
build.gradle
Gradle Scripts/build.gradle
plugins {
    id 'com.android.application'
}

android {
    namespace 'com.dream.login'
    compileSdk 33

    defaultConfig {
        applicationId "com.dream.login"
        minSdk 24
        targetSdk 33
        versionCode 1
        versionName "1.0"

        testInstrumentationRunner "androidx.test.runner.AndroidJUnitRunner"
    }

    buildTypes {
        release {
            minifyEnabled false
            proguardFiles getDefaultProguardFile('proguard-android-optimize.txt'), 'proguard-rules.pro'
        }
    }
    compileOptions {
        sourceCompatibility JavaVersion.VERSION_1_8
        targetCompatibility JavaVersion.VERSION_1_8
    }
}

dependencies {

    implementation 'androidx.appcompat:appcompat:1.4.1'
    implementation 'com.google.android.material:material:1.5.0'
    implementation 'androidx.constraintlayout:constraintlayout:2.1.3'
    testImplementation 'junit:junit:4.13.2'
    androidTestImplementation 'androidx.test.ext:junit:1.1.3'
    androidTestImplementation 'androidx.test.espresso:espresso-core:3.4.0'
    implementation "com.squareup.okhttp3:okhttp:4.9.1"
    implementation 'com.google.code.gson:gson:2.8.6'
    implementation 'com.github.bumptech.glide:glide:4.11.0'

}
【3】XML持久化
- 后端获取的数据,token数据,保存到手机端
- 后期发送请求需要携带----》一般保存在xml文件中
(1)写到xml中
- sp_token
- xml 文件名字
SharedPreferences sp = getSharedPreferences("sp_token", MODE_PRIVATE);
SharedPreferences.Editor editor = sp.edit(); // 取到写入对象

editor.putString("token","111111"); // 写入的数据

editor.commit(); // 提交操作
(2)从xml中取出来
getSharedPreferences("sp_token", MODE_PRIVATE);
String token = sp.getString("token","");

SharedPreferences sp =
(3)删除xml中的数据
SharedPreferences sp = getSharedPreferences("sp_token", MODE_PRIVATE);
SharedPreferences.Editor editor = sp.edit();
editor.remove("token");- 后期
- 破解app,他们的token,就很有可能放在xml中
- 手机的
/data/data/包名/shared_prefs/sp_token.xml
adb shell
su

cd /data/data/
cd com.justin.justinapp01
cd shared_prefs
ls # 看到xml文件
cat sp_token.xml # 能看到保存到本地的token- 后期,app中,有些数据,有可能存在xml中
- root权限了,可以去对应的xml中取出它存的东西
- 比如逆向的app,有个加密---》加密的秘钥,存在xml中
- python重写加密方法,xml把秘钥拿出来,再用
- 可以不破解登录接口
- 如果token存在xml中,直接取出 token,模拟发送请求,就是登录状态
【4】okhttp 拦截器
(1)问题:
做安卓开发,我们想,每个请求的请求头中都带 ctime发送请求的当前时间,和sign:ctime就是ctime使用md5加密
(2)解决
使用okhttp的拦截器,解决,在发送请求之前,先把一堆东西放入,以后,用的时候,只需要使用拦截器,所有的请求都会带上面两个参数
(3)拦截器使用方式
- 1 定义拦截器:
- 类必须实现Intercept接口
- 重写intercept---》可以写多个
- 2 在发送请求时,使用拦截器---》类实例化得到对象,注册进okhttp的请求中
(4)实践
package com.justin.justinapp01.interceptor;

import android.util.Log;

import androidx.annotation.NonNull;

import java.io.IOException;

import okhttp3.Interceptor;
import okhttp3.Request;
import okhttp3.Response;

import com.justin.justinapp01.Utils;

public class CommonInterceptor implements Interceptor {
    @Override
    public Response intercept(Chain chain) throws IOException {
        // 1 获取当前时间,获取签名
        String ctime = String.valueOf(System.currentTimeMillis() / 1000);
        String sign = Utils.md5(ctime);
        // 2 把当前时间和签名添加到请求头中
        Request request = chain.request().newBuilder().addHeader("ctime", ctime).addHeader("sign", sign).build();

        // 3 继续执行下面的拦截器
        Response response = chain.proceed(request);
        //4 把返回的响应对象返回回去
        return response;


    }
}- 使用okhttp的位置,加入使用拦截器即可
OkHttpClient client = new OkHttpClient.Builder().addInterceptor(拦截器对象).build();【5】retrofit
(1)retrofit介绍
(2)使用步骤
1 build.gradle中引入retrofit
implementation "com.squareup.retrofit2:retrofit:2.9.0"2 写接口,声明网络请求
public interface HttpReq {
            #  向/api/v1/post 发送POST请求,编码是UrlEncoded,传入userName和password,但被组装成 name=xx&pwd=xx
            @POST("/api/v1/post")
            @FormUrlEncoded
            Call<ResponseBody> postLogin(@Field("name") String userName, @Field("pwd") String password);

            #  向/api/v2/xxx发送get请求,传入age,拼接成 /api/v2/xxx?age=19
            @GET("/api/v2/xxx")
            Call<ResponseBody> getInfo(@Query("age") String age);

            # 向/post/users 发送POST请求,编码是json格式 {name:xxxx,age:123}
            @POST("/post/users")
            Call<ResponseBody> postLoginJson(@Body RequestBody body);
        }
3 发送网络请求
new Thread() {
        @Override
        public void run() {
            Retrofit retrofit = new Retrofit.Builder().baseUrl("http://192.168.1.12:8080/").build();
            HttpReq req = retrofit.create(HttpReq.class);
            Call<ResponseBody> call = req.postLogin("justin","123");
            try {
                ResponseBody responseBody = call.execute().body();
                String responseString = responseBody.string();
                Log.e("Retrofit返回的结果", responseString);

            } catch (Exception e) {
                e.printStackTrace();
            }
      }
    }.start();
4 简写
new Thread() {
        @Override
        public void run() {
            Retrofit retrofit = new Retrofit.Builder().baseUrl("http://192.168.1.12:8080/").build();
            try {
                String responseString = retrofit.create(HttpReq.class).postLogin("justin","123").execute().body().string();

                Log.e("Retrofit返回的结果", responseString);

            } catch (Exception e) {
                e.printStackTrace();
            }
      }
    }.start();


 已为社区贡献1条内容

所有评论(0)