在Tuneflow开发和运行自己的本地插件
作为开发者,可以开发运行自己的本地插件并部署在tuneflow服务器中是非常重要的。要在本地开发 TuneFlow 插件,我们需要启动一个本地调试服务器,它负责模拟生产环境,并且在本地直接与 TuneFlow 桌面版通信。开发者文档:https://help.tuneflow.com/zh/developer/devkit-python.html。根据你在bundle.json设置中提供的trig
·
在Tuneflow开发和运行自己的本地插件
作为开发者,可以开发运行自己的本地插件并部署在tuneflow服务器中是非常重要的。这篇文章主要讲解开发者如何通过python开发运行自己的本地插件,以hello world为例。
开发者文档:https://help.tuneflow.com/zh/developer/devkit-python.html
要在本地开发 TuneFlow 插件,我们需要启动一个本地调试服务器,它负责模拟生产环境,并且在本地直接与 TuneFlow 桌面版通信。为此,我们需要首先安装 tuneflow-devkit-py。
pip install tuneflow-devkit-py
以hello world插件为例:
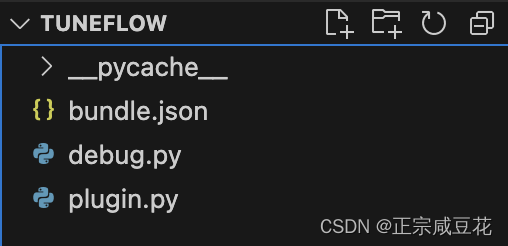
插件工程结构:

bundle.json
{
"plugins": [
{
"providerId": "aircrushin",
"providerDisplayName": {
"zh": "aircrushin",
"en": "aircrushin"
},
"pluginId": "hello-world",
"pluginDisplayName": {
"zh": "Hello World 插件",
"en": "Hello World Plugin"
},
"pluginDescription": {
"zh": "这是一个Hello World插件",
"en": "This is a hello world plugin."
},
"triggers": [
{
"type": "song"
}
],
"categories": ["generate"],
"version": "1.0.0",
"options": {
"allowReset": false
}
}
]
}
plugin.py
from tuneflow_py import TuneflowPlugin, Song, ParamDescriptor
from typing import Any
class HelloWorld(TuneflowPlugin):
@staticmethod
def provider_id():
return "aircrushin"
@staticmethod
def plugin_id():
return "hello-world"
@staticmethod
def params(song: Song) -> dict[str, ParamDescriptor]:
return {}
@staticmethod
def run(song: Song, params: dict[str, Any]):
"""
Do nothing except printing "hello world".
You should be able to load all metadata of this plugin and
the song should remain unchanged after running this plugin.
"""
print("Hello World!")
debug.py
from plugin import HelloWorld
from tuneflow_devkit import Debugger
from pathlib import Path
if __name__ == "__main__":
Debugger(plugin_class=HelloWorld, bundle_file_path=str(
Path(__file__).parent.joinpath('bundle.json').absolute())).start()
启动debug.py
python debug.py
接下来,启动 TuneFlow Desktop。并在 TuneFlow 插件库中安装我们的插件。

你将会看到我们开发中的 Python 插件以调试模式加载到了 TuneFlow Desktop 中。
根据你在bundle.json设置中提供的triggers,你可以在对应的右键菜单中运行你的插件。
点击阅读全文
更多推荐
 已为社区贡献1条内容
活动日历
查看更多
直播时间 2025-02-26 16:00:00


 华为云 x DeepSeek:AI驱动云上应用创新
直播时间 2025-01-08 16:30:00


 DTT年度收官盛典:华为开发者空间大咖汇,共探云端开发创新
直播时间 2024-12-11 16:30:00

 华为云数字人,助力行业数字化业务创新
直播时间 2024-11-27 16:30:00


 企业数据治理一站式解决方案及应用实践
直播时间 2024-11-21 16:30:00

 轻松构建AIoT智能场景应用


 免费领云主机

所有评论(0)