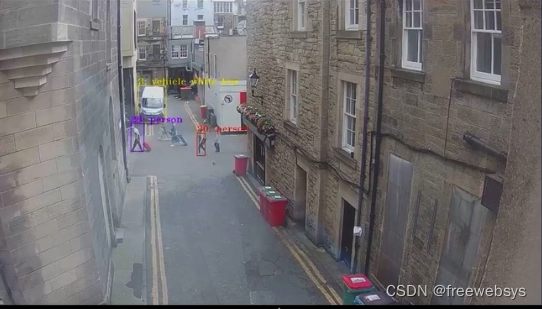
【EdgeX(13)】 :EdgeX官方的摄像头demo-app,接入摄像头可以控制摄像头的上下左右方向,创建OpenVINO的目标检测跟踪服务,并成功接受到相关坐标数据,可以直接做边缘计算了。
EdgeX官方的摄像头demo-app,接入摄像头可以控制摄像头的上下左右方向,创建OpenVINO的目标检测跟踪服务,并成功接受到相关坐标数据。这个官方例子还是非常的丰富的。稍作修改下就可以应用到项目当中了,已经把相关的目标检测模型都放到 OpenVINO 中,封装成一个docker 服务器启动了。整个流程也通过配置下就可以了。非常的方便、简单、高效的边缘演示服务!
目录
前言
相关EdgeX Foundry 全部分类:
https://blog.csdn.net/freewebsys/category_9437788.html
本文的原文连接是:
https://blog.csdn.net/freewebsys/article/details/126230258
未经博主允许不得转载。
博主地址是:http://blog.csdn.net/freewebsys
1,关于EdgeX的demo-app例子
信息地址:
https://www.edgexfoundry.org/software/releases/
使用文档:
https://github.com/edgexfoundry/device-onvif-camera/blob/main/doc/using-demo-app.md
首先下载 edgex examples 项目
$ git clone https://github.com/edgexfoundry/edgex-examples.git
# 切换到 camera management 项目
$ cd edgex-examples/application-services/custom/camera-management/
2,使用 :make install-edge-video-analytics 安装操作
日志都保存,看看都下载了一些文件。
项目是:
https://github.com/intel/edge-video-analytics-microservice.git
$ make install-edge-video-analytics
# 保留了一些日志,不全。
make -C edge-video-analytics install
git clone --depth=1 --branch v0.7.0 https://github.com/intel/edge-video-analytics-microservice.git src_v0.7.0
正克隆到 'src_v0.7.0'...
ln -sf src_v0.7.0/pipelines pipelines
mkdir -p models
chmod +x src_v0.7.0/tools/model_downloader/model_downloader.sh src_v0.7.0/docker/run.sh
src_v0.7.0/tools/model_downloader/model_downloader.sh --model-list src_v0.7.0/models_list/models.list.yml
Found /dev/dri/render entry - enabling for GPU
Found /dev/bus/usb - enabling for Intel(R) NCS2
Running Video Analytics Serving Image: 'openvino/ubuntu20_data_dev:2021.4.2'
模型放到了:
/data/home/test/edgex/edgex-examples/application-services/custom/camera-management/edge-video-analytics/src_v0.7.0/models_list
...
Copied model_proc to: /output/models/object_detection/person_vehicle_bike/person-vehicle-bike-detection-crossroad-0078.json.
...
Copied model_proc to: /output/models/object_classification/vehicle_attributes/vehicle-attributes-recognition-barrier-0039.json
...
Conversion command: /usr/bin/python3 -- /opt/intel/openvino/deployment_tools/model_optimizer/mo.py --
	- Inference Engine found in: 	/opt/intel/openvino_2021.4.752/python/python3.8/openvino
...
3,使用 make run-edge-video-analytics 启动镜像,开启端口 8080
要保障本地 8080 端口没有被占用,服务启动成功开启 8080 端口。
这个是图像处理服务,是 OpenVINO 的模型进行处理,识别的服务,必须开启应用才可以跑通。
$ make run-edge-video-analytics
# 保留了一些日志,不全。
make -C edge-video-analytics run
docker-compose -p edge-video-analytics up
# 加载模型
edge-video-analytics-edge_video_analytics_microservice-1  | {"levelname": "INFO", "asctime": "2022-10-19 06:46:34,872", "message": "Loading Model: object_detection version: person_vehicle_bike type: IntelDLDT from {'FP16': '/app/models/object_detection/person_vehicle_bike/FP16/person-vehicle-bike-detection-crossroad-0078.xml', 'FP32': '/app/models/object_detection/person_vehicle_bike/FP32/person-vehicle-bike-detection-crossroad-0078.xml', 'model-proc': '/app/models/object_detection/person_vehicle_bike/person-vehicle-bike-detection-crossroad-0078.json'}", "module": "model_manager"}
# 服务启动成功,端口 8080
edge-video-analytics-edge_video_analytics_microservice-1  | {"levelname": "INFO", "asctime": "2022-10-19 06:46:35,619", "message": "Completed Loading Pipelines", "module": "pipeline_manager"}
edge-video-analytics-edge_video_analytics_microservice-1  | {"levelname": "INFO", "asctime": "2022-10-19 06:46:35,619", "message": "===========================", "module": "pipeline_manager"}
edge-video-analytics-edge_video_analytics_microservice-1  | {"levelname": "INFO", "asctime": "2022-10-19 06:46:35,698", "message": "Starting Tornado Server on port: 8080", "module": "__main__"}                                                         1.1s
4,创建摄像头-应用,这个才是处理配置的界面,端口 59750
配置摄像头凭证文件。输入账号密码。
$ vi res/configuration.toml

# 设置账号密码
    # TODO: Enter your camera's credentials here.
    # NOTE: currently this solution is limited to supporting only 1 username/password combination
    #       for ALL cameras. In the future when then device-onvif-camera service is able to provide
    #       us with pre-authenticated uris, this can be removed.
    [Writable.InsecureSecrets.CameraCredentials]
    path = "CameraCredentials"
      [Writable.InsecureSecrets.CameraCredentials.Secrets]
      username = "admin"
      password = "password"
需要golang 环境:
https://golang.google.cn/doc/install
首先删除之前的老版本的文件,然后在解压缩到/usr/local目录下面:需要root权限

$ sudo rm -rf /usr/local/go && sudo tar -C /usr/local -xzf go1.19.2.linux-amd64.tar.gz

$ vi $HOME/.bashrc
增加环境变量
# add golang
export PATH=$PATH:/data/local/go/bin
# 增加代理,下载提速
export GO111MODULE=on
export GOPROXY=https://goproxy.cn

测试
$ go version
go version go1.19.2 linux/amd64
安装工具和依赖:
# 需要安装工具 pkg-config
$ sudo apt install pkg-config
# 安装 zeromq 依赖开发工具包:
$ sudo apt-get install libzmq3-dev
执行构建,没有任何问题代表构建成功!
$ make build-app
go mod tidy
CGO_ENABLED=1 go build -ldflags "-X github.com/edgexfoundry/app-functions-sdk-go/v2/internal.SDKVersion=v2.2.0 -X github.com/edgexfoundry/app-functions-sdk-go/v2/internal.ApplicationVersion=0.0.0" -o app-camera-management
$ make run-app
EDGEX_SECURITY_SECRET_STORE=false ./app-camera-management
.....
level=INFO ts=2022-10-19T08:31:46.13384954Z app=app-camera-management source=service.go:202 msg="StoreAndForward disabled. Not running retry loop."
level=INFO ts=2022-10-19T08:31:46.133856645Z app=app-camera-management source=service.go:205 msg="Camera Management Application Service has started"
level=INFO ts=2022-10-19T08:31:46.133863725Z app=app-camera-management source=server.go:162 msg="Starting HTTP Web Server on address 0.0.0.0:59750"
然后就可以看到界面了:可以看到各种服务都OK,同时要保证上面的 8080 服务也开着。
如果界面报错:说明上面的 run-edge-video-analytics 没有启动成功,端口不通。
"Failed to get pipelines: GET request to query all EVAM pipelines failed: failed to send a http request -> Get \"http://localhost:8080/pipelines\": dial tcp 127.0.0.1:8080: connect: connection refused"
偶尔会有 google 字体加载失败的情况,需要特殊解决下,找到个字体服务替换下,在 web-ui/dist/index.html 文件中。
https://fonts.gstatic.com/s/materialicons/v139/flUhRq6tzZclQEJ-Vdg-IuiaDsNcIhQ8tQ.woff2

可以上下左右的控制摄像头了,操作之后可以看到 API log 生效了

然后开始推理,【start pipeline】
就可以找到相关的人和车了。
使用
然后开启事件可以看到:

使用命令可以直接查看实时结果:需要安装 sudo apt install ffmpeg
ffplay -rtsp_transport tcp rtsp://localhost:8554/Camera001
在工位,没有车辆行人的视频,用截图代替了。


5,使用总结
EdgeX官方的摄像头demo-app,接入摄像头可以控制摄像头的上下左右方向,创建OpenVINO的目标检测跟踪服务,并成功接受到相关坐标数据。
这个官方例子还是非常的丰富的。稍作修改下就可以应用到项目当中了,已经把相关的目标检测模型都放到 OpenVINO 中,
封装成一个docker 服务器启动了。整个流程也通过配置下就可以了。
非常的方便、简单、高效的边缘演示服务!
本文的原文连接是:
https://blog.csdn.net/freewebsys/article/details/126230258
更多推荐
 已为社区贡献21条内容


所有评论(0)