uni-app 中实现位置授权以及打开地图选择位置功能
最近在项目中遇到一个要用户授权位置且可以用户自己选择位置的功能,看起来好像很难,其实并不难,我在网上看了一些优秀博主的博客,只要跟着步骤一步步来就能实现,下面是我在实现该功能后做的一次总结,希望能帮到更多的小伙伴~一、实现位置授权功能实现的效果图:实现步骤:1. 登录小程序官网获取AppID(用自己的小程序账号登录):[开发 ->开发设置 -> 复制AppID]2. 注册并登录腾讯地图
·
最近在项目中遇到一个要用户授权位置且可以用户自己选择位置的功能,看起来好像很难,其实并不难,我在网上看了一些优秀博主的博客,只要跟着步骤一步步来就能实现,下面是我在实现该功能后做的一次总结,希望能帮到更多的小伙伴~
一、实现位置授权功能
实现的效果图:

实现步骤:
1. 登录小程序官网获取AppID(用自己的小程序账号登录):
[开发 ->开发设置 -> 复制AppID]

2. 注册并登录腾讯地图api获取key:
[控制台->我的应用->创建应用->填写信息->添加Key]


注:橘色框中填写刚刚获取到的 APPID
3. 下载微信小程序 JavaScriptSDK :微信小程序JavaScript SDK | 腾讯位置服务
4. 将下载的压缩包解压放入项目静态文件夹中

5. 开始编写代码:进行 Vuex 配置,在 store 的 index.js 文件中写如下代码
[其中用到的 Key 值就是上面在腾讯地图 api 获取的 key]
import Vue from 'vue'
import Vuex from 'vuex'
// 引入腾讯地图jssdk文件
import  QQMapWX from "../static/js/qqmap-wx-jssdk.min.js"

Vue.use(Vuex)

const store = new Vuex.Store({
  state: {
  		// 默认城市
  		city: '北京市'
  },
  mutations:{
  		newCityFun (state, newCity) {
  			state.city = newCity
  			console.log(state.city)
  		}
  },
  actions: {
  		getCity(context) {
  			// 向用户发起授权请求,弹框提示
  			uni.authorize({
  			    // 获取用户定位信息
   				scope: "scope.userLocation",
   				// 用户同意授权执行
  				success(){
  					// 引入腾讯地图api
  					// 实例化API核心类
  					let qqmapsdk = new QQMapWX({
  					     // 填写自己的Key值,这个值是与AppID绑定的
  					     key: 'H7KBZ-5KOKU-ZDSVY-2APXY-AP24E-HUB6Q'
  					 });
  					//获取位置信息
  					uni.getLocation({
  					    type: 'gcj02',
  					    success: function (res) {
  					        console.log('当前位置的经度:' + res.longitude)
  					        console.log('当前位置的纬度:' + res.latitude)
  							// 逆地址解析方法
  							qqmapsdk.reverseGeocoder({
  								location: {
  									latitude: res.latitude,
  									longitude: res.longitude
  								},
  							success(res) {
  								var newCity = ''
  								// 取到用户的定位城市,赋值传递出去
  								newCity = res.result.address_component.city
                                context.commit('newCityFun',newCity)
  							},
                        fail(res){
                            console.log(res)
                        }
  							 })
  					    }
  					})
  				},
  				// 若用户不同意授权,弹框提示
  				fail(res){
                    // 这里是封装了一个提示框方法
  					uni.$showMsg('注意:需要获取您的定位授权,否则部分功能将无法使用')
  				}
  			})
  		}
  	},
})

export default store
6. 在需要的页面引入使用:
<template>
  <view>
    <view class="address">
      <span>{{newCity}}</span>
    </view>
  </view>
</template>

<script>
  export default {
    data() {
      return {
      };
    },
    onReady(){
      //页面加载完调用获取地址权限
      this.$store.dispatch('getCity')
    },
    computed:{
      //授权后获取到的当前位置(重庆市)
      newCity(){
        return this.$store.state.city
      }
    },
  }
</script>
二、打开地图选择位置功能
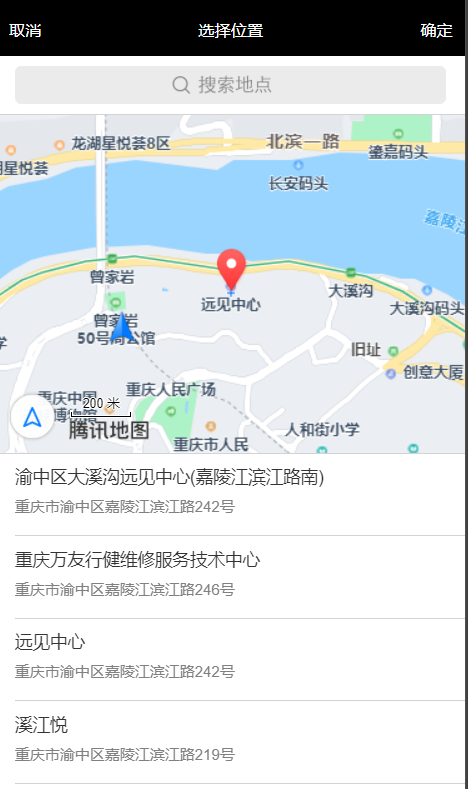
实现的效果:

实现代码:
<template>
  <view>
    <view class="address" @click="goMap">
      <uni-icons type="location-filled" size="25"></uni-icons>
      <span>{{location}}</span>
      <uni-icons type="bottom" size="18"></uni-icons>
    </view>
  </view>
</template>

<script>
  export default {
    data() {
      return {
        location:'重庆市'
      };
    },
    methods:{
      goMap(){
        const that = this
        // uniapp 需要先调取用户授权请求询问用户是否授权
        uni.authorize({
          scope:'scope.userLocation',
          success(res){
            uni.chooseLocation({
              success:function(res){
                // console.log('位置名称:' + res.name);
                // console.log('详细地址:' + res.address);
                that.location = res.name;
              }
            })
          },
          fail(err){
            uni.$showMsg('获取位置失败!')
          }
        })
      }
    }
  }
</script>

<style lang="scss">
.address {
  padding: 0 5px;
}
</style>
参考文档:
-
uni.authorize:uni.authorize(OBJECT) | uni-app官网
-
uni.chooseLocation(OBJECT):uni.getLocation(OBJECT) | uni-app官网
注意:要勾选位置接口

更多推荐
 已为社区贡献2条内容


所有评论(0)