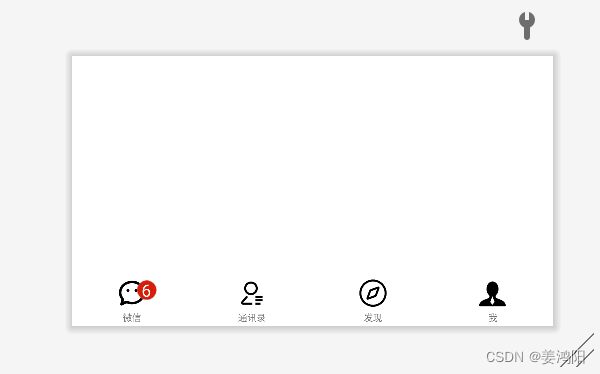
Android Studio 安卓微信底部界面带消息红点的代码
(我发在这里,需要的请导出下载,但这个图片有水印,我的这些图标都是从阿里巴巴矢量图库网站里面下载,想要没有水印的,可以在那里看看)
目录
一、说明
- 我使用的是Android Studio2021.12.1版本的;
- 本程序分为代码和素材以及运行结果三部分;
- 在将代码完全粘贴到软件中,常见问题就是图片丢失,这样需要将涉及到的图片导入到本项目下的drawable目录下。其他问题可在评论留言或自行解决;
- 我本人是学生,这个程序是自己做得,有些地方不够完善,同时不算太美观,因能力有限,请谅解;
- 这个消息红点有很多种方法实现,我使用的是上下左右定位以及layout等方法;
二、代码段
<?xml version="1.0" encoding="utf-8"?>
<LinearLayout xmlns:android="http://schemas.android.com/apk/res/android"
    xmlns:app="http://schemas.android.com/apk/res-auto"
    android:layout_width="match_parent"
    android:layout_height="match_parent"
    android:gravity="bottom"
    android:orientation="vertical">

    <LinearLayout
        android:layout_width="match_parent"
        android:layout_height="50dp"
        android:orientation="horizontal">

        <RelativeLayout
            android:layout_width="match_parent"
            android:layout_height="match_parent"
            android:gravity="center"
            android:layout_weight="1">

            <ImageView
                android:id="@+id/imageView5"
                android:layout_width="90dp"
                android:layout_height="90dp"
                android:layout_centerInParent="true"
                app:srcCompat="@drawable/wx" />

            <ImageView
                android:id="@+id/imageView8"
                android:layout_width="40dp"
                android:layout_height="40dp"
                android:layout_alignRight="@id/imageView5"
                android:layout_marginRight="2dp"
                app:srcCompat="@drawable/hd4" />

            <TextView
                android:id="@+id/textView2"
                android:layout_width="15dp"
                android:layout_height="wrap_content"
                android:gravity="right"
                android:layout_alignRight="@id/imageView8"
                android:layout_marginRight="14dp"
                android:layout_marginTop="3dp"
                android:text="6"
                android:textColor="#FFFFFF"
                android:textSize="26sp" />

        </RelativeLayout>

        <RelativeLayout
            android:layout_width="match_parent"
            android:layout_height="match_parent"
            android:gravity="center"
            android:layout_weight="1">

            <ImageView
                android:id="@+id/imageView98"
                android:layout_width="90dp"
                android:layout_height="90dp"
                app:srcCompat="@drawable/txl" />


        </RelativeLayout>

        <RelativeLayout
            android:layout_width="match_parent"
            android:layout_height="match_parent"
            android:gravity="center"
            android:layout_weight="1">

            <ImageView
                android:id="@+id/imageView97"
                android:layout_width="90dp"
                android:layout_height="90dp"
                app:srcCompat="@drawable/faxian" />

        </RelativeLayout>

        <RelativeLayout
            android:layout_width="match_parent"
            android:layout_height="match_parent"
            android:gravity="center"
            android:layout_weight="1">

            <ImageView
                android:id="@+id/imageView96"
                android:layout_width="90dp"
                android:layout_height="90dp"
                app:srcCompat="@drawable/geren" />
        </RelativeLayout>
    </LinearLayout>

    <LinearLayout
        android:layout_width="match_parent"
        android:layout_height="25dp"

        android:orientation="horizontal">

        <RelativeLayout
            android:layout_width="match_parent"
            android:layout_height="match_parent"
            android:layout_weight="1"
            android:gravity="center"
            >

            <TextView
                android:id="@+id/textView4"
                android:layout_width="wrap_content"
                android:layout_height="wrap_content"

                android:text="微信" />
        </RelativeLayout>

        <RelativeLayout
            android:layout_width="match_parent"
            android:layout_height="match_parent"
            android:gravity="center"
            android:layout_weight="1">

            <TextView
                android:id="@+id/textView5"
                android:layout_width="wrap_content"
                android:layout_height="wrap_content"
                android:text="通讯录" />
        </RelativeLayout>

        <RelativeLayout
            android:layout_width="match_parent"
            android:layout_height="match_parent"
            android:gravity="center"
            android:layout_weight="1">

            <TextView
                android:id="@+id/textView10"
                android:layout_width="wrap_content"
                android:layout_height="wrap_content"
                android:text="发现" />
        </RelativeLayout>

        <RelativeLayout
            android:layout_width="match_parent"
            android:layout_height="match_parent"
            android:gravity="center"
            android:layout_weight="1">

            <TextView
                android:id="@+id/textView11"
                android:layout_width="wrap_content"
                android:layout_height="wrap_content"

                android:text="我" />
        </RelativeLayout>
    </LinearLayout>
</LinearLayout>
三、效果图
1.横板效果图

2.竖版效果图

四、素材
(我发在这里,需要的请导出下载,但这个图片有水印,我的这些图标都是从阿里巴巴矢量图库网站里面下载,想要没有水印的,可以在那里看看)


![]()
五、部分代码实现的功能
把上文的部分代码讲解以下,以文字顺序和代码顺序讲的。还有就是讲解的有可能有错误,请见谅,并及时查找正确答案!
1.定义图片名称,设置好宽高,设置与父元素居中位置以及设计图片源
<ImageView
android:id="@+id/imageView5"
android:layout_width="90dp"
android:layout_height="90dp"
android:layout_centerInParent="true"
app:srcCompat="@drawable/wx" />
2. 定义图片名称,设置好宽高,遇上一个图片进行相对布局设置,设置距顶元素值以及设计图片源
<ImageView
android:id="@+id/imageView8"
android:layout_width="40dp"
android:layout_height="40dp"
android:layout_alignRight="@id/imageView5"
android:layout_marginRight="2dp"
app:srcCompat="@drawable/hd4" />
3.设置好宽高,设置文本的方向,对使用相对布局,设置距离右边14dp,距离顶部3dp,设置文本内容为6,设置好文本颜色以及本文本的大小
<TextView
android:layout_width="15dp"
android:gravity="right"
android:layout_alignRight="@id/imageView8"
android:layout_marginRight="14dp"
android:layout_marginTop="3dp"
android:text="6"
android:textColor="#FFFFFF"
android:textSize="26sp" />
更多推荐
 已为社区贡献1条内容


所有评论(0)