SpringAOP学习--SpringAOP简介及原理
前文对AOP做了介绍,实际项目中,一般不会直接上手手动实现aop,而是使用一些高级封装的aop实现,如SpringAOP。Spring是一个广泛应用的框架,SpringAOP则是Spring提供的一个标准易用的aop框架,依托Spring的IOC容器,提供了极强的AOP扩展增强能力,对项目开发提供了极大地便利。前文提到AOP的实现有AspectJ、JDK动态代理、CGLIB动态代理,SpringA
前文对AOP做了介绍,实际项目中,一般不会直接上手手动实现aop,而是使用一些高级封装的aop实现,如SpringAOP。
Spring是一个广泛应用的框架,SpringAOP则是Spring提供的一个标准易用的aop框架,依托Spring的IOC容器,提供了极强的AOP扩展增强能力,对项目开发提供了极大地便利。
前文提到AOP的实现有AspectJ、JDK动态代理、CGLIB动态代理,SpringAOP不是一种新的AOP实现,其底层采用的是JDK/CGLIB动态代理。
JDK动态代理回顾
上一篇简单介绍了JDK动态代理如何使用,我们就以此展开SpringAOP原理,和我们自己手写JDK动态代理有何不同!
JDK动态代理使用需要定义一个代理实例的调用拦截处理器InvocationHandler,反射执行目标方法,之前前后可以加入一些额外的代码实现增强。
public interface InvocationHandler {
    public Object invoke(Object proxy, Method method, Object[] args)
        throws Throwable;
}

实现类
@Override
public Object invoke(Object proxy, Method method, Object[] args) throws Throwable {
    // before do something;
    Object result = method.invoke(word, args);
    // after do something;
    return result;
}
然后和原对象一起可以生成一个代理对象。
Proxy.newProxyInstance(clazz.getClassLoader(), new Class<?>[]{clazz}, invocationHandler)
然后就可以用代理对象替换原对象,执行原对象操作实现代理切面处理。
这里其实还有些点没有细化:
- 如果当前类有三个方法,只需要对其中一个进行切面,那么我们就需要在invoke方法中对方法判断,不是目标方法就不需要增强而是直接反射执行。
- 一个类需要进行多次切面,如何有效组织多个切面。
SpringAOP介绍
为了标准化AOP,Spring引入了一套AOP顶级API-- AOP联盟,用来定义和使用AOP。
底层根据配置生成JDK或CGLIB动态代理对象。
AOP联盟
AOP联盟,一群热爱技术的人觉得AOP思想不错,于是打算促进和标准化AOP,定制了一套标准,推动AOP和JAVA发展。
那么AOP联盟的标准是什么呢?
spring-aop jar包中有个目录org.aopalliance,其中存在几个接口,即是AOP联盟提供的AOP标准API。


SpringAOP核心概念
上述中已经出现的关键词有Advice(顶级的通知类/拦截器)、MethodInvocation(方法连接点)、MethodInterceptor(方法拦截器)
SpringAOP在此基础上又增加了几个类,丰富了AOP定义及使用概念,包括
Advisor:包含通知(拦截器),Spring内部使用的AOP顶级接口,还需要包含一个aop适用判断的过滤器,考虑到通用性,过滤规则由其子接口定义,例如IntroductionAdvisor和PointcutAdvisor,过滤器用于判断bean是否需要被代理
Pointcut: 切点,属于过滤器的一种实现,匹配过滤哪些类哪些方法需要被切面处理,包含一个ClassFilter和一个MethodMatcher,使用PointcutAdvisor定义时需要
ClassFilter:限制切入点或引入点与给定目标类集的匹配的筛选器,属于过滤器的一种实现。过滤筛选合适的类,有些类不需要被处理
MethodMatcher:方法匹配器,定义方法匹配规则,属于过滤器的一种实现,哪些方法需要使用AOP
SpringAOP实现的大致思路:
1.配置获取Advisor (顾问):拦截器+AOP匹配过滤器,生成Advisor
2.生成代理:根据Advisor生成代理对象,会生成JdkDynamicAopProxy或CglibAopProxy
3.执行代理:代理类执行代理时,从Advisor取出拦截器,生成MethodInvocation(连接点)并执行代理过程
SpringAOP与AOP联盟关系

配置Advisor
这一步对SpringAOP使用者很关键,决定了我们如何定义配置Advisor,即SpringAOP和Aspectj,实际使用配置AOP方式有多种,还区分xml和注解,最终转化处理时我认为只分为这两种。其中Aspectj方式配置AOP应该是最常见应用最广泛的用法了。
前面提到Aspectj是一种静态代理,而SpringAOP是动态代理。但Aspectj的一套定义AOP的API非常好,直观易用。所以Spring引入了Aspectj,但只使用部分注解用来定义配置AOP,在获取Advisor阶段用来生成Advisor,与后面的代理生成和代理增强执行无关!
这两种方式有什么不同呢?
1.直接配置Advisor
实现Advisor接口,定义拦截器和拦截规则(切点)
2.间接配置Advisor
使用Aspectj jar包提供的注解定义AOP配置,由Spring解析配置生成Advisor
下面以一个DEMO看看分别如何配置,为了方便展示,直接使用SpringBoot项目配置,暂时忽略复杂的细节只关注核心配置。
示例全部采用注解方式,不使用XML配置方式
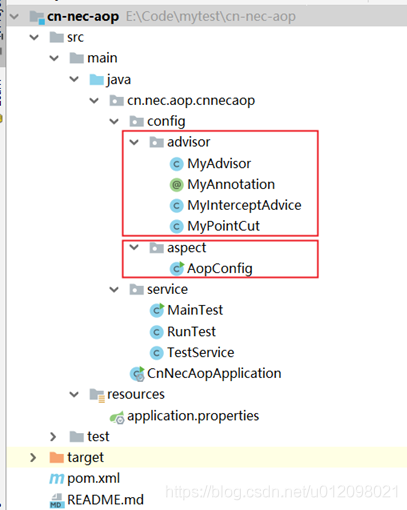
直接配置Advisor
最少需要定义三个类,一个Advisor的实现类,一个Advice实现类(拦截器),一个aop适配过滤器(这里使用的Advisor为派生的PointcutAdvisor ,需要定义PointCut切点)。可以增加一个注解用于AOP埋点,需要给bean哪个方法进行切面,则方法上加上该注解。
Advisor:MyAdvisor,返回一个Advice,
Advice:MyInterceptAdvice,拦截器,invoke方法中可以添加切面逻辑代码
PointCut: MyPointCut,切点,匹配过滤出需要切面的类及方法,查找方法头注解了MyAnnotation的方法。
埋点注解:MyAnnotation
MyAnnotation.java
@Target({ElementType.TYPE, ElementType.METHOD})
@Retention(RetentionPolicy.RUNTIME)
@Inherited
@Documented
public @interface MyAnnotation {
}
MyAdvisor.java
@Component
public class MyAdvisor implements PointcutAdvisor {

    @Override
    public Advice getAdvice() {
        return new MyInterceptAdvice();
    }

    @Override
    public boolean isPerInstance() {
        return false;
    }

    @Override
    public Pointcut getPointcut() {
        return new MyPointCut();
    }
}
MyInterceptAdvice.java
public class MyInterceptAdvice implements MethodInterceptor {

    @Override
    public Object invoke(MethodInvocation invocation) throws Throwable {
        System.out.println("go go go MyAdvisor process!!!");
        return invocation.proceed();
    }
}
MyPointCut.java
public class MyPointCut implements Pointcut {

    @Override
    public ClassFilter getClassFilter() {
        return new MyClassFilter();
    }

    @Override
    public MethodMatcher getMethodMatcher() {
        return new MyMethodMatcher();
    }

    private class MyMethodMatcher implements MethodMatcher {
        @Override
        public boolean matches(Method method, Class<?> targetClass) {
            Annotation[] annoArray = method.getDeclaredAnnotations();
            if (annoArray == null || annoArray.length == 0) {
                return false;
            }

            for (Annotation annotation : annoArray) {
                if (annotation.annotationType() == MyAnnotation.class) {
                    return true;
                }
            }
            return false;
        }

        @Override
        public boolean isRuntime() {
            return false;
        }

        @Override
        public boolean matches(Method method, Class<?> targetClass, Object... args) {
            return false;
        }
    }

    private class MyClassFilter implements ClassFilter {

        @Override
        public boolean matches(Class<?> clazz) {
            return AnnotationUtils.isCandidateClass(clazz, MyAnnotation.class);
        }
    }
}
需要切面的Service类
@Component
public class TestService {

    @MyAnnotation
    public void test() {
        System.out.println("test!");
    }
}
再定义一个测试类
@Component
public class RunTest {

    @Autowired
    private TestService testService;

    @PostConstruct
    public void test() {
        testService.test();
    }
}
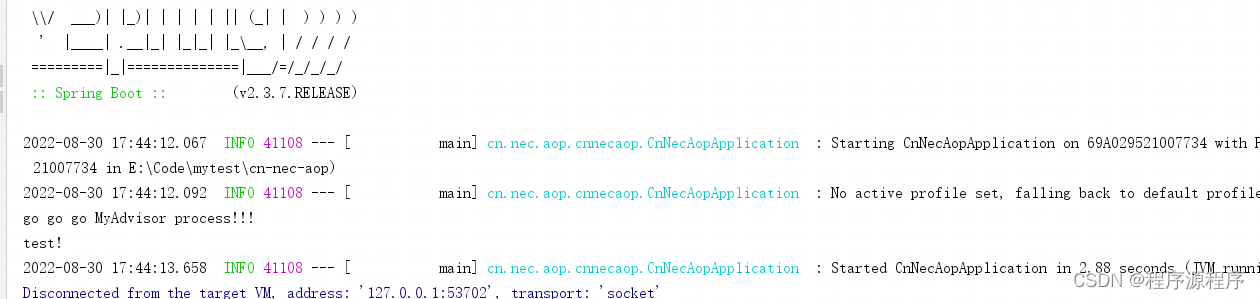
运行结果:
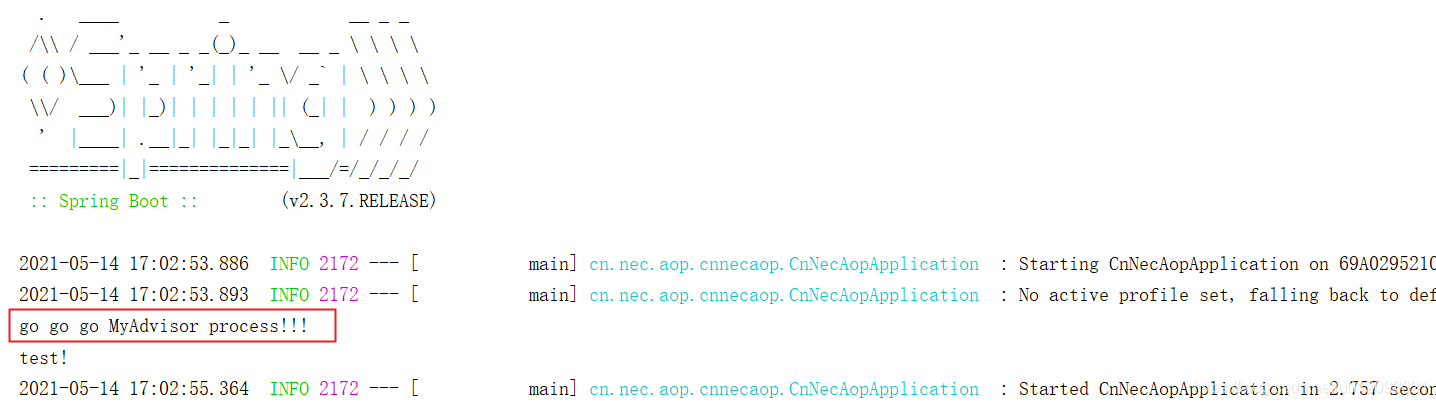
可以看到除了执行test内容,还执行到了拦截器中的代码,说明这种方式配置AOP生效了。
使用Aspectj间接配置Advisor
一个类就可以了,定义切点和增强方法
@Aspect
@Component
public class AopConfig {

    @Pointcut("execution(* cn.nec.aop.cnnecaop.service.*.*(..))")
    public void pointCut() {}
    public static void main(String[] args) {
        List<String> aa = Collections.singletonList("aa");
        System.out.println(aa.size());

    }

    @Around("pointCut()")
    public Object around(ProceedingJoinPoint joinPoin) {
        System.out.println("go go go MyAspectJ process!!!");
        Object obj = null;
        try {
            obj = joinPoin.proceed();
        } catch (Throwable throwable) {
            throwable.printStackTrace();
        }

        return obj;
    }
}
运行结果:

SpringAOP原理
上面介绍了SpringAOP并简单展示了如何使用,下面来看看SpringAOP原理,内部是如何实现的!
AOP入口
SpringAOP是对bean的一种扩展,是后处理器的一种处理。Spring bean在 执行初始化方法前后,会使用所有BeanPostProcessor对bean进行特殊处理。Aop代理即是一种对bean特殊处理。
protected Object initializeBean(String beanName, Object bean, @Nullable RootBeanDefinition mbd) {
   if (System.getSecurityManager() != null) {
      AccessController.doPrivileged((PrivilegedAction<Object>) () -> {
         invokeAwareMethods(beanName, bean);
         return null;
      }, getAccessControlContext());
   }
   else {
      invokeAwareMethods(beanName, bean);
   }

   Object wrappedBean = bean;
   if (mbd == null || !mbd.isSynthetic()) {
      wrappedBean = applyBeanPostProcessorsBeforeInitialization(wrappedBean, beanName);
   }

   try {
      invokeInitMethods(beanName, wrappedBean, mbd);
   }
   catch (Throwable ex) {
      throw new BeanCreationException(
            (mbd != null ? mbd.getResourceDescription() : null),
            beanName, "Invocation of init method failed", ex);
   }
   if (mbd == null || !mbd.isSynthetic()) {
      wrappedBean = applyBeanPostProcessorsAfterInitialization(wrappedBean, beanName);
   }

   return wrappedBean;
}
此时用于代理的BeanPostProcessor登场,对需要代理的bean进行代理
对应的BeanPostProcessor为AbstractAutoProxyCreator的子类,执行AbstractAutoProxyCreator.postProcessAfterInitialization()。
@Override
public Object postProcessAfterInitialization(@Nullable Object bean, String beanName) {
	if (bean != null) {
		Object cacheKey = getCacheKey(bean.getClass(), beanName);
		if (this.earlyProxyReferences.remove(cacheKey) != bean) {
			return wrapIfNecessary(bean, beanName, cacheKey);
		}
	}
	return bean;
}

/**
 * Wrap the given bean if necessary, i.e. if it is eligible for being proxied.
 * @param bean the raw bean instance
 * @param beanName the name of the bean
 * @param cacheKey the cache key for metadata access
 * @return a proxy wrapping the bean, or the raw bean instance as-is
 */
protected Object wrapIfNecessary(Object bean, String beanName, Object cacheKey) {
	if (StringUtils.hasLength(beanName) && this.targetSourcedBeans.contains(beanName)) {
		return bean;
	}
	if (Boolean.FALSE.equals(this.advisedBeans.get(cacheKey))) {
		return bean;
	}
	if (isInfrastructureClass(bean.getClass()) || shouldSkip(bean.getClass(), beanName)) {
		this.advisedBeans.put(cacheKey, Boolean.FALSE);
		return bean;
	}

	// Create proxy if we have advice.
	// 获取拦截器,及Advisor,看样子也可以获取Advice!
	Object[] specificInterceptors = getAdvicesAndAdvisorsForBean(bean.getClass(), beanName, null);
	if (specificInterceptors != DO_NOT_PROXY) {
		this.advisedBeans.put(cacheKey, Boolean.TRUE);
		// 生成代理对象
		Object proxy = createProxy(
				bean.getClass(), beanName, specificInterceptors, new SingletonTargetSource(bean));
		this.proxyTypes.put(cacheKey, proxy.getClass());
		return proxy;
	}

	this.advisedBeans.put(cacheKey, Boolean.FALSE);
	return bean;
}
可以看到代理生成分了两步,获取AdvicesAndAdvisors,然后生成代理对象
获取AdvicesAndAdvisors
分两步,先从容器中获取所有的Advisor,然后用Advisor的PointCut判断是否需要代理
protected List<Advisor> findEligibleAdvisors(Class<?> beanClass, String beanName) {
   List<Advisor> candidateAdvisors = findCandidateAdvisors();
   List<Advisor> eligibleAdvisors = findAdvisorsThatCanApply(candidateAdvisors, beanClass, beanName);
   extendAdvisors(eligibleAdvisors);
   if (!eligibleAdvisors.isEmpty()) {
      eligibleAdvisors = sortAdvisors(eligibleAdvisors);
   }
   return eligibleAdvisors;
}
获取所有的Advisor
findCandidateAdvisors用于获取所有的Advisor,默认获取直接配置的Advisor。即实现了Advisor的所有bean。
advisors.add(this.beanFactory.getBean(name, Advisor.class));
AnnotationAwareAspectJAutoProxyCreator重写了findCandidateAdvisors,不仅可以获取直接配置得Advisor,还可以获取用AspectJ间接定义的Advisor,即把AspectJ定义的bean转化为Advisor。
所以使用AnnotationAwareAspectJAutoProxyCreator可以同时支持两种配置AOP方式!
@Override
protected List<Advisor> findCandidateAdvisors() {
   // Add all the Spring advisors found according to superclass rules.
   List<Advisor> advisors = super.findCandidateAdvisors();
   // Build Advisors for all AspectJ aspects in the bean factory.
   if (this.aspectJAdvisorsBuilder != null) {
      advisors.addAll(this.aspectJAdvisorsBuilder.buildAspectJAdvisors());
   }
   return advisors;
}
获取AspectJ间接定义的Advisor
if (this.advisorFactory.isAspect(beanType)) {
      aspectNames.add(beanName);
      AspectMetadata amd = new AspectMetadata(beanType, beanName);
      if (amd.getAjType().getPerClause().getKind() == PerClauseKind.SINGLETON) {
         MetadataAwareAspectInstanceFactory factory =
               new BeanFactoryAspectInstanceFactory(this.beanFactory, beanName);
         List<Advisor> classAdvisors = this.advisorFactory.getAdvisors(factory);
         if (this.beanFactory.isSingleton(beanName)) {
            this.advisorsCache.put(beanName, classAdvisors);
         }
         else {
            this.aspectFactoryCache.put(beanName, factory);
         }
         advisors.addAll(classAdvisors);
      }
      else {
         // Per target or per this.
         if (this.beanFactory.isSingleton(beanName)) {
            throw new IllegalArgumentException("Bean with name '" + beanName +
                  "' is a singleton, but aspect instantiation model is not singleton");
         }
         MetadataAwareAspectInstanceFactory factory =
               new PrototypeAspectInstanceFactory(this.beanFactory, beanName);
         this.aspectFactoryCache.put(beanName, factory);
         advisors.addAll(this.advisorFactory.getAdvisors(factory));
      }
   }
}
查找过滤合适的Advisor
findAdvisorsThatCanApply用于查找可用的Advisor,遍历所有的Advisor,使用Advisor的PointCut执行匹配方法,对bean Class的方法挨个进行匹配,能匹配到说明该Advisor合格,加入到返回结果中,这里只展示了其中一种切点的处理逻辑–PointcutAdvisor。
public static boolean canApply(Pointcut pc, Class<?> targetClass, boolean hasIntroductions) {
   Assert.notNull(pc, "Pointcut must not be null");
   if (!pc.getClassFilter().matches(targetClass)) {
      return false;
   }

   MethodMatcher methodMatcher = pc.getMethodMatcher();
   if (methodMatcher == MethodMatcher.TRUE) {
      // No need to iterate the methods if we're matching any method anyway...
      return true;
   }

   IntroductionAwareMethodMatcher introductionAwareMethodMatcher = null;
   if (methodMatcher instanceof IntroductionAwareMethodMatcher) {
      introductionAwareMethodMatcher = (IntroductionAwareMethodMatcher) methodMatcher;
   }

   Set<Class<?>> classes = new LinkedHashSet<>();
   if (!Proxy.isProxyClass(targetClass)) {
      classes.add(ClassUtils.getUserClass(targetClass));
   }
   classes.addAll(ClassUtils.getAllInterfacesForClassAsSet(targetClass));

   for (Class<?> clazz : classes) {
      Method[] methods = ReflectionUtils.getAllDeclaredMethods(clazz);
      for (Method method : methods) {
         if (introductionAwareMethodMatcher != null ?
               introductionAwareMethodMatcher.matches(method, targetClass, hasIntroductions) :
               methodMatcher.matches(method, targetClass)) {
            return true;
         }
      }
   }

   return false;
}
过滤规则扩展
直接实现Advisor,和实现Advisor的扩展接口有什么区别?
Advisor是顶级接口,其实器残缺的,没有给出过滤匹配的方式
扩展接口IntroductionAdvisor和PointcutAdvisor。
Advisor没有过滤匹配规则,会匹配所有bean(不包含特殊bean)
IntroductionAdvisor给出了class类型过滤方式,会匹配限定类型的bean
PointcutAdvisor给出了class类型+方法匹配过滤方式,会匹配限定类型限定方法的bean。
显然PointcutAdvisor功能最强大,适用性和实用性最强
public static boolean canApply(Advisor advisor, Class<?> targetClass, boolean hasIntroductions) {
	if (advisor instanceof IntroductionAdvisor) {
		return ((IntroductionAdvisor) advisor).getClassFilter().matches(targetClass);
	}
	else if (advisor instanceof PointcutAdvisor) {
		PointcutAdvisor pca = (PointcutAdvisor) advisor;
		return canApply(pca.getPointcut(), targetClass, hasIntroductions);
	}
	else {
		// It doesn't have a pointcut so we assume it applies.
		return true;
	}
}
生成代理对象及代理执行
使用可用的Advisor和当前bean对象生成动态代理对象
给出简化版源码
ProxyFactory proxyFactory = new ProxyFactory();
Advisor[] advisors = buildAdvisors(beanName, specificInterceptors);
proxyFactory.getProxy(getProxyClassLoader());createAopProxy().getProxy(classLoader);
createAopProxy用于创建代理类,进入源码可以看到支持两种代理方式,其中JDK动态代理需要bean实现接口。
public AopProxy createAopProxy(AdvisedSupport config) throws AopConfigException {
   if (config.isOptimize() || config.isProxyTargetClass() || hasNoUserSuppliedProxyInterfaces(config)) {
      Class<?> targetClass = config.getTargetClass();
      if (targetClass == null) {
         throw new AopConfigException("TargetSource cannot determine target class: " +
               "Either an interface or a target is required for proxy creation.");
      }
      if (targetClass.isInterface() || Proxy.isProxyClass(targetClass)) {
         return new JdkDynamicAopProxy(config);
      }
      return new ObjenesisCglibAopProxy(config);
   }
   else {
      return new JdkDynamicAopProxy(config);
   }
}
JDK动态代理类
直接看代码
public Object getProxy(@Nullable ClassLoader classLoader) {
   if (logger.isTraceEnabled()) {
      logger.trace("Creating JDK dynamic proxy: " + this.advised.getTargetSource());
   }
   Class<?>[] proxiedInterfaces = AopProxyUtils.completeProxiedInterfaces(this.advised, true);
   findDefinedEqualsAndHashCodeMethods(proxiedInterfaces);
   return Proxy.newProxyInstance(classLoader, proxiedInterfaces, this);
}
是不是熟悉了,和手动定义JDK动态代理一样,核心就是
Proxy.newProxyInstance(clazz.getClassLoader(), new Class<?>[]{clazz}, invocationHandler)。
再来看看核心方法invoke,仍然是精简版的源码
// Get the interception chain for this method.
List<Object> chain = this.advised.getInterceptorsAndDynamicInterceptionAdvice(method, targetClass);

// Check whether we have any advice. If we don't, we can fallback on direct
// reflective invocation of the target, and avoid creating a MethodInvocation.
if (chain.isEmpty()) {
   // We can skip creating a MethodInvocation: just invoke the target directly
   // Note that the final invoker must be an InvokerInterceptor so we know it does
   // nothing but a reflective operation on the target, and no hot swapping or fancy proxying.
   Object[] argsToUse = AopProxyUtils.adaptArgumentsIfNecessary(method, args);
   retVal = AopUtils.invokeJoinpointUsingReflection(target, method, argsToUse);
}
else {
   // We need to create a method invocation...
   MethodInvocation invocation =
         new ReflectiveMethodInvocation(proxy, target, method, args, targetClass, chain);
   // Proceed to the joinpoint through the interceptor chain.
   retVal = invocation.proceed();
}
从Advisor中获取拦截器,然后生成一个连接点(ReflectiveMethodInvocation),包含链接器和代理信息,执行连接点的proceed方法,会链式调用拦截器,执行所有的切面代码。
public Object proceed() throws Throwable {
   // We start with an index of -1 and increment early.
   if (this.currentInterceptorIndex == this.interceptorsAndDynamicMethodMatchers.size() - 1) {
      return invokeJoinpoint();
   }

   Object interceptorOrInterceptionAdvice =
         this.interceptorsAndDynamicMethodMatchers.get(++this.currentInterceptorIndex);
   if (interceptorOrInterceptionAdvice instanceof InterceptorAndDynamicMethodMatcher) {
      // Evaluate dynamic method matcher here: static part will already have
      // been evaluated and found to match.
      InterceptorAndDynamicMethodMatcher dm =
            (InterceptorAndDynamicMethodMatcher) interceptorOrInterceptionAdvice;
      Class<?> targetClass = (this.targetClass != null ? this.targetClass : this.method.getDeclaringClass());
      if (dm.methodMatcher.matches(this.method, targetClass, this.arguments)) {
         return dm.interceptor.invoke(this);
      }
      else {
         // Dynamic matching failed.
         // Skip this interceptor and invoke the next in the chain.
         return proceed();
      }
   }
   else {
      // It's an interceptor, so we just invoke it: The pointcut will have
      // been evaluated statically before this object was constructed.
      return ((MethodInterceptor) interceptorOrInterceptionAdvice).invoke(this);
   }
}
CGLIB动态代理类
动态生成字节码并在内存中创建代理类,具体不甚了解,和JDK大致相似,看看怎么执行的
public Object intercept(Object proxy, Method method, Object[] args, MethodProxy methodProxy) throws Throwable {
   Object oldProxy = null;
   boolean setProxyContext = false;
   Object target = null;
   TargetSource targetSource = this.advised.getTargetSource();
   try {
      if (this.advised.exposeProxy) {
         // Make invocation available if necessary.
         oldProxy = AopContext.setCurrentProxy(proxy);
         setProxyContext = true;
      }
      // Get as late as possible to minimize the time we "own" the target, in case it comes from a pool...
      target = targetSource.getTarget();
      Class<?> targetClass = (target != null ? target.getClass() : null);
      List<Object> chain = this.advised.getInterceptorsAndDynamicInterceptionAdvice(method, targetClass);
      Object retVal;
      // Check whether we only have one InvokerInterceptor: that is,
      // no real advice, but just reflective invocation of the target.
      if (chain.isEmpty() && Modifier.isPublic(method.getModifiers())) {
         // We can skip creating a MethodInvocation: just invoke the target directly.
         // Note that the final invoker must be an InvokerInterceptor, so we know
         // it does nothing but a reflective operation on the target, and no hot
         // swapping or fancy proxying.
         Object[] argsToUse = AopProxyUtils.adaptArgumentsIfNecessary(method, args);
         retVal = methodProxy.invoke(target, argsToUse);
      }
      else {
         // We need to create a method invocation...
         retVal = new CglibMethodInvocation(proxy, target, method, args, targetClass, chain, methodProxy).proceed();
      }
      retVal = processReturnType(proxy, target, method, retVal);
      return retVal;
   }
   finally {
      if (target != null && !targetSource.isStatic()) {
         targetSource.releaseTarget(target);
      }
      if (setProxyContext) {
         // Restore old proxy.
         AopContext.setCurrentProxy(oldProxy);
      }
   }
}
执行时生成的连接点为CglibMethodInvocation,是JDK动态代理连接点ReflectiveMethodInvocation的子类,执行的还是ReflectiveMethodInvocation的proceed方法
总结
- SpringAOP不是一种新的AOP实现,使用JDK动态代理和CGLIB动态代理实现
- SpringAOP配置方式核心是Advisor,可以自定义Advisor,也可以通过AspectJ间接定义Advisor
- SpringAOP的实现遵循了AOP联盟规范,AOP联盟顶级API接口贯穿了整个AOP过程
#############################补充#############################
连续有两个小伙伴提问方法一为何不生效,一开始着实没看明白什么意思,感谢@
ylemfei 童鞋,提醒需要加入aopstarter。
这个着实是我的疏忽,上面演示的DEMO 一开始提到“为了方便展示,直接使用SpringBoot项目配置,暂时忽略复杂的细节只关注核心配置。”.
实际我忽略了一个重要的东西,使用springboot目的是为了自动启用aop,这块的细节我没有讲到,导致照着我的配置,aop会不起作用。。。
为什么呢?
ylemfei 童鞋提示需要用到aopstarter,这个没问题,利用SpringBoot自动装配的特性启用AspectJ方式的aop注解
<dependency>
	<groupId>org.springframework.boot</groupId>
	<artifactId>spring-boot-starter-aop</artifactId>
</dependency>
这个实际是将“AnnotationAwareAspectJAutoProxyCreator”作为BeanPostProcessor加入到BeanPostProcessors,供bean初始化时生成代理对象,这个类前面也做了说明:AnnotationAwareAspectJAutoProxyCreator重写了findCandidateAdvisors,不仅可以获取直接配置得Advisor,还可以获取用AspectJ间接定义的Advisor,即把AspectJ定义的bean转化为Advisor。
加入了spring-boot-starter-aop,实际引入了spring-aop和aspectj
	<dependency>
      <groupId>org.springframework</groupId>
      <artifactId>spring-aop</artifactId>
      <version>5.2.12.RELEASE</version>
      <scope>compile</scope>
    </dependency>
    <dependency>
      <groupId>org.aspectj</groupId>
      <artifactId>aspectjweaver</artifactId>
      <version>1.9.6</version>
      <scope>compile</scope>
    </dependency>
引入这两个依赖,会进一步导致AopAutoConfiguration可以自动装载springaop,因为matchIfMissing =true,意味着aop默认是开启的,只要存在“org.aspectj.weaver.Advice”,就会启用“AspectJ”注解方式的代理支持。
@Configuration(proxyBeanMethods = false)
@ConditionalOnProperty(prefix = "spring.aop", name = "auto", havingValue = "true", matchIfMissing = true)
public class AopAutoConfiguration {

	@Configuration(proxyBeanMethods = false)
	@ConditionalOnClass(Advice.class)
	static class AspectJAutoProxyingConfiguration {

		@Configuration(proxyBeanMethods = false)
		@EnableAspectJAutoProxy(proxyTargetClass = false)
		@ConditionalOnProperty(prefix = "spring.aop", name = "proxy-target-class", havingValue = "false",
				matchIfMissing = false)
		static class JdkDynamicAutoProxyConfiguration {

		}

		@Configuration(proxyBeanMethods = false)
		@EnableAspectJAutoProxy(proxyTargetClass = true)
		@ConditionalOnProperty(prefix = "spring.aop", name = "proxy-target-class", havingValue = "true",
				matchIfMissing = true)
		static class CglibAutoProxyConfiguration {

		}

	}

	...
}
话说这个开启是支持AspectJ注解方式使用SpringAop,而第一种直接配置Advisor的方式显然和这个无关,为什么不引入aopstarter,两种方式都失效了呢?
代理的核心是“AbstractAutoProxyCreator”,这是一个抽象类,当Spring初始化所有单例bean时,容器中存在AbstractAutoProxyCreator的实现类作为BeanPostProcessor时,bean才会被代理,这才是aop代理生成根本。
AnnotationAwareAspectJAutoProxyCreator是AbstractAutoProxyCreator的子类,它提供了更强的查找切面的能力(支持AspectJ注解),自然兼容直接配置Advisor的方式,因为直接配置Advisor的方式是由AbstractAutoProxyCreator提供的。
如果不使用AspectJ如何使用直接配置Advisor的方式来使用SpringAOP呢?我们的最终目的是给Spring容器里放一个AbstractAutoProxyCreator,那就找找这个抽象类有哪些实现吧
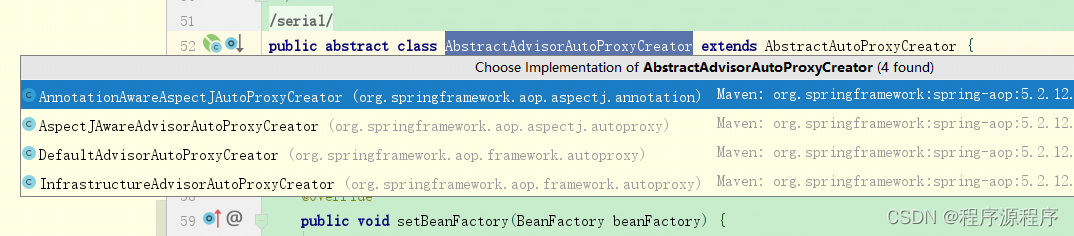
不包括aspectJ的实现有两个,DefaultAdvisorAutoProxyCreator和InfrastructureAdvisorAutoProxyCreator。
InfrastructureAdvisorAutoProxyCreator这个是Spring基础(或者说内部)用的代理生成器,对应用bean(用户自定义bean)是不起作用的,要求bean的role必须是ROLE_INFRASTRUCTURE,而Spring用户自定义的bean默认是ROLE_APPLICATION
@Override
protected boolean isEligibleAdvisorBean(String beanName) {
	return (this.beanFactory != null && this.beanFactory.containsBeanDefinition(beanName) &&
		this.beanFactory.getBeanDefinition(beanName).getRole() == BeanDefinition.ROLE_INFRASTRUCTURE);
}

用户自定义bean
private int role = BeanDefinition.ROLE_APPLICATION;
DefaultAdvisorAutoProxyCreator作为默认的Advisor代理生成器,在不引入aopstarter和aspectj依赖时,仅引入spring-aop依赖既可以开启Springaop.
怎么做呢?试验下
pom.xml中仅引入spring-aop
    <dependencies>
        <dependency>
            <groupId>org.springframework.boot</groupId>
            <artifactId>spring-boot-starter</artifactId>
        </dependency>

        <dependency>
            <groupId>org.springframework</groupId>
            <artifactId>spring-aop</artifactId>
            <version>5.2.12.RELEASE</version>
            <scope>compile</scope>
        </dependency>
    </dependencies>
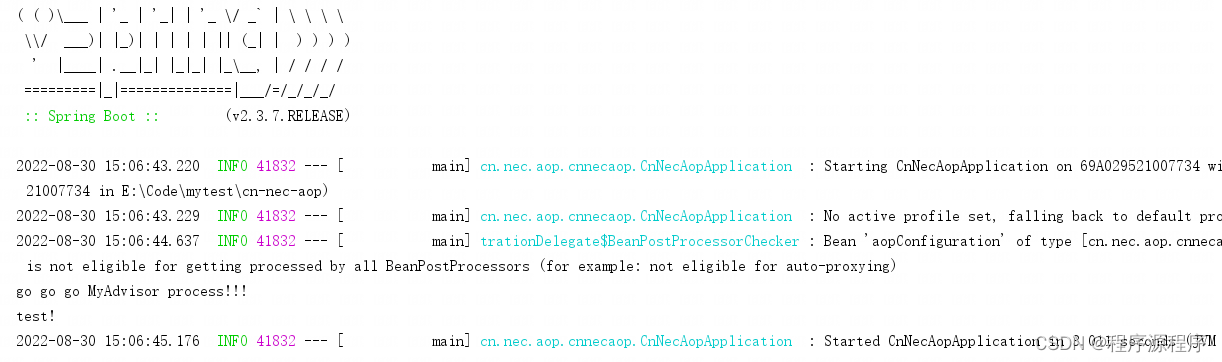
手动把DefaultAdvisorAutoProxyCreator放入Spring容器中
@Configuration
public class AopConfiguration {

    @Bean
    public DefaultAdvisorAutoProxyCreator createDefaultConfig() {
        return new DefaultAdvisorAutoProxyCreator();
    }

}
运行成功
或者自己定义一个
@Component
public class MyDefaultAdvisorAutoProxyCreator extends AbstractAdvisorAutoProxyCreator {
}
后面想到什么了再补充。。

为开发者提供学习成长、分享交流、生态实践、资源工具等服务,帮助开发者快速成长。
更多推荐


 43
43 1
1- 0


 已为社区贡献2条内容

所有评论(0)