Java GUI——Java图形用户界面
Java GUI——Java图形用户界面1、Java GUI概述1.1、GUI的前世今生早期,电脑向用户提供的是单调、枯燥、纯字符状态的“命令行界面(CLI)”。如:Windows中的DOS窗口。后来,Apple公司率先在电脑的操作系统中实现了图形化的用户界面(Graphical User Interface,简称GUI),但由于Apple公司封闭的市场策略,与其它PC不兼容。这使得Apple公司
Java GUI——Java图形用户界面
1、Java GUI概述
1.1、GUI的前世今生
早期,电脑向用户提供的是单调、枯燥、纯字符状态的“命令行界面(CLI)”。如:Windows中的DOS窗口。后来,Apple公司率先在电脑的操作系统中实现了图形化的用户界面(Graphical User Interface,简称GUI),但由于Apple公司封闭的市场策略,与其它PC不兼容。这使得Apple公司错过了一次一统全球PC的好机会。后来,Microsoft公司推出了风靡全球的Windows操作系统,它凭借着优秀的图形化用户界面,一举奠定了操作系统标准的地位。
在这图形用户界面风行于世的今天,一个应用软件没有良好的GUI是无法让用户接受的。而Java语言也深知这一点的重要性,它提供了一套可以轻松构建GUI的工具。
AWT,Java最早的界面库。(java.awt:Abstract Windows ToolKit(抽象窗口工具包),需要调用本地系统方法来实现功能,属重量级控件。)
Swing,是对AWT的扩展。(javax.swing:在AWT的基础上, 建立的一套图像界面系统,其中提供了更多的组件,而且完全由Java实现。增强了移植性,属轻量级组件。)
JavaFX,JDK1.8引入的新的界面库。
SWT,Eclipse使用的界面库。它吸收了AWT和Swing实现的最好的部分,SWT于2001年与Eclipse IDE(Integrated Development Environment)一起集成发布。在这个最初发布版之后,SWT发展和演化为一个独立的版本。 JFace的构建基于SWT,它提供了SWT的功能和更简易的MVC模式。SWT和JFace不仅使Java成为一个构建桌面应用程序的可行的选择,也使之成为一个具有优势的开发平台。
声明:原创文章未经允许,不得转载!
2、AWT
2.1、AWT概述
抽象窗口工具包AWT(Abstract Window Toolkit)是java提供的建立图形用户界面GUI的开发包,AWT可用于Java的Applet 和 Application 中。java.awt包提供了基本的GUI设计工具,主要包括组件(Component)、容器(Container)和布局管理器(LayoutManager)三个概念。
java的图形用户界面的最基本组成部分是组件,组件是一个可以以图形化的方式显示在屏幕上并能与用户进行交互的对象,例如一个按钮、一个标签等。组件不能独立的显示出来,必须将组件放在一定的容器中才可以显示出来。
2.2、容器(Container)
容器是Component的子类,一个容器可以容纳多个组件,并使他们成为一个整体。容器可以简化图形化界面的设计,以整体结构来布置界面,所有的组件都可以通过add()方法加入容器中。
有三种类型的容器:Window、Panel、ScrollPane
Window类:是不依赖其他容器而独立存在的容器他有两个子类分别是Frame类和Dialog类。Frame类用于创建一个具有标题栏的框架窗口作为程序的主要界面,Dialog类用于创建一个对话框,实现与用户的信息交换。
Panel类:也是一个容器,但是他不能单独存在,只能存在于其他容器(window或其子类)中,一个panel对象代表了一个长方形的区域,在这个区域中可以容纳其他组件,在程序中通常会使panel来实现一些特殊的布局。
ScrollPane类:用于实现单个子组件的自动水平和/或垂直滚动的容器类。因此该类创建的对象也是一个容器,称为滚动面板。
常用的容器有:Panel、Frame、Applet
2.2.1、窗口(Frame)
import java.awt.Color;
import java.awt.Frame;

public class FirstFrame extends Frame{

	public static void main(String[] args) {
		// TODO Auto-generated method stub
		FirstFrame fr = new FirstFrame("Hello"); //构造方法
		fr.setSize(240,240);  //设置Frame的大小
		fr.setBackground(Color.blue); //设置Frame的背景色
		fr.setVisible(true); //设置Frame为可见,默认不可见
	}

	public FirstFrame(String str){
		super(str);
	}

}
案例效果:
注:awt在实际运行过程中,是调用所在平台的图形系统,底层实现依赖操作系统,为此在Windows平台下运行,则显示Windows风格。
2.2.2、面板(Panel)
Panel是一种透明的容器,既没有标题,也没有边框。它不能作为最外层的容器单独存在,首先必须先作为一个组件放置在其他容器中,然后在把它当做容器。
import java.awt.Color;
import java.awt.Frame;
import java.awt.Panel;

public class FirstFrameDemo {

	public static void main(String[] args) {
		// TODO Auto-generated method stub
        Frame fr = new Frame("Hello");
        fr.setSize(240,240);
        fr.setBackground(Color.green);
        fr.setLayout(null); //取消默认的布局BorderLayout
        Panel pan = new Panel(); //创建面板
        pan.setSize(100,100);
        pan.setBackground(Color.yellow);
        fr.add(pan);
        fr.setVisible(true);
	}

}
案例效果:
2.3、布局管理器(LayoutManager)
为了实现跨平台并获得动态的布局效果,java将容器内的所有组件安排给一个“布局管理器”负责管理,如:排列顺序、组件大小、位置、当窗口移动或调整大小后组件变化等功能授权给对应的容器布局管理器来管理。
布局管理器的相关类主要包括:java.awt.FlowLayout、java.awt.BorderLayout、java.awt.GridLayout、java.awt.GradLayout、java.awt.GridBagLayout。
2.3.1、FlowLayout——流式布局管理器
组件从左到右、从上到下,一个挨一个的放在容器中。(Panel和Applet的默认容器布局)如果容器足够宽,第一个组件先添加到容器中第一行的最左边,后续的组件依次添加到上一个组件的右边,如果当前行已放置不下该组件,则放置到下一行的最左边。
import java.awt.Button;
import java.awt.Color;
import java.awt.FlowLayout;
import java.awt.Frame;

public class FlowLayoutDemo {

	public static void main(String[] args) {
		// TODO Auto-generated method stub
		Frame frame = new Frame("FlowLayout"); //Frame默认的布局管理器为BorderLayout
        frame.setBounds(100, 100, 400, 300);
        frame.setLayout(new FlowLayout()); //设置布局管理器为FlowLayout

        Button but1 = new Button("button1");
        Button but2 = new Button("button2");
        Button but3 = new Button("button3");
        Button but4 = new Button("button4");
        Button but5 = new Button("button5");

        but1.setBackground(Color.blue);
        but2.setBackground(Color.yellow);
        but3.setBackground(Color.red);
        but4.setBackground(Color.green);
        but5.setBackground(Color.pink);

        frame.add(but1);
        frame.add(but2);
        frame.add(but3);
        frame.add(but4);
        frame.add(but5);

        frame.setVisible(true);
	}

}
案例效果:

FlowLayout的对齐方式默认为居中对齐,但是我们也可以自己指定对齐方式及横纵向间隔。
FlowLayout fl = new FlowLayout();
fl.setAlignment(FlowLayout.LEFT); //设置对齐方式
//也可以直接使用构造函数
//FlowLayout f1 = new FlowLayout(FlowLayout.LEFT,20,40); //三个参数,对齐方式(居左,横向间隔20像素,纵向间隔40像素)
frame.setLayout(fl);
2.3.2、BorderLayout——边框布局管理器
按照东、西、南、北、中放组件。(Window/Frame/Dialog的默认容器布局)BorderLayout布局管理器把容器分成5个区域:North,South,East,West和Center,每个区域只能放置一个组件。
import java.awt.BorderLayout;
import java.awt.Button;
import java.awt.Color;
import java.awt.Frame;

public class BorderLayoutDemo {

	public static void main(String[] args) {
		Frame frame = new Frame("BorderLayt");
        frame.setBounds(100, 100, 400, 300);
        //frame.setLayout(new BorderLayout()); //设置 frame的布局为BorderLayout,默认也是此布局

        Button btn1 = new Button("button1");
        Button btn2 = new Button("button2");
        Button btn3 = new Button("button3");
        Button btn4 = new Button("button4");
        Button btn5 = new Button("button5");

        btn1.setBackground(Color.blue);
        btn2.setBackground(Color.yellow);
        btn3.setBackground(Color.pink);
        btn4.setBackground(Color.green);
        btn5.setBackground(Color.red);

        frame.add(btn1,BorderLayout.EAST);
        frame.add(btn2,BorderLayout.NORTH);
        frame.add(btn3,BorderLayout.SOUTH);
        frame.add(btn4,BorderLayout.WEST);
        frame.add(btn5);

        frame.setVisible(true);
	}

}
案例效果:
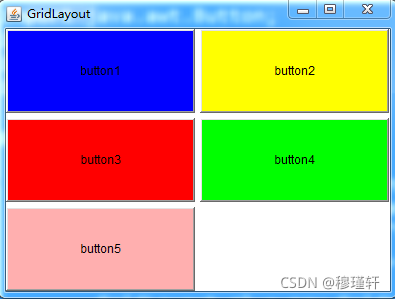
2.3.3、GridLayout——网格布局管理器
使容器中各个组件呈网格状布局,平均占据容器的空间。
import java.awt.Button;
import java.awt.Color;
import java.awt.Frame;
import java.awt.GridLayout;

public class GridLayoutDemo {

	public static void main(String[] args) {
		// TODO Auto-generated method stub
		Frame frame = new Frame("GridLayout");
        frame.setBounds(100, 100, 400, 300);

        GridLayout gl = new GridLayout(3,2,5,5); //设置表格为3行两列排列,表格横向间距为5个像素,纵向间距为5个像素
        frame.setLayout(gl);

        Button but1 = new Button("button1");
        Button but2 = new Button("button2");
        Button but3 = new Button("button3");
        Button but4 = new Button("button4");
        Button but5 = new Button("button5");

        but1.setBackground(Color.blue);
        but2.setBackground(Color.yellow);
        but3.setBackground(Color.red);
        but4.setBackground(Color.green);
        but5.setBackground(Color.pink);

        frame.add(but1);
        frame.add(but2);
        frame.add(but3);
        frame.add(but4);
        frame.add(but5);

        frame.setVisible(true);
	}

}
案例效果:
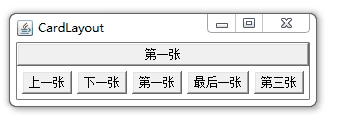
2.3.4、CardLayout——卡片布局管理器
import java.awt.BorderLayout;
import java.awt.Button;
import java.awt.CardLayout;
import java.awt.Frame;
import java.awt.Panel;
import java.awt.event.ActionEvent;
import java.awt.event.ActionListener;

public class CardLayoutDemo {
	Frame f = new Frame("测试窗口");
	String[] names = { "第一张", "第二张", "第三张", "第四张", "第五张" };
	Panel p1 = new Panel(); //显示的面板

	public void init() {
		final CardLayout c = new CardLayout(); //卡片局部
		p1.setLayout(c); //面板布局使用卡片布局
		for (int i = 0; i < names.length; i++) {
			p1.add(names[i], new Button(names[i])); //设置面板的名字和组件
		}
		Panel p = new Panel(); //创建一个放按钮的面板

		// 控制显示上一张的按钮
		Button previous = new Button("上一张");
		//为按钮添加监听
		previous.addActionListener(new ActionListener() {
			@Override
			public void actionPerformed(ActionEvent arg0) {
				c.previous(p1);
			}
		});

		// 控制显示下一张的按钮
		Button next = new Button("下一张");
		next.addActionListener(new ActionListener() {
			@Override
			public void actionPerformed(ActionEvent arg0) {
				c.next(p1);
			}
		});

		// 控制显示第一张的按钮
		Button first = new Button("第一张");
		first.addActionListener(new ActionListener() {
			@Override
			public void actionPerformed(ActionEvent arg0) {
				c.first(p1);
			}
		});

		// 控制显示最后一张的按钮
		Button last = new Button("最后一张");
		last.addActionListener(new ActionListener() {
			@Override
			public void actionPerformed(ActionEvent arg0) {
				c.last(p1);
			}
		});

		// 控制根据Card显示的按钮
		Button third = new Button("第三张");
		third.addActionListener(new ActionListener() {
			@Override
			public void actionPerformed(ActionEvent arg0) {
				c.show(p1, "第三张");
			}
		});

		p.add(previous);
		p.add(next);
		p.add(first);
		p.add(last);
		p.add(third);
		f.add(p1);
		f.add(p, BorderLayout.SOUTH);

		f.pack(); //紧凑排列
		f.setVisible(true);
	}

	public static void main(String[] args) {
		new CardLayoutDemo().init();
	}

}
案例效果:
2.3.5、GridBagLayout——网格包布局管理器
import java.awt.Button;
import java.awt.Frame;
import java.awt.GridBagConstraints;
import java.awt.GridBagLayout;

public class GridBagLayoutDemo {

	private Frame f = new Frame("GridBagLayout Test");
	private GridBagLayout gbl = new GridBagLayout();
	private GridBagConstraints gbc = new GridBagConstraints();

	private Button[] btns = new Button[10];

	private void addButton(Button btn) {
		gbl.setConstraints(btn, gbc);
		f.add(btn);
	}


	public void init() {
		for (int i = 0; i < 10; i++) { // 先初始化10个按钮
			btns[i] = new Button("button" + i);
		}
		f.setLayout(gbl); // 设定框架的布局模式

		//为了设置如果组件所在的区域比组件本身要大时的显示情况
		gbc.fill = GridBagConstraints.BOTH; // 使组件完全填满其显示区域
		//NONE:不调整组件大小。
        //HORIZONTAL:加宽组件,使它在水平方向上填满其显示区域,但是不改变高度。
        //VERTICAL:加高组件,使它在垂直方向上填满其显示区域,但是不改变宽度。
		//BOTH:使组件完全填满其显示区域。

		gbc.weighty = 1; // 该方法是设置组件水平所占用的格子数,如果为0,就说明该组件是该行的最后一个,为1则只占一格

		// 第1行的4个按钮
		gbc.weightx = 1; // 该方法设置组件水平的拉伸幅度,如果为0就说明不拉伸,不为0就随着窗口增大进行拉伸,0到1之间
		addButton(btns[0]);
		addButton(btns[1]);
		addButton(btns[2]);
		gbc.gridwidth = GridBagConstraints.REMAINDER; // 该组件是该行的最后一个,第4个添加后就要换行了
		addButton(btns[3]);

		// 第2行1个按钮,仍然保持REMAINDER换行状态
		addButton(btns[4]);

		//第3行
		gbc.gridwidth = 2; //按钮分别横跨2格
		gbc.weightx = 1;  //该方法设置组件水平的拉伸幅度
		addButton(btns[5]);
		gbc.gridwidth = GridBagConstraints.REMAINDER;
		addButton(btns[6]);

		// 按钮7纵跨2个格子,8、9一上一下
		gbc.gridheight = 2; //按钮7纵跨2格
		gbc.gridwidth = 1;  //横跨1格
		gbc.weightx = 1;    //该方法设置组件水平的拉伸幅度
		addButton(btns[7]); // 由于纵跨2格因此纵向伸缩比例不需要调整,默认为1*2格,比例刚好

		gbc.gridwidth = GridBagConstraints.REMAINDER;
		gbc.gridheight = 1;
		gbc.weightx = 1;
		addButton(btns[8]);
		addButton(btns[9]);

		f.pack();
		f.setVisible(true);
	}

	public static void main(String[] args) {
		new GridBagLayoutDemo().init();
	}


}
案例效果:

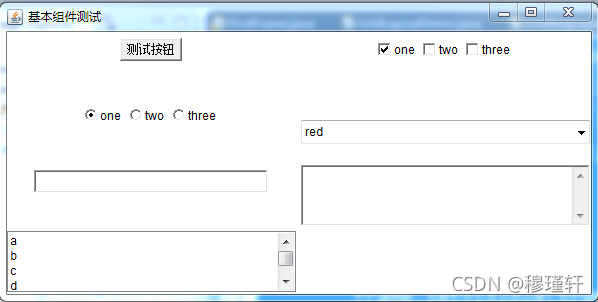
2.4、组件(Component)
awt组件库中还有很多比较常用的组件,如:按钮(Button)、复选框(Checkbox)、复选框组(CheckboxGroup)、下拉菜单(Choice)、单行文本输入框(TextField)、多行文本输入框(TextArea)、列表(List)、对话框(Dialog)、文件对话框(Filedialog)、菜单(Menu)、MenuBar、MenuItem、Canvas等;
2.4.1、基本组件
import java.awt.Button;
import java.awt.Checkbox;
import java.awt.CheckboxGroup;
import java.awt.Choice;
import java.awt.FlowLayout;
import java.awt.Frame;
import java.awt.GridLayout;
import java.awt.List;
import java.awt.Panel;
import java.awt.TextArea;
import java.awt.TextField;

public class ComponentTest {

	public static void main(String[] args) {
		// TODO Auto-generated method stub
		Frame frame = new Frame("基本组件测试");
        frame.setBounds(100, 100, 600, 300);
        GridLayout gl = new GridLayout(4,2,5,5); //设置表格为3行两列排列,表格横向间距为5个像素,纵向间距为5个像素
        frame.setLayout(gl);

        //按钮组件
        Button but1 = new Button("测试按钮");
        Panel pn0 = new Panel();
        pn0.setLayout(new FlowLayout());
        pn0.add(but1);
        frame.add(pn0);

        //复选框组件
		Panel pn1 = new Panel();
		pn1.setLayout(new FlowLayout());
		pn1.add(new Checkbox("one",null,true));
		pn1.add(new Checkbox("two"));
		pn1.add(new Checkbox("three"));
		frame.add(pn1);

		//复选框组(单选)
		Panel pn2 = new Panel();
		CheckboxGroup cg = new CheckboxGroup();
		pn2.setLayout(new FlowLayout());
		pn2.add(new Checkbox("one",cg,true));
		pn2.add(new Checkbox("two",cg,false));
		pn2.add(new Checkbox("three",cg,false));
		frame.add(pn2);

		//下拉菜单
		Choice cC = new Choice();
		cC.add("red");
		cC.add("green");
		cC.add("yellow");
        frame.add(cC);

        //单行文本框
  		Panel pn3 = new Panel();
  		pn3.setLayout(new FlowLayout());
        TextField tf = new TextField("",30); //30列长度
        pn3.add(tf);
        frame.add(pn3);

        //多行文本框
        TextArea ta = new TextArea();
        frame.add(ta);

        //列表
        List ls = new List();
        ls.add("a");
        ls.add("b");
        ls.add("c");
        ls.add("d");
        frame.add(ls);
        frame.setVisible(true);
	}

}
案例效果:
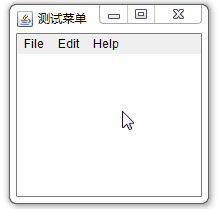
2.4.2、Menu组件
import java.awt.Frame;
import java.awt.Menu;
import java.awt.MenuBar;
import java.awt.MenuItem;

public class MenuDemo {

	private Frame f;
	public MenuDemo(){
		f = new Frame("测试菜单");
		f.setBounds(100, 100, 200, 200);
		//Menu无法直接添加到容器中,只能直接添加到菜单容器中
		MenuBar mb = new MenuBar(); //创建菜单容器
		f.setMenuBar(mb);
		//添加菜单
		Menu m1 = new Menu("File");
		Menu m2 = new Menu("Edit");
		Menu m3 = new Menu("Help");
		mb.add(m1);
		mb.add(m2);
		mb.add(m3);

		//添加菜单项
		MenuItem mi1 = new MenuItem("Save");
		MenuItem mi2 = new MenuItem("Load");
		MenuItem mi3 = new MenuItem("Quit");
		m1.add(mi1);
		m1.add(mi2);
		m1.addSeparator(); //添加分隔线
		m1.add(mi3);
		f.setVisible(true);
	}

	public static void main(String[] args) {
		// TODO Auto-generated method stub
		MenuDemo md = new MenuDemo();
	}

}
案例效果:
2.5、事件
与AWT有关的所有事件类都由AWTEvent类派生,它是EventObject类的子类。这些AWT事件分为两大类:低级事件和高级事件。低级事件是指基于组件和容器的事件,当一个组件上发生事件,如鼠标进入、点击、拖放或组件的窗口开关等都是低级事件。高级事件是语义事件,它不可以和特点的动作相关联,而依赖于触发此类事件的类,如选中项目列表中的某一项就会触发ActionEvent事件。
低级事件:
1)ComponentEvent 构件事件,构件尺寸的变化以及移动·
2)ContainerEvent 容器事件,构件增加,移动
3)WindowEvent 窗口事件,关闭窗口,窗口闭合,图标化
4)FocusEvent 焦点事件,焦点的获得与丢失
5)KeyEvent 键盘事件,键按下,释放
6)MouseEvent 鼠标事件,鼠标点击,移动
高级事件(语义事件):
1)ActionEvent 动作事件,按键按下,TextField中按下Enter键
2)AdjustmentEvent 调节事件,在滚动条上移动滑块以调节数值
3)ItemEvent 项目事件,选择项目,不选择“项目改变”
· 4)TextEvent 文本事件,文本对象改变
2.5.1、事件监听器
每类事件都有对应的事件监听器,AWT一共10类事件,11个接口。
| 事件类别 | 描述信息 | 接口名 | 方法 |
| ActionEvent | 激活组件 | ActionListener | actionPerformrd(ActionEvent) |
| ItemEvent | 选择了某些项目 | ItemListener | itemStateChange(ItemEvent) |
| MouseEvent | 鼠标移动/鼠标点击 | MouseMotionListener/ MouseListener | mouseDragged(MouseEvent) mouseMoved(MouseEvent)/ mousePressed(MouseEvent) mouseReleased(MouseEvent) mouseEntered(MouseEvent) mouseExited(MouseEvent) mouseClicked(MouseEvent) |
| KeyEvent | 键盘输入 | KeyListener | keyPressed(KeyEvent ) keyReleased(KeyEvent ) keyTyped(KeyEvent ) |
| FocusEvent | 收到或失去焦点 | FocusListener | focusGained(FocusEvent) focusLost(FocusEvent) |
| AdjustmentEvent | 滚动条上移动滑块以调节数值 | AdjustmentListener | adjustmentValueChanged(AdjustmentEvent ) |
| ComponentEvent | 对象移动、缩放、显示、隐藏等 | ComponentListener | componentMoved(ComponentEvent ) componentHidden(ComponentEvent ) componentResized(ComponentEvent ) componentShown(ComponentEvent ) |
| WindowEvent | 窗口事件 | WindowListener | windowClosing(WindowEvent) windowOpened(WindowEvent) windowIconified(WindowEvent) windowDeiconfied(WindowEvent) windowClosed(WindowEvent) windowActived(WindowEvent) windowDeactivated(WindowEvent) |
| ContainerEvent | 容器中增加或删除组件 | ContainerListener | componentAdded(ContainerEvent ) componentRemoved(ContainerEvent ) |
| TextEvent | 文本字段或区域发生变化 | TextListener | testValueChanged(TextEvent) |
import java.awt.Button;
import java.awt.Color;
import java.awt.Frame;
import java.awt.event.ActionEvent;
import java.awt.event.ActionListener;
import java.awt.event.WindowEvent;
import java.awt.event.WindowListener;

//使用接口的好处就是支持多继承,而接口中又必须实现父类的抽象方法
public class TestAddListenerDemo implements ActionListener,WindowListener{

	Frame f;
	Button b;
	public TestAddListenerDemo(){
		f = new Frame("Add Listener");
		b = new Button("press me");
		b.addActionListener(this);
		f.addWindowListener(this);
		f.add(b,"North");
		f.setSize(200,200);
		f.setVisible(true);
	}

	public static void main(String[] args) {
		TestAddListenerDemo ta = new TestAddListenerDemo();
	}

	@Override
	public void windowOpened(WindowEvent e) {}

	@Override
	public void windowClosing(WindowEvent e) {
		System.exit(1);
	}

	@Override
	public void windowClosed(WindowEvent e) {}

	@Override
	public void windowIconified(WindowEvent e) {}

	@Override
	public void windowDeiconified(WindowEvent e) {}

	@Override
	public void windowActivated(WindowEvent e) {}

	@Override
	public void windowDeactivated(WindowEvent e) {}

	@Override
	public void actionPerformed(ActionEvent e) {
		b.setBackground(Color.blue);
	}

}
案例效果:
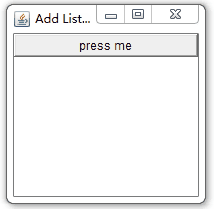
ActionListener,WindowListener均监听到了相应的操作。
2.5、事件适配器
java语言为一些Listener接口提供了适配器类。适配器类提供了一些简单的实现或空实现,可以缩短程序代码,有时候我们并不需要实现接口中所有的方法,但是类呢只支持单继承,对于多种监听器就无法采用事件适配器了,而接口支持多继承,则更大程度上给与我们自己发挥的空间。
import java.awt.Button;
import java.awt.Color;
import java.awt.Frame;
import java.awt.event.ActionEvent;
import java.awt.event.ActionListener;
import java.awt.event.WindowAdapter;
import java.awt.event.WindowEvent;

public class TestAddListenerDemo2 implements ActionListener{

	Frame f;
	Button b;
	public TestAddListenerDemo2(){
		f = new Frame("Add Listener");
		b = new Button("press me");
		b.addActionListener(this);
		f.addWindowListener(new WindowAdapter() {
			public void windowClosing(WindowEvent e) {
				System.exit(1);
			}
		});
		f.add(b,"North");
		f.setSize(200,200);
		f.setVisible(true);
	}

	public static void main(String[] args) {
		// TODO Auto-generated method stub
		TestAddListenerDemo2 ta = new TestAddListenerDemo2();
	}

	@Override
	public void actionPerformed(ActionEvent e) {
		// TODO Auto-generated method stub
		b.setBackground(Color.blue);
	}

}
有了适配器,我们可以使用内部类的形式,然后重写父类的方法就行,代码量瞬间就少了一波。
案例实践
做一个简单的文本编辑器,支持保存和读取文件。如果能理解这个,则后面的使用Swing实现这个功能应该没有问题了。
import java.awt.FileDialog;
import java.awt.Frame;
import java.awt.Menu;
import java.awt.MenuBar;
import java.awt.MenuItem;
import java.awt.TextArea;
import java.awt.event.ActionEvent;
import java.awt.event.ActionListener;
import java.awt.event.WindowAdapter;
import java.awt.event.WindowEvent;
import java.io.BufferedReader;
import java.io.FileNotFoundException;
import java.io.FileOutputStream;
import java.io.FileReader;
import java.io.IOException;
import java.io.OutputStreamWriter;

public class TextEditor {

	private Frame f;
	private TextArea ted;
	public TextEditor(){
		f = new Frame("简单文本编辑器");
		f.setBounds(100, 100, 200, 200);
		//Menu无法直接添加到容器中,只能直接添加到菜单容器中
		MenuBar mb = new MenuBar(); //创建菜单容器
		f.setMenuBar(mb);
		//添加菜单
		Menu m1 = new Menu("File");
		Menu m2 = new Menu("Edit");
		Menu m3 = new Menu("Help");
		mb.add(m1);
		mb.add(m2);
		mb.add(m3);

		//添加菜单项
		MenuItem mi1 = new MenuItem("Save");
		MenuItem mi2 = new MenuItem("Load");
		MenuItem mi3 = new MenuItem("Quit");
		m1.add(mi1);
		m1.add(mi2);
		m1.addSeparator(); //添加分隔线
		m1.add(mi3);

		ted = new TextArea("",10,10);
		f.add("Center",ted);

		f.setVisible(true);

		//窗口事件监听-关闭
		f.addWindowListener(new WindowAdapter() {
			public void windowClosing(WindowEvent e){
				System.exit(1);
			}
		});
		//事件监听:如果直接在当前类上继承或实现监听,则此处使用this
		mi1.addActionListener(new MenuListener());
		mi2.addActionListener(new MenuListener());
		mi3.addActionListener(new MenuListener());
	}

	//菜单选项监听器
	class MenuListener implements ActionListener{

		@Override
		public void actionPerformed(ActionEvent e) {
			// 操作的组件是谁,就返回谁
			MenuItem i = (MenuItem) e.getSource();
			if("Quit".equals(i.getLabel())){
				System.exit(1);
			}else if("Save".equals(i.getLabel())){
				SaveFile();
			}else if("Load".equals(i.getLabel())){
				loadFile();
			}
		}

	}

	/**
	 * 保存文件方法
	 */
	void SaveFile(){
		FileDialog fd = new FileDialog(f,"请输入要保存的文件名",FileDialog.SAVE);
		fd.setVisible(true);
		if(fd==null || fd.getFile()==null || "".equals(fd.getFile())){
			return;
		}
		String fileName = fd.getFile();
		String filePath = fd.getDirectory()+fileName;
		try {
			FileOutputStream fos = new FileOutputStream(filePath);
			OutputStreamWriter ows = new OutputStreamWriter(fos);
			ows.write(ted.getText());
			ows.flush();
			ows.close();
			fos.close();
		} catch (FileNotFoundException e) {
			e.printStackTrace();
		} catch (IOException e) {
			e.printStackTrace();
		}
	}

	/**
	 * 文件读取方法
	 */
	void loadFile(){
		FileDialog fd = new FileDialog(f,"请选择要读取的文件",FileDialog.LOAD);
		fd.setVisible(true);
		if(fd==null || fd.getFile()==null || "".equals(fd.getFile())){
			return;
		}
		ted.setText("");
		String fileName = fd.getFile();
		String filePath = fd.getDirectory()+fileName;
		try {
			BufferedReader in = new BufferedReader(new FileReader(filePath));
			String line = null;
            while ((line = in.readLine()) != null)
            {
               ted.setText(ted.getText() + line+ System.getProperty("line.separator"));
            }
            in.close();
		} catch (FileNotFoundException e) {
			e.printStackTrace();
		} catch (IOException e) {
			e.printStackTrace();
		}
	}

	public static void main(String[] args) {
		new TextEditor();
	}

}
3、Swing
3.1、Swing概述
AWT中大量引入了Windows函数,所以经常被称为重量级组件。而Swing使用Java语言实现的轻量级组件,没有本地代码,直接使用Swing可以更加轻松的构建用户界面。
在Java中所有的Swing都保存在javax.swing包中,从包名可以清楚的发现这个是一个扩展包,所有的组件是从JComponent扩展出来的。
Swing的类层次结构:
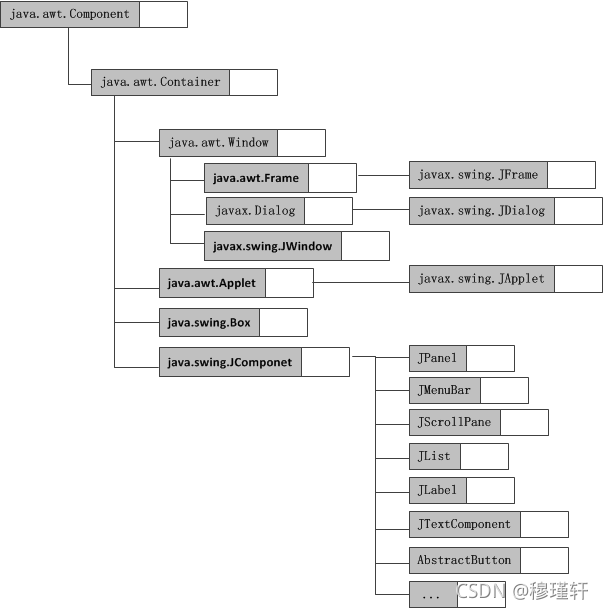
顶层容器:JFrame、JApplet、JDialog、JWindow
中间容器:JPanel、JScrollPane、JSplitPane、JToolBar
特殊容器:JInternalFrame、JLayeredPane、JRootPane
基本控件:JButton、JComboBox、JList、JMenu、JSlider、JTextField
JLabel、JProgressBar、JToolTip
JColorChooser、JFileChoose、JFileChooser、JTable、JTextArea
Swing的用法与awt的非常类似,只是Swing组件更丰富且简化了一些操作,比如窗口默认是可以关闭的。后面我们就Swing的一些不同的组件简单的介绍一下。
3.2、Swing面板及组件
与AWT组件不同,Swing组件不能直接添加到顶层容器中,它必须添加到一个与Swing顶层容器相关的内容面板上。内容面板是顶层容器包含的一个普通容器。
3.2.1、根面板
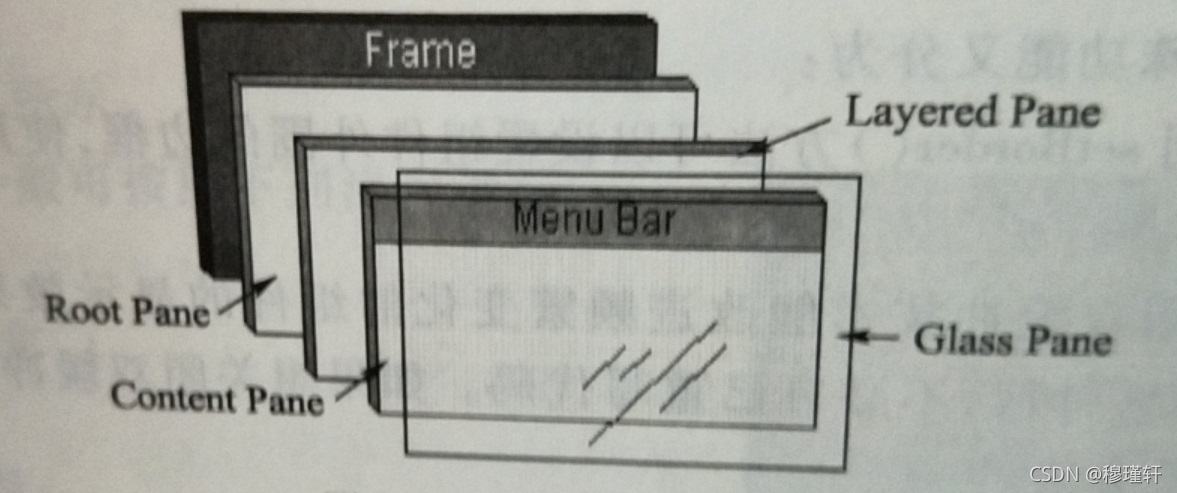
Swing的顶层容器(根面板),由一个玻璃面板(GlassPane)、一个内容面板(ContentPane)和一个可选的菜单条(JMenuBar)组成,而内容面板和可选面板的菜单放在同一层,玻璃面板是完全透明的,默认值为不可见,为接收鼠标事件和所有组件上绘图提供方便。
import java.awt.Color;
import java.awt.Menu;
import java.awt.MenuBar;
import java.awt.MenuItem;
import javax.swing.JFrame;
import javax.swing.JPanel;
public class FirstJFrame extends JFrame{
public static void main(String[] args) {
// TODO Auto-generated method stub
new FirstJFrame();
}
public FirstJFrame(){
super();
this.setBounds(100,100,200,200);
//创建组件普通的模板
JPanel jp = new JPanel();
jp.setSize(100,100);
jp.setBackground(Color.blue);
//获取内容面板,取消默认布局
this.getContentPane().setLayout(null);
//添加普通面板到内容面板
this.getContentPane().add(jp);
//创建菜单组件
MenuBar mb = new MenuBar();
Menu m = new Menu("Menu 1");
MenuItem mi1 = new MenuItem("Menu Item 1");
MenuItem mi2 = new MenuItem("Menu Item 2");
MenuItem mi3 = new MenuItem("Menu Item 3");
m.add(mi1);
m.add(mi2);
m.addSeparator();
m.add(mi3);
mb.add(m);
//设置菜单组件,这里自带菜单条,不需要指定位置add组件,可以直接设置
this.setMenuBar(mb);
this.setVisible(true);
this.setDefaultCloseOperation(JFrame.EXIT_ON_CLOSE);
}
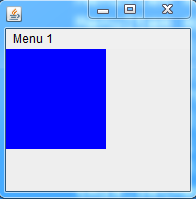
}案例效果:
3.2.2、分层面板
Swing提供了两种分层面板,JLayeredPane和JDesktopPane。JDesktopPane是JLayeredPane的子类,专门为容纳内部框架而设置。
import java.awt.Color;
import javax.swing.JFrame;
import javax.swing.JLayeredPane;
import javax.swing.JPanel;
import javax.swing.WindowConstants;

public class JLayeredPaneDemo extends JFrame{

	public static void main(String[] args) {
		// TODO Auto-generated method stub
        new JLayeredPaneDemo();
	}

	public JLayeredPaneDemo(){
		super("分层面板测试");
		this.setSize(300, 300);
	    this.setLocationRelativeTo(null);
	    JLayeredPane layeredPane = new JLayeredPane();
	    //红 绿 蓝 依次排列
	    // 位置1:最顶层
	    JPanel jp1 = new JPanel();
	    jp1.setBounds(30, 30, 100, 100);
	    jp1.setBackground(Color.blue);
	    layeredPane.add(jp1, 0);

	    // 位置2:最下层
	    JPanel jp2 = new JPanel();
	    jp2.setBounds(60, 60, 100, 100);
	    jp2.setBackground(Color.red);
	    layeredPane.add(jp2, 2);

	    // 位置3:中间层
	    JPanel jp3 = new JPanel();
	    jp3.setBounds(90, 90, 100, 100);
	    jp3.setBackground(Color.green);
	    layeredPane.add(jp3, 1);

	    this.getContentPane().add(layeredPane);
	    this.setVisible(true);
	    this.setDefaultCloseOperation(WindowConstants.EXIT_ON_CLOSE);
	}

}
案例效果:

3.2.3、面板(JPanel)
面板JPanel是一个轻量级容器组件。用法根awt中的Panel类似,是一个中间容器。
3.2.4、滚动面板(JscrollPane)
JscrollPane是带滚动条的面板。
3.2.5、分隔板
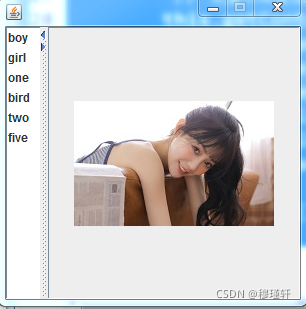
分隔板用于分隔两个组件,这两个组件可以水平分,也可以垂直分隔。
import java.awt.Dimension;
import javax.swing.ImageIcon;
import javax.swing.JFrame;
import javax.swing.JLabel;
import javax.swing.JList;
import javax.swing.JSplitPane;

public class FrameDemo4 extends JFrame{

	public static void main(String[] args) {
		// TODO Auto-generated method stub
        new FrameDemo4();
	}
	JSplitPane jsp;
	JList<String> jlist;
	JLabel jl;

	FrameDemo4(){
		super();
		String words[] = { "boy", "girl", "one", "bird", "two", "five", };
		jlist = new JList<String>(words);
		jl = new JLabel(new ImageIcon("./lib/33.jpg"));
		jsp = new JSplitPane(JSplitPane.HORIZONTAL_SPLIT, jlist, jl);
		jsp.setOneTouchExpandable(true);
		 // 设置布局管理器
		this.getContentPane().add(jsp);
		this.setLocation(100, 100);
		this.setSize(new Dimension(300, 300));
		this.setAlwaysOnTop(true);//窗口层次默认最顶层
		this.setResizable(false); //设置此窗体是否可由用户调整大小
		this.setVisible(true);
		this.setDefaultCloseOperation(JFrame.EXIT_ON_CLOSE);

//	      this.pack();
	}
}
案例效果:
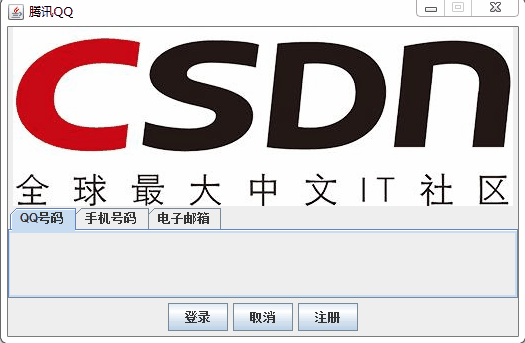
3.2.6、选项板(JTabbedPane)
JTabbedPane提供一组可供用户选择的带有标签或图标的选项。
import java.awt.BorderLayout;
import java.awt.Color;
import javax.swing.ImageIcon;
import javax.swing.JButton;
import javax.swing.JCheckBox;
import javax.swing.JFrame;
import javax.swing.JLabel;
import javax.swing.JPanel;
import javax.swing.JPasswordField;
import javax.swing.JTabbedPane;
import javax.swing.JTextField;

public class MyFrameJTAB extends JFrame{

	public static void main(String[] args) {
		// TODO Auto-generated method stub
        new MyFrameJTAB();
	}
	// 北部区域
	JLabel jl1;
	// 南部区域
	JButton login, quit, register;
	JPanel jp1;
	// 中部区域
	JTabbedPane jtp;// 选项卡
	JPanel jp2, jp3, jp4;
	JLabel jl2, jl3, jl4, jl5;
	JTextField user;
	JPasswordField password;
	JButton clear;
	JCheckBox jcb1, jcb2;
	MyFrameJTAB(){
		super();
		// 北部区域
		ImageIcon ic = new ImageIcon("./lib/hui.jpg");
	    jl1 = new JLabel(ic);
		// 南部区域
		jp1 = new JPanel();
		login = new JButton("登录");
		quit = new JButton("取消");
		register = new JButton("注册");
		jp1.add(login);
		jp1.add(quit);
		jp1.add(register);

		jtp = new JTabbedPane();
		jp2 = new JPanel();
		jp3 = new JPanel();
		jp3.setBackground(Color.RED);
	    jp4 = new JPanel();
	    jp4.setBackground(new Color(0, 0, 255));

	    // 将面板添加到选项卡窗格上
	    jtp.add("QQ号码", jp2);
	    jtp.add("手机号码", jp3);
	    jtp.add("电子邮箱", jp4);
	    this.add(jl1, BorderLayout.NORTH);
	    this.add(jp1, BorderLayout.SOUTH);
	    this.add(jtp);
		this.setVisible(true);

		this.setLocation(200, 200);

		this.setAlwaysOnTop(true);

		this.setDefaultCloseOperation(JFrame.EXIT_ON_CLOSE);

		this.setResizable(false);

		this.pack();
        this.setTitle("腾讯QQ");
	}
}
案例效果:
3.2.7、常用组件
3.2.7.1、JLabel、JButton、JPasswordField
标签(JLabel)、按钮组件(JButton)、密码框(JPasswordField)
import java.awt.FlowLayout;
import java.awt.GridLayout;
import javax.swing.JButton;
import javax.swing.JFrame;
import javax.swing.JLabel;
import javax.swing.JPanel;
import javax.swing.JPasswordField;
import javax.swing.JTextField;

public class MyJFream extends JFrame{

	public static void main(String[] args) {
		new MyJFream("测试");
	}
	public MyJFream(String name){
		super(name);
		JPanel jp1 = new JPanel();
		JLabel jl1 = new JLabel("管理员");
		JTextField username = new JTextField(10);

	    jp1.setLayout(new FlowLayout());
	    jp1.add(jl1);
	    jp1.add(username);

	    JPanel jp2 = new JPanel();
	    JLabel jl2 = new JLabel("密    码");
	    JPasswordField pw = new JPasswordField(10);
	    pw.setEchoChar('*');
	    jp2.setLayout(new FlowLayout());
	    jp2.add(jl2);
	    jp2.add(pw);

	    JButton ok = new JButton("确认");
	    JButton quit = new JButton("取消");
	    JPanel jp3 = new JPanel();
	    jp3.setLayout(new FlowLayout());
	    jp3.add(ok);
	    jp3.add(quit);

	    this.setLayout(new GridLayout(3,1));
	    this.add(jp1);
	    this.add(jp2);
	    this.add(jp3);
	    this.setAlwaysOnTop(true);
	    this.setSize(500, 300);
	    this.setVisible(true);
	    this.setResizable(false);
	    this.pack();
	    this.setDefaultCloseOperation(JFrame.EXIT_ON_CLOSE);
	}
}
案例效果:

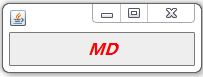
案例2:字体设置
import java.awt.Color;
import java.awt.Font;
import javax.swing.JFrame;
import javax.swing.JLabel;

public class jDemoFont {

	public static void main(String[] args) {
        JFrame fr = new JFrame();
        JLabel jl = new JLabel("MD",JLabel.CENTER);
        Font fnt = new Font("微软雅黑", Font.ITALIC+Font.BOLD, 16);
        jl.setFont(fnt);
        jl.setForeground(Color.red);
        fr.add(jl);
        fr.setSize(200,70);
        fr.setLocation(100,100);
        fr.setVisible(true);
        fr.setDefaultCloseOperation(JFrame.EXIT_ON_CLOSE);
	}

}
案例效果:
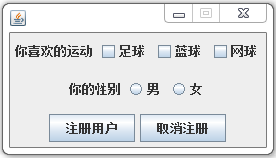
3.2.7.2、JCheckBox、JRadioButton
复选框组件(JCheckBox)、单选框组件(JRadioButton)
import java.awt.FlowLayout;
import java.awt.GridLayout;
import javax.swing.ButtonGroup;
import javax.swing.JButton;
import javax.swing.JCheckBox;
import javax.swing.JFrame;
import javax.swing.JLabel;
import javax.swing.JPanel;
import javax.swing.JRadioButton;

public class FrameDemo extends JFrame{

	public static void main(String[] args) {
		// TODO Auto-generated method stub
        new FrameDemo("测试单复选");
	}
    JPanel jp1, jp2, jp3;
    JLabel jl1, jl2;
    JCheckBox jcb1, jcb2, jcb3;
    ButtonGroup bg;
    JRadioButton jrb1, jrb2;
    JButton jb1, jb2;

	public FrameDemo(String title){
		jp1 = new JPanel();
		jp1.setLayout(new FlowLayout());

		jl1 = new JLabel("你喜欢的运动");
		jcb1 = new JCheckBox("足球");
		jcb2 = new JCheckBox("蓝球");
		jcb3 = new JCheckBox("网球");
		jp1.add(jl1);
		jp1.add(jcb1);
		jp1.add(jcb2);
		jp1.add(jcb3);

		bg = new ButtonGroup();
		jp2 = new JPanel();
		jp2.setLayout(new FlowLayout());
		jl2 = new JLabel("你的性别");
		jrb1 = new JRadioButton("男");
		jrb2 = new JRadioButton("女");
		bg.add(jrb1);
		bg.add(jrb2);
		jp2.add(jl2);
		jp2.add(jrb1);
		jp2.add(jrb2);

		jp3 = new JPanel();
		jp3.setLayout(new FlowLayout());
		jb1 = new JButton("注册用户");
		jb2 = new JButton("取消注册");
		jp3.add(jb1);
		jp3.add(jb2);
		this.setResizable(false);
		this.setLayout(new GridLayout(3,1));
		this.add(jp1);
		this.add(jp2);
		this.add(jp3);

		this.pack();
		this.setVisible(true);
		this.setDefaultCloseOperation(EXIT_ON_CLOSE);
	}

}
案例效果:
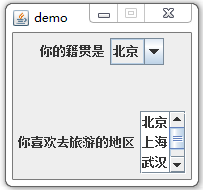
3.2.7.3、JComboBox、JList
下拉框组件(JComboBox)、列表框组件(JList)
import java.awt.FlowLayout;
import java.awt.GridLayout;
import javax.swing.JComboBox;
import javax.swing.JFrame;
import javax.swing.JLabel;
import javax.swing.JList;
import javax.swing.JPanel;
import javax.swing.JScrollPane;

public class FrameDemo3 extends JFrame{

	public static void main(String[] args) {
		// TODO Auto-generated method stub
        new FrameDemo3("demo");
	}
	JPanel jp1, jp2;
	JLabel jl1, jl2;
	JComboBox jcb;
	JList jl;
	JScrollPane jsp;
	public FrameDemo3(String name){
		super(name);
		jp1 = new JPanel();
		jp2 = new JPanel();
		jp1.setLayout(new FlowLayout());
	    jp2.setLayout(new FlowLayout());
		jl1 = new JLabel("你的籍贯是");
	    jl2 = new JLabel("你喜欢去旅游的地区");
	    String[] jg = { "北京", "上海", "武汉", "随州" };
	    jcb = new JComboBox(jg);

	    jp1.add(jl1);
	    jp1.add(jcb);

	    jl = new JList(jg);
	    jl.setVisibleRowCount(3);
	    jsp = new JScrollPane(jl);
	    jp2.add(jl2);
	    jp2.add(jsp);
	    this.setLayout(new GridLayout(2, 1));
        this.add(jp1);
        this.add(jp2);
        this.setLocation(200, 200);
        this.setResizable(false);
        this.setVisible(true);
        this.setDefaultCloseOperation(JFrame.EXIT_ON_CLOSE);
        this.pack();
	}

}
案例效果:
当然关于组件还有很多,包括:选择框(JComboBox)、进程条(JProgressBar)、滑动杆(JSlider)、表格(JTable)、树(JTree)等等,这里就不一一去演示了。
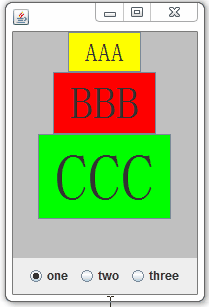
3.3、Swing布局
和AWT一样,Swing也采用布局管理器来管理组件的排放、位置、大小等布置。只是Swing在设置布局管理器是针对内容面板的。除了FlowLayout、BorderLayout、CardLayout、GridLayout、GridBagLayout外,Swing中新增了一种布局管理器,BoxLayout——框式布局(盒布局)。
其他布局就不再详细介绍了,和AWT中的一样。这里只对BoxLayout框式布局介绍一下。
框式布局有两种类型:水平模式和垂直模式。水平模式把组件在容器内从左到右排列。垂直模式把组件在容器内从上到下进行排列。
框式布局所取的水平方向和垂直方向分别由x轴和y轴表示,你指定的X_AXIS(左到右),Y_AXIS在创建时(从上到下)。
import java.awt.BorderLayout;
import java.awt.Color;
import java.awt.Component;
import java.awt.Container;
import java.awt.Font;
import java.awt.event.ActionEvent;
import java.awt.event.ActionListener;
import javax.swing.BoxLayout;
import javax.swing.ButtonGroup;
import javax.swing.JButton;
import javax.swing.JFrame;
import javax.swing.JPanel;
import javax.swing.JRadioButton;

public class BoxLayoutDemo {

	public static void main(String[] args) {
		// TODO Auto-generated method stub
        new BoxLayoutDemo();
	}
	Container cp;
	JFrame jf;
	JRadioButton j1;
	JRadioButton j2;
	JRadioButton j3;
	JButton jb1;
	JButton jb2;
	JButton jb3;
	JPanel jp1;
	public BoxLayoutDemo(){
		jf = new JFrame();
		jf.setBounds(100, 100, 200, 300);
		//存放按钮的面板
		jp1 = new JPanel();
		jp1.setSize(200,200);
		jp1.setBackground(Color.LIGHT_GRAY);
		cp = jf.getContentPane();
		cp.add(BorderLayout.CENTER,jp1);
		jp1.setLayout(new BoxLayout(jp1, BoxLayout.Y_AXIS));
		//存放模式选择的面板
		JPanel jp2 = new JPanel();
		jp2.setSize(200,100);
		ButtonGroup group=new ButtonGroup();
		j1 = new JRadioButton("one");
		j2 = new JRadioButton("two");
		j3 = new JRadioButton("three");
		group.add(j1);
		group.add(j2);
		group.add(j3);
		jp2.add(j1);
		jp2.add(j2);
		jp2.add(j3);
		jf.getContentPane().add(BorderLayout.SOUTH,jp2);
		j1.setSelected(true);
		//放置按钮
		jb1 = new JButton("AAA");
		Font f1 = new Font("隶书",Font.PLAIN,25);
		jb1.setFont(f1);
		jb1.setBackground(Color.yellow);
		jb2 = new JButton("BBB");
		jb2.setBackground(Color.red);
		Font f2 = new Font("隶书",Font.PLAIN,45);
		jb2.setFont(f2);
		jb3 = new JButton("CCC");
		jb3.setBackground(Color.green);
		Font f3 = new Font("隶书",Font.PLAIN,65);
		jb3.setFont(f3);
		jp1.add(jb1);
		jp1.add(jb2);
		jp1.add(jb3);
		jb1.setAlignmentX(Component.CENTER_ALIGNMENT);
		jb2.setAlignmentX(Component.CENTER_ALIGNMENT);
		jb3.setAlignmentX(Component.CENTER_ALIGNMENT);
		jf.setVisible(true);
		j1.addActionListener(new AddListener());
		j2.addActionListener(new AddListener());
		j3.addActionListener(new AddListener());

		jf.setDefaultCloseOperation(JFrame.EXIT_ON_CLOSE);
	}

	class AddListener implements ActionListener{
		@Override
		public void actionPerformed(ActionEvent e) {
			// TODO Auto-generated method stub
			JRadioButton jr = (JRadioButton) e.getSource();
			if(jr.getText().equals("one")){
				changeVisable(false);
				changeVisable(true);
				jb1.setAlignmentX(Component.CENTER_ALIGNMENT);
				jb2.setAlignmentX(Component.CENTER_ALIGNMENT);
				jb3.setAlignmentX(Component.CENTER_ALIGNMENT);
			}else if(jr.getText().equals("two")){
				changeVisable(false);
				changeVisable(true);
				jp1.setLayout(new BoxLayout(jp1, BoxLayout.Y_AXIS));
				jb1.setAlignmentX(Component.RIGHT_ALIGNMENT);
				jb2.setAlignmentX(Component.RIGHT_ALIGNMENT);
				jb3.setAlignmentX(Component.RIGHT_ALIGNMENT);
			}else if(jr.getText().equals("three")){
				changeVisable(false);
				changeVisable(true);
				jb1.setAlignmentX(Component.LEFT_ALIGNMENT);
				jb2.setAlignmentX(Component.LEFT_ALIGNMENT);
				jb3.setAlignmentX(Component.LEFT_ALIGNMENT);
			}
		}

		void changeVisable(boolean b){
			jb1.setVisible(b);
			jb2.setVisible(b);
			jb3.setVisible(b);
		}

	}
}
案例效果:
3.4、Swing事件监听
import java.awt.*;
import java.awt.event.*;
import javax.swing.*;

public class ActionDemo extends JFrame implements ActionListener {

	JButton jb1, jb2;
	JPanel jp;
	int i = 0, j = 0, k = 0;
	public static void main(String[] args) {
		new Demo1();
	}

	ActionDemo() {
		jb1 = new JButton("黑色");
		jb2 = new JButton("红色");
		jb1.addActionListener(this);
		jb2.addActionListener(this);
		// 指定action命令
		jb1.setActionCommand("黑色");
		jb2.setActionCommand("红色");
		jp = new JPanel();
		this.add(jb1, BorderLayout.NORTH);
		this.add(jp, BorderLayout.CENTER);
		this.add(jb2, BorderLayout.SOUTH);
		this.setVisible(true);
		this.setDefaultCloseOperation(JFrame.EXIT_ON_CLOSE);
		this.setBounds(200, 200, 300, 300);
		this.setAlwaysOnTop(true);
		jp.setBackground(Color.BLACK);
	}

	public void actionPerformed(ActionEvent e) {
		//c除了使用e.getSource(),事件监听还可以指定action使用的指令
		if (e.getActionCommand().equals("黑色"))
			jp.setBackground(Color.BLACK);
		if (e.getActionCommand().equals("红色"))
			jp.setBackground(Color.RED);
	}

}
案例实践:
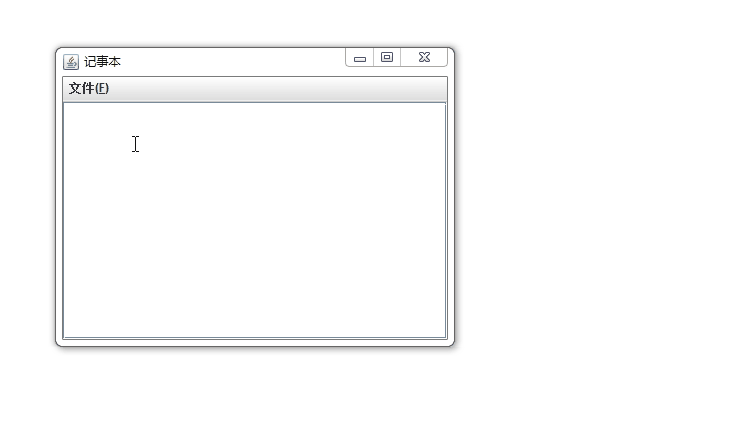
完成类似记事本的功能,这种例题考的可能性比较大,我之前考试的大题就有这类题目。
import java.awt.event.ActionEvent;
import java.awt.event.ActionListener;
import java.io.BufferedReader;
import java.io.FileOutputStream;
import java.io.FileReader;
import java.io.IOException;
import java.io.OutputStreamWriter;
import javax.swing.JFileChooser;
import javax.swing.JFrame;
import javax.swing.JMenu;
import javax.swing.JMenuBar;
import javax.swing.JMenuItem;
import javax.swing.JScrollPane;
import javax.swing.JTextArea;
import javax.swing.filechooser.FileNameExtensionFilter;

public class Notepad extends JFrame implements ActionListener{

   JTextArea jta = null;
   JScrollPane jsp = null;
   // 菜单条
   JMenuBar jmb = null;
   // 第一个JMenu
   JMenu file = null;
   JMenuItem open = null;
   JMenuItem save = null;
   JMenuItem exit = null;
   public static void main(String[] args){
      new Notepad();
   }

   Notepad() {
      jta = new JTextArea();
      jsp = new JScrollPane(jta);
      jmb = new JMenuBar();
      file = new JMenu("文件(F)");
      // 设置助记符:使用alt+F可以激活相应的事件
      file.setMnemonic('F');
      open = new JMenuItem("打开(O)");
      open.setMnemonic('O');
      save = new JMenuItem("保存(S)");
      save.setMnemonic('S');
      exit = new JMenuItem("退出(X)");
      exit.setMnemonic('X');
      file.setActionCommand("file");
      open.setActionCommand("open");
      open.addActionListener(this);
      save.setActionCommand("save");
      save.addActionListener(this);
      exit.setActionCommand("exit");
      exit.addActionListener(this);
      this.setJMenuBar(jmb);
      jmb.add(file);
      file.add(open);
      file.add(save);
      file.add(exit);
      this.add(jsp);
      this.setTitle("记事本");
      this.setDefaultCloseOperation(JFrame.EXIT_ON_CLOSE);
      this.setVisible(true);
      this.setBounds(300, 200, 400, 300);
   }
   public void actionPerformed(ActionEvent e){
      if (e.getActionCommand().equals("open")){
    	  JFileChooser jfc = new JFileChooser();
    	  FileNameExtensionFilter filter = new FileNameExtensionFilter("txt","txt");
    	  jfc.setDialogTitle("请选择文件");
    	  jfc.setFileFilter(filter);
    	  int ret = jfc.showOpenDialog(null);
    	  if(ret != JFileChooser.APPROVE_OPTION){
    		  return;
    	  }
    	  String filename = jfc.getSelectedFile().getAbsolutePath();
    	  try {
			BufferedReader in = new BufferedReader(new FileReader(filename));
			String line = null;
			jta.setText("");
			while((line = in.readLine())!=null){
				jta.setText(jta.getText() +line+ System.getProperty("line.separator"));
			}
			in.close();
		} catch (IOException e1) {
			e1.printStackTrace();
		}
      }

      if (e.getActionCommand().equals("save")){
    	  JFileChooser jfc = new JFileChooser();
          jfc.setDialogTitle("另存为");
          // 按默认的方式显示
          jfc.showSaveDialog(null);
          jfc.setVisible(true);
          // 得到用户希望保存的路劲
          String file = jfc.getSelectedFile().getAbsolutePath();
    	  String str = jta.getText();
    	  try {
    		FileOutputStream fos = new FileOutputStream(file);
    		OutputStreamWriter ow = new OutputStreamWriter(fos);
    		ow.write(str);
    		ow.flush();
    		ow.close();
    		fos.close();
		} catch (IOException e1) {
			e1.printStackTrace();
		}
      }
      if (e.getActionCommand().equals("exit")){
        System.exit(0);
      }
   }

}
案例效果:
4、Applet程序设计
4.1、Applet概述
Applet是能嵌入到HTML页面中,并且能在浏览器中运行的Java类,Applet自身不能运行,必须嵌入到其他应用程序中运行(Web浏览器,appletviewer命令或者是ide去运行)。虽然现在不用但是为了考试,多多少少还是了解一下。
在 HTML 4.01 中,<applet> 元素已废弃: This feature is obsolete. Although it may still work in some browsers, its use is discouraged since it could be removed at any time. Try to avoid using it.
HTML5 不支持 <applet> 标签。请使用 <object> 标签代替它。
我们先来看一个案例:
package com.cn.applet;

import java.applet.Applet;
import java.awt.Graphics;
import java.awt.event.MouseEvent;
import java.awt.event.MouseListener;

public class HelloApple extends Applet implements MouseListener{

	StringBuffer strBuffer;

    public void init() {
         addMouseListener(this);
         strBuffer = new StringBuffer();
        String newline = System.getProperty("line.separator");
        addItem("initializing the apple "+newline);
    }

    public void start() {
    	String newline = System.getProperty("line.separator");
        addItem("starting the applet "+newline);
    }

    public void stop() {
        addItem("stopping the applet ");
    }

    public void destroy() {
        addItem("unloading the applet ");
    }

    void addItem(String word) {
        System.out.println(word);
        strBuffer.append(word);
        repaint();
    }

	public void paint(Graphics g){
		g.drawRect(0, 0,
                getWidth() - 1,
                getHeight() - 1);
		String newline = System.getProperty("line.separator");
		int i = 0;
		//根据换行符分割换行
		for (String line : strBuffer.toString().split(newline))
	        g.drawString(line, 0, i += g.getFontMetrics().getHeight());
	}

	@Override
	public void mouseClicked(MouseEvent e) {
		String newline = System.getProperty("line.separator");
		addItem("mouse clicked! "+newline);
	}

	@Override
	public void mousePressed(MouseEvent e) {
	}

	@Override
	public void mouseReleased(MouseEvent e) {
	}

	@Override
	public void mouseEntered(MouseEvent e) {
	}

	@Override
	public void mouseExited(MouseEvent e) {
	}
}
案例效果:直接在ide中运行
控制台打印内容:
initializing the apple
starting the applet
mouse clicked!
mouse clicked!
mouse clicked!
stopping the applet
unloading the applet
Applet应用的运行主要依靠类中的钩子函数。
4.1.1、开始我们的第一个小程序
我们不在IDE中运行,如何去完成一个Applet小程序呢?
1)第一步
在D:\applet\bg目录下,新建一个名为HelloWorldApplet.java的文件。使用applet,必须继承java.applet.Applet类或者是javax.swing.JApplet类。
package bg;
import java.applet.*;
import java.awt.*;

public class HelloWorldApplet extends Applet
{
   public void paint (Graphics g)
   {
      g.drawString ("Hello World", 25, 50);
   }
}
2)第二步
使用javac命令编译HelloWorldApplet.java,编译成功后会在bg文件夹中生成HelloWorldApplet.class文件
3)第三步
在D:\applet目录下,建立hello.html文件。
<html>
<title>The Hello, World Applet</title>
<hr>
<applet code="bg.HelloWorldApplet.class" width="320" height="120">
If your browser was Java-enabled, a "Hello, World"
message would appear here.
</applet>
<hr>
</html>
4)第四步
使用appletviewer命令运行小程序
C:\Users\Administrator>d:

D:\>cd D:\applet

D:\applet>appletviewer hello.html
5)最终效果
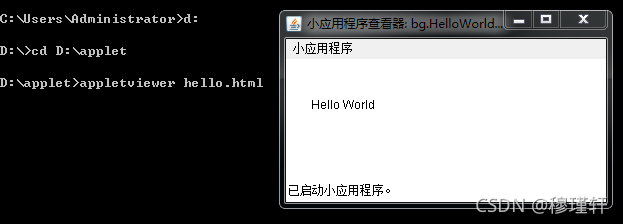
4.2、applet生命周期
初始化init(): 该方法的目的是为你的applet提供所需的任何初始化。在Applet标记内的param标签被处理后调用该方法。
启动start():浏览器调用init方法后,该方法被自动调用。每当用户从其他页面返回到包含Applet的页面时,则调用该方法。
停止stop():当用户从包含applet的页面移除的时候,该方法自动被调用。因此,可以在相同的applet中反复调用该方法。
销毁destroy():此方法仅当浏览器正常关闭时调用。因为applets只有在HTML网页上有效,所以你不应该在用户离开包含Applet的页面后遗漏任何资源.
paint(): 该方法在start()方法之后立即被调用,或者在applet需要重绘在浏览器的时候调用。paint()方法实际上继承于java.awt。
剩下的内容只要了解就行。

为开发者提供学习成长、分享交流、生态实践、资源工具等服务,帮助开发者快速成长。
更多推荐


 628
628 1
1- 0


 已为社区贡献5条内容

所有评论(0)