java+vue3实现生成、验证图形验证码,和手机短信验证码
java+vue3实现生成、验证图形验证码,和手机短信验证码
·
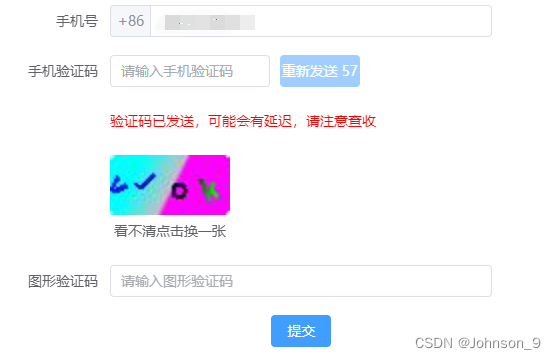
一、效果图
二、实现生成图形验证码、校验验证码
1、实现后端接口
①控制层代码
 /**
     * 生成图片验证码
     * time用于保证每次可以刷新图片验证码
     */
    @GetMapping("authCode/{time}")
    public void getAuthCode(@PathVariable("time")String time, HttpServletRequest request, HttpServletResponse response) throws IOException {
        loginService.getAuthCode(request,response);
    }

    /**
     * 验证图片验证码
     */
    @GetMapping("verifyCode/{inputVerify}")
    public Result verifyCode(@PathVariable("inputVerify") String inputVerify, HttpServletRequest request){
        Boolean bool = loginService.verifyCode(inputVerify,request);
        return new Result(1,"已验证",bool);
    }
②业务层代码
 /**
     * 生成图片验证码
     */
    @Override
    public void getAuthCode(HttpServletRequest request, HttpServletResponse response) throws IOException {
        //req.setCharacterEncoding("utf-8");
        //res.setContentType("text/html;charset=utf-8");
        // 设置http响应的文件MIME类型为图片
        response.setContentType("image/jpeg");
        // 不让浏览器记录此图片的缓存
        response.setDateHeader("expries", -1);
        response.setHeader("Cache-Control", "no-cache");
        response.setHeader("Pragma", "no-cache");
        // 这里调用了一个工具类VerifyCodeUtils来生成指定位数(也可指定内容)的验证码字符串
        String verifyCode = VerifyCodeUtils.generateVerifyCode(4);
        // 将生成验证码字符串保存到session域中,方面进行表单验证
        request.getSession().setAttribute("verifyCode", verifyCode);
        VerifyCodeUtils.outputImage(60, 30, response.getOutputStream(), verifyCode);
    }

    /**
     * 验证图片验证码
     */
    @Override
    public Boolean verifyCode(String inputVerify, HttpServletRequest request) {
        String verifyCode = (String) request.getSession().getAttribute("verifyCode");
        return inputVerify.equalsIgnoreCase(verifyCode);
    }
③工具类:画图、校验
里面包含多种方法,和传递方式,这里我采用的是将图片流传入请求头的session域中,也可以存到本地
public class VerifyCodeUtils{
    // 可自定义验证码字符源
    public static final String VERIFY_CODES = "123456789abcdefghijklmnopqrstuvwxyzABCDEFGHIJKLMNOPQRSTUVWXYZ";


    /**
     * 使用系统默认字符源生成验证码
     * @param verifySize 验证码长度
     * @return
     */
    public static String generateVerifyCode(int verifySize){
        return generateVerifyCode(verifySize, VERIFY_CODES);
    }
    /**
     * 使用指定源生成验证码
     * @param verifySize 验证码长度
     * @param sources   验证码字符源
     * @return
     */
    public static String generateVerifyCode(int verifySize, String sources){
        if(sources == null || sources.length() == 0){
            sources = VERIFY_CODES;
        }
        int codesLen = sources.length();
        Random rand = new Random(System.currentTimeMillis());
        StringBuilder verifyCode = new StringBuilder(verifySize);
        for(int i = 0; i < verifySize; i++){
            verifyCode.append(sources.charAt(rand.nextInt(codesLen-1)));
        }
        return verifyCode.toString();
    }

    /**
     * 生成随机验证码文件,并返回验证码值
     * @param w 图片宽(像素)
     * @param h 图片高(像素)
     * @param outputFile
     * @param verifySize
     * @return
     * @throws IOException
     */
    public static String outputVerifyImage(int w, int h, File outputFile, int verifySize) throws IOException{
        String verifyCode = generateVerifyCode(verifySize);
        outputImage(w, h, outputFile, verifyCode);
        return verifyCode;
    }

    /**
     * 输出随机验证码图片流,并返回验证码值
     * @param w
     * @param h
     * @param os
     * @param verifySize
     * @return
     * @throws IOException
     */
    public static String outputVerifyImage(int w, int h, OutputStream os, int verifySize) throws IOException{
        String verifyCode = generateVerifyCode(verifySize);
        outputImage(w, h, os, verifyCode);
        return verifyCode;
    }

    /**
     * 生成指定验证码图像文件
     * @param w
     * @param h
     * @param outputFile
     * @param code
     * @throws IOException
     */
    public static void outputImage(int w, int h, File outputFile, String code) throws IOException{
        if(outputFile == null){
            return;
        }
        File dir = outputFile.getParentFile();
        if(!dir.exists()){
            dir.mkdirs();
        }
        try{
            outputFile.createNewFile();
            FileOutputStream fos = new FileOutputStream(outputFile);
            outputImage(w, h, fos, code);
            fos.close();
        } catch(IOException e){
            throw e;
        }
    }

    /**
     * 输出指定验证码图片流
     * @param w
     * @param h
     * @param os
     * @param code
     * @throws IOException
     */
    public static void outputImage(int w,
                                   int h,
                                   OutputStream os,
                                   String code) throws IOException{
        int verifySize = code.length();
        BufferedImage image = new BufferedImage(w, h, BufferedImage.TYPE_INT_RGB);
        Random rand = new Random();
        Graphics2D g2 = image.createGraphics();
        Color[] colors = new Color[5];
        Color[] colorSpaces = new Color[] { Color.WHITE, Color.CYAN,
                Color.GRAY, Color.LIGHT_GRAY, Color.MAGENTA, Color.ORANGE,
                Color.PINK, Color.YELLOW };
        float[] fractions = new float[colors.length];
        for(int i = 0; i < colors.length; i++){
            colors[i] = colorSpaces[rand.nextInt(colorSpaces.length)];
            fractions[i] = rand.nextFloat();
        }
        Arrays.sort(fractions);
        Paint linearPaint = new LinearGradientPaint(0, 0, w, h, fractions, colors);
        Paint linearPaint2 = new LinearGradientPaint(0, 0, w, h, new float[]{0.3f, .6f, .8f, .9f}, new Color[]{Color.BLUE, Color.BLACK, Color.GREEN, Color.BLUE});
        //设置图片背景为白色
        g2.setPaint(Color.WHITE);
        g2.fillRect(0, 0, w, h);
        //设置图片渐变背景
        g2.setPaint(linearPaint);
        g2.fillRoundRect(0, 0, w, h, 5, 5);

        g2.setPaint(linearPaint2);
        int fontSize = (int) (Math.min(w/verifySize, h));
        Font font = new Font("微软雅黑", Font.BOLD, fontSize);
        g2.setFont(font);
        char[] chars = code.toCharArray();
        for(int i = 0; i < verifySize; i++){
            AffineTransform affine = new AffineTransform();
            affine.setToRotation(Math.PI / 4 * rand.nextDouble() * (rand.nextBoolean() ? 1 : -1), (w / verifySize) * i + fontSize/2, h/2);
            g2.setTransform(affine);
            g2.drawChars(chars, i, 1, (w / verifySize) * i, h/2 + fontSize /2);
        }
        g2.dispose();
        ImageIO.write(image, "jpg", os);
    }

    //public static void main(String[] args) throws IOException{
    //    File dir = new File("D:/image");
    //    int w = 200, h = 80;
    //    for(int i = 0; i < 100; i++){
    //        String verifyCode = generateVerifyCode(4);
    //        File file = new File(dir, verifyCode + ".jpg");
    //        outputImage(w, h, file, verifyCode);
    //    }
    //}
}
2、前端实现
前端采用的是vue3+ts+element-plus
验证码单独提取出一个组件
<div>
    <img :src="image" style="height: 60px" @click="changeImage" /><span
      @click="changeImage">看不清点击换一张</span>
</div>
// 图片url
const image = ref(url.value + '/authCode/1'); // 此处为图片生成接口的完整路径
// 更换图片方法
const changeImage = () => {
image.value = url.value + '/authCode/' + getNowTime();
};
// 加一个当前时间,确保每次刷新都可以重新发送请求
function getNowTime() {
var date = new Date();
//年 getFullYear():四位数字返回年份
var year = date.getFullYear(); //getFullYear()代替getYear()
//月 getMonth():0 ~ 11
var month = date.getMonth() + 1;
//日 getDate():(1 ~ 31)
var day = date.getDate();
//时 getHours():(0 ~ 23)
var hour = date.getHours();
//分 getMinutes(): (0 ~ 59)
var minute = date.getMinutes();
//秒 getSeconds():(0 ~ 59)
var second = date.getSeconds();
var time = '当前时间是:' + year + month + day + hour + minute + second;
return time;
}form表单
<el-form-item><image-check /></el-form-item> <!-- 引入子组件 -->
<el-form-item label="图形验证码" prop="checkNum">
      <el-input
      v-model="registerData.checkNum"
      placeholder="请输入图形验证码"
     />
</el-form-item>
const ruleFormRef = ref<FormInstance>();
// 图形验证码校验规则
const validateCheckNum = (rule: any, value: string, callback: any) => {
if (value === '') {
callback(new Error('请输入验证码'));
} else {
// 发送校验请求
getImageCode(value).then((res) => {
if (res) {
callback();
} else {
callback(new Error('验证码错误'));
}
});
}
};
// 表单校验规则
const rules = reactive({
checkNum: [{ validator: validateCheckNum, trigger: 'blur' }]
});三、实现手机短信发送,以及短信验证
1、后端接口实现
①因为借助的是阿里云的测试短信,所以需要引入依赖
<!-- 阿里云 短信验证依赖、sdk 依赖 -->
<dependency>
     <groupId>com.aliyun</groupId>
     <artifactId>aliyun-java-sdk-core</artifactId>
     <version>4.6.0</version>
</dependency>
<dependency>
     <groupId>com.aliyun</groupId>
     <artifactId>aliyun-java-sdk-dysmsapi</artifactId>
     <version>2.2.1</version>
</dependency>
②控制层代码
/**
     * 发送短信验证码
     */
    @PostMapping ("sendMessage")
    public Result sendMessage(@RequestBody String phoneNo,HttpServletRequest request){
        loginService.sendMessage(phoneNo,request);
        return new Result(1,"发送验证码成功","发送验证码成功");
     }

    /**
     * 短信验证码验证
     */
    @PostMapping ("receiveMessage")
    public Result receiveMessage(@RequestBody String PhoneCode,HttpServletRequest request) {
        String result = loginService.receiveMessage(PhoneCode,request);
        return new Result(1,result,result);
    }
③业务层代码
将验证码的key保存到session域中,方面进行验证码验证,并且存入redis设置一分钟过期
/**
     * 发送短信验证码
     */
    @Override
    public void sendMessage(String phoneNo, HttpServletRequest request) {
        // 这里最好也做一次手机号码校验,我这里偷懒没做
        Boolean bool = IsMobile.isMobile(phoneNo);
        String randomCode = String.valueOf((int)((Math.random()*9+1)*100000));
        WebUtil.sendMessage(phoneNo,randomCode);
        //当前时间
        SimpleDateFormat formatter = new SimpleDateFormat("yyyyMMddHHmmss");
        Date date = new Date(System.currentTimeMillis());
        String format = formatter.format(date);
        // 将验证码的key保存到session域中,方面进行验证码验证
        request.getSession().setAttribute("phoneKey", "phone"+format);
        // 存入redis
        redisTemplate.opsForValue().set("phone"+format,randomCode,60, TimeUnit.SECONDS);
    }

    /**
     * 短信验证码验证
     */
    @Override
    public String receiveMessage(String phoneCode, HttpServletRequest request) {
        String phoneKey = (String) request.getSession().getAttribute("phoneKey");
        if(!StringUtils.isEmpty(phoneKey)){
            System.err.println(redisTemplate.hasKey(phoneKey));
            if(Boolean.TRUE.equals(redisTemplate.hasKey(phoneKey))){
                String phoneKey1 = redisTemplate.opsForValue().get(phoneKey);
                if(Objects.equals(phoneKey1, phoneCode)){
                    return "验证成功";
                }else {
                    return "验证错误";
                }
            }else {
                return "验证超时";
            }
        }else {
            return "请求体没有phoneKey的值";
        }
    }
④发送短信工具类
下面的key和keysecret需要去登录自己的阿里云账号查看,因为用的是短信测试,所以其他配置信息都只能使用默认的
public class WebUtil {

    /**
     * 发送短信验证码方法
     * @param phoneNum
     * @param messageCode
     */
    public static void sendMessage(String phoneNum,String messageCode) {

        DefaultProfile profile = DefaultProfile.getProfile("cn-hangzhou", "你的key", "你的keysecret");
        /** use STS Token
         DefaultProfile profile = DefaultProfile.getProfile(
         "<your-region-id>",           // The region ID
         "<your-access-key-id>",       // The AccessKey ID of the RAM account
         "<your-access-key-secret>",   // The AccessKey Secret of the RAM account
         "<your-sts-token>");          // STS Token
         **/

        IAcsClient client = new DefaultAcsClient(profile);

        SendSmsRequest request = new SendSmsRequest();
        request.setSignName("阿里云短信测试");
        request.setTemplateCode("SMS_154950909");
        request.setPhoneNumbers(phoneNum);
        request.setTemplateParam("{\"code\":"+messageCode+"}");

        try {
            SendSmsResponse response = client.getAcsResponse(request);
            System.out.println(new Gson().toJson(response));
        } catch (ServerException e) {
            e.printStackTrace();
        } catch (ClientException e) {
            System.out.println("ErrCode:" + e.getErrCode());
            System.out.println("ErrMsg:" + e.getErrMsg());
            System.out.println("RequestId:" + e.getRequestId());
        }
    }
}
2、前端实现
前端采用的是vue3+ts+element-plus
form表单
<el-form-item label="手机号" prop="phoneNo">
              <el-input v-model="registerData.phoneNo" placeholder="请输入手机号">
                <template #prepend>
                  <span style="width: 0px; margin: 0 0 0 -25px">+86</span>
                </template>
              </el-input>
            </el-form-item>
            <el-form-item label="手机验证码" prop="checkPhoneNo">
              <el-input
                v-model="registerData.checkPhoneNo"
                placeholder="请输入手机验证码"
                style="width: 160px"
              /><el-button
                :disabled="disabled"
                type="primary"
                style="width: 80px; margin-left: 10px"
                @click="getCheckPhoneNo"
                >{{ getPhoneCodeName }}</el-button
              >
            </el-form-item>
            <el-form-item label="">
              <span v-show="isCheckDesc === true" style="color: red">
                {{checkDesc}}
              </span>
</el-form-item>
const ruleFormRef = ref<FormInstance>();
// 获取短信验证码按钮名称
const getPhoneCodeName = ref('获取验证码');
// 获取短信验证码按钮是否启用
const disabled = ref(false);
// 短信验证码按钮倒计时时间
const timeNum = ref(60);
// 发送验证码后的提示内容
const checkDesc = ref('验证码已发送,可能会有延迟,请注意查收');
// 发送验证码后的提示内容是否展示
const isCheckDesc = ref(false);
// 手机验证码校验规则
const validateCheckPhoneNo = (rule: any, value: string, callback: any) => {
if (value === '') {
callback(new Error('请输入手机验证码'));
} else {
receiveMessage(value).then((res) => {
if (res === '验证超时') {
callback(new Error('验证码已超时,请重新发送'));
} else if (res === '验证错误') {
callback(new Error('验证码错误,请重新输入'));
} else if (res === '请求体没有phoneKey的值') {
callback(new Error('请先发送验证码'));
} else {
isCheckDesc.value = false;
callback();
}
});
}
};
// 表单校验规则
const rules = reactive({
checkPhoneNo: [{ validator: validateCheckPhoneNo, trigger: 'blur' }],
});
// 获取手机验证码方法
const getCheckPhoneNo = () => {
const reg =
/^1(3[0-9]|4[01456879]|5[0-35-9]|6[2567]|7[0-8]|8[0-9]|9[0-35-9])\d{8}$/;
if (!reg.test(registerData.phoneNo)) {
ElMessage({
message: '请先正确输入手机号',
type: 'warning'
});
return;
}
disabled.value = true;
sendMessage(registerData.phoneNo).then((res) => {
if (res === '手机号格式错误') {
ElMessage({
message: '请先正确输入手机号',
type: 'warning'
});
disabled.value = false;
return;
} else {
isCheckDesc.value = true;
let timer = setInterval(() => {
--timeNum.value;
getPhoneCodeName.value = `重新发送 ${timeNum.value}`;
}, 1000);
setTimeout(() => {
clearInterval(timer);
timeNum.value = 60;
disabled.value = false;
getPhoneCodeName.value = '获取验证码';
}, 60000);
}
});
};

为开发者提供学习成长、分享交流、生态实践、资源工具等服务,帮助开发者快速成长。
更多推荐


 4
4 0
0- 0


 已为社区贡献6条内容

所有评论(0)