利用vue编写一个后台管理页面
Vue实现简单的后台管理页面
·
目录
兄弟们多话不说直接上手
前期的准备:
首先创建vue项目
vue ui
安装Element-plus框架
npm install --legacy-peer-deps element-plus --save配置main.js文件(直接覆盖你以前的代码)
import { createApp } from 'vue'
import App from './App.vue'
import router from './router'
import store from './store'
import '../src/assets/gloable.css'

import ElementPlus from 'element-plus'
import 'element-plus/dist/index.css'


createApp(App).use(store).use(router).use(ElementPlus).mount('#app')
项目的目录结构:
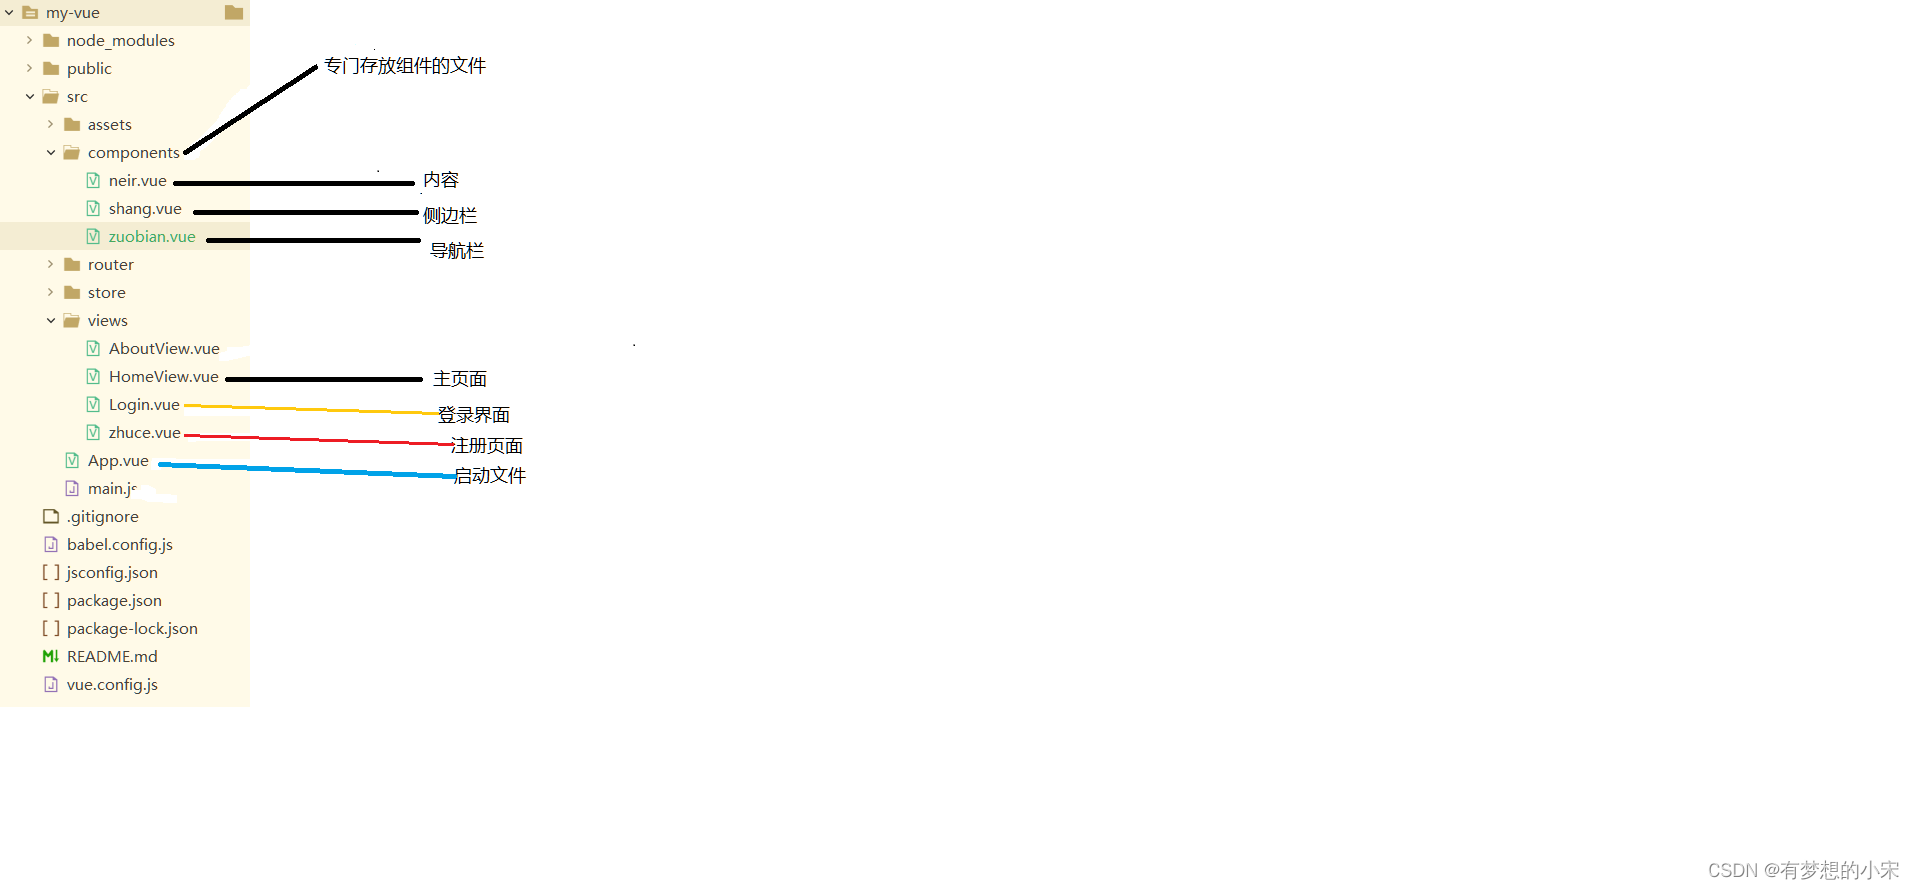
代码编辑:
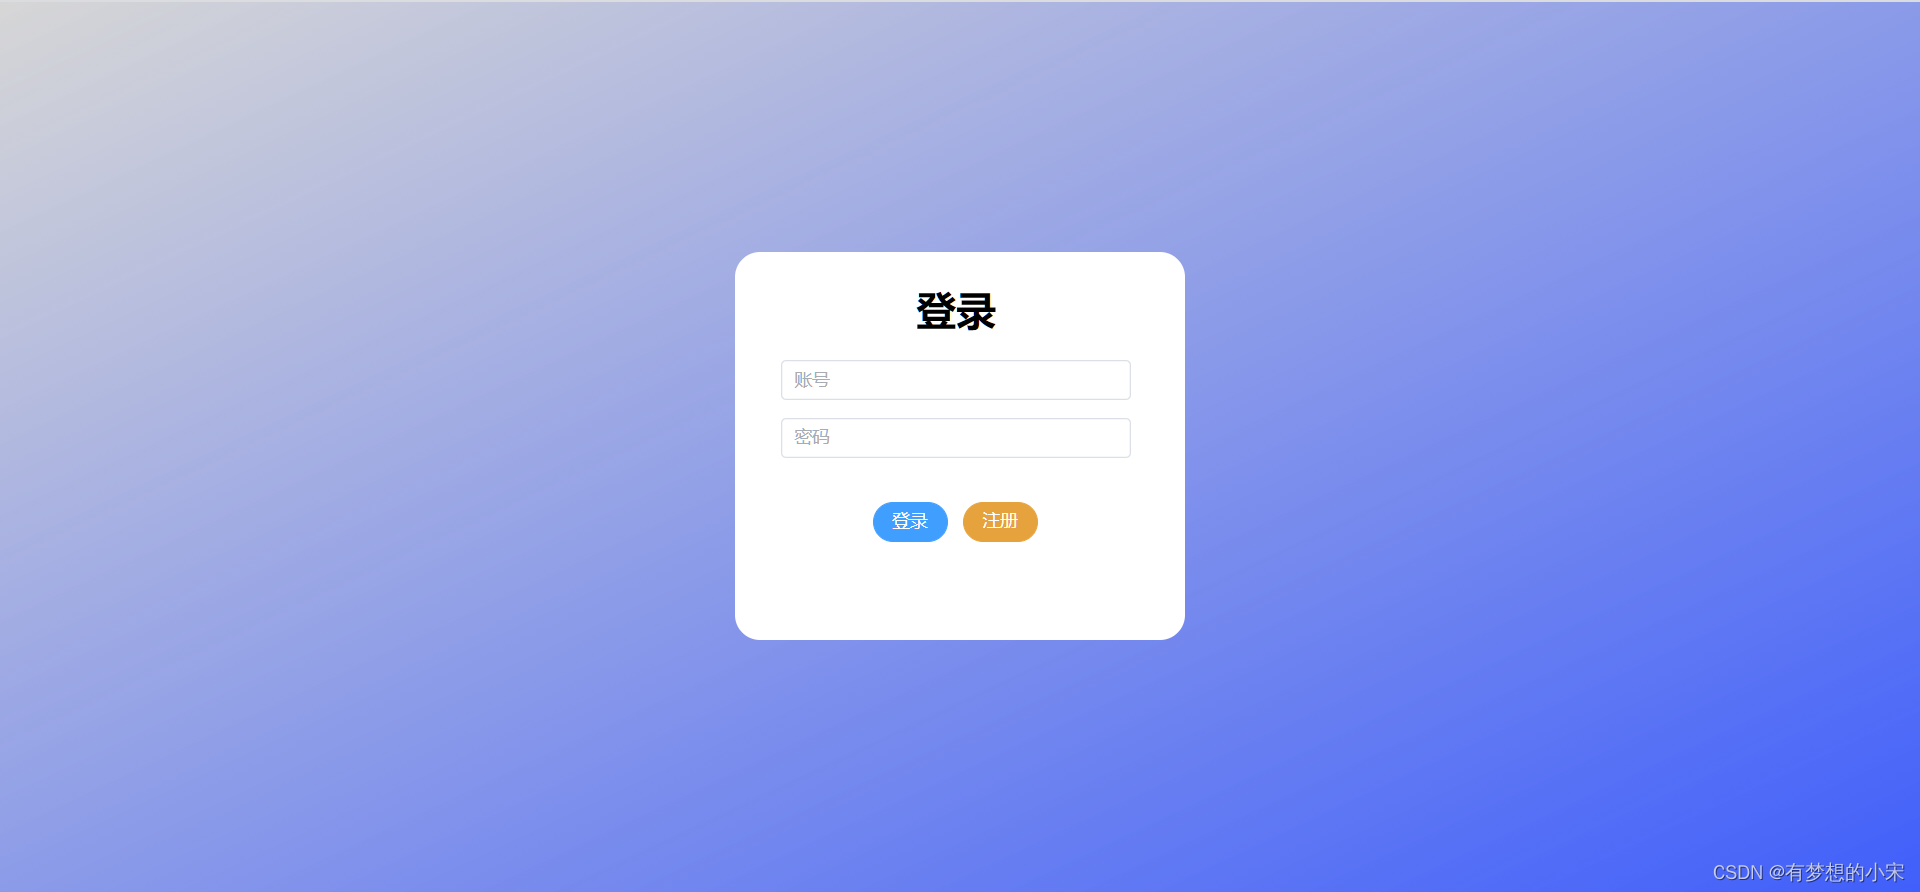
1、登录界面(Login.vue文件)登录与注册切换的功能
代码复制贴吧即可
<template>
	<div class= "one" >
		<div style="height: 300px; width: 350px; background-color: #fff;margin: 200px auto;padding:5px;border-radius:20px;">
			<div style="display: inline-block; margin:20px 40%;"><h1>登录</h1></div>
			<el-input
			 v-model="user.id"
			 placeholder="账号"
			 clearable
			 style="width: 80%; margin-left:9%;
			  margin-bottom: 4%;
			 display: flex;"
			/>
			 <el-input
				v-model="user.password"
			    type="password"
			    placeholder="密码"
			    show-password
				style="width: 80%; margin-left:9%;
				 margin-bottom: 4%;
				display: flex; margin-bottom: 10%;"
			  />
			<div style="margin-left:30%;">
				<el-button type="primary" round @click="login">登录</el-button>
				<el-button type="warning" round @click="zhuce">注册</el-button>
			</div>

		</div>
	</div>
</template>

<script>
	export default {

		data(){
			return {
				user:{}
			}
		},
		methods:{
			//切换注册页面
			zhuce(){
				this.$router.push("/zhuce")
			},
		}
	}
</script>

<style>
	.one {
		height: 100vh;
		background-image: linear-gradient(to bottom right,#cccc,#3F5EFB);
		/* background:url(""); */
		overflow: hidden;
	}
</style>
2、注册界面(zhuce.vue文件)

<template>
	<div class= "two" >
		<div style="height: 300px; width: 350px; background-color: #fff;margin: 200px auto;padding:5px;border-radius: 10px;">
			<div style="display: inline-block; margin:20px 40%;"><h1>注册</h1></div>
			<el-input
			 v-model="user.name"
			 placeholder="名字"
			 clearable
			 style="width: 80%; margin-left:9%;
			 margin-bottom: 4%;
			 display: flex;"
			/>
			<el-input
			 v-model="user.id"
			 placeholder="账号"
			 clearable
			 style="width: 80%; margin-left:9%;
			  margin-bottom: 4%;
			 display: flex;"
			/>
			 <el-input
				v-model="user.password"
			    type="password"
			    placeholder="密码"
			    show-password
				style="width: 80%; margin-left:9%;
				 margin-bottom: 4%;
				display: flex; margin-bottom: 10%;"
			  />
			<div style="margin-left:28%;">
				<el-button type="primary" round @click="login">返回登录</el-button>
				<el-button type="warning" round @click="ZHUCE">注册</el-button>
			</div>

		</div>
	</div>
</template>

<script>
	// import request from '@/utls/request';
	export default {
		data(){
			return {
				user:{}
			}
		},
		methods:{
			//返回登录界面
			login(){
				this.$router.push("/Login")
			},
		}
	}
</script>

<style>
	.two{
		height: 100vh;
		background-image: linear-gradient(to bottom right,#ccc,#3F5EFB);
		overflow: hidden;
	}
</style>
3、首页(利用组件的方法完成)
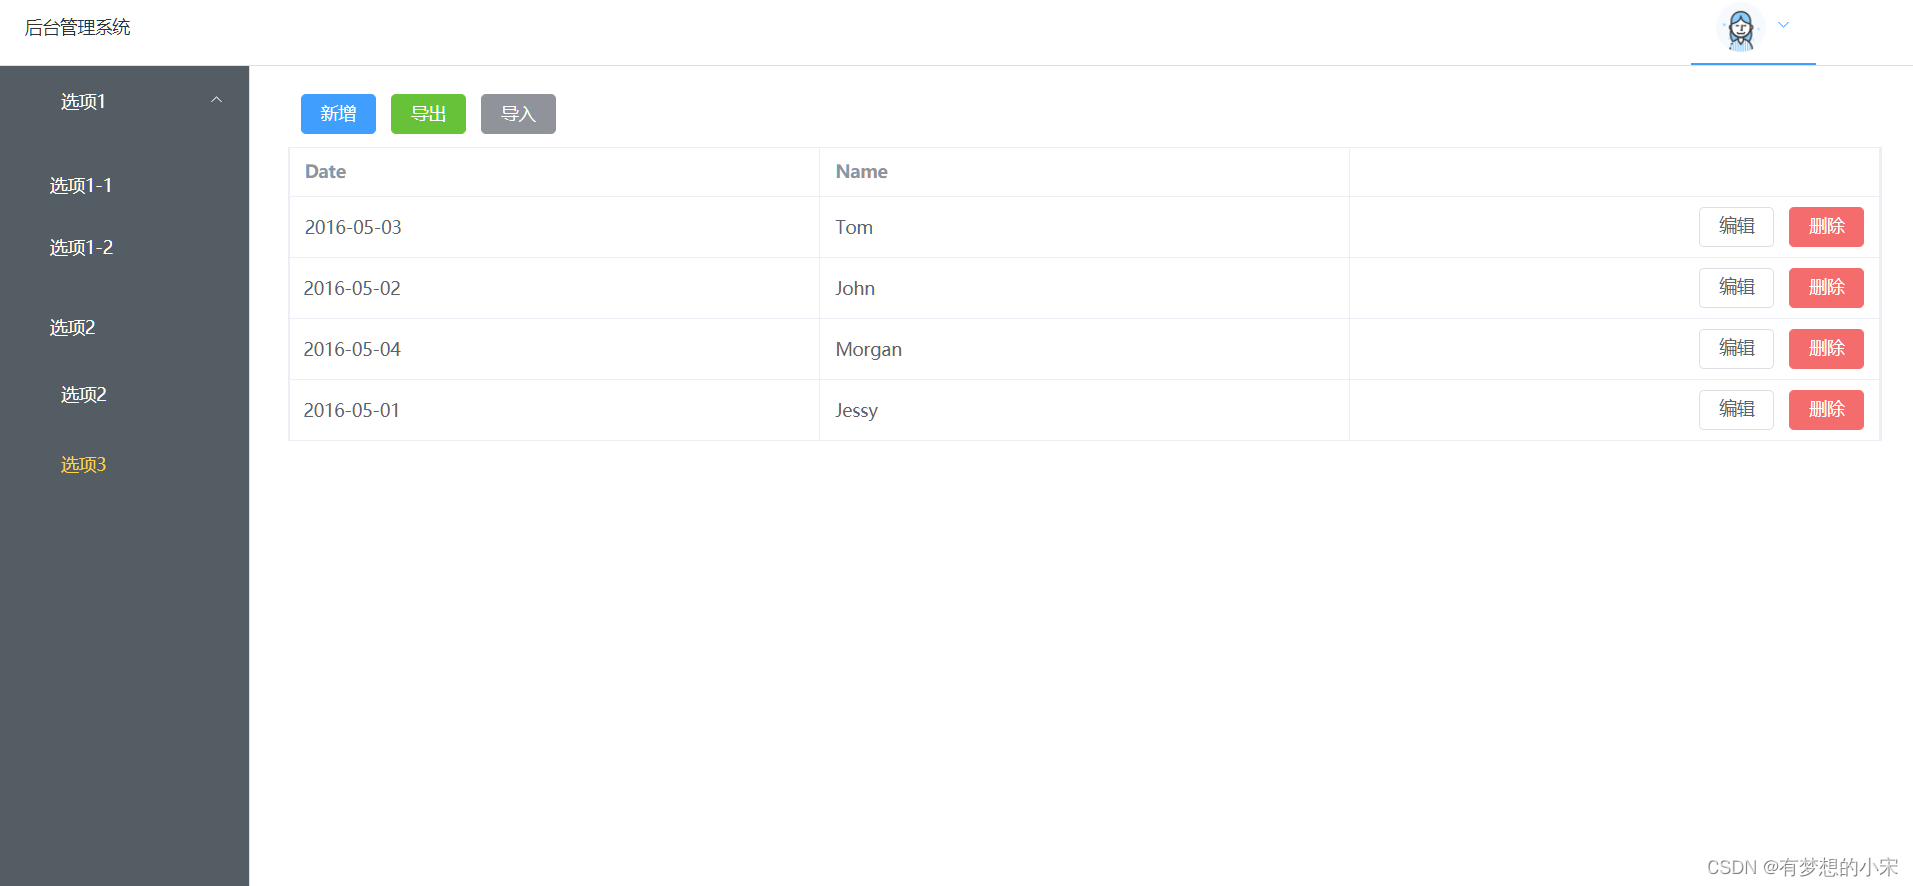
首页利用组件的方式来完成
(1)侧边栏组件(zuobian.vue文件)
<template>
	 <el-row class="tac">
	 <el-col :span="12">

	      <el-menu
	        active-text-color="#ffd04b"
	        background-color="#545c64"
	        class="el-menu-vertical-demo"
	        default-active="2"
	        text-color="#fff"
	        @open="handleOpen"
	        @close="handleClose"
			style="width: 200px;
			height: calc(100vh - 60px);
			"
	      >
	        <el-sub-menu index="1">
	          <template #title>
	            <el-icon><location /></el-icon>
	            <span>选项1</span>
	          </template>
	          <el-menu-item-group>
	            <el-menu-item index="1-1">选项1-1</el-menu-item>
	            <el-menu-item index="1-2">选项1-2</el-menu-item>
	          </el-menu-item-group>
	          <el-menu-item-group>
	            <el-menu-item index="1-3">选项2</el-menu-item>
	          </el-menu-item-group>
	         <!-- <el-sub-menu index="1-4">
	            <template #title>选项3</template>
	            <el-menu-item index="1-4-1">选项3-1</el-menu-item>
	          </el-sub-menu> -->
	        </el-sub-menu>
	        <el-menu-item index="2">
	          <el-icon><icon-menu /></el-icon>
	          <span>选项2</span>
	        </el-menu-item>
	        <!-- <el-menu-item index="3" disabled>
	          <el-icon><document /></el-icon>
	          <span>Navigator Three</span>
	        </el-menu-item> -->
	        <el-menu-item index="4">
	          <el-icon><setting /></el-icon>
	          <span>选项3</span>
	        </el-menu-item>
	      </el-menu>
	    </el-col>
	  </el-row>
</template>

<script>

</script>

<style>
</style>
(2)顶部导航组件(shang.vue文件)
<template>
	<el-menu
	    :default-active="activeIndex"
	    class="el-menu-demo"
	    mode="horizontal"
	    :ellipsis="false"
	    @select="handleSelect"
		style="height: 60px;"
	  >
	    <el-menu-item index="#">后台管理系统</el-menu-item>
	    <el-sub-menu index="2" style="margin-left: 80%;">
	      <template #title> <el-avatar
        src="https://cube.elemecdn.com/0/88/03b0d39583f48206768a7534e55bcpng.png"
      /></template>
	      <el-menu-item index="2-1">个人中心</el-menu-item>
	      <el-menu-item index="2-2">退出</el-menu-item>
	    </el-sub-menu>
	  </el-menu>
</template>

<script>

</script>

<style>
</style>
(3)内容(neir.vue文件)
<template>
	<div style="height: 100%; width: 85%; margin-left: 2%; margin-right: 2%;" >
		<div style="margin-top: 1%;padding: 10px;">
			<el-button type="primary">新增</el-button>
			<el-button type="success">导出</el-button>
			<el-button type="info">导入</el-button>
		</div>

		<div>
			<el-table :data="filterTableData" style="width: 100%"
			      border
			>
			    <el-table-column label="Date" prop="date" />
			    <el-table-column label="Name" prop="name" />
			    <el-table-column align="right">

			      <template #default="scope">
			        <el-button size="default " @click="handleEdit(scope.$index, scope.row)"
			          >编辑</el-button
			        >
			        <el-button
			          size="default "
			          type="danger"
			          @click="handleDelete(scope.$index, scope.row)"
			          >删除</el-button
			        >
			      </template>
			    </el-table-column>
			  </el-table>
		</div>

	</div>


</template>

<script>
	export default {
		data(){
			return {
                //首先利用假数据
				filterTableData:  [
				  {
				    date: '2016-05-03',
				    name: 'Tom',
				    address: 'No. 189, Grove St, Los Angeles',
				  },
				  {
				    date: '2016-05-02',
				    name: 'John',
				    address: 'No. 189, Grove St, Los Angeles',
				  },
				  {
				    date: '2016-05-04',
				    name: 'Morgan',
				    address: 'No. 189, Grove St, Los Angeles',
				  },
				  {
				    date: '2016-05-01',
				    name: 'Jessy',
				    address: 'No. 189, Grove St, Los Angeles',
				  },
				]
			}
		}
	}
</script>

<style>
</style>
(4)将组件全部连接在一起(HomeView.vue文件)
<template>
	<div>
		<!-- 最上边 -->
		<shang/>
	</div>

	<div>
		<div style="display: flex">
			<!-- 左边 -->
			<zuobian/>
			<!-- 内容 -->
			<neir/>
		</div>
	</div>

</template>


<script>
    //将组件引入进来
import shang from '../components/shang.vue'
import zuobian from '../components/zuobian.vue'
import neir from '../components/neir.vue'
	export default {
		name:'dou',
		components:{
			shang,
			zuobian,
			neir
		}

	}
</script>
(5) 在App.vue中添加
<template>
   <div>
		<router-view/>
   </div>

</template>

<style>

</style>
(6) 在my-vue\src\router\index.js文件中添加登录与注册页面的路由
  {
	path: '/Login',
	name: 'Login',
	component: () => import('../views/Login.vue')
  },
  {
  	path: '/zhuce',
  	name: 'zhuce',
  	component: () => import('../views/zhuce.vue')
  },
最后在终端就可以启动项目了(所有文件的起名有点随意,希望对各位朋友有所帮助)

为开发者提供学习成长、分享交流、生态实践、资源工具等服务,帮助开发者快速成长。
更多推荐


 10
10 0
0- 0


 已为社区贡献1条内容

所有评论(0)