Vuex 模块化详解
本篇主要讲vuex的模块化,虽然官网已经讲得比较细致了,但是在实践的时候还是踩了不少坑。今天就在这里把模块化使用过程中的细节都讲清楚,方便大家学习,也方便自己以后复习。1.Vuex简单介绍1.1 Vuex是什么官方:Vuex是一个专为Vue.js应用程序开发的状态管理模式,采用集中式存储管理应用的所有组件的状态,并以相应的规则保证状态以一种可预测的方式发生变化(即通过提交mutation来更新状态
本篇主要讲vuex的模块化,虽然官网已经讲得比较细致了,但是在实践的时候还是踩了不少坑。今天就在这里把模块化使用过程中的细节都讲清楚,方便大家学习,也方便自己以后复习。
1.Vuex简单介绍
1.1 Vuex是什么
官方:Vuex是一个专为Vue.js应用程序开发的状态管理模式,采用集中式存储管理应用的所有组件的状态,并以相应的规则保证状态以一种可预测的方式发生变化(即通过提交mutation来更新状态)
Vuex是适用于Vue项目开发时使用的状态管理工具。把组件中的共享状态抽取出来,以一个全局单例模式管理,采用集中式存储的方式管理应用的所有组件的状态,同时利用Vue.js的响应式机制来进行高效的管理与更新。并且只能通过提交mutation的方式来进行数据修改,主要是为了保证数据状态的可预测。
1.2 为什么使用Vuex
在Vue中最重要的是数据驱动和组件化,每个组件都有自己的data,template和methods,data是数据,我们也叫做状态,通过methods中的方法改变状态来更新视图。在单个组件中修改状态更新视图特别方便,但实际开发复杂应用时,经常会遇到多个组件共享同一个状态,或者多个组件会去更新同一个状态。在涉及组件较少时,我们可以通过组件间通信去维护共享数据。但是如果涉及组件较多时,组件之间的数据通信关系会变得错综复杂,难以维护。
这时就需要Vuex进行状态管理,将共享数据抽取出来进行统一存储管理。
Vuex主要解决的问题
● 多个视图依赖同一个状态
● 来自不同视图的行为需要变更同一个状态
对于多个视图依赖统一状态的情况,传参的方法对于多层嵌套的组件将会非常繁琐,并且兄弟组件间的状态传递更是繁琐。
对于第二个问题,我们会采用父子组件直接引用或者通过事件来变更和同步状态的多份拷贝,这两种方式容易导致后期维护代码的难度较大。
使用Vuex的好处
● 能够在Vuex中集中管理共享数据,易于开发和后期维护
● 能够高效地实现组件之间的数据共享,提高开发效率
● 在Vuex中的数据都是响应式的
1.3 Vuex的状态管理模式

通过官方的这张图我们可以看得出来,Vuex的状态管理模式主要是实现了一个单项数据流,在全局拥有一个State存放数据,所有修改State的操作必须通过mutation进行。所有异步接口需要走Action,并且Action也是无法直接修改State的,还是需要通过mutation来修改State的数据。最后根据State的变化,渲染到试图上。Vuex运行机制依赖Vue内部数据双向绑定机制,需要new一个Vue对象来实现响应式,所以Vuex是一个专门为Vue.js设计的状态管理库。
1.4 Vuex Modules
关于Vuex的使用这里就不过多的赘述了,需要了解的可以直接点击Vue.js官网进行学习。现在我们来说一下Vuex的模块化。
1.4.1 为什么要用到Vuex Modules
在Vuex中应用的所有需要共享和被修改的数据源都存放在state对象中,当应用较为复杂,需要共享的数据较多时,state对象以及store对象都会变得很臃肿,不利于代码维护。并且大多应用都会根据业务分为不同的功能模块,很多情况下不同模块之间的数据交互并不密切,如果我们能将store也分割为不同模块,每个模块管理不同的数据,会使数据管理起来更加结构清晰,方便管理。
那么为了解决以上的问题,Vuex允许我们将store分割成模块。每个模块拥有自己的state、mutation、action、getter并且可以嵌套子模块。
1.4.2 Vuex Modules简单使用
我们在src目录下建立我们的store文件夹,用来写一些vuex module的简单使用。
// index.js
import Vue from 'vue'
import Vuex from 'vuex'
import { moduleA } from './moduleA'
import { moduleB } from './moduleB'

Vue.use(Vuex)

export default new Vuex.Store({
    state: {
        count: 0,
        name: 'index'
    },
    mutations: {
        increment(state, payload) {
            state.count += payload.amount;
            console.log("mutations" + state.name)

        },
    },
    actions: {
        incrementAsync({ state, commit }, products) {
            setTimeout(() => {
                console.log("actions" + state.name)
                commit('increment', products)
            }, 1000)
        }
    },
    modules: { moduleA, moduleB },
    getters: {
        getCount: (state) => {
            return "store被调用了" + state.count + "次"
        }
    }
})
// moduleA.js
export const moduleA = {
    state: {
        nameA: "moduleA",
        countA: 0
    },
    mutations: {
        incrementA(state, payload) {
            state.countA += payload.amount;
            console.log("mutations" + state.nameA)
        }
    },
    actions: {
        incrementAsyncA({ commit }, products) {
            setTimeout(() => {
                commit('incrementA', products)
                console.log("actions" + state.nameA)
            }, 1000)
        }
    },
    getters: {
        getCountA: (state, getters) => {
            console.log("getter" + state.nameA)
            return state.nameA + "被调用了" + state.countA + "次"
        }
    }
}
// moduleB.js
export const moduleB = {
    state: {
        nameB: "moduleB",
        countB: 0
    },
    mutations: {
        incrementB(state, payload) {
            state.countB += payload.amount;
            console.log("mutations" + state.nameB)
        }
    },
    actions: {
        incrementAsyncB({ commit }, products) {
            setTimeout(() => {
                commit('incrementB', products)
                console.log("actions" + state.nameB)
            }, 1000)
        }
    },
    getters: {
        getCountB: (state, getters) => {
            console.log("getter" + state.nameB)
            return state.nameB + "被调用了" + state.countB + "次"
        }
    }
}
<template>
  <div class="hello">
   <div>
     {{name}}
     <button @click="incrementFun">{{count}}</button>
     {{getCount}}
   </div>
   <div>
     {{nameA}}
     <button @click="incrementFunA">{{countA}}</button>
     {{getCountA}}
   </div>
   <div>
     {{nameB}}
     <button @click="incrementFunB">{{countB}}</button>
     {{getCountB}}
   </div>
  </div>
</template>

<script>
import { mapState, mapMutations, mapActions, mapGetters } from 'vuex'

export default {
  name: 'HelloWorld',
  data () {
    return {
      msg: 'Welcome to Your Vue.js App'
    }
  },
  computed:{
    ...mapState({
      count: state => state.count,
      name: state => state.name,
      countA: state => state.moduleA.countA,
      nameA: state => state.moduleA.nameA,
      countB: state => state.moduleB.countB,
      nameB: state => state.moduleB.nameB
    }),
    ...mapGetters([
      'getCount',
      'getCountA',
      'getCountB'
    ])
  },methods:{
    ...mapMutations([
      'increment',
      'incrementA',
      'incrementB'
    ]),
    ...mapActions([
      'incrementAsync',
      'incrementAsyncB',
      'incrementAsyncB'
    ]),
    incrementFun(){
      this.increment({amount:1})
      console.log(this.$store.state);
    },
     incrementFunA(){
      this.incrementA({amount:1})
    },
    incrementFunB(){
      this.incrementB({amount:1})
    }
  }
}
</script>

<style scoped>
</style>
我们需要注意的是,不同mutation以及action中函数的名字相同会出现函数被重复调用的情况。
1.4.3 模块的局部状态
对于模块内部的mutation和getter,接收到的第一个参数是模块的局部状态对象。在getter中,根节点状态会作为第三个参数暴露出来。
//moduleA.js
    mutations: {
        incrementA(state, payload) {
            state.countA += payload.amount;
            console.log(state);
        }
    },
    getters: {
        getCountA: (state, getters, rootState) => {
            console.log(state);
            console.log(rootState);
            return state.nameA + "被调用了" + state.countA + "次"
        }
    }
根据输出我们可以看到,这里的state只是moduleA的state对象。
同样,对于模块内部的action,局部状态通过context.state暴露出来,根节点状态则为context.rootState
// moduleA.js
    actions: {
        incrementAsyncA({ commit, state, rootState }, products) {
            setTimeout(() => {
                console.log(state);
                console.log(rootState);
                commit('incrementA', products)
            }, 1000)
        }
    }

1.4.4 命名空间
默认情况下,模块内部的action、mutation和getter是注册在全局命名空间的,这样使得多个模块能够对同一mutation或action做出响应。
如果我们想让我们的模块具有更高的封装度和复用性,可以通过添加namespaced: true的方式使其成为带命名空间的模块。当模块被注册后,他的所有getter、action及matation都会自动根据模块注册的路径调整命名。
// index.js 只倒入moduleA
modules: { moduleA }

// moduleA
import { moduleB } from './moduleB'
import { moduleC } from './moduleC'

//moduleA.js
export const moduleA = {
    namespaced: true,
    state: {
        nameA: "moduleA",
        countA: 0
    },
    mutations: {
        incrementA(state, payload) {
            state.countA += payload.amount;
        }
    },
    actions: {
        incrementAsyncA({ commit, state, rootState }, products) {
            setTimeout(() => {
                commit('incrementA', products)
            }, 1000)
        }
    },
    getters: {
        getCountA: (state, getters, rootState) => {
            return state.nameA + "被调用了" + state.countA + "次"
        }
    },
  //嵌套子模块
    modules: {
        moduleB,
        moduleC
    }
}
// moduleB.js moduleB没有设置namespaced: true会继承父模块命名空间
export const moduleB = {
    state: {
        nameB: "moduleB",
        countB: 0
    },
    mutations: {
        incrementB(state, payload) {
            state.countB += payload.amount;
        }
    },
    actions: {
        incrementAsyncB({ commit }, products) {
            setTimeout(() => {
                commit('incrementB', products)
            }, 1000)
        }
    },
    getters: {
        getCountB: (state, getters) => {
            return state.nameB + "被调用了" + state.countB + "次"
        }
    }
}
//moduleC.js
export const moduleC = {
    namespaced: true,
    state: {
        nameC: "moduleC",
        countC: 0
    },
    mutations: {
        incrementC(state, payload) {
            state.countC += payload.amount;
        }
    },
    actions: {
        incrementAsyncC({ commit }, products) {
            setTimeout(() => {
                commit('incrementC', products)
            }, 1000)
        }
    },
    getters: {
        getCountC: (state, getters) => {
            return state.nameC + "被调用了" + state.countC + "次"
        }
    }
}
组件内使用:
<template>
  <div class="hello">
   <div>
     {{name}}
     <button @click="incrementFun">{{count}}</button>
     {{getCount}}
   </div>
   <div>
     {{nameA}}
     <button @click="incrementFunA">{{countA}}</button>
     {{getCountA}}
   </div>
   <div>
     {{nameB}}
     <button @click="incrementFunB">{{countB}}</button>
     {{getCountB}}
   </div>
    <div>
     {{nameC}}
     <button @click="incrementFunC">{{countC}}</button>
     {{getCountC}}
   </div>
  </div>
</template>

<script>
import { mapState, mapMutations, mapActions, mapGetters } from 'vuex'

export default {
  name: 'HelloWorld',
  data () {
    return {
      msg: 'Welcome to Your Vue.js App'
    }
  },
  computed:{
    ...mapState({
      count: state => state.count,
      name: state => state.name,
      countA: state => state.moduleA.countA,
      nameA: state => state.moduleA.nameA,
      countB: state => state.moduleA.moduleB.countB,
      nameB: state => state.moduleA.moduleB.nameB,
      countC: state => state.moduleA.moduleC.countC,
      nameC: state => state.moduleA.moduleC.nameC
    }),
    ...mapGetters({
      getCount: 'getCount',
      getCountA: 'moduleA/getCountA',
      getCountB: 'moduleA/getCountB',
      getCountC: 'moduleA/moduleC/getCountC'
    })
  },methods:{
    ...mapMutations({
      increment: 'increment',
      incrementA: 'moduleA/incrementA',
      incrementB: 'moduleA/incrementB',
      incrementC: 'moduleA/moduleC/incrementC'
    }),
    ...mapActions({
      incrementAsync: 'incrementAsync',
      incrementAsyncA: 'moduleA/incrementAsyncA',
      incrementAsyncB: 'moduleA/incrementAsyncB',
      incrementAsyncC: 'moduleA/moduleC/incrementAsyncC'
    }),
    incrementFun(){
      this.increment({amount:1})
    },
     incrementFunA(){
      this.incrementA({amount:1})
    },
    incrementFunB(){
      this.incrementB({amount:1})
    },
    incrementFunC(){
      this.incrementC({amount:1})
    }
  }
}
</script>

<style scoped>
</style>
1.4.5 在带命名空间的模块内访问全局内容
如果我们希望使用全局的state和getter,rootState和rootGetters作为第三和第四参数传入getter,也会通过context对象的属性传入action。
若需要在全局命名空间内分发action或提交mutation,将{root: true}作为第三参数传给dispath或commit即可。
  // moduleA.js
	actions: {
        incrementAsyncA({ dispatch, commit, getters, rootGetters }, products) {
            setTimeout(() => {
                console.log(rootGetters['moduleA/moduleC/getCountC'])
                commit('moduleA/incrementB', products, { root: true })
                commit('incrementA', products)
            }, 1000)
        }
    },
    getters: {
        getCountA: (state, getters, rootState, rootGetters) => {
            console.log(rootGetters.getCount)
            console.log(rootGetters['moduleA/getCountB'])
            return state.nameA + "被调用了" + state.countA + "次"
        }
    }
由上我们可以看到在触发moduleA.js中的getter时,可以通过rootState与rootGetters获取到其他模块的state对象与getter对象。在action中也可以通过context中的rootGetters与rootState来访问其他模块的对应对象,并且可通过{root: true}调用其他模块的action函数与mutation函数。
1.4.6 在带命名空间的模块注册全局action
若需要在命名空间的模块注册全局action,我们可以添加root: true,并将这个action的定义放在函数handler中
actions: {
        incrementAsyncA: {
            root: true,
            handler({ dispatch, commit, getters, rootGetters }, products) {
                setTimeout(() => {
                    commit('incrementA', products)
                }, 1000)
            }
        }
    }
2. Vuex简单实现
2.1 搭建
关于Vuex的大致功能,相信大家不都不陌生。这里我们来写一个简易版的Vuex代码,实现一些基本的功能。
我们新建一个Vuex的文件夹,在该目录下添加一个index.js文件,来进行Vuex功能模拟。
/* Vuex/index.js */
// 保存一个全局的Vue之后会用到
let _Vue = null

// Store 类
class Store {
	// 先完成构造方法,构造方法接收一个对象,这个对象是我们在new Store时传的对象
  constructor(options){

  }
}

// 因为Vuex需要Vue.use()安装,所以我们必须要有个install方法,并传入Vue
// 第二个参数是一个可选对象
function install(Vue){

}

//导出Install和Store
export default{
	install,
  Store
}
2.2 install方法实现
因为Vuex插件需要Vue.use()安装,所以我们必须要有一个install方法,第一个参数传入Vue。
function install(Vue) {
	_Vue = Vue; //保存Vue对象至全局
  //全局注册混入 这样在所有的组件都能使用$store
  _Vue.mixin({
    // 在beforeCreate这个时候把$store挂载到Vue上
  	beforeCreate() {
      // 判断Vue传递对象是否有store需要挂载
      // this.$options是new Vue()传递的对象
    	if(this.$options.store) {
        // 把store挂载到Vue原型上
      	_Vue.prototype.$store = this.$options.store
      }
    }
  })
}
2.3 Store类
我们继续来完成Store的构造方法。
// Store 类
class Store {
	// 先完成构造方法,构造方法接收一个对象
  constructor(options) {
  	// 赋初值,为什么不用{},而是使用Object.create(null),后面我们会详细给大家讲到
    const state = options.state || Object.create(null);
    const mutations = options.mutations || Object.create(null);
    const actions = options.actions || Object.create(null);
    const getters = options.getters || Object.create(null);
  }
}
还是在Store的构造方法中,我们继续来实现state、getters、mutations、actions、commit、dispatch。
2.3.1 state
因为state与组件中的data类似,是响应式的,这里我们不深入去写响应式实现,直接调用Vue的observable把state变成响应式;
// Store 类
class Store {
	constructor(options) {
  	// 赋初值
    ...

    // 1. 实现state把state中的数据转为响应式,直接用Vue中的observable
    this.state = _Vue.observable(state)
  }
}
2.3.2 getters
为每一个getters里面的属性添加一个get,我们访问getters中的属性,或者某个getter使用到的state数据发生修改,都会触发该属性对应的方法执行。
// Store 类
class Store {
	constructor(options) {
  	// 赋初值
    ...
    // 1. 实现state把state中的数据转为响应式,直接用Vue中的observable
    ...
    // 2. 实现访问this.getters中的属性会触发getters中对应函数,需要为this.getters中每个属性做数据劫持,添加get
    this.getters = Object.create(null);
    // 先拿到getters中的每一个方法
    Object.keys(getters).forEach((key) => {
    	// 第一个参数是指为哪个对象添加数据劫持,第二个参数是具体劫持的属性名,第三个对象是设置数据劫持的配置对象
      Object.difineProperty(this.getters, key, {
      	// 为this.getters每一项添加一个get方法
        get: () => {
        	// 当访问this.getters的该属性时,触发getters中对应函数,并改变this指向为Store实例,默认将state传入方法
          return getters[key].call(this, this.state);
        }
      })
    })
  }
}
2.3.3 mutations
// Store 类
class Store {
	constructor(options) {
  	// 赋初值
    ...
    // 1. 实现state把state中的数据转为响应式,直接用Vue中的observable
    ...
    // 2. 实现访问this.getters中的属性会触发getters中对应函数,需要为this.getters中每个属性做数据劫持,添加get
    ...
    // 3. 实现mutations,主要实现功能为将this.mutations中相应属性绑定到参数传过来的mutations中对应的函数上。
    this.mutations = Object.create(null);
    // 先遍历mutations中的对象
    Object.keys(mutations).forEach((key) => {
    	// 绑定this.mutations[key]为一个函数,函数内执行参数传过来的mutations对象的对应函数执行上,并修改this指向,与传参
      this.mutations[key] = (params) => {
        // 修改this指向,默认传入state
      	mutations[key].call(this, this.state, params)
      }
    })
  }
}
2.3.4 actions
actions的处理方式与mutations差不多,不过参数传递不同,需要传递上下文context可以说是简易的store对象,但有所不同。这里我们只是简单实现,所以就用this代替。但是关于store对象与context对象的区别我们可以通过其属性查看其不同。
store对象
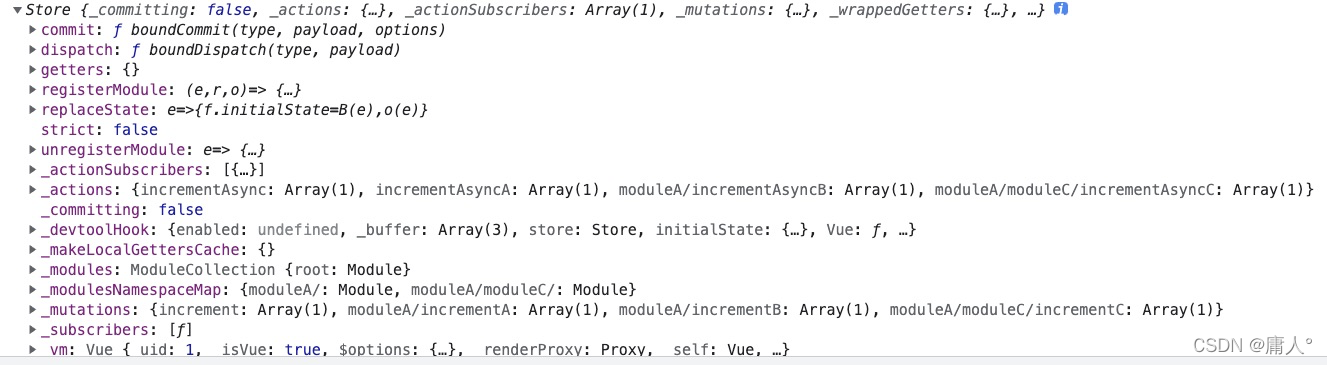
context对象

但是在我们的简单实现中为了方便,使用store代替context。
// Store 类
class Store {
	constructor(options) {
  	// 赋初值
    ...
    // 1. 实现state把state中的数据转为响应式,直接用Vue中的observable
    ...
    // 2. 实现访问this.getters中的属性会触发getters中对应函数,需要为this.getters中每个属性做数据劫持,添加get
    ...
    // 3. 实现mutations,主要实现功能为将this.mutations中相应属性绑定到参数传过来的mutations中对应的函数上。
    ...
    //4. 实现actions
    this.actions = Object.create(null)
    Object.keys(actions).forEach((key) => {
      this.actions[key] = (params) => {
        // 改变this指向 ,默认是要传入 store也就是 this
        actions[key].call(this, this, params)
      }
    })
  }
}
2.3.5 commit与dispatch
// Store 类
class Store {
	constructor(options) {
  	// 赋初值
    ...
    // 1. 实现state把state中的数据转为响应式,直接用Vue中的observable
    ...
    // 2. 实现访问this.getters中的属性会触发getters中对应函数,需要为this.getters中每个属性做数据劫持,添加get
    ...
    // 3. 实现mutations,主要实现功能为将this.mutations中相应属性绑定到参数传过来的mutations中对应的函数上。
    ...
    // 4. 实现actions
    ...
    // 5. 实现commit方法,用于触发mutations中的方法
    // 第一个参数是事件名,第二个是该方法需要的参数
    this.commit = (eventName, params) => {
    	this.mutations[eventName](params)
    }
    // 6. 实现dispatch方法,用于触发actions中的异步方法
    // 第一个参数是事件名,第二个是该方法需要的参数
    this.dispatch = (eventName, params) => {
    	this.actions[eventName](params)
    }
  }
}
到目前为止一个最简易的Vuex就实现了,我们来测试一下:
import Vue from 'vue'
import Vuex from '../Vuex/index'
import { moduleA } from './moduleA'

Vue.use(Vuex)

export default new Vuex.Store({
    state: {
        count: 0,
        name: 'index'
    },
    mutations: {
        increment(state, payload) {
            state.count += payload.amount;
        },
    },
    actions: {
        incrementAsync({ state, commit }, products) {
            setTimeout(() => {
                commit('increment', products)
            }, 1000)
        }
    },
    modules: { moduleA },
    getters: {
        getCount: (state) => {
            return "store被调用了" + state.count + "次"
        }
    }
})
<template>
  <div class="hello">
   <div>
     <button @click="incrementFun">{{$store.state.count}}</button>
   </div>
  </div>
</template>

<script>
export default {
  name: 'HelloWorld',
  data () {
    return {
      msg: 'Welcome to Your Vue.js App'
    }
  },
  computed:{

  },methods:{
    incrementFun(){
      this.$store.commit('increment',{amount:1})
      console.log(this.$store.getters.getCount)
    }
  }
}
</script>

<style scoped>
</style>
可以看到基本的state、mutation、action、getter、commit、dispatch等功能都能实现。当然与Vue源码相比缺少了很多需要思考的逻辑,但是可以从简易版入手,后面在真正扒源码时将会轻松一些。
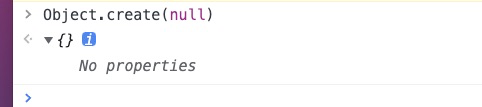
2.4 为什么使用Object.create(null)做初始化,不直接用{}
Object.create()主要用于创建一个新对象,且使用现有对象来提供新创建的对象的__proto__,就是说现有对象会作为新对象的原型,且新对象会继承现有对象的原型链。
原型链的最后指向null,Object.create(null)创建的对象没有原型,没有任何属性,显示No properties。我们可以把它当作一个很纯净的对来来使用,可以自己定义任何方法,不用担心会出现原型链上的属性同名的情况。或者当我们使用Object.keys()遍历对象属性时,就不用担心原型链上的属性会被遍历出来。
而字面量定义对象{},相当于Object.create(new Object),创建的对象会继承Object实例的原型。
总结
● 当我们需要一个非常干净且高度可制定的对象当作数据字典时,可以用Object.create(null)来创建对象
● 当我们需要遍历对象属性,但又想节省hasOwnProperty带来的一点性能损失时,可以用Object.create(null)来创建对象

为开发者提供学习成长、分享交流、生态实践、资源工具等服务,帮助开发者快速成长。
更多推荐


 17
17 0
0- 0


 已为社区贡献4条内容

所有评论(0)