
Vue2基础(CDN方式)
Vue2基础(CDN方式)一、环境搭建1.Vue的引入<script src="https://cdn.bootcdn.net/ajax/libs/vue/2.6.13/vue.js"></script>2.安装vue Devtools(v2)3.关闭cdn开发模式提示tip:关闭提示编码:使用了Vue的全局配置对象,更多配置请参考:API — Vue.js (vuejs.
·
Vue2基础(CDN方式)
一、环境搭建
1.Vue的引入
<script src="https://cdn.bootcdn.net/ajax/libs/vue/2.6.13/vue.js"></script>
2.安装vue Devtools(v2)
3.关闭cdn开发模式提示
tip:

关闭提示编码:
使用了Vue的全局配置对象,更多配置请参考:API — Vue.js (vuejs.org)
Vue.config.productionTip = false;
二、Vue基本语法
1.模板语法
a.简述
html 中包含了一些 JS 语法代码,语法分为两种,分别为:
1. 插值语法(双大括号表达式) 		// {表达式}
2. 指令(以 v-开头)		// v-bind、v-model、v-on
b.编码:
两种挂载方式,el配置项、实列的$mount()方式
<script src="./js/vue.js"></script>

<body>
    <div id="root">
        <h1>{{msg}}</h1>
    </div>
    <script>
        Vue.config.productionTip = false;
        // const vm = new Vue({
        //     data(){
        //         return {
        //             msg:'hello vue'
        //         }
        //     }
        // });
        // vm.$mount('#root');

        const vm = new Vue({
            el:'#root',
            data(){
                return {
                    msg:'hello vue'
                }
            }
        });

    </script>
</body>
c.添加响应式数据
简述:
			// target可以是对象或数组
Vue.delete( target, propertyName/index, value )	// 注意对象不能是 Vue 实例,或者 Vue 实例的根数据对象。
// 修改数组是,只能使用vue重写的修改数组的方法或用新的数组替换旧的数组,不然不能触发数据响应式渲染页面
编码:
 <script type="text/javascript">
    // 默认data中定义的属性都是响应式
    let vm = new Vue({
      data: {
        msg: {
          jone: 'JONE'
        }
      },
      created: function () {
        // 后续直接动态添加的data中的属性不具备响应式能力
        this.msg.tom = 'TOM'

        // 需要使用Vue相关API动态添加响应式属性
            //方法一
        // this.$set(this.msg, 'tom', 'TOM')
          //方法二
        Vue.set(this.msg, 'tom', 'TOM')
      }
    })
      vm.$mount('#root');
  </script>
2.数据绑定
a.简述
数据绑定分为单项数据绑定(v-bind:value=>:value)、双向数据绑定(v-model:value=>v-model)=
b.两种数据绑定的区别
编码:
<body>
    <div id="root">
        单项数据: <input type="text" v-bind:value="unidirection"/> <span>展示绑定:{{unidirection}}</span><br>
        单项数据: <input type="text" v-model:value="bidirection"/> <span>展示绑定:{{bidirection}}</span>
    </div>
    <script>
        Vue.config.productionTip = false;
        const vm = new Vue({
            data() {
                return {
                    unidirection: "init",
                    bidirection: "init"
                }
            }
        });
        vm.$mount('#root');
    </script>
</body>
看效果的区别:

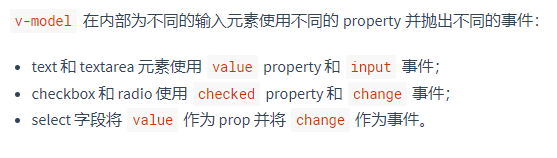
c.v-model原理
不同输入元素v-model实现的方式
text中v-model实现编码:input事件+v-bind
<input type="text" v-bind:value="unidirection" v-on:input="v_model"/>

methods:{
    v_model(e){
       this.unidirection = e.target.value;
    }
}
d.v-model常用修饰符
简述
.lazy
	在默认情况下,v-model 是使用 input 事件触发数据同步,添加 lazy 修饰符,从而转为在 change 事件_之后_进行同步。
.number
	将用户的输入值转为数值类型
.trim
	自动过滤用户输入的首尾空白字符
3.MVVM模型
a.简述
1. M:模型(Model) :对应 data 中的数据
2. V:视图(View) :模板
3. VM:视图模型(ViewModel) : Vue 实例对象
b.原理图

4.事件处理
a.事件绑定
简述:
1. v-on:xxx="fun"	//简写 @xxx="fun" 默认事件函数参数:event
2. v-on:xxx="fun(参数)"	// 隐含属性参数 $event
3. @:xxx="fun"	===	 @:xxx="fun($event)"
编码:
<button v-on:click="method_v,method_v2">v-on绑定</button>
<button @click="method_a(1,$event)">传递参数</button>
<button @click="method_v(),method_v2()">v-on绑定</button>	// 多个事件处理函数时,函数名后必须加()

methods:{
    method_v(e){ //默认有一个事件对象参数
        console.log(e)
    },
    method_a(n,e){
        console.log(n),
        console.log(e);
   }
}
b.事件修饰符
简述
v-on 提供了事件修饰符							原生
.stop			//阻止事件冒泡	e.stopPropagation()
.prevent		//阻止默认事件	e.preventDefault()
.capture		//事件处理发生在事件捕获阶段	el.addEventListener(eventType, function(){}, true);
.self			//当e.target为自身元素时,才触发是事件处理	冒泡、捕获导致的,不处理
.once			//事件只能触发一次	可能是,触发一次后就取消了事件监听了吧
.passive		//事件的默认行为立即执行,不用等事件回调执行完毕
编码:
<a @click.prevent href="http://www.baidu.com">百度</a>
c.按键修饰符
简述
原生使用keycode、keyName判断按键
常用的按键码的别名
.enter
.tab	只能绑定keydown
.delete (捕获“删除”和“退格”键)
.esc
.space
.up
.down
.left
.right
编码:
<input @keyup.enter="showData"></input>

methods:{
    showData(e){
        alert(e.target.value);
    }
}
自定义按键修饰符:可以通过全局 config.keyCodes 对象自定义按键修饰符别名:
// 可以使用 `v-on:keyup.f1`
Vue.config.keyCodes.f1 = 112
d.系统修饰键
简述
系统修饰键:ctrl、alt、shift、meta
事件触发:
	配合keyup:事件触发时修饰键必须处于按下状态,然后再释放其它按键,事件才会被触发
    配合keydown:正常事件触发
使用:
<input @keyup.ctrl.enter="showData"></input>
5.计算属性与监视
a.计算属性-computed
基于它们的响应式依赖进行缓存的
编码:
姓:<input type="text" v-model="firstName"><br />
名:<input type="text" v-model="lastName"><br />
全名:<span>{{fullName}}</span>

const vm = new Vue({
            data() {
                return {
                    firstName: '',
                    lastName: ''
                }
            },
            computed: {
                 /*
                // 默认只有 getter
                fullName(){
                    return this.firstName + ' ' + this.lastName
                }
                */
                fullName: {
                    // getter
                    get() {
                        return this.firstName + ' ' + this.lastName
                    },
                    // setter
                    set(newValue) {
                        var names = newValue.split(' ')
                        this.firstName = names[0]
                        this.lastName = names[names.length - 1]
                    }
                }
            }
        });
b.侦听器-watch
简述:
编码:
<div id="root">
    <h3>今天天气很{{isHot?'热':'冷'}}</h3>
    <button @click="isHot = !isHot">切换天气</button>
</div>
<script>
    Vue.config.productionTip = false;
    const vm = new Vue({
        data() {
            return {
                isHot:true
            }
        },
        watch:{
                isHot:{
                    immediate:true,     // 初始化时让handler调用一下
                        handler(newValue,oldValue){
                        console.log({newValue,oldValue});
                    },
                        deep:true       // 开启深度监视
                }

            	// 简写,当配置项只有handler时
                isHot(newValue,oldValue){}
            }
    });

    // 监视属性方法二
    vm.$watch('isHot',{
        // ... 配置对象
    })
    // 简写
    vm.$watch('isHot',function(){
        // ... 配置对象
    })


    vm.$mount('#root');
</script>
6.class、与style样式绑定
a.class绑定
简述:
1.v-bind:clas="xxx" 	//简写:class="xxx"
2.表达式是字符串:'classA'
3.表达式是对象:{classA:isA,classB:isB}
4.表达式是数组:['classA','classB']	// [{classA:isA},'classB']
编码:
<style>
    .bg_red {
        background-color: red;
    }

    .ft_blue {
        color: blue;
    }
</style>

<div id="root">
    <div :class="helloClass">hello vue</div>
</div>
<script>
    Vue.config.productionTip = false;
    const vm = new Vue({
        data() {
            return {
                // 对象形式
                // helloClass:{
                //     bg_red:true,
                //     ft_blue:true
                // }
                // 数组
                helloClass: [{ bg_red: false }, 'ft_blue']
            }
        },
    });
    vm.$mount('#root');
</script>
b.style绑定
简述:
CSS property 名可以用驼峰式 (camelCase) 或短横线分隔 (kebab-case,记得用引号括起来)
使用需要添加浏览器引擎前缀的 CSS property 时,Vue.js 会自动侦测并添加相应的前缀。

1.表达式为对象形式	:style="{backgroundColor: 'green','font-size': '20px'}"
2.表达式为数组新式	:style="[{ backgroundColor: 'skyblue' }, {color:'red'}]"
3.CSS property多重值	:style="{ display: ['-webkit-box', '-ms-flexbox', 'flex'] }"
编码:
<div id="root">
        <div :style="helloStyle">hello vue</div>
    </div>
    <script>
        Vue.config.productionTip = false;
        const vm = new Vue({
            data() {
                return {
                    // 对象形式
                    // helloStyle: {
                    //     backgroundColor: 'green',
                    //     'font-size': '20px'
                    // }
                    // 数组
                    helloStyle: [{ backgroundColor: 'skyblue' }, {color:'red'}]
                }
            },
        });
        vm.$mount('#root');
    </script>
7.条件渲染
简述:
1. 如果需要频繁切换 v-show 较好 =>{display:none}
2. 当条件不成立时, v-if 的所有子节点不会解析(项目中使用),会引起Vue组件重绘
3. 结合<tempalete>标签使用,不会破坏原有的dom结构
v-if与v-show的使用
编码:
<div id="root">
    <div v-if="v_if_v">v-if</div>
    <div v-show="v_show_v">v-show</div>
</div>
<script>
    Vue.config.productionTip = false;
    const vm = new Vue({
        data() {
            return {
                v_if_v:true,
                v_show_v:false
            }
        },
    });
    vm.$mount('#root');
</script>
8.列表渲染
简述:
推荐一个js库 uuid 用于生成唯一标识
遍历数组: v-for / index 	使用of或者in都可以
遍历对象: v-for / key

遍历每一条数据时,所对应的key属性值,一定要不同,当出现数据插入(非末尾添加)<影响diffing算法,重绘大量重复节点,损失性能>,节点中有输入类元素时<页面渲染出错>,不能使用数组的index,必须使用每条数据本身的id

当要使用到列表过滤、列表排序时,建议使用computed属性,而不修改源数据
编码:
<div id="root">
    <ul>
        <li v-for="(person,index) of persons" :key="person.id">
            {{person.name}} -- {{person.age}}
        </li>
    </ul>
</div>
<script>
    Vue.config.productionTip = false;
    const vm = new Vue({
        data() {
            return {
                persons:[
                    {id:'001',name:'张三',age:18},
                    {id:'002',name:'李四',age:19},
                    {id:'003',name:'王五',age:23},
                ]
            }
        },
    });
    vm.$mount('#root');
</script>
9.过滤器
推荐一个处理日期时间的库 dayjs ,多个过滤器可以连用
简述:
1. 功能: 对要显示的数据进行特定格式化后再显示
2. 注意: 并没有改变原本的数据, 是产生新的对应的数据
编码:
<script src="https://cdn.bootcdn.net/ajax/libs/dayjs/1.11.0/dayjs.min.js"></script> // 引入dayjs


<div id="root">
    <div>当前时间戳:{{time}}</div>
    <div>使用过滤器:{{time | timeFormater | mySlice}}</div>
</div>
<script>
    Vue.config.productionTip = false;
    const vm = new Vue({
        data() {
            return {
                time:Date.now()
            }
        },
            filters:{
                timeFormater(value){
                    return dayjs(value).format('YYYY-MM-DD HH:mm:ss')
                },
                    mySlice(value){
                        return value.slice(0,4)
                    }
            }
    });
    vm.$mount('#root');
</script>
注册全局过滤器
Vue.filter('mySlice',function(value){
    return value.slice(0,4);
})
10.指令
简述:
常用全局指令
1. v-text : 更新元素的 textContent
2. v-html : 更新元素的 innerHTML
3. v-if : 如果为 true, 当前标签才会输出到页面
4. v-else: 如果为 false, 当前标签才会输出到页面
5. v-show : 通过控制 display 样式来控制显示/隐藏
6. v-for : 遍历数组/对象
7. v-on : 绑定事件监听, 一般简写为@
8. v-bind : 绑定解析表达式, 可以省略 v-bind
9. v-model : 双向数据绑定
10. v-cloak : 防止闪现, 与 css 配合: [v-cloak] { display:none }
11. v-pre : 跳过其所在节点的编译过程,不会解析节点中的语法,可利用它跳过没有插值语法的节点,加快编译
13. v-onece : 数据只在初次渲染,数据后续改变,不会再动态渲染
自定义指令:
简述:
定义语法:
	(1).局部指令
		new Vue({									new Vue(
            directives:{指令名:配置对象}		或			directives:{指令名:回调函数}
        })											)
备注:指令定义时不用夹v-,但使用时需要加v-;指令名是多个单词时,要使用 kebab-case 方式命名
指令的生命周期钩子:
    1.bind				//指令第一次绑定到元素时调用
    2.inserted 			//被绑定元素插入父节点时调用
    3update				// 所在组件的 VNode 更新时调用,
    3.componentUpdated		//所在组件的 VNode 及其孩子的 VNode 全部更新时调用。
    4.unbind			//只调用一次, 指令与元素解绑时调用。

钩子函数的参数
1.el
    指令所绑定的元素,可以用来直接操作 DOM。
2.binding一个对象,包含以下属性:
    name: 指令名,不包括 v- 前缀。
    value: 指令的绑定值, 例如: v-my-directive="1 + 1", value 的值是 2。
    oldValue: 指令绑定的前一个值,仅在 update 和 componentUpdated 钩子中可用。无论值是否改变都可用。
    expression: 绑定值的字符串形式。 例如 v-my-directive="1 + 1" , expression 的值是 "1 + 1"。
    arg: 传给指令的参数。例如 v-my-directive:foo, arg 的值是 "foo"。
    modifiers: 一个包含修饰符的对象。 例如: v-my-directive.foo.bar, 修饰符对象 modifiers 的值是 { foo: true, bar: true }。
3.vnode 		// 编译生成的虚拟节点。
4.oldVnode		//上一个虚拟节点,仅在 update 和 componentUpdated 钩子中可用。


[注意]除了 el 之外,其它参数都是只读的,尽量不要修改他们。如果需要在钩子之间共享数据,建议通过元素的 dataset 来进行。
编码:
<div id="root">
    <h3>当前的n值:{{n}}</h3>
    <h3>放大10倍后的n值:<span v-big.ll:arg1="n"></span></h3>
    <button @click="n++">点我n+1</button>
    <br>
    <input type="text" v-autof="n">
</div>
<script>
    Vue.config.productionTip = false;

     // 注册一个全局自定义指令 `v-focus`
    Vue.directive('focus', {
        // 当被绑定的元素插入到 DOM 中时……
        inserted: function (el) {
            // 聚焦元素
            el.focus()
        }
    })

    const vm = new Vue({
        data() {
            return {
                n: 99
            }
        },
        directives: {
            /*简写 函数形式
                big函数何时被调用?
                    1.指令与元素绑定成功时(一上来)
                    2.指令所在的模板被重新解析
            */
            big(el, binding) {
                console.log(binding);
                el.innerText = binding.value * 10;
            },
            autof: {
                bind(el, binding) {
                    // 设置样式 设置innerText
                    el.value = binding.value;
                },
                inserted(el, binding) {
                    el.focus();
                },
                update(el, binding) {
                    // 更新数据
                    el.value = binding.value;
                    el.focus();
                }
            }
        }
    });

</script>
11.生命周期
简述:
1) 初始化显示
    * beforeCreate()
    * created()
    * beforeMount()
    * mounted()
2) 更新状态: this.xxx = value
    * beforeUpdate()
    * updated()
3) 销毁 vue 实例: vm.$destory()
    * beforeDestory()
    * destoryed()
生命周期图示:

常用生命周期钩子编码:
    mounted() {
        //对dom的操作有效,开启定时器、订阅消息、绑定自定义事件等初始化操作。
        console.log('mounted');
    },
    beforeDestroy() {
        // 关闭定时器、取消消息订阅、解绑自定义事件
        console.log('beforeDestroy');
    },
});
vm.$mount('#root')
三、组件化
简述:
重要内置关系 VueComponent extends Vue
应用中的功能都是多组件的方式来编写的, 那这个应用就是一个组件化的应用
注意:
	关于组件名:
    	一个单词:School (首字母大写)		// 首字母可以小写(不建议)
		多个单词:MySchool (CamelCase需要Vue脚手架支持)		// 也可以my-school (kebab-case)  我喜欢前一种命名方式
	关于组件标签:
		写法一:<School />	//	不使用脚手架时,会导致后续组件不能渲染
		写法二:<School></School>
	关于组件定义简写:
    	const School = Vue.extend(options)		// 简写	const School = options
编码:
// 第一步 创建组件
const Student = Vue.extend({                    // 简写  const Student = {template: `<span>Student组件</span>`};
    name:'Student',
    template: `<span>Student组件</span>`
});
const vm = new Vue({
    //第二步 注册组件
    components: {
        Student
    },
    // 第三步 使用组件
    template: `
		<div>
			<Student></Student>
		</div>
		`
});
vm.$mount('#root')


// 全局定义组件
// 定义一个名为 button-counter 的新组件
Vue.component('button-counter', {
  data: function () {
    return {
      count: 0
    }
  },
  template: '<button v-on:click="count++">You clicked me {{ count }} times.</button>'
})

为开发者提供学习成长、分享交流、生态实践、资源工具等服务,帮助开发者快速成长。
更多推荐


 4
4 0
0- 0


 已为社区贡献1条内容

所有评论(0)