wangEditor编辑器在vue使用并自定义菜单功能
wangEditor编辑器进行初始化,和进行一些更符合自己的处理,并自定义code的菜单,希望多多支持
wangEditor编辑器在vue使用并自定义菜单功能
由于最近需求变动,所以我突然改变了编辑器,秉着最近在用,所以相对比较熟悉,所以先穿插几篇这个wangEditor的帖子。
介绍
这个编辑器在长期的迭代和更新,以及作者的努力下,相对市面上大部分编辑器来说成熟,在现如今更新的wangEditor5版本中,作者花了一年时间进行了对编辑器中元素制定了一个标准,使得编辑器更偏向稳定,同时也会有一点问题,就是导入方面的问题,这个可以尝试用自定义元素和样式去实现自己想要的兼容。
在vue中使用
以vue2为例,首先通过脚手架去搭建一个基础的项目,通过命令去安装编辑器,
yarn add @wangeditor/editor
# 或者 npm install @wangeditor/editor --save

yarn add @wangeditor/editor-for-vue
# 或者 npm install @wangeditor/editor-for-vue --save
其实用于vue2在官网上写的已经非常详细了
wangEditor用于vue2
其他我也不在赘述了,我就说明一下我自己修改的地方,这里注意一点,我们最好封装一个自己的组件,符合自己的需求。
- 我将css文件拉到了静态文件的下面public里引用,这里是为了我方便去修改样式。

写完就是长这个样子

这个demo其实官方也有就是需要自己跟着样式写我将源码丢到评论区可以自己拿
自定义一个html编辑的菜单
接下来进入正题,写一个自己需求的菜单项,这一部分呢其实官网和官方视频也有讲,讲的是原生的方法,所以我拼拼凑凑看源码,写了一个符合vue2的自定义。
- 今天先写ModalMenu,第一步为了代码好看且直观,所以我们创建一个文件plugins,写我们的所有自定义内容
import { Boot, IModalMenu } from '@wangeditor/editor'

// 定义菜单 class
class MyModalMenu implements IModalMenu {
    // 菜单配置,代码可参考“插入链接”菜单源码
}

// 定义菜单配置
export const menu4Conf = {
  key: 'menu4', // menu key ,唯一。注册之后,可配置到工具栏
  factory() {
    return new MyModalMenu()
  },
}
- 根据官网的描述先定义菜单配置,然后factory里是要return出我们的渲染的内容一个类,这个工厂函数为了生成实例的。
- 这个类是我们配置的重头戏
class MyButtonMenu {
    title = "code";
    iconSvg = ``;
    tag = "button";
    showModal = true;
    modalWidth = window.innerWidth * 0.6;
    $content = null;
    // eslint-disable-next-line no-unused-vars
    getValue(editor) {
        // 用不到 getValue
        return "";
    }
    isActive() {
        return false;
    }
    isDisabled() {
            return false;
        }
        // eslint-disable-next-line no-unused-vars
    async exec(editor, value) {}
        // eslint-disable-next-line no-unused-vars
    getModalPositionNode(editor) {
            return null;
        }
        // eslint-disable-next-line no-unused-vars
    getModalContentElem(editor) {

        const $content = document.createElement("div");
        this.$content = $content
        return $content
    }
}
这里就是最基本的配置,简单说一下吧,前面几个其实简单的,第一个标题,第二个就是图标,如果没有图标渲染出来就会显示标题,图标可以自己去复制svg的代码。tag这个就是button,showModal就是相当于我这个模块打开的开关一般,modalWidth一看就是这个模块的宽度,$content这个是用来记录创建的模块htm的元素实例。
提供一下我用的svg
<svg t="1658298161465" class="icon" viewBox="0 0 1024 1024" version="1.1" xmlns="http://www.w3.org/2000/svg" p-id="2392" width="200" height="200"><path d="M390.272 919.552a53.077333 53.077333 0 0 1-38.186667-16.128L35.84 578.602667a96.298667 96.298667 0 0 1 0-133.333334l316.245333-324.821333a53.333333 53.333333 0 0 1 76.416 74.410667l-294.4 302.208a21.333333 21.333333 0 0 0 0 29.866666l294.4 302.165334a53.333333 53.333333 0 0 1-38.4 90.538666zM633.770667 919.552a53.333333 53.333333 0 0 1-38.4-90.538667l294.4-302.208a21.333333 21.333333 0 0 0 0-29.866666l-294.4-302.165334a53.333333 53.333333 0 0 1 76.416-74.410666l316.202666 324.778666a96.298667 96.298667 0 0 1 0 133.333334l-316.245333 324.864a53.077333 53.077333 0 0 1-37.973333 16.213333z m277.930666-399.914667z" p-id="2393"></path></svg>
- 接下来具体讲讲里面方法吧,首先这些方法都必须有,没有就会报错
- getValue获取值用的,这里我没用,直接return
- isActive表示这个菜单需不需要激活,这个属性可以通过editor实例自行判断
- isDisabled这个是表示是否禁用,也是随情况而定,同样自行通过实例去判断
- exec这个是点击时触发这个方法,因为这里我们是modelmenu所以不需要
- getModalPositionNode这个方法是调整模块节点的位置的
- getModalContentElem这个是我们最关键的东西,这个里面就是渲染我们模块内部dom,这里官网中源码中,都是用他的方法,我们如果自己写,要拿那个方法非常麻烦,所以我们用最基本的js创建html,我是这样去写的
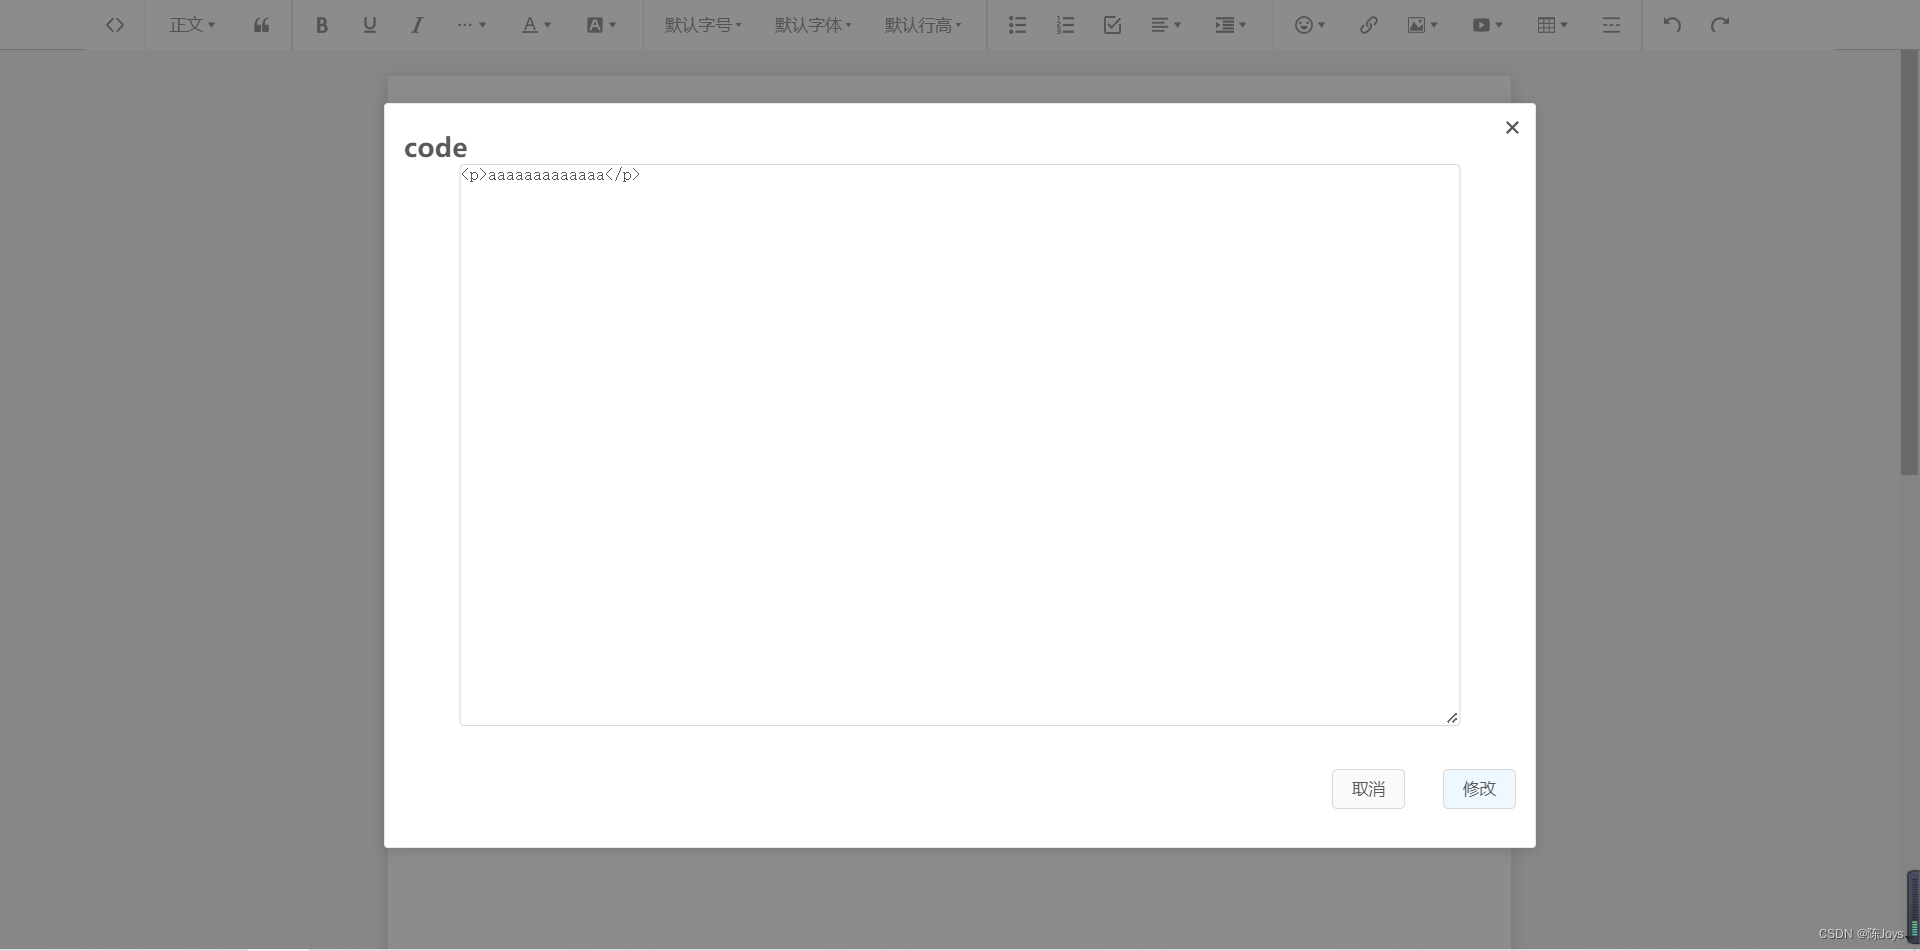
可能相对比较繁琐,同样这里多次对style进行操作,所以我封装了一个getstyle去添加样式,为了别的地方可以用到,我将此暴露出去具体如下const textarea = document.createElement("textarea"); const h2 = document.createElement("h2"); const $content = document.createElement("div"); const updatabutton = document.createElement("button"); const cancelbutton = document.createElement("button"); const div = document.createElement("div"); setstyle($content, { maxHeight: "600px", overflowY: "auto", position: "relative", overflowX: "hidden", width: "100%", }); // 文本框 setstyle(textarea, { minHeight: "450px", width: `90%`, padding: "0", marginLeft: "50%", transform: "translateX(-50%)", }); setstyle(h2, { textAlign: "concent", }); //修改按钮 setstyle(div, { display: "flex", justifyContent: "flex-end", margin: "30px 0", }); const button = { right: "40px", }; setstyle(cancelbutton, { ...button, ...{} }); setstyle(updatabutton, { ...button, ...{ backgroundColor: "#F0F8FF", marginLeft: "30px" }, }); h2.innerText = "code"; updatabutton.innerText = "修改"; cancelbutton.innerText = "取消"; textarea.value = editor.getHtml(); div.appendChild(cancelbutton); div.appendChild(updatabutton); $content.appendChild(h2); $content.appendChild(textarea); $content.appendChild(div); setstyle(cancelbutton, { ...button, ...{} }); setstyle(updatabutton, { ...button, ...{ backgroundColor: "#F0F8FF", marginLeft: "30px" }, }); h2.innerText = "code"; updatabutton.innerText = "修改"; cancelbutton.innerText = "取消"; textarea.value = editor.getHtml(); div.appendChild(cancelbutton); div.appendChild(updatabutton); $content.appendChild(h2); $content.appendChild(textarea); $content.appendChild(div); const updata = updatabutton.addEventListener('click', () => { text = text.replace(/'/g, "'") console.log(); if (text === '') text = ' ' // const area = document.getElementById('w-e-textarea-1') // area.innerHTML = text editor.setHtml(text) editor.hidePanelOrModal() updatabutton.removeEventListener('click', updata) }) const cancel = cancelbutton.addEventListener('click', () => { editor.hidePanelOrModal() cancelbutton.removeEventListener('click', cancel) }) this.$content = $content return $contentexport function setstyle(dom, styles) { Object.keys(styles).forEach((style) => { dom.style[style] = styles[style]; }); } - 到这里这个功能已经实现了,我们只要将这个菜单注册到我我们的编辑器中就好了,注意一点在编辑器实例之前注册,最开始配置的key则是我们的标识,菜单通过key找到我们的模块。

6.插入到菜单当中

这样就完成了,来看看效果


今天的内容大致就是如此,还有很多细节我们需要去看文档,看文档真的非常重要,会有很多细枝末节的信息,让我们开始进阶wangEditor吧,如果还有什么需要,可以告诉我,我会去看看并做更新。
更多推荐
 已为社区贡献1条内容


所有评论(0)