前端js实现给图片添加水印
提示:本文技术暂时只支持图片添加水印 。页面DOM水印后续更新技术调研参考文献文章目录整体思路一、Image加载图片,创建canvas来绘制图片二、canvas绘制水印文本算法三、vant中上传图片使用示例总结整体思路1:、获取图片base64数据,使用js Image对象加载图片 (可以直接加载base64数据)2、 使用canvas写入图片,再canvas 绘制水印文本 ,具体算法见下文。 【
整体思路
1:、传入图片base64数据,使用js Image对象加载图片 (img src 可以直接加载base64数据)
2、 使用canvas写入图片,再绘制水印文本 ,具体算法见下文。 【canvas绘制文本参考: canvas绘制文本】
3、canvas输出添加水印后的base64数据
一、Image加载图片,创建canvas来绘制图片
base64Img: 原始图片base64位数据。
wmConfig:水印配置,参考如下。
     wmConfig = {
                font: "microsoft yahei", //字体
                textArray: ['张三','2021/11/26 16:44'],//水印文本内容,允许数组最大长度3 即:3行水印
                density: 3  //密度 建议取值范围1-5   值越大,水印越多,可能会导致水印重叠等问题,慎重!!!
            }
new Image()创建img对象,通过 img.src = base64Img 加载图片,加载成功(img.onload)后,作为canvas的参数,在画布中绘制原始图片 ctx.drawImage(img, 0, 0)。0,0表示从canvas的左上角开始绘制。
drawWaterMark(ctx, img.width, img.height, wmConfig)方法实现在原始图片上绘制水印,具体参考下面第二部分算法。
水印绘制完成后,使用canvas的toDataURL 方法,将canvas内容转化成base64数据。由于图片base64数据较大,使用Promise封装将处理后的数据异步返回。 在实际业务代码中即可异步获取,添加了水印的图片的base64编码数据。
export const base64AddWaterMaker = (base64Img, wmConfig) => {

    if (wmConfig.textArray.length === 0) {
        console.error("****没有水印内容*****");
        return base64Img;
    }

    return new Promise((resolve, reject) => {

        const canvas = document.createElement("canvas");
        const ctx = canvas.getContext("2d");
        const img = new Image();
        let resultBase64 = null;

        img.onload = function() {
            canvas.width = img.width;
            canvas.height = img.height;

            //canvas绘制图片,0 0  为左上角坐标原点
            ctx.drawImage(img, 0, 0);
            //写入水印
            drawWaterMark(ctx, img.width, img.height, wmConfig);
            resultBase64 = canvas.toDataURL("image/png");

            if (!resultBase64) {
                reject();
            } else {
                resolve(resultBase64);
            }
        };
        img.src = base64Img;
    });


};
二、canvas绘制水印文本算法
1、 不同设备的分辨率相差甚大,水印字体大小兼容处理。
if (imgWidth >= 3456) {
        fontSize = 50;
    } else if (imgWidth >= 2700) {
        fontSize = 30;
    } else if (imgWidth >= 2000) {
        fontSize = 26;
    } else if (imgWidth >= 1436) {
        fontSize = 20;
    } else if (imgWidth >= 800) {
        fontSize = 12;
    } else if (imgWidth >= 500) {
        fontSize = 10;
    } else {
        fontSize = 8;
    }
2、canvas基本文本绘制设置。
font设置字体,fillStyle 设置颜色及透明度 textAlign 左对齐 fillText填充字体
   ctx.fillStyle = "white";

    ctx.font = `${fontSize}px ${wmConfig.font}`;
    ctx.lineWidth = 1;
    ctx.fillStyle = "rgba(255,255,255,0.3)";
    ctx.textAlign = "left";
    ctx.textBaseline = "middle";
...
 ctx.fillText(el, arrayX[i], arrayX[j] + offsetY);
3、水印算法思想:
1>. 取图片水平像素和垂直像素的最大值。通过wmConfig配置的密度density 值等分。
(比如:with :2000px height:2400px density :3 ,则确定step长度为2400 px / 3 = 800px )
2> . 将画笔触电移动至图片中心,确定第一个水印坐标点 ,再以step为步长向四周扩散。直到超过最远边界
图示: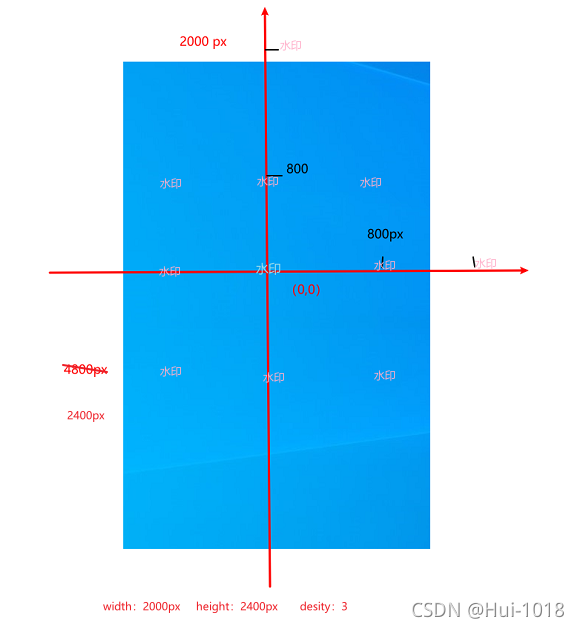
3>. 水印文案以原点为圆心, 逆时针 旋转 PI/5 弧度即可。
完整代码如下(示例):
//画布添加水印
const drawWaterMark = (ctx, imgWidth, imgHeight, wmConfig) => {


    let fontSize;
    if (imgWidth >= 3456) {
        fontSize = 50;
    } else if (imgWidth >= 2700) {
        fontSize = 30;
    } else if (imgWidth >= 2000) {
        fontSize = 26;
    } else if (imgWidth >= 1436) {
        fontSize = 20;
    } else if (imgWidth >= 800) {
        fontSize = 12;
    } else if (imgWidth >= 500) {
        fontSize = 10;
    } else {
        fontSize = 8;
    }
    console.log(imgWidth, imgHeight, fontSize);
    ctx.fillStyle = "white";

    ctx.font = `${fontSize}px ${wmConfig.font}`;
    ctx.lineWidth = 1;
    ctx.fillStyle = "rgba(255,255,255,0.3)";
    ctx.textAlign = "left";
    ctx.textBaseline = "middle";


    //文字坐标

    const maxPx = Math.max(imgWidth, imgHeight);

    const stepPx = Math.floor(maxPx / wmConfig.density);


    let arrayX = [0];//初始水印位置 canvas坐标 0 0 点
    while (arrayX[arrayX.length - 1] < maxPx/2) {
        arrayX.push(arrayX[arrayX.length - 1] + stepPx);

    }
    arrayX.push(...arrayX.slice(1, arrayX.length).map((el) => {
        return -el;
    }));

    console.log(arrayX);

    for (let i = 0; i < arrayX.length; i++) {
        for (let j = 0; j < arrayX.length; j++) {
            ctx.save();
            ctx.translate(imgWidth / 2, imgHeight / 2); ///画布旋转原点 移到 图片中心
            ctx.rotate(-Math.PI / 5);
            if (wmConfig.textArray.length > 3) {
                wmConfig.textArray = wmConfig.textArray.slice(0, 3);
            }
            wmConfig.textArray.forEach((el, index) => {
                let offsetY = fontSize * index + 2;
                ctx.fillText(el, arrayX[i], arrayX[j] + offsetY);
            });
            ctx.restore();
        }

    }

};
三、vant中上传图片使用示例
我们使用vant组件(基于vue)上传图片进行测试,组件中添加 after-read 回调事件。
也可以使用原生 进行上传测试。
  <van-uploader v-model="fileList" multiple :capture="capture"
                          :after-read="afterRead"

            />
方法实现,引用异步水印处理即可:
        async afterRead(file) {
            file.status = "uploading";
            file.message = "处理中...";

            let resultBase64 = await base64AddWaterMaker(file.content, this.wmConfig);

            file.content = resultBase64 ;
            file.status = "done";
        },
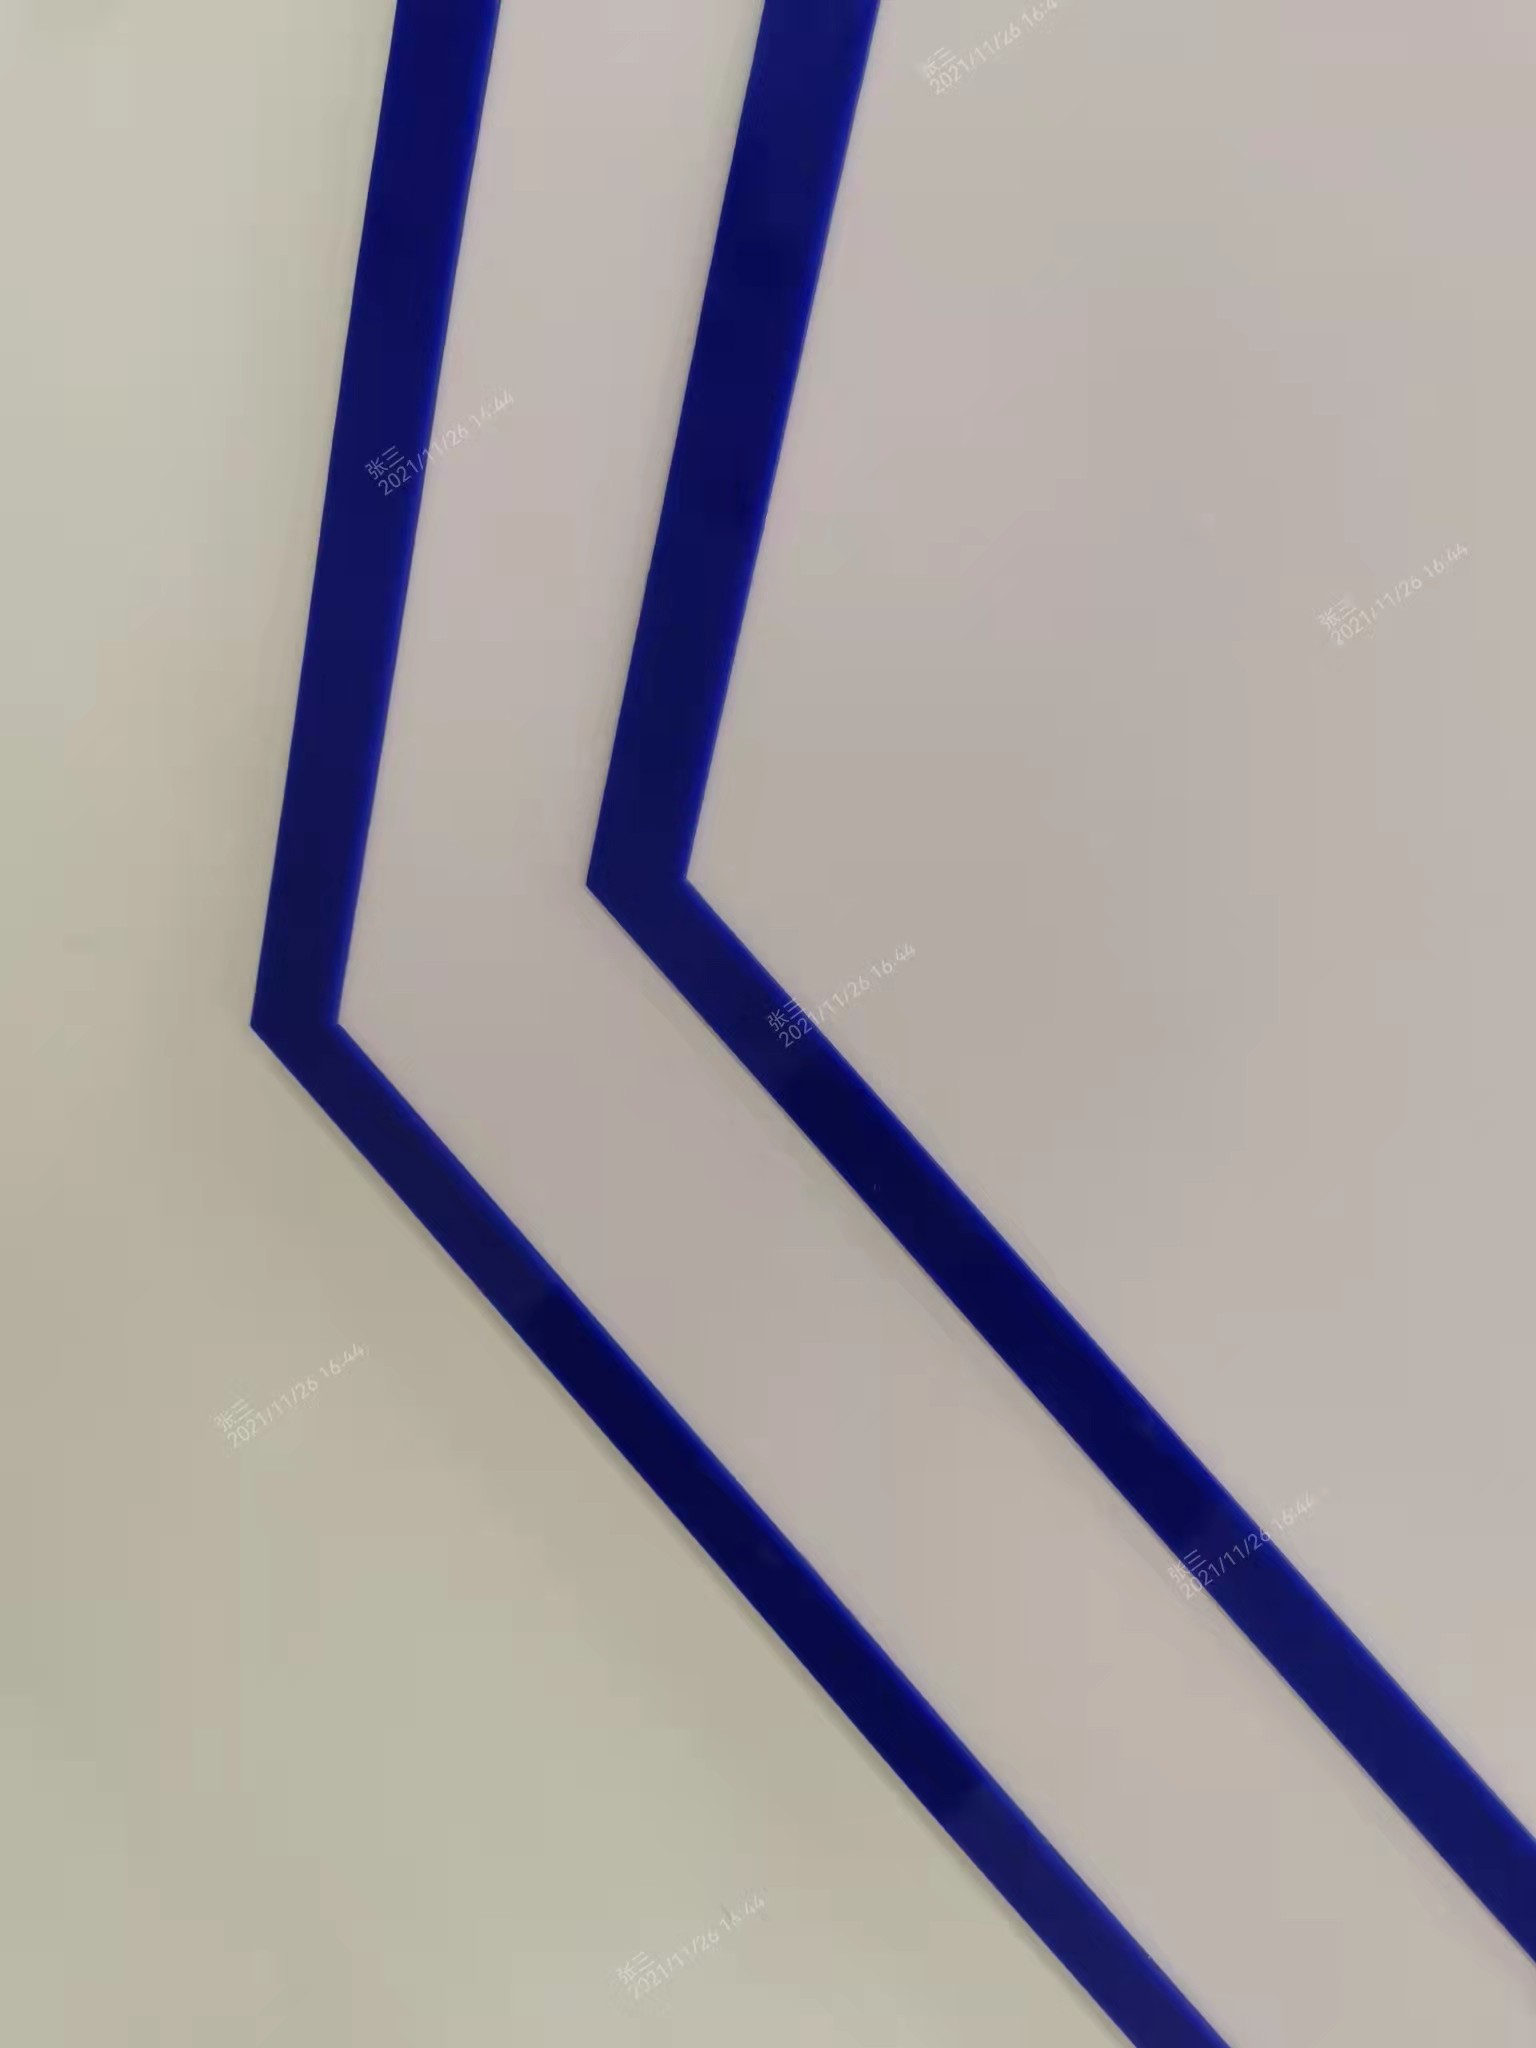
效果预览:
总结
每天记录一点,从小小菜鸟变小菜鸟!!!

为开发者提供学习成长、分享交流、生态实践、资源工具等服务,帮助开发者快速成长。
更多推荐


 16
16 1
1- 0


 已为社区贡献1条内容

所有评论(0)