一文教会你如何用Vue开发Chrome插件
一文教会你用Vue开发Chrome
前言
作为一个常年的B端前端开发者来说,千篇一律的业务开发有着些许的枯燥无味。在联调过程中,会经常发现后端在部署服务,然后又不知什么时候部署好,由于公司的部署系统查看系统部署状态入口较深,所以闲暇之余,研究了一下Chrome插件开发。因此从今天起,我们进行Chrome插件的开发学习。
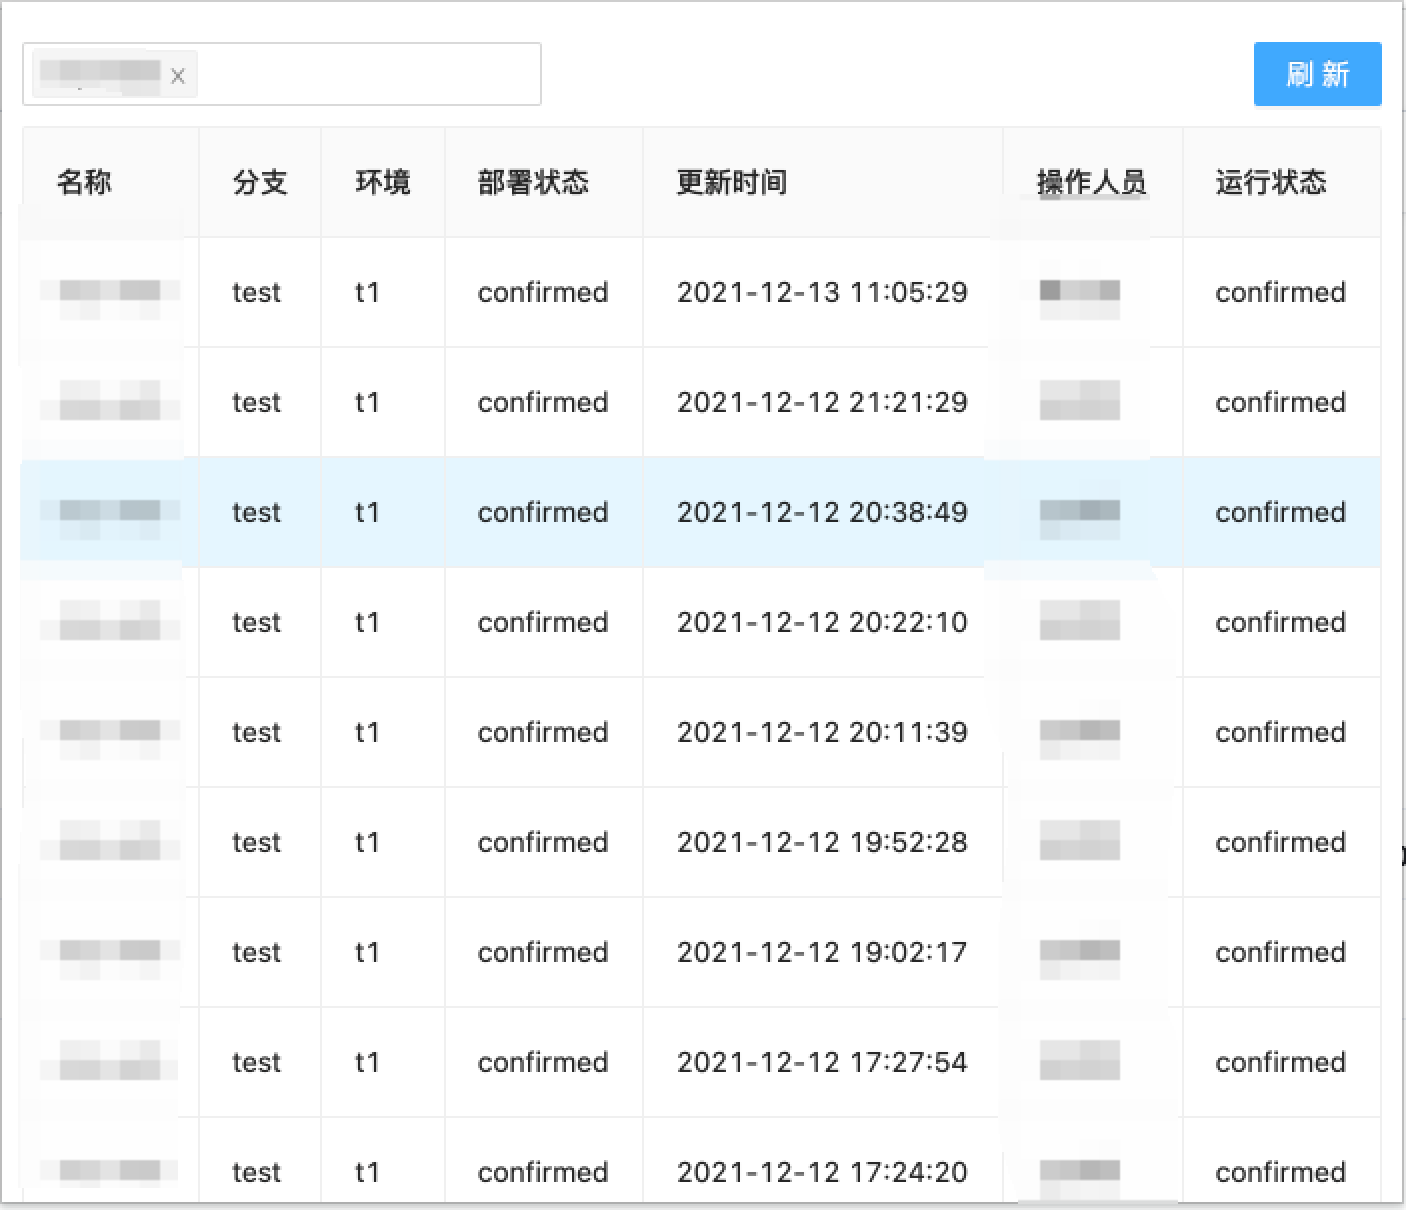
通过下拉框可以快速的切换不同项目的前后端部署状态,先看一下成果:
插件
1. 什么是Chrome插件
-
谷歌浏览器插件是一种小型的定制浏览器体验的程序,通过插件可以自定义浏览器的一些行为来适合个人的需求,例如上面的查看服务器状态插件。
-
在应用商店中下载下来的插件基本上都是以
.crx为文件后缀,该文件其实就是一个压缩包,包括插件所需要的HTML,Javascript,CSS、图片资源等等文件。 -
开发
Chrome插件只需要会HTML,Javascript,CSS就可以动手开发了。
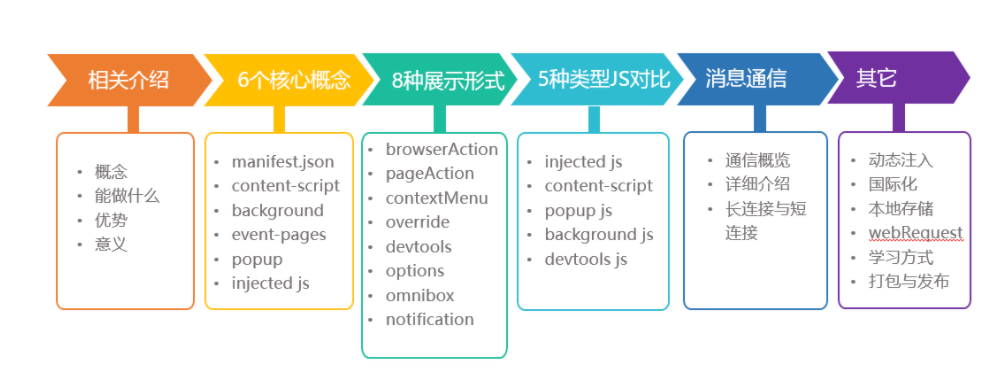
2. 基础概念
2.1 基本原理
下面这张图很好的可以理解Chrome插件的原理。
原理
2.2 文件的目录
│  manifest.json
├─html
│   index.html
├─images
│   icon-128.png
│   icon-48.png
│   icon-16.png
├─scripts
│   background.js
├─styles
│   main.css
└─_locales
    ├─en
    │  messages.json
    └─zh_CN
        messages.json
-
manifest.json是整个插件的功能和文件配置清单,非常重要 -
images存放的为插件的图标文件 -
_locales存放的为插件的国际化语言脚本 -
scripts存放的为js文件 -
styles存放的为样式文件 -
html存放的html文件
着重说一下manifest.json 文件
{
 // 清单文件的版本,这个必须写,而且必须是2
 "manifest_version": 2,
 // 插件的名称
 "name": "hello-world-plugin",
 // 插件的版本
 "version": "1.0.0",
 // 插件描述
 "description": "简单的Chrome扩展demo",
 // 图标,一般偷懒全部用一个尺寸的也没问题
 "icons":
 {
  "16": "img/icon.png",
  "48": "img/icon.png",
  "128": "img/icon.png"
 },
 // 会一直常驻的后台JS或后台页面
 "background":
 {
  // 2种指定方式,如果指定JS,那么会自动生成一个背景页
  "page": "background.html"
  //"scripts": ["js/background.js"]
 },
 // 浏览器右上角图标设置,browser_action、page_action、app必须三选一
 "browser_action":
 {
  "default_icon": "img/icon.png",
  // 图标悬停时的标题,可选
  "default_title": "hello-world-plugin",
  "default_popup": "popup.html"
 },
 // 当某些特定页面打开才显示的图标
 /*"page_action":
 {
  "default_icon": "img/icon.png",
  "default_title": "我是pageAction",
  "default_popup": "popup.html"
 },*/
 // 需要直接注入页面的JS
 "content_scripts":
 [
  {
   //"matches": ["http://*/*", "https://*/*"],
   // "<all_urls>" 表示匹配所有地址
   "matches": ["<all_urls>"],
   // 多个JS按顺序注入
   "js": ["js/jquery-1.8.3.js", "js/content-script.js"],
   // JS的注入可以随便一点,但是CSS的注意就要千万小心了,因为一不小心就可能影响全局样式
   "css": ["css/custom.css"],
   // 代码注入的时间,可选值: "document_start", "document_end", or "document_idle",最后一个表示页面空闲时,默认document_idle
   "run_at": "document_start"
  },
  // 这里仅仅是为了演示content-script可以配置多个规则
  {
   "matches": ["*://*/*.png", "*://*/*.jpg", "*://*/*.gif", "*://*/*.bmp"],
   "js": ["js/show-image-content-size.js"]
  }
 ],
 // 权限申请
 "permissions":
 [
  "contextMenus", // 右键菜单
  "tabs", // 标签
  "notifications", // 通知
  "webRequest", // web请求
  "webRequestBlocking",
  "storage", // 插件本地存储
  "http://*/*", // 可以通过executeScript或者insertCSS访问的网站
  "https://*/*" // 可以通过executeScript或者insertCSS访问的网站
 ],
 // 普通页面能够直接访问的插件资源列表,如果不设置是无法直接访问的
 "web_accessible_resources": ["js/inject.js"],
 // 插件主页,这个很重要,不要浪费了这个免费广告位
 "homepage_url": "https://www.baidu.com",
 // 覆盖浏览器默认页面
 "chrome_url_overrides":
 {
  // 覆盖浏览器默认的新标签页
  "newtab": "newtab.html"
 },
 // Chrome40以前的插件配置页写法
 "options_page": "options.html",
 // Chrome40以后的插件配置页写法,如果2个都写,新版Chrome只认后面这一个
 "options_ui":
 {
  "page": "options.html",
  // 添加一些默认的样式,推荐使用
  "chrome_style": true
 },
 // 向地址栏注册一个关键字以提供搜索建议,只能设置一个关键字
 "omnibox": { "keyword" : "go" },
 // 默认语言
 "default_locale": "zh_CN",
 // devtools页面入口,注意只能指向一个HTML文件,不能是JS文件
 "devtools_page": "devtools.html"
}
3. Hello world
创建manifest.json文件, 添加基本的配置
{
    "name": "hello-world-plugin",
    "description" : "hello-world-plugin",
    "version": "1.0",
    "manifest_version": 2,
}
在这里我们定义了当前的插件名字hello-world-plugin ,插件的描述和插件的版本。
注意:verison在插件打包之后,后面可以根据版本号来判断插件是否需要更新。
给自己的插件添加一个浏览器右上角的图标
image-20211126225723155
增加html
-
继续修改我们的
manifest.json文件
{
  "name": "hello-world-plugin",
  "description" : "hello-world-plugin",
  "version": "1.0",
  "manifest_version": 2,
  # 新增内容
  "browser_action": {
    "default_popup": "hello_world.html",
    "default_icon": "hello_world.png"
  }
}
-
我们的
html文件
<html>
    <body>
      <h1>hello world</h1>
    </body>
</html>
-
我们的图标文件

image-20211126230325202
新增快捷键
修改我们的manifest.json 文件
{
  "name": "hello-world-plugin",
  "description" : "hello-world-plugin",
  "version": "1.0",
  "manifest_version": 2,
  "browser_action": {
    "default_popup": "hello_world.html",
    "default_icon": "hello_world.png"
  },
  "commands": {
    "_execute_browser_action": {
      "suggested_key": {
        "default": "Ctrl+Shift+F",
        "mac": "MacCtrl+Shift+F"
      },
      "description": "Opens hello.html"
    }
  }
}
安装浏览器
-
找到我们的扩展程序,如下图所示
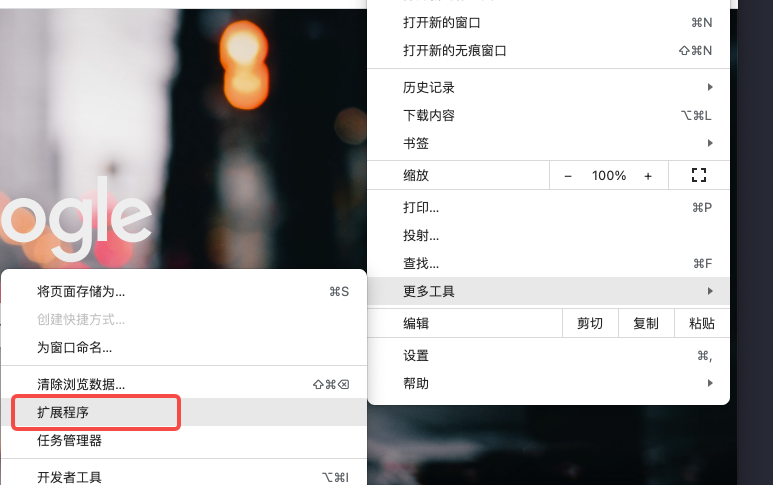
image-20211126230821843
点击**加载以解压的扩展程序**
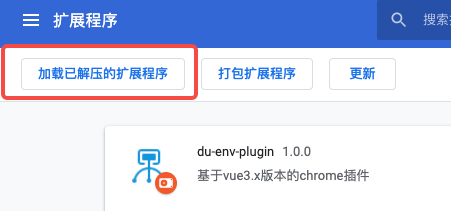
image-20211126230929845
加载我们的扩展程序之后,便可以在拓展程序列表里面查看到我们自己的扩展程序了
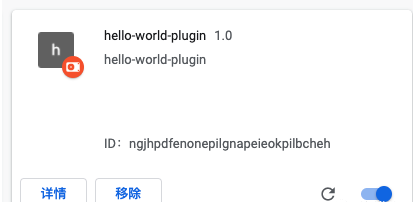
image-20211126231039351
从拓展程序的显示,我们查看我们的扩展程序名称hello-world-plugin,扩展程序的描述hello-world-plugin ,以及我们扩展程序的版本号1.0。
-
点击我们的扩展程序
点击我们的扩展程序,我们就可以看到我们的html内容了
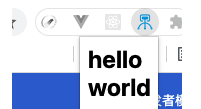
image-20211126231401083
4. 创建 Vue 项目
当前Vue3已经相对趋于稳定,很多公司和个人都开始尝鲜使用其进行开发,那么我们今天也以Vue3进行搭建学习。
使用vue-cli创建vue3.x版本的vue项目 vue create hello-world-plugin:
vue create hello-world-plugin

 Default ([Vue 2] babel, eslint)
> Default (Vue 3) ([Vue 3] babel, eslint)
 Manually select features
回车之后,我们选择Default (Vue 3) ([Vue 3] babel, eslint),不过如何喜欢用自己配置的可以选择第三条。
cd hello-world-plugin
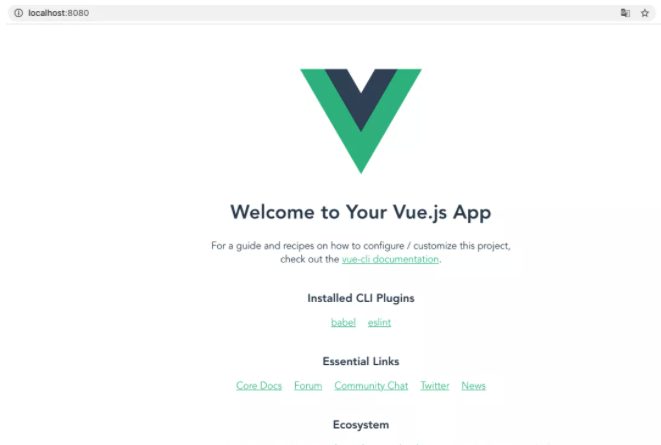
npm run serve
常规的项目跑起来之后可以在浏览器看到基本的页面
此时的项目结构目录大致为
├── README.md
├── babel.config.js
├── package.json
├── public
│   ├── favicon.ico
│   └── index.html
├── src
│   ├── App.vue
│   ├── assets
│   │   └── logo.png
│   ├── components
│   │   └── HelloWorld.vue
│   └── main.js
└── package-lock.json
5. 改造项目
5.1. 修改项目目录
-
删除
main.js、App.vue、components以及文件夹下的HelloWorld.vue、logo.png、public文件 -
在根目录下创建
vue.config.js的vue配置文件 -
从阿里巴巴矢量图标库 下载自己想要的图标文件,笔者用了16、48、128这三种大小的图标,将下载的图标放到
src/assets下面。 -
src文件夹下面创建background、plugins、popup、utils文件 -
在
popup文件夹下面创建components、main.js和index.html,在components文件夹下创建App.vue -
在
plugins文件夹下创建inject.js和manifest.json -
在
background下面创建main.js文件
那么修改后的项目目录:
├── src
│   ├── assets
│   │   ├── icon128.png
│   │   ├── icon16.png
│   │   └── icon48.png
│   ├── background
│   │   └── main.js
│   ├── main.js
│   ├── plugins
│   │   ├── inject.js
│   │   └── manifest.json
│   ├── popup
│   │   ├── components
│   │   │   └── app.vue
│   │   ├── index.html
│   │   └── main.js
│   └── utils
├── vue.config.js
└── package-lock.json
├── README.md
├── babel.config.js
├── package.json
5.2. 新增文件配置
-
manifest.json
我们先配置 src/plugins/manifest.json 文件,我们在前面已经说过,这个是 Chrome 插件必须的文件。
{
 "manifest_version": 2,
 "name": "hello-word-plugin",
 "description": "vue3版本的chrome插件",
 "version": "1.0.0",
 "browser_action": {
  "default_title": "hello-word-plugin",
  "default_icon": "assets/icon48.png",
  "default_popup": "popup.html"
 },
 "permissions": [],
 "background": {
  "scripts": ["js/background.js"]
 },
 "icons": {
  "16": "assets/icon16.png",
  "48": "assets/icon48.png",
  "128": "assets/icon128.png"
 },
 "content_scripts": [
  {
   "matches": ["http://*/*", "https://*/*"],
   "css": [],
      "js": [],
   "run_at": "document_idle"
  }
 ],
 "web_accessible_resources": ["js/inject.js"]
}
-
vue.config.js
vue.config.js 文件作为 vue 项目打包,运行等的基本配置,主要功能是打包成为我们 Chrome 插件所需要的项目目录。
-
添加
copy-webpack-plugin模块,主要是用来拷贝文件
// 安装
npm install copy-webpack-plugin@6.0.2 -save-dev
-
配置
vue.config.js
const CopyWebpackPlugin = require("copy-webpack-plugin");
const path = require("path");

// 复制文件到指定目录
const copyFiles = [
 {
     from: path.resolve("src/plugins/manifest.json"),
     to: `${path.resolve("dist")}/manifest.json`
   },
   {
     from: path.resolve("src/assets"),
     to: path.resolve("dist/assets")
   },
   {
     from: path.resolve("src/plugins/inject.js"),
     to: path.resolve("dist/js")
   }
];

// 复制插件
const plugins = [
   new CopyWebpackPlugin({
     patterns: copyFiles
   })
];

// 页面文件
const pages = {};
// 配置 popup.html 页面
const chromeName = ["popup"];

chromeName.forEach(name => {
   pages[name] = {
     entry: `src/${name}/main.js`,
     template: `src/${name}/index.html`,
     filename: `${name}.html`
   };
});

module.exports = {
 pages,
 productionSourceMap: false,
 // 配置 content.js background.js
 configureWebpack: {
  entry: {
   background: "./src/background/main.js"
  },
  output: {
   filename: "js/[name].js"
  },
  plugins
 },
 // 配置 content.css
 css: {
  extract: {
   filename: "css/[name].css"
  }
 }
}
-
popup/index.html
index.html 我们只是将原来的 public 文件夹下的 index.html 文件内容拷贝过来。
<!DOCTYPE html>
<html lang="en">
  <head>
    <meta charset="utf-8">
    <meta http-equiv="X-UA-Compatible" content="IE=edge">
    <meta name="viewport" content="width=device-width,initial-scale=1.0">
    <title>my-vue-chrome-plugin</title>
  </head>
  <body>
    <noscript>
      <strong>We're sorry but <%= htmlWebpackPlugin.options.title %> doesn't work properly without JavaScript enabled. Please enable it to continue.</strong>
    </noscript>
    <div id="app"></div>
    <!-- built files will be auto injected -->
  </body>
</html>
-
popup/main.js
这个是 vue 项目的入口配置文件,将原来的 main.js 复制过来
import { createApp } from 'vue'
import App from './components/App.vue'

createApp(App).mount('#app')
-
popup/components/App.vue
正常的vue 文件
<template>
  <div>hello world</div>
</template>

<script>
export default {

}
</script>

<style>

</style>
-
background/main.js
简单打印一下
console.log('hello world background')
5.3. 打包
npm run build
可以看到打印台已经完成打包
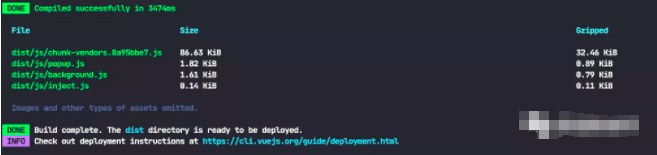
image-20211127204106509
此时的项目目录
.
├── README.md
├── babel.config.js
├── dist
│   ├── assets
│   │   ├── icon128.png
│   │   ├── icon16.png
│   │   └── icon48.png
│   ├── js
│   │   ├── background.js
│   │   ├── chunk-vendors.fa86ccee.js
│   │   ├── inject.js
│   │   └── popup.js
│   ├── manifest.json
│   └── popup.html
├── package.json
├── src
│   ├── assets
│   │   ├── icon128.png
│   │   ├── icon16.png
│   │   └── icon48.png
│   ├── background
│   │   └── main.js
│   ├── plugins
│   │   ├── inject.js
│   │   └── manifest.json
│   ├── popup
│   │   ├── components
│   │   │   └── app.vue
│   │   ├── index.html
│   │   └── main.js
│   └── utils
├── vue.config.js
└── package-lock.json
5.4. 加载插件
在Chrome 插件中加载已解压的扩展程序 ,选择我们的 dist 文件,发现无法加载

image-20211127205353154
是因为缺少了可以执行的js 文件,因此将我们打包生成的js/chunk-vendors.8a95bbe7.js文件放到manifest.json 文件里面
 "content_scripts": [
  {
   "matches": ["http://*/*", "https://*/*"],
   "css": [],
      "js": ["js/chunk-vendors.8a95bbe7.js"], // 修改
   "run_at": "document_idle"
  }
 ],
再进行打包加载,即可发现我们的插件已经成功安装

image-20211127205637069
6. 改进配置
6.1 引入 less less-loader
npm install less@4.0.0 less-loader@7.2.1 -save-dev
修改popup/components/App.vue文件
<template>
  <div class="popup-header">hello world</div>
</template>

<script>
export default {

}
</script>

<style lang="less" scoped>
.popup-header {
  width: 100px;
  height: 100px;
  color: red;
}
</style>
执行打包,发现样式不生效,但是我们看打印日志确实生成了对应的Css 文件
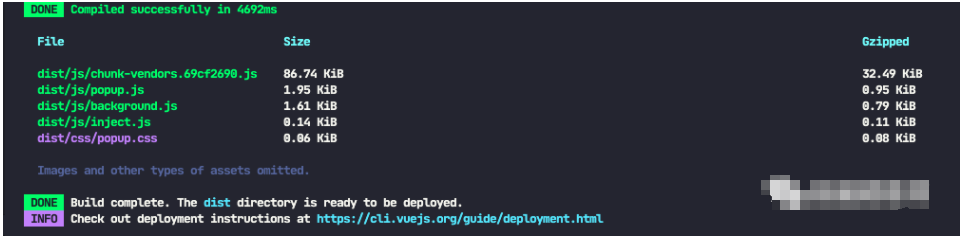
img
不要慌,这个时候我们去看一下我们的manifest.json 文件,毕竟它是插件的一切配置来源,然后在content_scripts里面我们找到了样式的配置
img
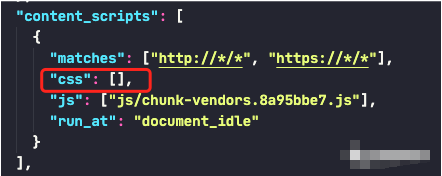
那么后面就简单了,将生成的样式文件配置在里面即可
"content_scripts": [
  {
   "matches": ["http://*/*", "https://*/*"],
   "css": ["css/popup.css"],
   "js": ["js/chunk-vendors.69cf2690.js"],
   "run_at": "document_idle"
  }
 ],
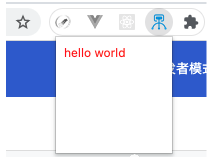
重新刷新插件,我们可以看到我们想要的内容了
img
6.2 修改chunk-vendors.xxx.js
在dist 文件夹下,我们可以看到有一个 chunk-vendors.69cf2690.js ,这个是vue 打包之后的文件,每次生成的 chunk-vendors.js 都会带一个 hash 值,如果每次我们修改了内容,在执行 npm run build 之后,hash 值就会发现变化,那我们岂不是又要在manifest.json 修改 content_scripts 的 js 配置再重新打包。
修改
chunk-vendors.js使其不带hash
6.2.1 配置 chainWebpack 字段
module.exports = {
 pages,
 productionSourceMap: false,
 // 配置 content.js background.js
 configureWebpack: {
  entry: {
   background: "./src/background/main.js"
  },
  output: {
   filename: "js/[name].js"
  },
  plugins
 },
 // 配置 content.css
 css: {
  extract: {
   filename: "css/[name].css"
  }
 },
  // 增加chainWebpack配置
  chainWebpack: config => {
  if (process.env.NODE_ENV === 'production') {
   config.output.filename('js/[name].js').end()
   config.output.chunkFilename('js/[name].js').end()
  }
 }
}
6.2.2 修改manifest.json
 "content_scripts": [
  {
   "matches": ["http://*/*", "https://*/*"],
   "css": ["css/popup.css"],
   "js": ["js/chunk-vendors.js"], // 修改不带hash值
   "run_at": "document_idle"
  }
 ],
执行打包
npm run build
可以看到打印日志不再含有hash 值
img
刷新重新加载插件,可以看到页面正常显示

img
6.3 热加载
至此我们的
vue插件开发项目基本完成了配置,剩下的就是按照需求开发插件页面了,但是我们发现每次打包完之后,都要刷新页面查看,严重影响开发效率。
6.3.1在utils 文件夹下创建 hotReload.js
// 加载文件

const filesInDirectory = dir =>
  new Promise(resolve =>
    dir.createReader().readEntries(entries => {
      Promise.all(
          entries
          .filter(e => e.name[0] !== '.')
          .map(e =>
            e.isDirectory ? filesInDirectory(e) : new Promise(resolve => e.file(resolve))
          )
        )
        .then(files => [].concat(...files))
        .then(resolve);
    })
  );

// 遍历插件目录,读取文件信息,组合文件名称和修改时间成数据
const timestampForFilesInDirectory = dir =>
  filesInDirectory(dir).then(files =>
    files.map(f => f.name + f.lastModifiedDate).join()
  );

// 刷新当前活动页
const reload = () => {
  window.chrome.tabs.query({
      active: true,
      currentWindow: true
    },
    tabs => {
      // NB: see https://github.com/xpl/crx-hotreload/issues/5
      if (tabs[0]) {
        window.chrome.tabs.reload(tabs[0].id);
      }
      // 强制刷新页面
      window.chrome.runtime.reload();
    }
  );
};

// 观察文件改动
const watchChanges = (dir, lastTimestamp) => {
  timestampForFilesInDirectory(dir).then(timestamp => {
    // 文件没有改动则循环监听watchChanges方法
    if (!lastTimestamp || lastTimestamp === timestamp) {
      setTimeout(() => watchChanges(dir, timestamp), 1000); // retry after 1s
    } else {
      // 强制刷新页面
      reload();
    }
  });
};

const hotReload = () => {
  window.chrome.management.getSelf(self => {
    if (self.installType === 'development') {
      // 获取插件目录,监听文件变化
      window.chrome.runtime.getPackageDirectoryEntry(dir => watchChanges(dir));
    }
  });
};

export default hotReload;
6.3.2 引入
在background/main.js 中引入
import hotReload from '@/utils/hotReload'
hotReload()

console.log('hello world background')
6.3.3 监听
-
修改
package.json中的scripts,增加一个watch来监听打包
"scripts": {
  "watch": "vue-cli-service build --watch",
  "serve": "vue-cli-service serve",
  "build": "vue-cli-service build",
  "lint": "vue-cli-service lint"
}
-
执行监听打包
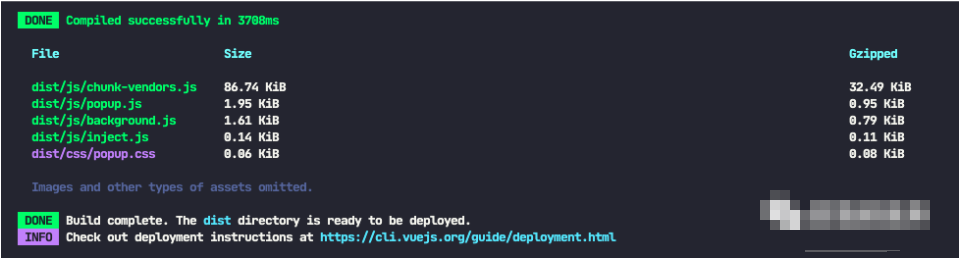
npm run watch,可以发现一只在监听改变
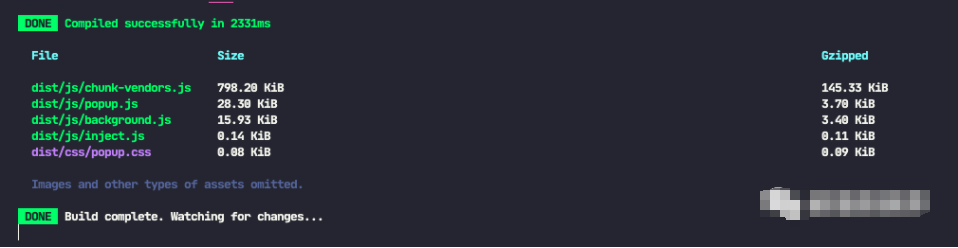
img
但是刷新页面之后,我们发现报错
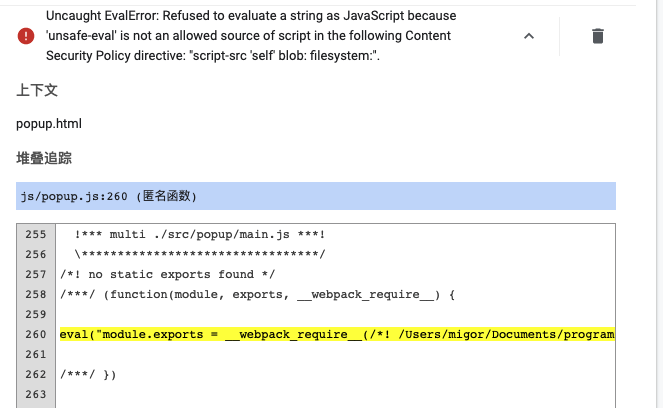
img
-
按照报错给的提示,我们在
manifest.json中添加
"content_security_policy": "script-src 'self' 'unsafe-eval'; object-src 'self'",
-
重新执行打包监听命令,清除错误信息,刷新插件,发现即可随时刷新界面变化了
我们已经搭建完成了一个基本针对Chrome插件开发的的 Vue开发的配置,同时也完成了基本的改进配置。剩下的就是简单的Vue 开发了


为开发者提供学习成长、分享交流、生态实践、资源工具等服务,帮助开发者快速成长。
更多推荐


 13
13 0
0- 0


 已为社区贡献1条内容

所有评论(0)