uni-app 父传子、子传父、路径传参、本地存储
父子组件之间的通信、还有路径的传参、本地存储
·
一、父传子
父传子步骤:①要动态绑定一个属性给子组件
②子组件要接收父组件传过来的值,就要使用props接收
③然后子组件就可以使用了
代码实现:
父组件
//template代码
<Son :hobby="hobby" :fatherObj="obj" :fatherSetPrice="price" :fatherSetName="name"></Son>


//data中的数据
data(){
			return{
				price:100,
				name:'张三',
				num:0,
				hobby:'唱、跳、rap',
				obj:{
					name:'李四',
					age:18
				}
			}
		},
父亲传过来的数据我们要在子组件中接收、使用
		<view>
			我是子组件
			<!-- 父传子 -->
			<view>这是父组件传过来的数据:{{fatherSetPrice}}</view>
			<view>父亲传过来的名字:{{fatherSetName}}</view>
			<view>父亲传过来的爱好:{{hobby}}</view>
			<view>父亲传过来的对象:{{fatherObj.name}}</view>

		</view>


//script

props:{
			fatherSetPrice:{
				type:Number,   //检测数据类型
				default:0,     //默认值
				required:true  //是否为必填项
			},
			fatherSetName:{
				type:String,
				default:'',
				required:true
			},
			hobby:{
				type:String,
				default:'',
				required:true
			},
			fatherObj:{
				type:Object,
				default:{},
				required:true
			}
		},
props有两种写法,一种是直接写成数组形式,用逗号隔开
props : ['fatherPrice','sonName']另一种是对象形式,我们主要使用 对象形式,在传过来的基础上加上校验
props:{
			fatherSetPrice:{
				type:Number,  //检测数据类型
				default:0,	  //默认值
				required:true //是否为必填项
			},
二、子传父
子传父是通过$emit()方法进行传递,通过点击事件,向父组件传值,父组件通过事件名接收
子组件传值
//template
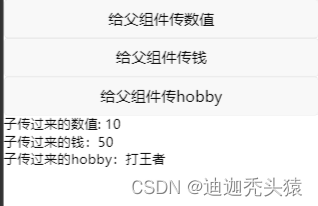
<button @click="sendNum">给父组件传数值</button>
<button @click="sendPrice">给父组件传钱</button>
<button @click="sendHobby">给父组件传hobby</button>
//data数据
data(){
return{
num1:10,
price:50,
hobby1:'打王者'
}
},
//methods方法
methods:{
sendNum(){
this.$emit('getNum',this.num1)
},
sendPrice(){
this.$emit('getPrice',this.price)
},
sendHobby(){
this.$emit('getHobby',this.hobby1)
}
}
}父组件接收
因为接收的是事件名,所以要用@事件名="事件"
//template
		<Son @getPrice="getPrice" @getHobby="getHobby" @getNum="getNum"></Son>
		<view>子传过来的数值: {{num}}</view>
		<view>子传过来的钱:{{price}}</view>
		<view>子传过来的hobby:{{hobby}}</view>


//data
		data(){
			return{
				price:100,
				name:'张三',
				num:0,
				hobby:'唱、跳、rap'
			}
		},


//methods方法
	methods:{
			getNum(num1){              //传过来的参数
				//console.log(num1);
				this.num = num1
			},
			getPrice(price1){           //传过来的参数
				//console.log(price1);
				this.price = price1
			},
			getHobby(hobby1){           //传过来的参数
				this.hobby = hobby1
			},
单击事件前

单击事件后
三、路径传参
平常我们跳转页面的路径是不带参的
			toUnclePage(){
				uni.navigateTo({
					url:'/pages/uncle/uncle'
				})
			}
传一个参跳转
格式:url: ' 地址?变量名=值'
			toUnclePage(){
				uni.navigateTo({
                    //url:'/pages/uncle/uncle?price=100'
                    url:'/pages/uncle/uncle?price' + this.price
				})
			}
传多个参跳转
格式:url:'地址?变量名='值'&'变量名='值'
			toUnclePage(){
				uni.navigateTo({
					url:'/pages/index/uncle?price=' + this.price + '&name=' + this.name
				})
			}
模板字符串写法
格式:url:`地址?变量名=${值}&变量名=${值}`
			toUnclePage(){
				uni.navigateTo({
					url:`/pages/uncle/uncle?price=${this.price}&name=${this.name}`

				})
}四、本地存储
将数据存储在本地缓存中,如果有多个地方使用到这个数据,就可以在本地存储中取
这是两个同步接口
存储:
格式:uni.setStorageSync('键',值)
uni.setStorageSync('name',this.name)取:
格式:uni.getStorageSync('键')
uni.getStorageSync('name')注:如果之前存储过变量key,那么再次存储会替换变量key的值

为开发者提供学习成长、分享交流、生态实践、资源工具等服务,帮助开发者快速成长。
更多推荐


 5
5 0
0- 0


 已为社区贡献4条内容

所有评论(0)