【ElementUI】el-upload 到底该怎么使用?记录有时上传图片会失败,有时上传成功又出现图片闪动的问题
el-upload 的单图片、图片墙使用和遇到的坑
ElementUI 官网 el-upload 组件使用:https://element.eleme.cn/#/zh-CN/component/upload
作为一个经常使用 ElementUI 的 CV 程序员,el-upload 使用的次数也是很多的。相信大家在仅查看 el-upload 的使用示例时,也会遇到很多问题,甚至我记得我使用它的使用示例时也会出现无法生效的问题。但其实在使用过程中,如果只是上传个任意格式的文件,还真是没遇到什么问题。只要涉及到上传和展示图片,每次我都会遇到各种各样的问题,让自己怀疑人生。现将遇到的一些问题和情况,进行一个总结,避免自己反复踩坑,希望也能给各位提供帮助。
首先先叙述一下需求,说明文章总体内容:
需求: 使用照片墙或单图片的方式,上传并展示图片。
现问题总结如下。
el-upload 问题总结
首先说具体问题前,先把 el-upload 的本身使用方式梳理清楚。目前仅有两个需求,一种情况可能会上传多张图片,一种情况可能会上传单张图片。
使用方式一:单图片
实现代码
为方便取用,先将可实现代码记录如下:
<template>
   <div>
	   <el-upload
	     class="avatar-uploader"
	     action="#"
	     :show-file-list="false"
	     :before-upload="handleInfoPic"
	     :http-request="testUpload"
	     :on-success="uploadSuccess"
	   >
	      <img v-if="testImage" :src="testImage" style="width:120px" />
	      <i v-else class="el-icon-plus avatar-uploader-icon" />
	   </el-upload>
   </div>
</template>
<script>
export default {
  data() {
    return {
      testImage: null
    };
  },
  methods: {
    handleInfoPic(file) {
      console.log(file);
      const isJPG = file.type === 'image/jpeg';
      const isJPG2 = file.type === 'image/jpg';
      const isPNG = file.type === 'image/png';
      if (!isJPG && !isJPG2 && !isPNG) this.$message.error('请上传格式为 png, jpg, jpeg 的图片!');
      return isJPG || isJPG2 || isPNG;
    },
    testUpload(content) {
      console.log(content);
      content.onSuccess();
    },
    uploadSuccess(res, file, fileList) {
      console.log(res, file, fileList)
      this.testImage = URL.createObjectURL(file.raw);
    }
  }
};
</script>
<style scoped>
.avatar-uploader-icon {
  font-size: 28px;
  color: #8c939d;
  width: 178px;
  height: 178px;
  line-height: 178px;
  text-align: center;
}
.avatar-uploader >>> .el-upload {
  border: 1px dashed #d9d9d9;
  border-radius: 6px;
  cursor: pointer;
  position: relative;
  overflow: hidden;
}
.avatar-uploader >>> .el-upload:hover {
  border-color: #409EFF;
}
</style>
样式和相关内容可自行调整。接下来就详细说一下,这里有什么问题以及和官方示例的区别。
使用说明
在去往 ElementUI 的官方示例中使用时发现,其实官方示例已经无法进行演示,当然直接拿官方示例也是无法使用的。这里面最关键的一步就是 http-request + action。
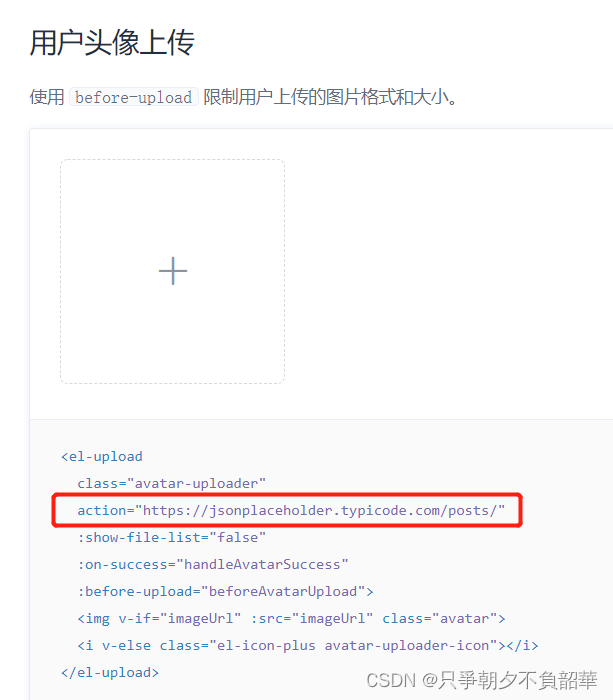
在官方示例中,没有书写 http-request, 且提供了一个 action。而这两个参数的作用,文档是这么写的:
| 参数 | 说明 |
|---|---|
| action | 必选参数,上传的地址 |
| http-request | 覆盖默认的上传行为,可以自定义上传的实现 |
所以,我们在自己使用时,显然不能完全 copy 示例。那我们要做的事简单来说就是:
点击按钮,选择一张图片 => 通过接口上传图片 或 存储在本地之后再上传。
因此,问题其实就是两个:
1、如何在上传过程中,通过后端提供的接口上传图片;
2、如果不想在上传图片的过程中调用接口,要将图片想办法存储在本地,将图片和其他字段组合或在进行某项操作后,再调用后端提供的接口上传图片。
问题总结一:el-upload 方法使用的坑
首先要说的就是 action。这个参数出现的初衷很好,想让使用者将接口写入,然后在合适的时机去调用。但在实际的开发过程中,这样的操作反而会加大开发难度,且让人摸不着头脑,导致我从来没有使用过它,就像最上面的例子一样用 action="#" 的方式来拒绝使用它。这主要是因为,平常在调用接口时,不仅仅是想仅上传一张图片,同时可能也会附带很多其他信息,且有时约定传递 file 文件(form-data),有时约定传递图片 base64 (json),而 ElementUI 本身拿到的 file 又是个本地路径 blob。所以如果要使用 action 和 默认 http-requert 就会让整个局面失控,很难判定出现的问题。所以为了能够让整个流程可控,通常都会像文中上方实现代码那样使用。
随后说一下用到的三个方法,它们分别对应着 before-upload、http-request、on-success:
handleInfoPic(file) {
  console.log(file);
  const isJPG = file.type === 'image/jpeg';
  const isJPG2 = file.type === 'image/jpg';
  const isPNG = file.type === 'image/png';
  if (!isJPG && !isJPG2 && !isPNG) this.$message.error('请上传格式为 png, jpg, jpeg 的图片!');
  return isJPG || isJPG2 || isPNG;
},
testUpload(content) {
  console.log(content);
  content.onSuccess();
},
uploadSuccess(res, file, fileList) {
  console.log(res, file, fileList)
  this.testImage = URL.createObjectURL(file.raw);
}
handleInfoPic 对应的 before-upload 就是在上传文件前,可以用来判定文件的格式。通常必加。
testUpload 对应的 http-request 就是自定义上传的实现,通常必加。我们可以把 问题一:在上传过程中,通过后端提供的接口上传图片 中的接口写在这里。使用案例如下:
testUpload(content) {
  const fileObj = content.file;
  const form = new FormData();
  form.append('file', fileObj);
  this.loading = true;
  test(form).then(() => {
    content.onSuccess();
  }).finally(() => { this.loading = false })
}
比如这里就有一个 test 接口,接收的参数类型是 form-data,传递的参数是图片文件。
需要注意的是,即使不想在这里调用接口,重写 http-request 也是必须的,否则就会报错。比如:
testUpload(content) {
  content.onSuccess();
}
这是因为 http-request 的默认上传行为是和 action 挂钩的。具体不在这里说明。

在调用了 content.onSuccess() 后,就会进入到 uploadSuccess 对应的 on-success 中。可以用来明确,在 http-request 中成功调用接口,或进行图片回显和其他提示。通常必加。在实现代码中,最后能展示出图片,是因为 testImage 拿到了 blob 对象。(URL.createObjectURL用法)
uploadSuccess(res, file, fileList) {
  console.log(res, file, fileList)
  this.testImage = URL.createObjectURL(file.raw);
}
因此,如果想解决问题二:将图片想办法存储在本地,将图片和其他字段组合或在进行某项操作后,再调用后端提供的接口上传图片, 只需要拿到这个 testImage 即可。
除此以外要注意以上三个方法中,console.log 中输出的内容。通常将会利用到这些参数,对图片进行适当处理。尤其是注意文件的类型,是 blob 还是 file 还是 base64,从而根据不同情况进行转换或使用。输出结果就不在这里展示。具体转换方法在照片墙问题总结中说明。
那么问题就来了,如果我想删除、修改上传的图片怎么办?
问题总结二:单图片使用优化 => 允许图片修改和删除
其实这个问题很简单。我们只需要在判断成功上传图片后,若要修改就修改 testImage,删除就清空 testImage,再根据 testImage 是否存在来判断是要展示图片还是使用上传功能即可。接口按需写入即可。示例:
在未上传图片时:

上传图片后:

主要代码(样式需自行设定):
<template>
  <div>
    <el-upload
      v-show="false"
      ref="fileRefs"
      :before-upload="beforeUpload"
      :show-file-list="false"
      action="#"
      :on-success="uploadSuccess"
      :http-request="submitUpload"
    ><el-button type="text">上传</el-button></el-upload>
    <div v-if="testImage !== null && testImage !== ''">
      <el-image
        :src="testImage"
        :preview-src-list="[testImage]"
        fit="contain"
        style="width:90px"
      >
        <div slot="error">图片加载失败</div>
      </el-image>
      <div @click="uploadPic">
        <i class="el-icon-edit" />
      </div>
      <div @click="deletePic">
        <i class="el-icon-delete" />
      </div>
    </div>
    <i v-else class="el-icon-plus avatar-uploader-icon2" @click="uploadPic" />
  </div>
</template>
<script>
export default {
  data() {
    return {
      testImage: null
    }
  },
  methods: {
    // 1、上传图片前需要判定是否已经存在图片,判断是修改操作还是新增操作
    uploadPic() {
      if (this.testImage !== null && this,testImage !== '') {
        this.$confirm('该操作将替换现有图片,且现有图片将无法找回,是否继续?', '提示', {
          cancelButtonText: '取消',
          confirmButtonText: '确定',
          type: 'warning'
        }).then(() => {
          this.$refs['fileRefs'].$refs['upload-inner'].handleClick(); // 触发上传el-upload
        }).catch(() => {})
      } else {
        this.$refs['fileRefs'].$refs['upload-inner'].handleClick();
      }
    },
    // 2、上传文件格式判断
    beforeUpload(file) {
      const isJPG = file.type === 'image/jpeg';
      const isJPG2 = file.type === 'image/jpg';
      const isPNG = file.type === 'image/png';
      if (!isJPG && !isJPG2 && !isPNG) this.$message.error('请上传格式为 png, jpg, jpeg 的图片!');
      return isJPG || isJPG2 || isPNG;
    },
    // 3、http-request 重写
    submitUpload(content) {
      content.onSuccess();
    },
    // 4、成功上传
    uploadSuccess(res, file) {
      this.$message.success('图片上传成功!');
      this.testImage = URL.createObjectURL(file.raw);
    },
    // 5、删除图片
    deletePic() {
      this.$confirm('该操作将删除现有图片,删除后现有图片将无法找回,是否继续?', '提示', {
        cancelButtonText: '取消',
        confirmButtonText: '确定',
        type: 'warning'
      }).then(() => {
        this.$message.success('删除图片成功!');
        this.testImage = null;
      }).catch(() => {})
    }
  }
}
</script>
<style scoped>
.avatar-uploader-icon2:hover {
  border-color: #409EFF;
}
.avatar-uploader-icon2 {
  font-size: 28px;
  color: #8c939d;
  text-align: center;
  border: 1px dashed #d9d9d9;
  border-radius: 6px;
  cursor: pointer;
  position: relative;
  overflow: hidden;
  left: 50%;
  transform: translateX(-50%);
  width: 120px;
  height: 120px;
  line-height: 120px;
  background-color: #fbfdff;
}
</style>
大致可以这样实现,当然您也可以根据自己需求,调整用法。在这里权当我自己的用法总结。
使用方式二:照片墙
实现代码
为方便取用,先将可实现代码记录如下:
<template>
  <div>
    <el-upload
      action="#"
      :before-upload="handleInfoPic"
      :on-success="handleSuccess"
      :http-request="submitUpload"
      list-type="picture-card"
      :file-list="showPicList"
    >
      <i slot="default" class="el-icon-plus" />
      <div slot="file" slot-scope="{ file }">
        <img class="el-upload-list__item-thumbnail" :src="file.url" alt="" />
        <span class="el-upload-list__item-actions">
          <span
            class="el-upload-list__item-preview"
            @click="handlePictureCardPreview(file)"
          ><i class="el-icon-zoom-in" /></span>
          <span
            class="el-upload-list__item-delete"
            @click="handleRemove(file)"
          ><i class="el-icon-delete" /></span>
        </span>
      </div>
    </el-upload>
    <el-dialog :visible.sync="dialogVisible" append-to-body title="图片预览">
      <img width="100%" :src="dialogImageUrl" alt="" />
    </el-dialog>
   </div>
</template>
<script>
export default {
  data() {
    return {
      dialogImageUrl: '', // 图片操作对话框上的图片
      dialogVisible: false, // 图片操作对话框可见性
      infopics: [], // 所需上传图片组 => 存储base64
      picName: '', // 图片名称
      showPicList: [] // 所需展示图片组 => 存储图片文件
    }
  },
  methods: {
    // 0.3.1 上传图片 => 点击上传触发
  	handleInfoPic(file) {
      const isJPG = file.type === 'image/jpeg';
      const isJPG2 = file.type === 'image/jpg';
      const isPNG = file.type === 'image/png';
      if (!isJPG && !isJPG2 && !isPNG) this.$message.error('请上传格式为 png, jpg, jpeg 的图片!');
      this.picName = file.name;
      return isJPG || isJPG2 || isPNG;
    },
    // 0.3.2 提交请求
    submitUpload(content) {
      content.onSuccess();
    },
    // 0.3.3 图片上传成功加入数据
    handleSuccess(response, file, fileList) {
      this.showPicList = fileList;
      const reader = new FileReader();
      reader.readAsDataURL(file.raw); // 图片文件转 base64
      reader.onload = () => {
        this.infopics.push({
          name: this.picName,
          url: reader.result
        })
      };
    },
    // 0.3.4 图片移除操作
    handleRemove(file) {
      const indexShow = this.showPicList.findIndex((el) => el.name === file.name);
      this.showPicList = this.showPicList
        .slice(0, indexShow)
        .concat(this.showPicList.slice(indexShow + 1, this.showPicList.length));
      const index = this.infopics.findIndex((el) => el.name === file.name);
      this.infopics = this.infopics
        .slice(0, index)
        .concat(this.infopics.slice(index + 1, this.infopics.length));
    },
    // 0.3.5 图片浏览操作
    handlePictureCardPreview(file) {
      this.dialogImageUrl = file.url;
      this.dialogVisible = true;
    }
  }
}
</script>
<style scoped>
</style>
使用说明
对于照片墙,相关的使用和单张图片是相同的,相同内容不再赘述,依然拥有 before-upload、on-success、http-request。在单图片使用时的删除和修改问题,这里也是一样,照片墙本身不存在这样的功能,这里其实也是自己做了浏览、删除的功能。除此以外,需要使用 :file-list="showPicList" 列出展示图片组。其实官方例子写的很简单,但官方例子无法供所有情况使用。
除此以外,在上述代码中可以发现我有两个图片数组:infopics 和 showPicList。那为什么要分成两个,一个行不行?这需要看下面第一个问题总结。
问题总结一:照片墙上传图片,出现图片闪动问题
在正常的使用中是碰不到的,要是想查看问题效果和解决方案,可参考该文章:
在这里说一下我为什么要有两个图片数组:infopics 和 showPicList,以及出现图片闪动问题的原因和解决方案:
handleSuccess(response, file, fileList) {
  this.showPicList = fileList;
  const reader = new FileReader();
  reader.readAsDataURL(file.raw); // 图片文件转 base64
  reader.onload = () => {
    this.infopics.push({
      name: this.picName,
      url: reader.result
    })
  };
},
首先,我的需求就是要传递接口一个图片base64,但是在每个阶段拿到的图片都是 file 文件(blob本地路径),这也就导致后端接口处理不了,所以我需要在提交图片成功后,对图片进行处理,将图片文件转成 base64。而转换的方式在上面已经给出,当然也可参考以下文章:
如果此时没有 showPicList,直接使用该步骤,且 :file-list="infopics" 的话,就会出现图片闪动问题。
  const reader = new FileReader();
  reader.readAsDataURL(file.raw); // 图片文件转 base64
  reader.onload = () => {
    this.infopics.push({
      name: this.picName,
      url: reader.result
    })
  };
也就是说,该步骤确实将图片文件转成了 base64,且能够在照片墙上展示,但是会出现图片闪动。虽然出现问题的根本原因不明,但我们可以避免这个情况发生。避免的做法,就是再拿一个数组进行存储,存储的就是图片文件,用于展示。在调用接口时再提供存储 图片base64 的数组,从而完美解决问题。相似问题都是同理。
问题总结二:照片墙取消新增功能,隐藏样式
在使用照片墙时,我们可能会遇到一种情况,就是不允许新增图片。在单图片的时候我们使用的是 el-image。但如果展示多图片,虽然也可以这样,但我们也可以利用 el-upload。而照片墙会默认存在新增图片的功能,存在相关样式,此时我们可以像下面这样,将新增的样式和功能隐藏掉,这样就可以正常展示了。(只展示主要代码)
<template>
  <div>
    <el-upload
      :class="{picUploader: 判断条件}"
      action="#"
      :before-upload="handleInfoPic"
      :on-success="handleSuccess"
      :http-request="submitUpload"
      list-type="picture-card"
      :file-list="showPicList"
    >
      <i v-if="判断条件" slot="default" class="el-icon-plus" />
    </el-upload>
   </div>
</template>
<style scoped>
 .picUploader >>> .el-upload--picture-card {
   display: none;
 }
</style>


为开发者提供学习成长、分享交流、生态实践、资源工具等服务,帮助开发者快速成长。
更多推荐


 12
12 0
0- 0


 已为社区贡献5条内容

所有评论(0)