PVE7.21安装流程
PVE安装流程、注意事项、工具箱
一、先从官网下载镜像
Get the free Proxmox VE ISO installerDownload free ISO images for installing Proxmox VE.https://www.proxmox.com/en/downloads/category/iso-images-pve二、然后用U盘制作工具制作好启动U盘
U盘启动工具:
Rufus:http://wget.ktclouds.cn/ISO/rufus-3.20.exe
Ventoy:https://www.ventoy.net/cn/download.html
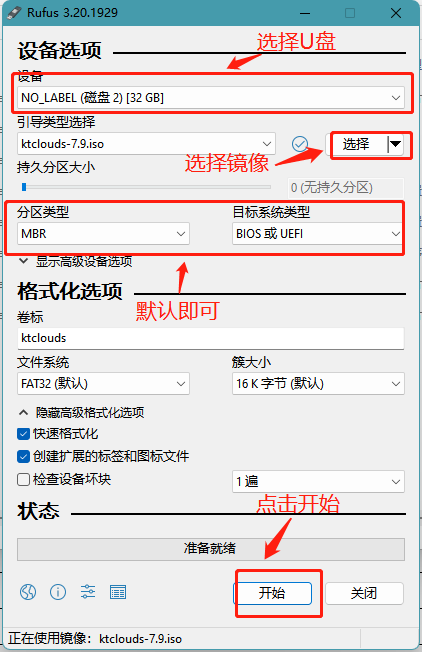
U盘启动盘制作(二选一)
①、如图所示(等5分钟左右即可制作完成,根据U盘速度不同等待时间不同)
②、下载Ventoy,打开软件、操作如图所示
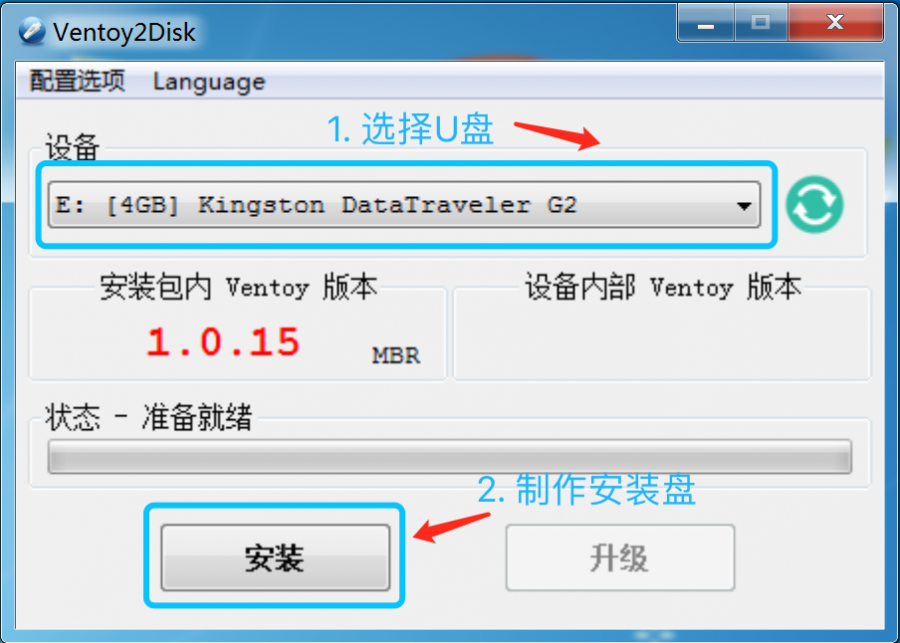
两次弹出窗口选择“是”,确认开始制作。
完成后,将ISO文件拷贝到U盘即可,后期ISO如有更新,只需 拷贝新的ISO到U盘即可,无需重新制作。
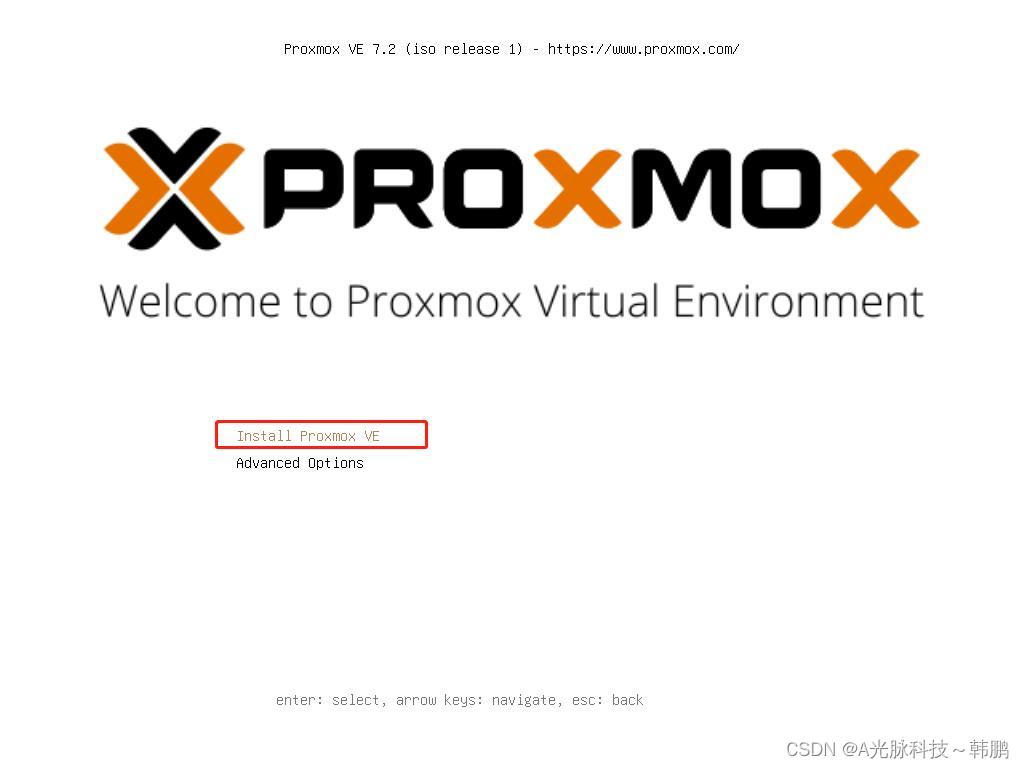
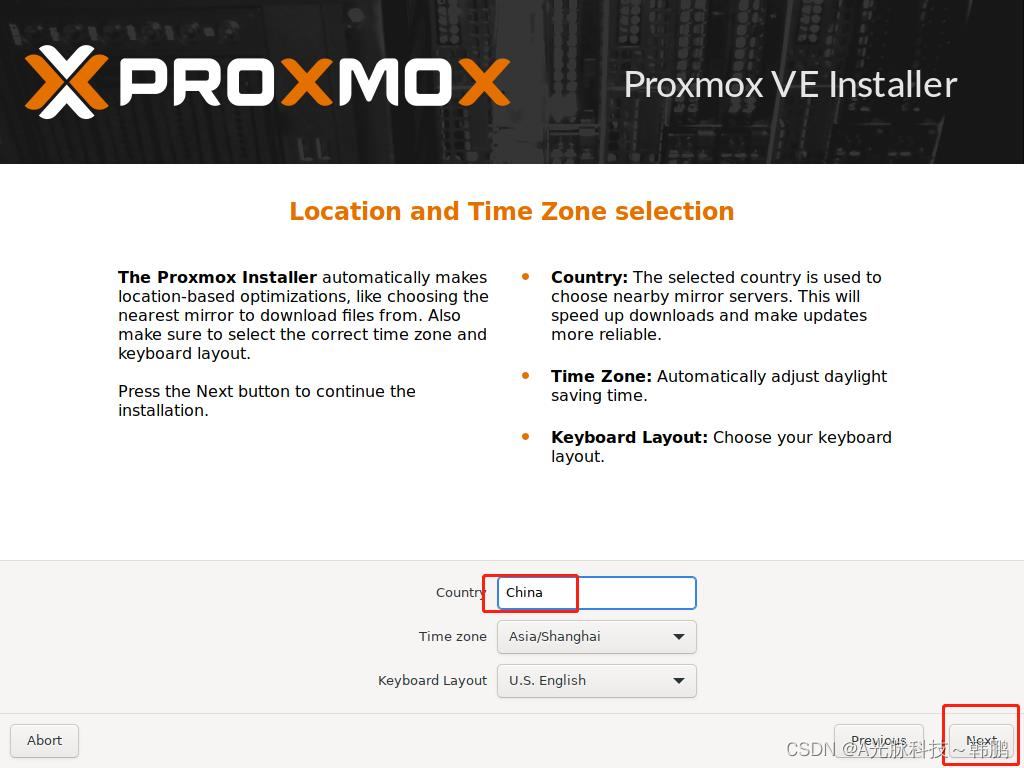
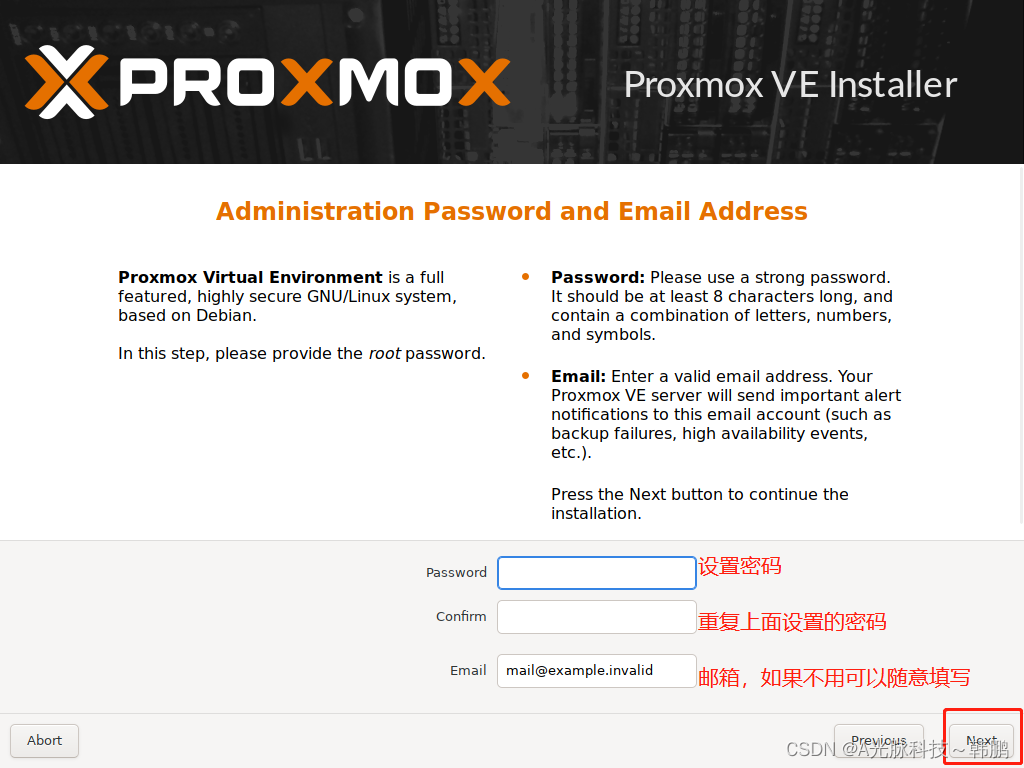
三、接下来跟着图片一步步来:

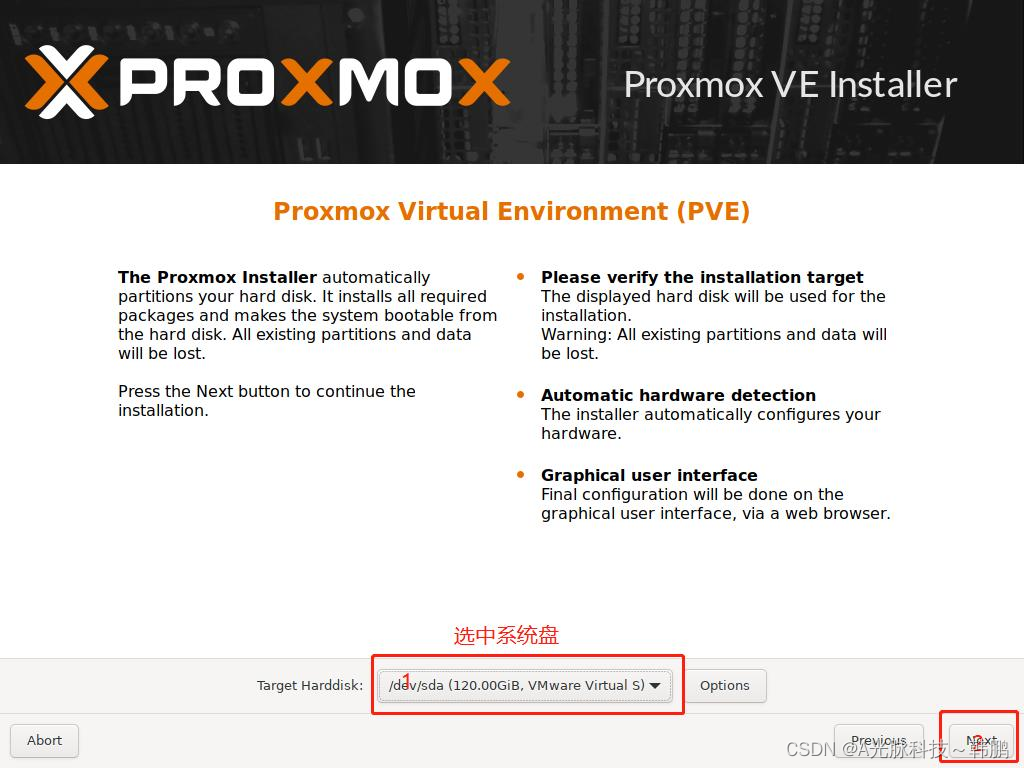

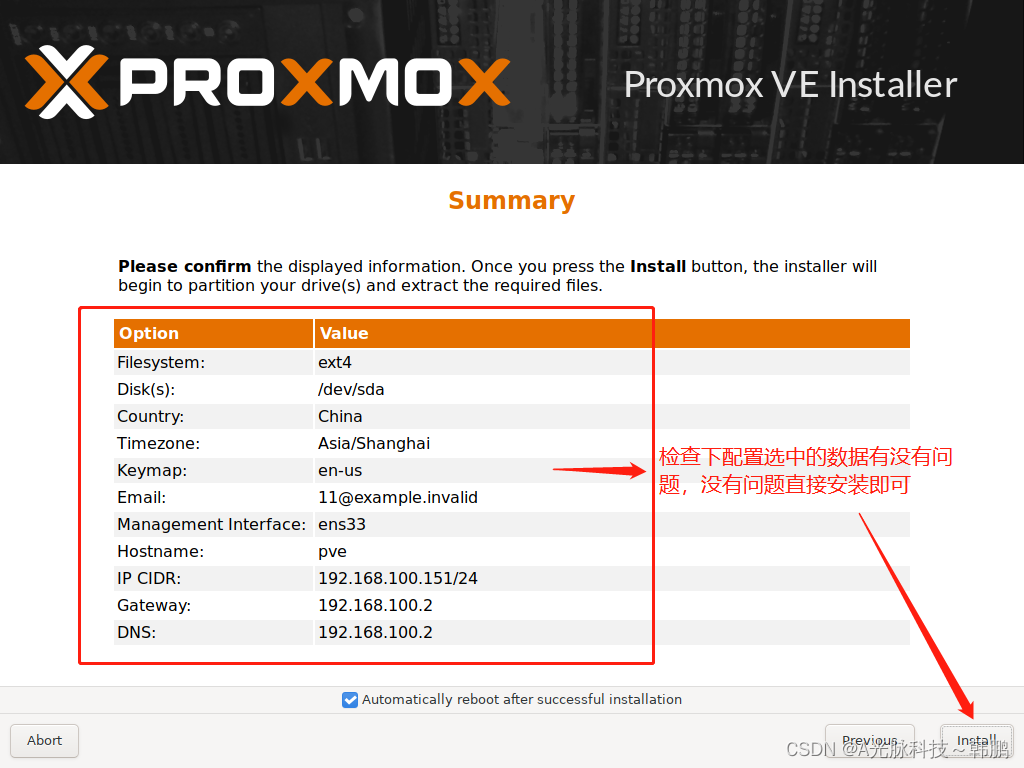
安装完毕点击reboot 重启系统后
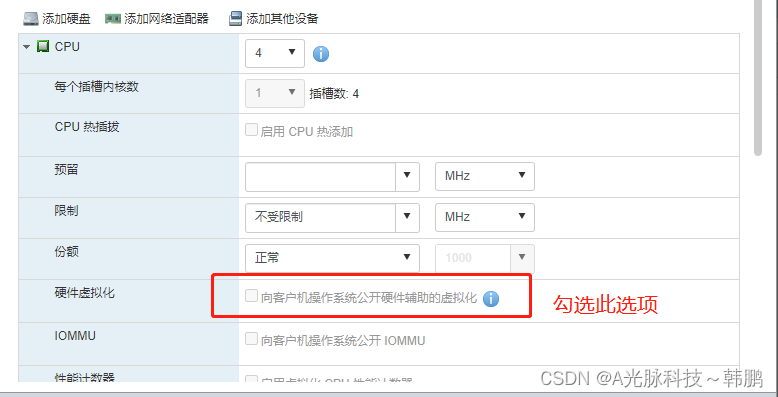
四、打开硬件虚拟化支持(有些主板默认未打开)
1、如果是安装在WIN下的虚拟机需要把此项勾选上
2、正常的物理机
英特尔的CPU:需要进入BIOS勾选上与Intel VT-X有关的选项
AMD的CPU:需要进入BIOS勾选上与AMD-V/RVI有关的选中
一般这些选项都在与CPU有关的选项附近
3、EXSI
五 、更新程序源与版本
复制如下代码到SHELL执行即可
	echo "#deb https://enterprise.proxmox.com/debian/pve bullseye pve-enterprise" > /etc/apt/sources.list.d/pve-enterprise.list  #关掉官方源
	wget https://mirrors.ustc.edu.cn/proxmox/debian/proxmox-release-bullseye.gpg -O /etc/apt/trusted.gpg.d/proxmox-release-bullseye.gpg
	echo "deb https://mirrors.ustc.edu.cn/proxmox/debian/pve bullseye pve-no-subscription" > /etc/apt/sources.list.d/pve-no-subscription.list     #中科大源
	echo "deb https://mirrors.ustc.edu.cn/proxmox/debian/ceph-pacific bullseye main" > /etc/apt/sources.list.d/ceph.list     #中科大源
	sed -i.bak "s#http://download.proxmox.com/debian#https://mirrors.ustc.edu.cn/proxmox/debian#g" /usr/share/perl5/PVE/CLI/pveceph.pm     #中科大源
	sed -i.bak "s#ftp.debian.org/debian#mirrors.tuna.tsinghua.edu.cn/debian#g" /etc/apt/sources.list     #清华Debian源
	sed -i "s#security.debian.org#mirrors.tuna.tsinghua.edu.cn/debian-security#g" /etc/apt/sources.list     #清华Debian源
	#LXC容器源
	cp /usr/share/perl5/PVE/APLInfo.pm /usr/share/perl5/PVE/APLInfo.pm_back
	sed -i 's|http://download.proxmox.com|https://mirrors.tuna.tsinghua.edu.cn/proxmox|g' /usr/share/perl5/PVE/APLInfo.pm
	apt update && apt dist-upgrade #更新系统文件
	systemctl restart pvedaemon.service
六、其他自己写的小脚本用得上的直接拿去
1、降低ZFS内存使用率
#降低ZFS内存使用率
echo "$[10 * 1024*1024*1024]" >/sys/module/zfs/parameters/zfs_arc_max

cat > /lib/systemd/system/rc-local.service <<EOF
[Unit]
Description=/etc/rc.local
ConditionPathExists=/etc/rc.local

[Service]
Type=forking
ExecStart=/etc/rc.local start
TimeoutSec=0
StandardOutput=tty
RemainAfterExit=yes
SysVStartPriority=99

[Install]
WantedBy=multi-user.target
EOF

cat > /etc/rc.local <<EOF
#!/bin/sh -e
#
# rc.local
#
# This script is executed at the end of each multiuser runlevel.
# Make sure that the script will "exit 0" on success or any other
# value on error.
#
# In order to enable or disable this script just change the execution
# bits.
#
# By default this script does nothing.
bash /root/MemoryDown.sh
EOF

chmod +x /etc/rc.local

cat > /root/MemoryDown.sh <<EOF
echo "$[10 * 1024*1024*1024]" >/sys/module/zfs/parameters/zfs_arc_max
EOF

systemctl start rc-local
2、降低SWAP权重
sysctl vm.swappiness=0
grep "swappiness" /etc/sysctl.conf >> /dev/null 2>&1 ||cat >> /etc/sysctl.conf <<EOF
vm.swappiness=0
EOF
3、img磁盘转换
read -p "请输入虚拟机ID:" vm_id
read -p "请输入要转换的镜像名称(包括后缀名):" vm_img_name
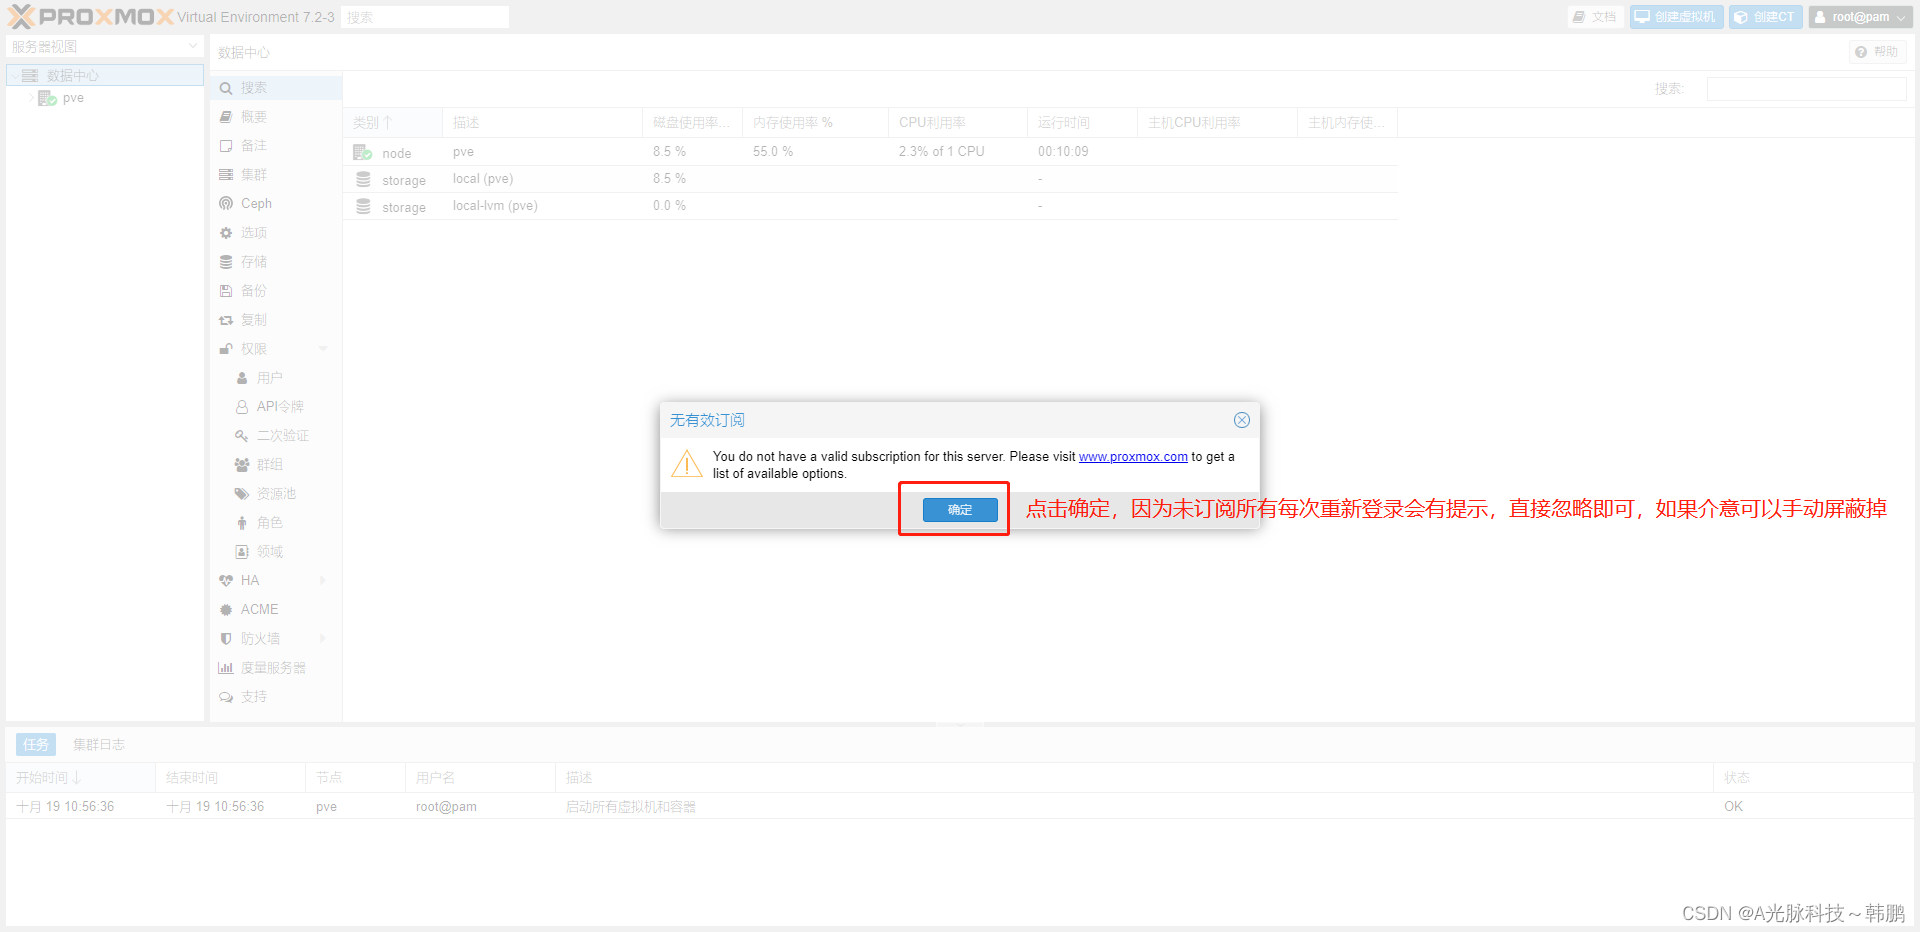
qm importdisk $vm_id $vm_img_name local-lvm4、去除订阅提示
echo 修改去除订阅弹窗
sed -r -i '//nodes/localhost/subscription/,+10{/^s+if (res === null /{N;s#.+#tt if(false){#}}' $plib
sed -n '//nodes/localhost/subscription/,+10p' $plib

systemctl restart pveproxy
七、git上面的大神做的工具箱集合
if [ ! -e /root/pvetools/pvetools.sh ] ; then
	apt -y install git && git clone https://github.com/ivanhao/pvetools.git && cd pvetools && ./pvetools.sh
else
	./pvetools/pvetools.sh
fi
八、UI增加CPU温度显示
#!/usr/bin/env bash
np="/usr/share/perl5/PVE/API2/Nodes.pm"
pvejs="/usr/share/pve-manager/js/pvemanagerlib.js"
plib="/usr/share/javascript/proxmox-widget-toolkit/proxmoxlib.js"


pvever=$(pveversion | awk -F"/" '{print $2}')
echo pve版本$pvever
echo 备份源文件
[ ! -e $np.$pvever.bak ] && cp $np $np.$pvever.bak || { echo 已经修改过,请务重复执行; exit 1;}
[ ! -e $pvejs.$pvever.bak ] && cp $pvejs $pvejs.$pvever.bak
[ ! -e $plib.$pvever.bak ] && cp $plib $plib.$pvever.bak

therm='$res->{thermalstate} = `sensors`;';
cpure='$res->{cpure} = `cat /proc/cpuinfo | grep -i "cpu mhz"`;';

echo 修改node.pm:
sed -i "/PVE::pvecfg::version_text()/a $cpuren$therm" $np

sed -n "/PVE::pvecfg::version_text()/,+5p" $np


tmpf=tmpfile.temp
touch $tmpf
cat > $tmpf << 'EOF'
{
itemId: 'thermal',
colspan: 2,
printBar: false,
title: gettext('温度'),
textField: 'thermalstate',
renderer:function(value){
const m = value.match(/(?<=:[^+]++)d+/g)
return `CPU: ${m[0]}(${m[1]},${m[2]},${m[3]},${m[4]}) | BOARD: ${m[5]} | NVME: ${m[6]}`;
}
},
{
itemId: 'cpumhz',
colspan: 2,
printBar: false,
title: gettext('CPU频率'),
textField: 'cpure',
renderer:function(value){
const m = value.match(/(?<=:s+)(d+)/g);
return `CPUMHZ: ${m[0]} | ${m[1]} | ${m[2]} | ${m[3]}`;
}
},
EOF

#找到关键字pveversion的行号
echo 修改pvemanagerlib.js
ln=$(sed -n '/pveversion/,+10{/},/{=;q}}' $pvejs)
echo "匹配的行号pveversion:" $ln

echo 修改结果:
sed -i "${ln}r $tmpf" $pvejs
sed -n '/pveversion/,+30p' $pvejs

rm $tmpf


echo 修改页面高度
sed -i -r '/widget.pveNodeStatus/,+5{/height/{s#[0-9]+#360#}}' $pvejs
sed -n '/widget.pveNodeStatus/,+5{/height/{p}}' $pvejs
sed -i -r '/[logView]/,+5{/heigh/{s#[0-9]+#460#;}}' $pvejs
sed -n '/[logView]/,+5{/heigh/{p}}' $pvejs


systemctl restart pveproxy

为开发者提供学习成长、分享交流、生态实践、资源工具等服务,帮助开发者快速成长。
更多推荐


 3
3 0
0- 0


 已为社区贡献1条内容

所有评论(0)