Vue--Vant组件
官网地址适用于移动端首先,通过 vue create xxx 创建 vue 项目其次,对于 vant 的安装有如下几种方式:一是通过, --本项目用的方式# Vue 2 项目,安装 Vant 2:npm i vant -S# Vue 3 项目,安装 Vant 3:npm i vant@next -S一是通过 CSDN,<!-- 引入样式文件 --><linkrel="styles
目录
一、初识 Vant
1.1 什么是 Vant
Vant是一个轻量、可靠的移动端 Vue 组件库, 开箱即用
特点:
- 提供 60 多个高质量组件,覆盖移动端各类场景
- 性能极佳,组件平均体积不到 1kb
- 支持 Vue 2 & Vue 3
- 善的中英文文档和示例
- 支持按需引入和主题定制
首先,通过 vue create xxx 创建 vue 项目
其次,对于 vant 的安装有如下几种方式:
1.2 安装 Vant 的几种方式
i. 通过 npm:
本项目用的方式
# Vue 2 项目,安装 Vant 2:
npm i vant -S

# Vue 3 项目,安装 Vant 3:
npm i vant@next -S
ii. 通过 CSDN:
<!-- 引入样式文件 -->
<link
  rel="stylesheet"
  href="https://cdn.jsdelivr.net/npm/vant@2.12/lib/index.css"
/>

<!-- 引入 Vue 和 Vant 的 JS 文件 -->
<script src="https://cdn.jsdelivr.net/npm/vue@2.6/dist/vue.min.js"></script>
<script src="https://cdn.jsdelivr.net/npm/vant@2.12/lib/vant.min.js"></script>

<script>
  // 在 #app 标签下渲染一个按钮组件
  new Vue({
    el: '#app',
    template: `<van-button>按钮</van-button>`,
  });

  // 调用函数组件,弹出一个 Toast
  vant.Toast('提示');

  // 通过 CDN 引入时不会自动注册 Lazyload 组件
  // 可以通过下面的方式手动注册
  Vue.use(vant.Lazyload);
</script>
使用 Vant 最简单的方法是直接在 html 文件中引入 CDN 链接,之后你可以通过全局变量 vant 访问到所有组件
iii. 通过脚手架:
在新项目中使用 Vant 时,推荐使用 Vue 官方提供的脚手架 Vue Cli 创建项目并安装 Vant。

# 安装 Vue Cli
npm install -g @vue/cli

# 创建一个项目
vue create hello-world

# 创建完成后,可以通过命令打开图形化界面,如下图所示
vue ui
二、 Vant 组件库引入组件的几种方式
2.1 自动按需引入组件 (推荐)
babel-plugin-import 是一款 babel 插件,它会在编译过程中将 import 的写法自动转换为按需引入的方式。
第一步:
# 安装插件
npm i babel-plugin-import -D
// 在.babelrc 中添加配置
// 注意:webpack 1 无需设置 libraryDirectory
{
  "plugins": [
    ["import", {
      "libraryName": "vant",
      "libraryDirectory": "es",
      "style": true
    }]
  ]
}

// 或:对于使用 babel7 的用户,可以在 babel.config.js 中配置
module.exports = {
  plugins: [
    ['import', {
      libraryName: 'vant',
      libraryDirectory: 'es',
      style: true
    }, 'vant']
  ]
};
第二步:
babel.config.js,
module.exports = {
  presets: [
    '@vue/cli-plugin-babel/preset'
  ],
  plugins: [
    ['import', {
      libraryName: 'vant',
      libraryDirectory: 'es',
      style: true
    }, 'vant']
  ]
}
第三步:
// 接着你可以在代码中直接引入 Vant 组件
// 插件会自动将代码转化为方式二中的按需引入形式
import { Button } from 'vant';
Tips: 如果你在使用 TypeScript,可以使用 ts-import-plugin 实现按需引入。
2.2 手动按需引入组件
在不使用插件的情况下,可以手动引入需要的组件。
import Button from 'vant/lib/button';
import 'vant/lib/button/style';
components: { // 手动注册组件名
// // VanButton: Button
// // 等价的
[Button.name]: Button
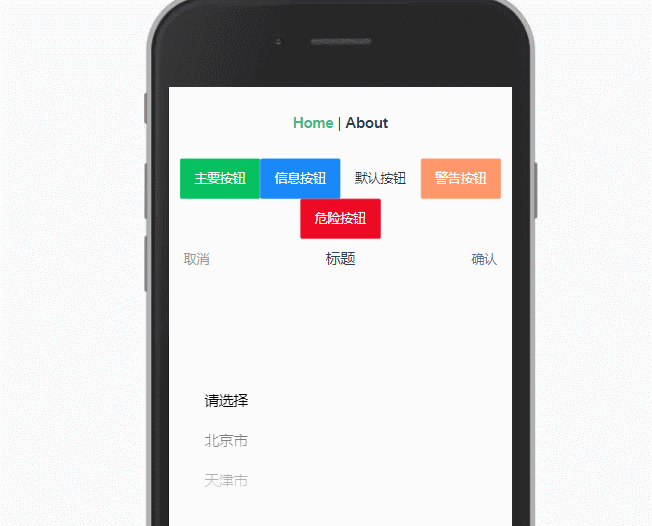
}<van-button type="primary">主要按钮</van-button>
<van-button type="info">信息按钮</van-button>
<van-button type="default">默认按钮</van-button>
<van-button type="warning">警告按钮</van-button>
<van-button type="danger">危险按钮</van-button>2.3 导入所有组件
Vant 支持一次性导入所有组件,引入所有组件会增加代码包体积,因此不推荐这种做法。
import Vue from 'vue';
import Vant from 'vant';
import 'vant/lib/index.css';
Vue.use(Vant);
Tips: 配置按需引入后,将不允许直接导入所有组件。
示例:
首先,在 src 目录下新建一个名为 plugins 的文件夹并在该文件夹里新建一个名为 vant.js 的文件,该文件则是用来存放 vant 相关的插件的内容
其次,在 mian.js 里引入(import "./plugins/vant")
再者,在 babel.config.js 里添加如下内容:
plugins: [
['import', {
libraryName: 'vant',
libraryDirectory: 'es',
style: true
}, 'vant']
]src/plugins/vant.js
import Vue from 'vue';
import { Button, Area } from 'vant';
Vue.use(Button);
Vue.use(Area);src/components/HelloWorld.vue
<template>
<div class="hello">
<van-button type="primary">主要按钮</van-button>
<van-button type="info">信息按钮</van-button>
<van-button type="default">默认按钮</van-button>
<van-button type="warning">警告按钮</van-button>
<van-button type="danger">危险按钮</van-button>
<van-area
title="标题"
:area-list="areaList"
:columns-placeholder="['请选择', '请选择', '请选择']"
/>
</div>
</template>
<script>
export default {
name: 'HelloWorld',
props: {
msg: String
},data () {
const areaList = {
province_list: {
110000: '北京市',
120000: '天津市',
},
city_list: {
110100: '北京市',
120100: '天津市',
},
county_list: {
110101: '东城区',
110102: '西城区',
// ....
},
};
return {
areaList
}
}
}
</script>
<!-- Add "scoped" attribute to limit CSS to this component only -->
<style scoped>
h3 {
margin: 40px 0 0;
}
ul {
list-style-type: none;
padding: 0;
}
li {
display: inline-block;
margin: 0 10px;
}
a {
color: #42b983;
}
</style>

为开发者提供学习成长、分享交流、生态实践、资源工具等服务,帮助开发者快速成长。
更多推荐


 2
2 0
0- 0


 已为社区贡献6条内容

所有评论(0)