Nuxt速度优化、性能优化、加载优化、首页加载优化、白屏优化、打包优化集合
本文会讲解决Nuxt首页加载慢、Nuxt的速度优化、Nuxt的性能优化、Nuxt的加载优化、Nuxt的首页加载优化、Nuxt的白屏优化、Nuxt的打包优化等集合。就是说例如我博客,之前为了花里胡哨,加了animate.css等动画效果,其实用处并不大,去掉并减少消耗性能,大家可以检查一下相关的npm包。6.有用到图片的全部压缩并转成webp格式,如果你们需要兼容IE,那么得再做兼容处理了,我这里就
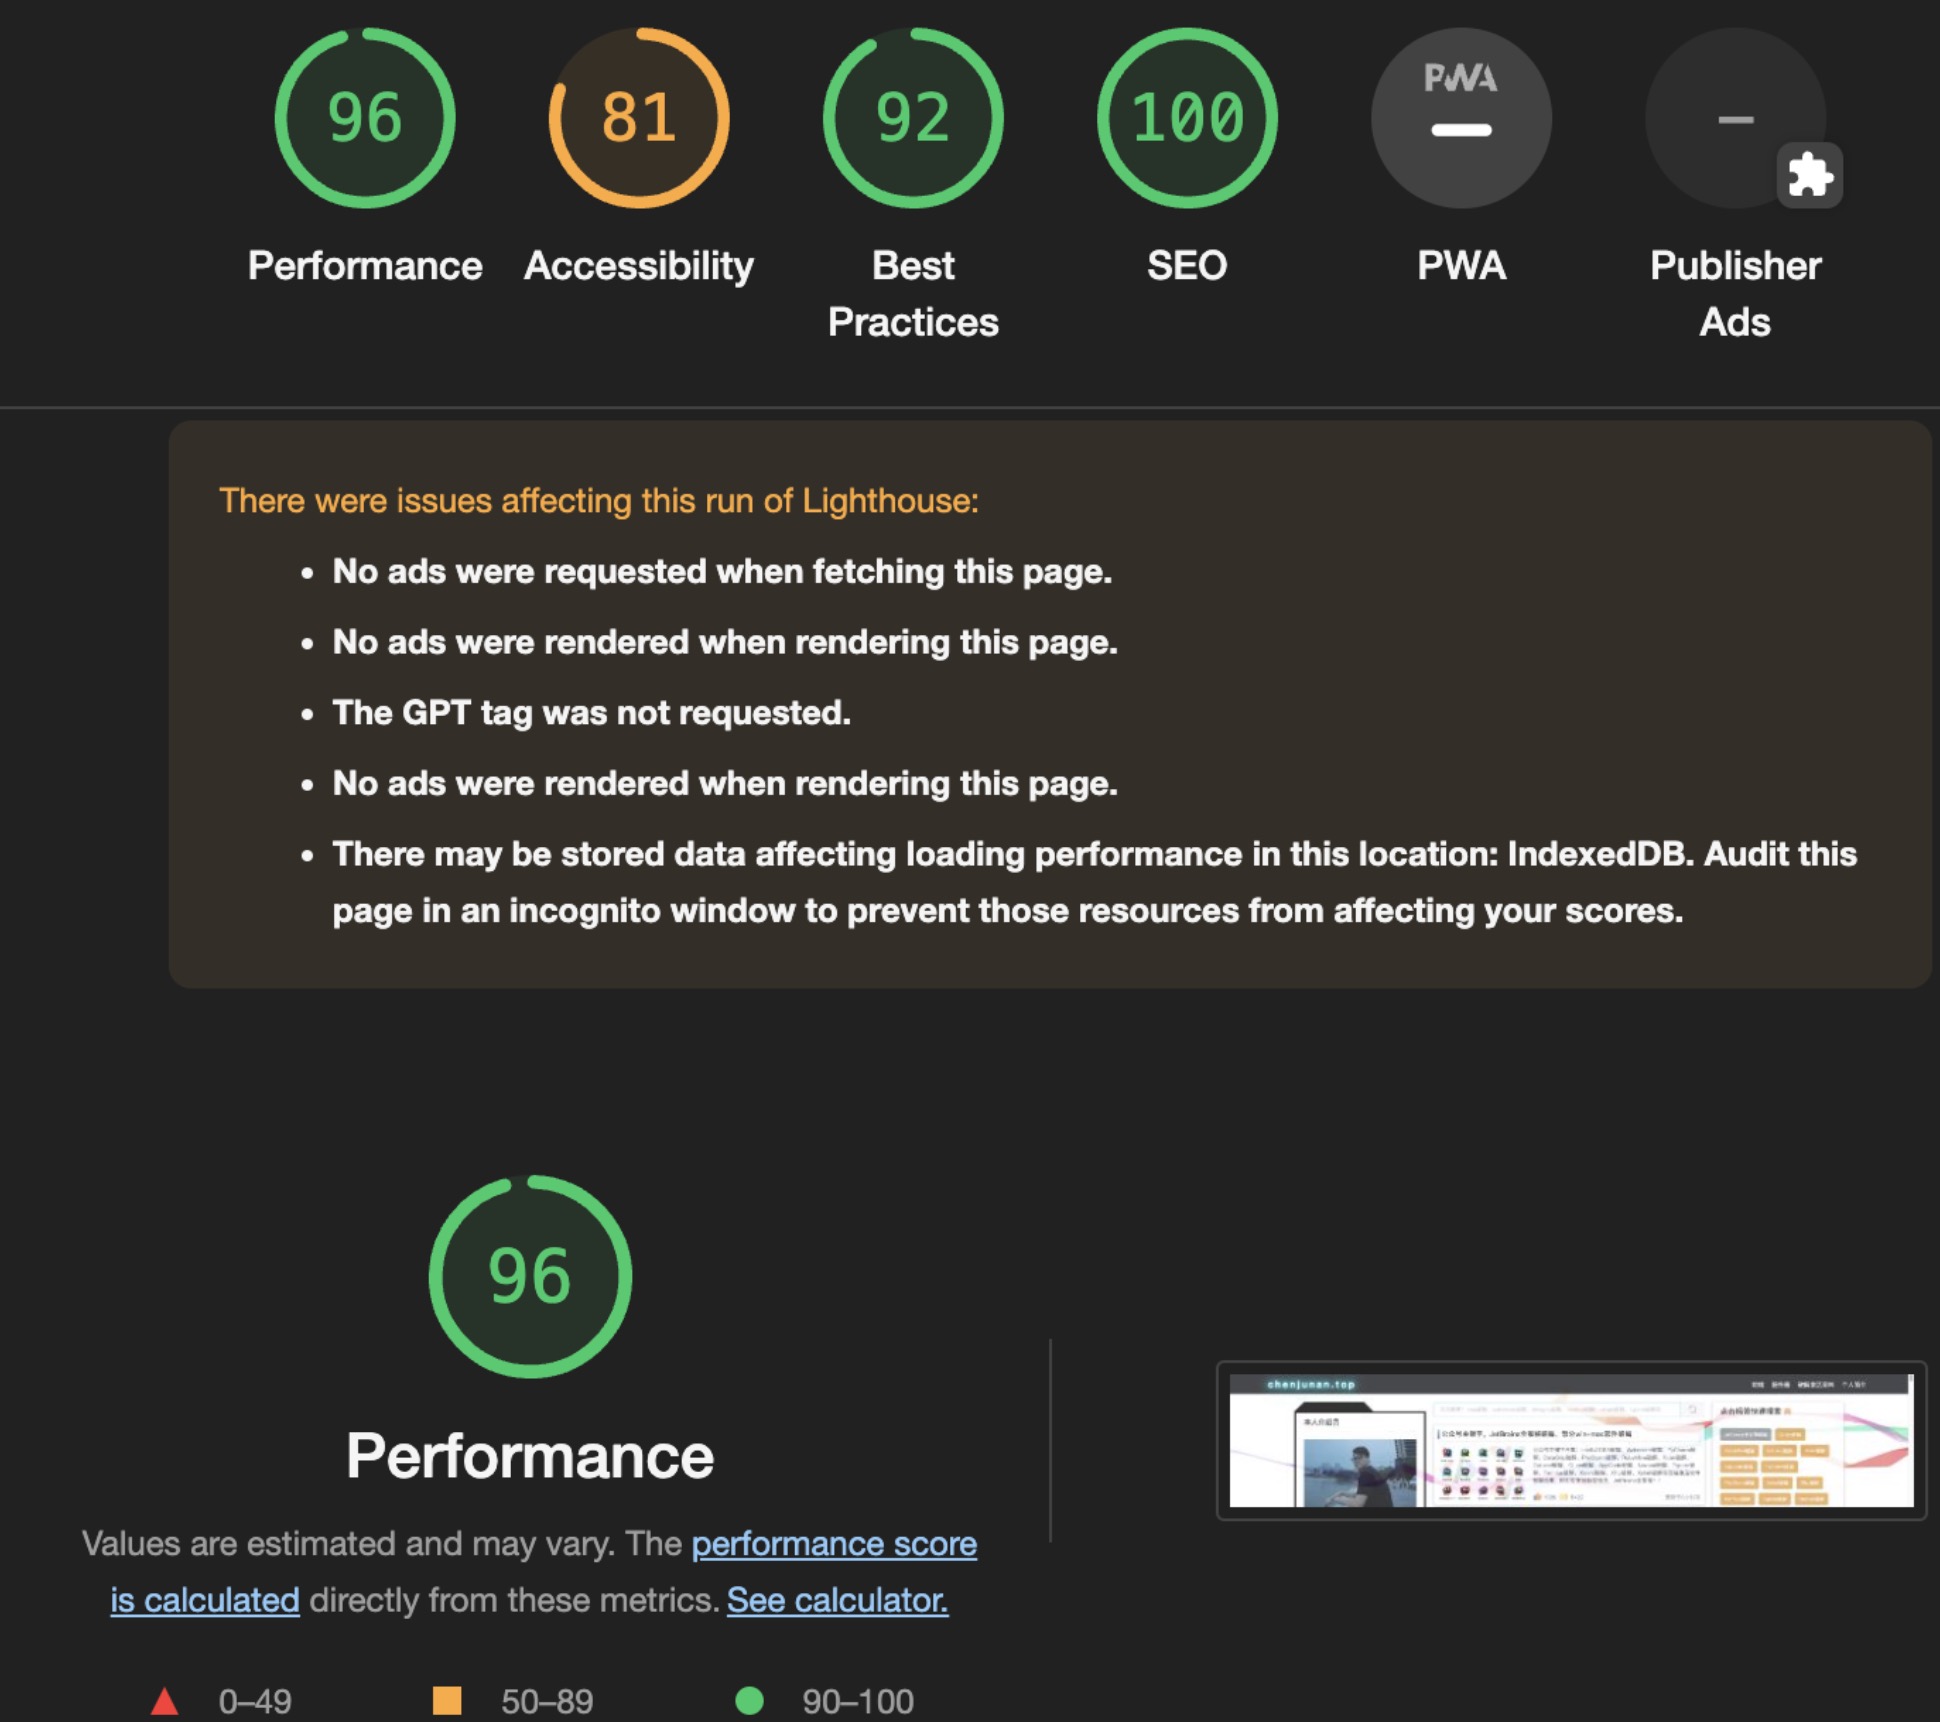
本文会讲解决Nuxt首页加载慢、Nuxt的速度优化、Nuxt的性能优化、Nuxt的加载优化、Nuxt的首页加载优化、Nuxt的白屏优化、Nuxt的打包优化等集合。
- 优化前

- 优化后

这里我总结一下关于我博客的优化,如何提升这么多的。
1.按需引入UI框架,我这里使用的是Element-UI
- 先安装依赖(按需引入才需要)
npm i babel-plugin-component
// or
yarn add babel-plugin-component
- 在plugins下的element-ui.js写入
import Vue from 'vue'
import { Button, Input, Row, Col } from 'element-ui'

Vue.use(Row);
Vue.use(Col);
Vue.use(Input);
Vue.use(Button)
Vue.prototype.$loading = Loading.service;
- 在nuxt.config.js中写入
module.exports = {
  // ...
  css: [
    'element-ui/lib/theme-chalk/index.css'
  ],
  plugins: [{ src: '@/plugins/element-ui' }],
  build: {
    vendor: ['element-ui'],
    transpile: [/^element-ui/],
    babel: {
      plugins: [
        [
          'component',
          {
            libraryName: 'element-ui',
            styleLibraryName: 'theme-chalk'
          }
        ]
      ]
    },
  }
  // ...
}
2.减少使用到的package.json的包
什么意思呢?就是说例如我博客,之前为了花里胡哨,加了animate.css等动画效果,其实用处并不大,去掉并减少消耗性能,大家可以检查一下相关的npm包。
3.不使用内联样式,使用scss的全局变量,全局样式,减少多个页面重复的css
4.请求分开服务端渲染及客户端渲染,并尽可能的减少请求
-
我首页有3个接口,其中1个接口需要seo,那么就使用asyncData或者fetch去服务端渲染,其他接口则在mounted里请求。
-
因为服务器的开销非常大,而且是同步去执行异步加载,所以为什么首页白屏这么久就是这个原因,可以减少服务器压力,分开请求,不需要seo的放到客户端去请求。
async fetch() {
    const data = {
      pageNum: 0,
      pageSize: 0,
    };
    await queryArticle(data).then((res) => {
      this.articleData = res.list;
    });
  },

  mounted() {
    this.getTags();
  },

  methods: {
    // 获取标签
    getTags() {
      queryTags({ pageNum: 0, pageSize: 0 }).then((res) => {
        this.tagItems = res.list;
      });
    },
  },
5.配置nginx的Gzip、http2
# ...
http {

  # gzip模块设置,使用 gzip 压缩可以降低网站带宽消耗,同时提升访问速度。
  gzip  on;                     #开启gzip
  gzip_min_length  1k;          #最小压缩大小
  gzip_buffers     4 16k;       #压缩缓冲区
  gzip_http_version 1.0;        #压缩版本
  gzip_comp_level 2;            #压缩等级
  gzip_types   text/plain text/css text/xml text/javascript application/json application/x-javascript application/xml application/xml+rss font/ttf font/otf image/svg+xml;#压缩类型

  server {
    listen 443 ssl http2;
    # ...
  }

  # ...
}
配置好后可以在浏览器F12的networks查看Content-Encoding是否有gzip

或者在Headers下查看

查看http2
打开f12的network,图片红色框框头部右键点开Protocol,即可查看了


6.有用到图片的全部压缩并转成webp格式,如果你们需要兼容IE,那么得再做兼容处理了,我这里就是直接使用webp格式的图片。
7.nuxt项目也开启gzip、br
- 先安装nuxt-precompress
yarn add nuxt-precompress
- 在nuxt.config.js中写入
module.exports = {
  // ...
  modules: [
    'nuxt-precompress',
  ],
  nuxtPrecompress: {
    gzip: {
      enabled: true,
      filename: '[path].gz[query]',
      threshold: 10240,
      minRatio: 0.8,
      compressionOptions: { level: 9 },
    },
    brotli: {
      enabled: true,
      filename: '[path].br[query]',
      compressionOptions: { level: 11 },
      threshold: 10240,
      minRatio: 0.8,
    },
    enabled: true,
    report: false,
    test: /\.(js|css|html|txt|xml|svg)$/,
    // Serving options
    middleware: {
      enabled: true,
      enabledStatic: true,
      encodingsPriority: ['br', 'gzip'],
    },
  },
  // ...
}
- yarn build后,打开.nuxt > dist > client,看一下是否有.br或者.gz结尾,说明成功。
8.nuxt再次压缩包体积CompressionPlugin及optimization
- 先安装compression-webpack-plugin
yarn add compression-webpack-plugin
- 在nuxt.config.js中写入
const CompressionPlugin = require('compression-webpack-plugin');
module.exports = {
  // ...
  build: {
    plugins: [
      new CompressionPlugin({
        test: /\.js$|\.html$|\.css/, // 匹配文件名
        threshold: 10240, // 对超过10kb的数据进行压缩
        deleteOriginalAssets: false // 是否删除原文件
      })
    ],
    optimization: {
      minimize: true,
      splitChunks: {
        chunks: 'all',
        automaticNameDelimiter: '.',
        name: true,
        minSize: 10000,
        maxSize: 244000,
        cacheGroups: {
          vendor: {
            name: 'node_vendors',
            test: /[\\/]node_modules[\\/]/,
            chunks: 'all',
            maxSize: 244000
          },
          styles: {
            name: 'styles',
            test: /\.(css|vue)$/,
            chunks: 'all',
            enforce: true
          },
          commons: {
            test: /node_modules[\\/](vue|vue-loader|vue-router|vuex|vue-meta|core-js|@babel\/runtime|axios|webpack|setimmediate|timers-browserify|process|regenerator-runtime|cookie|js-cookie|is-buffer|dotprop|nuxt\.js)[\\/]/,
            chunks: 'all',
            priority: 10,
            name: true
          }
        }
      }
    },
  }
  // ...
}
经过以上操作后,基本上没有其他问题了,第一次接触webpack,应该是还可以优化的。

华为开发者空间,是为全球开发者打造的专属开发空间,汇聚了华为优质开发资源及工具,致力于让每一位开发者拥有一台云主机,基于华为根生态开发、创新。
更多推荐


 12
12 0
0- 0


 已为社区贡献2条内容

所有评论(0)