基于element-plus-admin实际开发记录(一)element-plus-admin登录
采用element-plus-admin进行开发学习,GitHub地址该框架使用技术: ES2015+、vue-next、typescript、vite、postcss 和 element-plus
系列文章目录
前言
最近,学习vue3,对比vue2来说,对于我多多少少有点难上手。
身为一个前端程序员,自然不能直接躺平了,于是奋发努力开始充实自己。
GitHub上找了一个比较好的框架,开始摸索学习。
采用element-plus-admin进行开发学习,GitHub地址

该框架使用技术: ES2015+、vue-next、typescript、vite、postcss 和 element-plus
本人还在学习摸索中,如有哪里不妥,请各位见谅。
话不多说开搞。
提示:以下是本篇文章正文内容
一、解决跨域代理
element-plus-admin使用的vite,vite我也是第一次搞,查阅了不少资料。由于本次学习是好朋友用自己服务器给我搭了一个服务,我本地访问的他的接口需要进行下跨域代理。
直接在vite.config.ts文件中,把server下的proxy注释掉,修改一下,详细如下
 server: {
            // proxy: env.VITE_PROXY ? proxy(JSON.parse(env.VITE_PROXY)) : {},
            proxy:{
                '/api':{
                    target:env.VITE_PROXY,
                    changeOrigin:true,
                    rewrite:(path) => path.replace(/^\/api/,'')
                }
            },
            port: env.VITE_PORT,
            host: '0.0.0.0'
        },
然后在.env.production文件里,修改VITE_PROXY为自己的
VITE_PROXY = [["/api","http://xxx.xxx.xx.xx:8011"]]
二、获取验证码
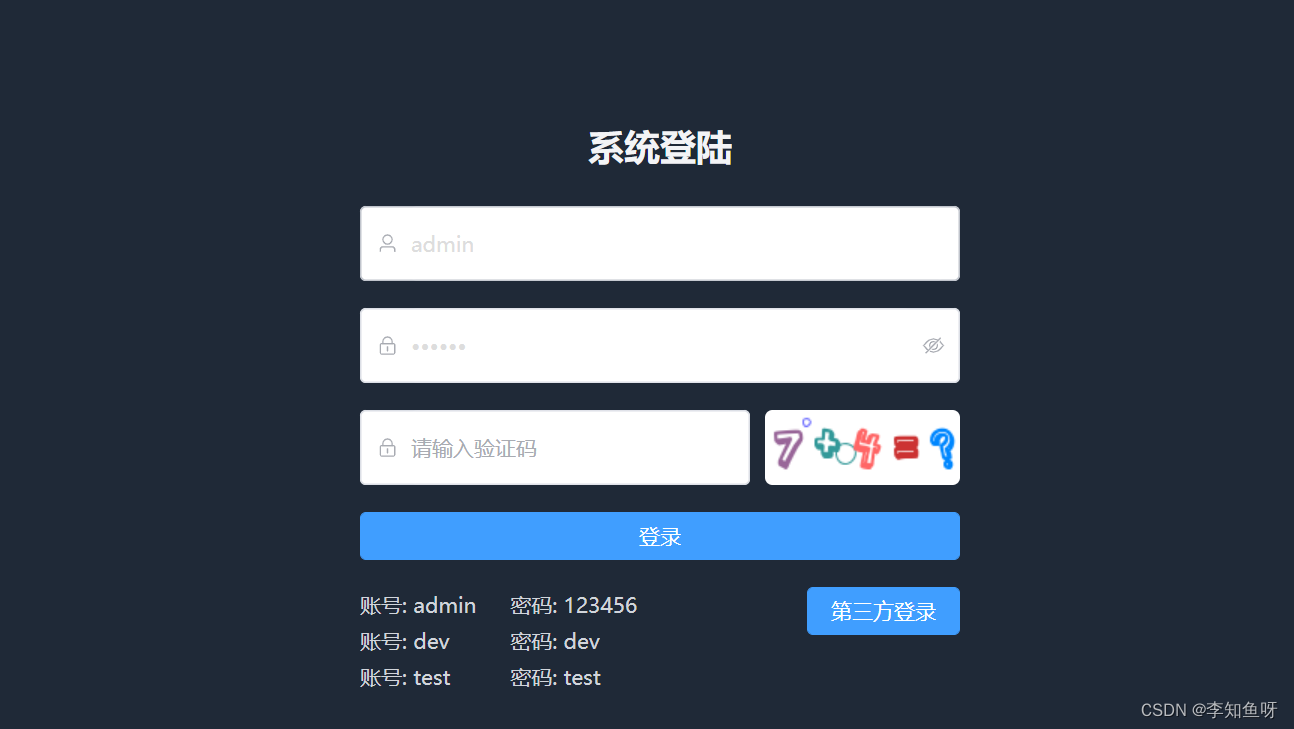
这里登录时需要输入用户名、密码,然后自己添加了一个图形验证码。
用户的登录的逻辑是这样:
1.用户打开登录页面要先发起请求,获取图形验证码,后台会返回一个image地址和uuid。
2.用户登录时要传递四个参数到登录接口,userName、passWord、captchaCode、uuid。
3.登录成功后会返回用户信息以及token。
4.然后调用路由接口,返回菜单,渲染后进入首页。
第一,在views-user-login.vue文件中添加图形验证码,详细代码如下:
<template>
    <div class='w-screen h-screen bg-gray-800'>
        <div class='layout-login' @keyup='enterSubmit'>
            <h3 class='text-2xl font-semibold text-gray-100 text-center mb-6'>系统登陆</h3>
            <el-form ref='ruleForm' label-position='right' label-width='80px' :model='form' :rules='rules'>
                <el-form-item class='mb-6 -ml-20' prop='name'>
                    <el-input v-model='form.name' placeholder='请输入用户名' prefix-icon='el-icon-user' />
                </el-form-item>
                <el-form-item class='mb-6 -ml-20' prop='pwd'>
                    <el-input v-model='form.pwd' placeholder='请输入密码' prefix-icon='el-icon-lock' show-password />
                </el-form-item>
                <el-form-item class='mb-6 -ml-20' prop='captchaCode'>
                    <el-input v-model='form.captchaCode' placeholder='请输入验证码' prefix-icon='el-icon-lock' style='width:260px' />
                    <el-image class='captchaCodeImg' style='width: 130px; height: 50px;margin-left:10px;border-radius:5px;' :src='captchaCodeImg' @click='getCaptchaCodeImg' />
                </el-form-item>
                <el-form-item class='mb-6 -ml-20'>
                    <el-button type='primary' class='w-full' @click='onSubmit'>登录</el-button>
                </el-form-item>

                <div class='flex justify-between'>
                    <div class='text-gray-300'>
                        <p class='leading-6 text-sm'><span class='w-24 inline-block'>账号: admin</span> 密码: 123456</p>
                        <p class='leading-6 text-sm'><span class='w-24 inline-block'>账号: dev</span> 密码: dev</p>
                        <p class='leading-6 text-sm'><span class='w-24 inline-block'>账号: test</span> 密码: test</p>
                    </div>
                    <div><el-button type='primary'>第三方登录</el-button></div>
                </div>
            </el-form>
        </div>
    </div>
</template>

<script lang="ts">
import { computed, defineComponent, reactive, ref } from 'vue'
import { useLayoutStore } from '/@/store/modules/layout'
import { ElNotification } from 'element-plus'
import { validate } from '/@/utils/formExtend'

export default defineComponent({
    name: 'Login',
    setup() {
        const { login } = useLayoutStore()
        let form = reactive({
            name: 'admin',
            pwd: '123456',
            captchaCode: '',
            uid: ''
        })
        const ruleForm = ref(null)
        const enterSubmit = (e:KeyboardEvent) => {
            if(e.key === 'Enter') {
                onSubmit()
            }
        }
        const onSubmit = async() => {
            let { name, pwd ,captchaCode ,uid } = form
            if(!await validate(ruleForm)) return
            await login({ username: name, password: pwd , captchaCode: captchaCode , uid: uid })
            ElNotification({
                title: '欢迎',
                message: '欢迎回来',
                type: 'success'
            })
        }
        const rules = reactive({
            name: [
                { validator: (rule: any, value: any, callback: (arg0?: Error|undefined) => void) => {
                    if (!value) {
                        return callback(new Error('用户名不能为空'))
                    }
                    callback()
                }, trigger: 'blur'
                }
            ],
            pwd: [
                { validator: (rule: any, value: any, callback: (arg0?: Error|undefined) => void) => {
                    if (!value) {
                        return callback(new Error('密码不能为空'))
                    }
                    callback()
                }, trigger: 'blur'
                }
            ]
        })
        const captchaCodeImg = ref('')
        // getCaptchaCodeImg为请求图形校验码地址
        function getCaptchaCodeImg() {
            useLayoutStore().getCaptchaCodeImg()
                .then(res => {
                    console.log(res)
                    captchaCodeImg.value = res.image
                    form.uid = res.uid
                })
        }
        return {
            labelCol: { span: 4 },
            wrapperCol: { span: 14 },
            form,
            onSubmit,
            enterSubmit,
            rules,
            ruleForm,
            captchaCodeImg,
            getCaptchaCodeImg
        }
    },
    mounted() {
        this.getCaptchaCodeImg()
    }
})
</script>

<style lang='postcss' scoped>
.layout-login {
    padding-top: 200px;
    width: 400px;
    margin: 0 auto;

    ::v-deep(.el-input__inner) {
        height: 50px;
        border: 1px solid hsla(0, 0%, 100%, 0.1);
        border-radius: 5px;
        color: #ddd;
    }
}

</style>
第二,在api-layout-index.ts文件里添加获取图形验证码接口,详细代码如下:
import request from '/@/utils/request'
import { AxiosResponse } from 'axios'
import { IMenubarList } from '/@/type/store/layout'

const api = {
    login: '/api/auth/login',
    getUser: '/api/auth/getUserInfo',
    getRouterList: '/api/auth/ownMenu',
    publickey: '/api/User/Publickey',
    getCaptchaCodeImg: '/api/auth/captcha' //获取图形验证码接口
}

export interface loginParam {
    username: string,
    password: string,
    captchaCode: string,
    uid: string
}

export function login(param: loginParam):Promise<AxiosResponse<IResponse<string>>> {
    return request({
        url: api.login,
        method: 'post',
        data: param
    })
}

export function publickey():Promise<AxiosResponse<IResponse<string>>> {
    return request({
        url: api.publickey,
        method: 'get'
    })
}

interface IGetuserRes {
    name: string
    role: Array<string>
}
interface ImgGetRes {
    image: string
    uuid: string
}

export function getUser(): Promise<AxiosResponse<IResponse<IGetuserRes>>> {
    return request({
        url: api.getUser,
        method: 'get'
    })
}
export function getRouterList(): Promise<AxiosResponse<IResponse<Array<IMenubarList>>>> {
    return request({
        url: api.getRouterList,
        method: 'get'
    })
}

export function getCaptchaCodeImg() {
    return request({
        url: api.getCaptchaCodeImg,
        method: 'get'
    })
}
第三,在store-modules-layout.ts里进行调用,引入getCaptchaCodeImg
import { login, loginParam, getRouterList, getUser , getCaptchaCodeImg } from '/@/api/layout/index'
在下方添加
async getCaptchaCodeImg() {
     const res = await getCaptchaCodeImg()
     const CaptchaCode = res.data.data
     return CaptchaCode
 },
这样子就实现了

为开发者提供学习成长、分享交流、生态实践、资源工具等服务,帮助开发者快速成长。
更多推荐


 2
2 0
0- 0


 已为社区贡献2条内容

所有评论(0)