vue自定义日历小组件
vue自定义小日历组件一、前言自己开发的项目需要用到类似博客侧边栏小日历组件,觉得自己造一个比较随心所欲,更能满足自己的需求,所以决定自己开发一个。二、日历样式我的这个日历组件主要分为导航栏区和主要内容区,导航栏按钮样式什么的都是自定义的,很简单,源码有就不罗嗦。主要讲一下日历内容的样式设计。日历内容都是用<ul>和<li>标签实现的,星期栏和日期栏分别为独立的<ul
vue自定义小日历组件
一、前言
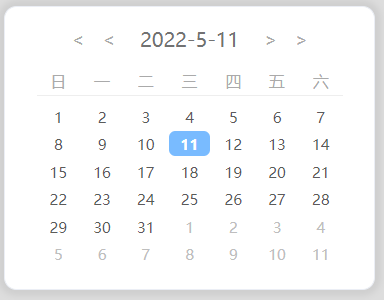
自己开发的项目需要用到类似博客侧边栏小日历组件,觉得自己造一个比较随心所欲,更能满足自己的需求,所以决定自己开发一个。最终效果如图所示。

二、日历样式
我的这个日历组件主要分为导航栏区和主要内容区,导航栏按钮样式什么的都是自定义的,很简单,源码有就不罗嗦。主要讲一下日历内容的样式设计。

日历内容都是用<ul>和<li>标签实现的,星期栏和日期栏分别为独立的<ul>,内容为<li>,两个<ul>均采用网格布局,星期栏1行7列,日期内容为6行7列,在css样式中设置display为grid,再分别设置行列属性,<li>会自动排布为设定的样式,这里前提是每个<li>要设置为inline-block排布。

关于grid布局可以参考这篇文章:CSS Grid 网格布局教程 - 阮一峰的网络日志 (ruanyifeng.com) 这篇博客讲得非常好。
template示例(完整版见末尾链接下载):
<div id="app">
<div class="calendar-card">
<div class="calendar-bar">
<button class="button button-year-minus"><</button>
<button class="button button-month-minus"><</button>
<div class="calendar-date">{{date.year}}-{{date.month}}-{{date.date}}</div>
<button class="button button-month-plus">></button>
<button class="button button-year-plus">></button>
</div>
<div class="calendar-content">
<ul class="ul-week">
<li class="li-week" v-for="item in week">{{item}}</li>
</ul>
<ul class="ul-day">
<li class="li-day" v-for="item in days">{{item}}</li>
</ul>
</div>
</div>
</div>
js代码:
var vm = new Vue({
            el:"#app",
            data:{
                date:{
                    year:2022,
                    month:5,
                    date:11
                },
                week:["日","一","二","三","四","五","六"],
                days:[]//用来绑定日期的数组
            },
            created(){
                for(let i=0;i<42;i++){   //生成日期数组(示范)
                    this.days.push(i)
                }
            }
        })
css样式:
.ul-week {
    display: grid;
    width: 245px;
    grid-template-rows: 20px;/*一个值只有一行20px高*/
    grid-template-columns: repeat(7, 35px);/*重复7个值代表7列35px宽*/

    list-style: none;/*记得清除ul的li标签的·样式*/
    text-align: center;

    font-size: 13px;
    color: #aaa;

    margin: 5px 20px 5px 20px;
    padding-inline-start: 0px;/*清除ul多余样式*/
    padding-inline-end: 0px;/*清除ul多余样式*/
    border-bottom: 1px solid #eee;/*分隔线*/
}

.li-week {
    display: inline-block;/*li标签设为行内排列*/
}
/*日期内容样式注释参照上面的自己理解*/
.ul-day {
    display: grid;
    width: 245px;
    grid-template-rows: repeat(6, 22px);/*6行22px高*/
    grid-template-columns: repeat(7, 35px);/*7列35px宽*/

    list-style: none;
    text-align: center;

    margin: 5px 20px 5px 20px;
    padding-inline-start: 0px;
    padding-inline-end: 0px;
}

.li-day {
    display: inline-block;/*必须设置为行内排布,否则为列排布,日期是竖着显示,虽然再grid布局下看上去一样*/
    font-size: 10px;
    line-height: 22px;
    text-align: center;
    border-radius: 5px;
    margin: 1px;
}
三、日历实现
1.实现显示当月日历
创建两个data的对象:date和current,date用来存放需要切换的日期,current用来存放今天的年月日
date: {
    year: "",
    month: "",
    date: ""
},
current: {
    year: "",
    month: "",
    date: "",
}
我们前面用days:[]绑定了日期的<li>,总共有6x7=42个<li>,所以每月只要生成对应的包含42个日期元素的days数组,就能够自动更新日历。先不考虑按钮切换年月,先实现本月日历的生成。我们前面讨论的其本质就是生成当月的42元素数组days,下面给出的就是实现的代码,注释会介绍:
/**
 * 根据参数year和month生成对应年月的日历数组
 */
createCalendar: function (year, month) {
    let d = new Date();         //获得date对象
    d.setFullYear(year);        //设置date为制定年份
    d.setMonth(month);          //设置date为制定月份(0~11)
    d.setDate(1);               //设置为本月第一天,为了是下面计算第一天是星期几
    let dayOfFirstDay = d.getDay();    //获得对应月份第一天是星期几(0~6)
    this.days = []                     //每次生成日历清空日期数组

    //向days数组填充每一个日期,包括上个与的末尾和下个月的开头总共42个日期
    /**
    *如何获得上个月末尾和下个月开头?
    *date对象可以设置年月日,其中设置每月几号为setDate(day) day一般为(1~31)
    *当day为0时,date设置的日期是上个月最后一天
    *当day为-1时,date设置的日期是上个月的倒数第二天,以此类推
    *当day设置超过当月天数时,比如三月的32,则会被设置为四月第一天
    *所以循环42次,每次设置对应的day,就可以生成完整日期数组,包括上月尾巴和下月的开头
    */
    for (let i = 0; i < 42; i++) {
        //每次循环重新设置为每月开头第一天,否则每次循环像本月只有28天,上轮循环到31,切换月份到本月的时候31超过28,date对象的month会被设置为下个月
        d.setDate(1);
        //每次循环重新设置月份,因为setDate()为负数或这超过本月天数,date对象的month会被设置成上个月或下个月,然后在下一轮循环就会出错
        d.setMonth(month)
        d.setDate(i - dayOfFirstDay + 1) //设置本轮循环对应的day,dayOfFirstDay为本月第一天的星期,本月第一天之前的day小于1,也就是0或者负数,需要减去dayOfFirstDay差+1,这里自己体会
        if (this.current.date == d.getDate() && this.current.month == d.getMonth() && this.current.year == d.getFullYear()) { //此为判断本次循环是否为当天,当天日期可以做标记以高亮显示,如加上“*”号
            this.days.push(d.getDate()+"*")  //往数组里push本次循环的日期
        } else {
            this.days.push(d.getDate())     //往数组里push本次循环的日期
        }
    }

}
为了在生成日历组件的同时初始化日历,所以需要在create()中做初始化处理
created() {
    let d = new Date();
    //初始化标题显示的年月日
    this.date.year = d.getFullYear();
    this.date.month = d.getMonth();
    this.date.date = d.getDate();

    //初始化今天的年月日
    this.current.year = d.getFullYear();
    this.current.month = d.getMonth();
    this.current.date = d.getDate();

    //调用createCalendar()生成本月的日历
    this.createCalendar(this.current.year,this.current.month)
}
最后的效果如下:

2. 区分本月和其他月
上月末尾日期和下月开头日期与本月日期混在一起,需要做一些样式处理。我们将days数组从原先的存放day数字,改为存放date对象,{year:"2022",month:"5",date:"11",isThisMonth:false},存放年月日,其中isThisMonth
为该日期是否是本月的标记,”1“为非本月,”2“为本月。然后通过css选择器属性来实现。
在createCalendar()中改成如下代码:
createCalendar: function (year, month) {
    let d = new Date();
    d.setFullYear(year);
    d.setMonth(month);
    d.setDate(1);
    let dayOfFirstDay = d.getDay();
    this.days = []

    for (let i = 0; i < 42; i++) {
        d.setDate(1);
        d.setMonth(month)
        d.setDate(i - dayOfFirstDay + 1)

        //判断是否为本月并添加标记
        let isThisMonth = 2
        if (d.getMonth() == month) {
            isThisMonth = 2
        } else {
            isThisMonth = 1
        }


        if (this.current.date == d.getDate() && this.current.month == d.getMonth() && this.current.year == d.getFullYear()) {
            isThisMonth = 3
            //改为对象
            let date = { year: year, month: month, date: d.getDate(), isThisMonth: isThisMonth }
            this.days.push(date)
        } else {
            //改为对象
            let date = { year: d.getFullYear(), month: d.getMonth(), date: d.getDate(), isThisMonth: isThisMonth }
            this.days.push(date)
        }
css运用选择器属性:
.li-day[isThisMonth="1"] {       /*非本月的本月样式*/
    color: rgb(190, 190, 190);
    font-size: 10px;
}

.li-day[isThisMonth="1"]:hover {/*非本月的本月样式hover*/
    background-color: #717de2;
    color: #fff;
    font-size: 15px;
    cursor: pointer;
}
对应标签改为:
<ul class="ul-day">
    <li class="li-day" v-for="item in days" :isThisMonth="item.isThisMonth">{{item.date}}</li>
</ul>
即可以实现如下的效果:

3.高亮今天的日期
我们在2的基础上,在isThisMonth判断上再加一个值3,如果当前day是今天,则标记为”3“。在createCalendar()判断是否为今天的代码修改为如下(可以把丑陋的"*"去掉了):
 if (this.current.date == d.getDate() && this.current.month == d.getMonth() && this.current.year == d.getFullYear()) {
     //标志为3代表是今天
     isThisMonth=3
     let date = { year: year, month: month, date: d.getDate(), isThisMonth: isThisMonth }
     this.days.push(date)
 }
css样式里添加如下代码:
.li-day[isThisMonth="3"] {
    border-radius: 5px;
    color: rgb(255, 255, 255);
    background-color: #79bbff;
    font-weight: 600;
  }
则实现了今天的日期高亮的效果:

4.实现切换年月从而切换日历
给button绑定事件,本质就是修改data中的date.year和date.month,并且每次修改年月都要调用createCalendar()重新更新日历。代码如下,其中的逻辑很简单,看下代码就懂的:
plusMonth: function () {
    if (this.date.month == 11) {
        this.date.month = 0;
        this.plusYear(false) //切换月份超过当年范围会导致年份增减,但是直接调用增减年份的函数会导致日历重复更新,所以在增减年份的函数中添加标志位,flase则不更新日历
    } else {
        this.date.month++;
    }
    this.createCalendar(this.date.year, this.date.month);
},
minusMonth: function () {
    if (this.date.month == 0) {
        this.date.month = 11;
        this.minusYear(false)   //切换月份超过当年范围会导致年份增减
    } else {
        this.date.month--;
    }
    this.createCalendar(this.date.year, this.date.month);
},
plusYear: function (create) {          //freate为flase则不更新日历
    if (this.date.year == 2049) {
        this.date.year = 1970;
    } else {
        this.date.year++;
    }
    if (create) {
        this.createCalendar(this.date.year, this.date.month);
    }
},
minusYear: function (create) {
    if (this.date.year == 1970) {
        this.date.year = 2049;
    } else {
        this.date.year--;
    }
    if (create) {
        this.createCalendar(this.date.year, this.date.month);
    }
}
给每个按钮绑定
<button class="button button-year-minus" @click="minusYear"><</button>
<button class="button button-month-minus" @click="minusMonth"><</button>
<div class="calendar-date">{{date.year}}-{{date.month+1}}-{{date.date}}</div>
<button class="button button-month-plus" @click="plusMonth">></button>
<button class="button button-year-plus" @click="plusYear">></button>
四、高级功能
给每个日期<li>点击事件@click,绑定handleClick()方法
<ul class="ul-day">
    <li class="li-day" v-for="item in days" :isThisMonth="item.isThisMonth" @click="handleClick(item)">{{item.date}}</li>
</ul>
添加handleClick()方法:
 handleClick: function (item) {
     console.log(item.year + "-" + item.month + "-" + item.date)
     alert(item.year + "-" + item.month + "-" + item.date)
 }
后续可以在handleClick()方法中定制自己的处理,例如点击某天实现某些页面的路由等等,可以将改天的年月日作为参数进行请求,实现DatePicker功能。
五、源码下载
所有源码可以在github https://github.com/PengQitao/gram-simple-calendar.git中下载,如果喜欢记得给个⭐star哦
更多推荐
 已为社区贡献1条内容


所有评论(0)