
手把手教学:VUE3+TS组件库开发与发布
前言当市面上主流的组件库不能满足我们业务需求的时候,那么我们就有必要开发一套属于自己团队的组件库。 以下用一个简单的组件来讲述基于Vue3.0 + TS的组件从开发到发布npm仓库的全过程(参考element-plus)环境版本这里列出本文所使用的环境版本vue 3.0vue/cli 4.5.9nodeJs 14.15.1npm 6.14.8> vue --version@vue/cli 4
前言
当市面上主流的组件库不能满足我们业务需求的时候,那么我们就有必要开发一套属于自己团队的组件库。 以下用一个简单的组件来讲述基于Vue3.0 + TS的组件从开发到发布npm仓库的全过程(参考element-plus)
环境
这里列出本文所使用的环境版本
-
vue 3.0
-
vue/cli 4.5.9
-
nodeJs 14.15.1
-
npm 6.14.8
> vue --version
@vue/cli 4.5.9

> npm -v
6.14.8

> node -v
v14.15.1
步骤
1. 创建项目
使用 vue-cli 创建一个 vue3 项目,假设项目名为 nandit-vue-vant
> vue create nandit-vue-vant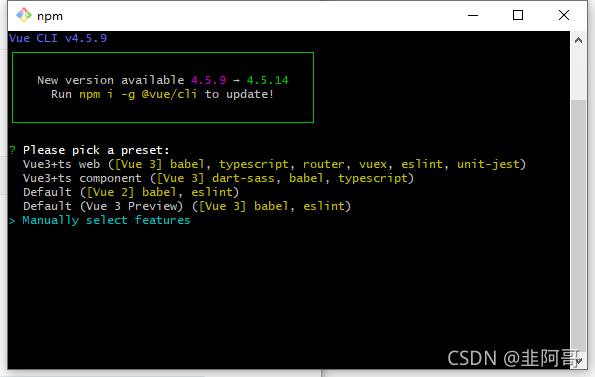
选择自定义Manually select features,回车进入下一步
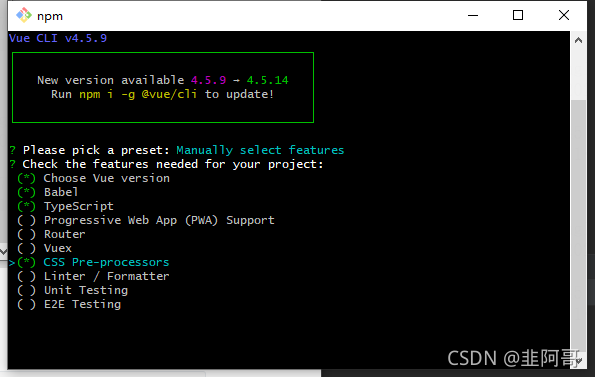
选中Choose Vue version、Babel 、TypeScript、 CSS Pre-processors 这4项,回车进入下一步
- Choose a version of Vue.js that you want to start the project with 选择 3.x (Preview)
- Use class-style component syntax? 输入n
- Use Babel alongside TypeScript (required for modern mode, auto-detected polyfills, transpiling JSX)? 输入y
- Pick a CSS pre-processor (PostCSS, Autoprefixer and CSS Modules are supported by default) 选择 Sass/SCSS (with dart-sass)
- Where do you prefer placing config for Babel, ESLint, etc.? 选择 In dedicated config files
- Save this as a preset for future projects? 输入y,回车后输入模板名保存模板

最后回车,等待项目创建完成

创建完成,目录结构如图

2. 规划目录
├─ build         // 编辑打包脚本目录,用于存放脚本文件
│  ├─ rollup.config.js
├─ docs          // 文档目录,用于生成 vuepress 文档页面
│  ├─ .vuepress
│  ├─ guide
│  ├─ README.md
├─ examples      // 原 src 目录,改成 examples 用于示例展示
│  ├─ App.vue
│  ├─ main.ts
├─ packages      // 新增 packages 目录,用于编写存放组件,如button
│  ├─ button
│  ├─ index.ts
├─ typings      // 新增 typings 目录,用于存放 .d.ts 文件,把shims-vue.d.ts移到这里
│  ├─ shims-vue.d.ts
├─ .npmignore    // 新增 .npmignore 配置文件
├─ vue.config.js // 新增 vue.config.js 配置文件
将 src 目录改为 examples ,并将里面的 assets 和 components 目录删除,移除 App.vue 里的组件引用。
调整后的目录结构如图

3. 项目配置
3.1 vue.config.js
新增 vue.config.js 配置文件,适配重新规划后的项目目录
const path = require('path')

module.exports = {
  // 修改 pages 入口
  pages: {
    index: {
      entry: "examples/main.ts", //入口
      template: "public/index.html", //模板
      filename: "index.html" //输出文件
    }
  },
  // 扩展 webpack 配置
  chainWebpack: (config) => {
    // 新增一个 ~ 指向 packages 目录, 方便示例代码中使用
    config.resolve.alias
      .set('~', path.resolve('packages'))
  }
}
3.2 .npmignore
新增 .npmignore 配置文件,组件发布到 npm 中,只有编译后的发布目录(例如lib)、package.json、README.md才是需要被发布的,所以我们需要设置忽略目录和文件
# 忽略目录
.idea
.vscode
build/
docs/
examples/
packages/
public/
node_modules/
typings/

# 忽略指定文件
babel.config.js
tsconfig.json
tslint.json
vue.config.js
.gitignore
.browserslistrc
*.map
3.3 tsconfig.json
修改 tsconfig.json 中 paths 的路径
    "paths": {
      "@/*": [
        "src/*"
      ]
    }
改为
    "paths": {
      "~/*": [
        "packages/*"
      ]
    }
修改 include 的路径
  "include": [
    "src/**/*.ts",
    "src/**/*.tsx",
    "src/**/*.vue",
    "tests/**/*.ts",
    "tests/**/*.tsx"
  ]
改为
  "include": [
    "examples/**/*.ts",
    "examples/**/*.tsx",
    "examples/**/*.vue",
    "packages/**/*.ts",
    "packages/**/*.tsx",
    "packages/**/*.vue",
    "typings/**/*.ts",
    "tests/**/*.ts",
    "tests/**/*.tsx"
  ]
3.4 package.json
修改 package.json 中发布到 npm 的字段
-
name:包名,该名字是唯一的。可在 npm 官网搜索名字,如果存在则需换个名字。 -
version:版本号,每次发布至 npm 需要修改版本号,不能和历史版本号相同。 -
description:描述。 -
main:入口文件,该字段需指向我们最终编译后的包文件。 -
typings:types文件,TS组件需要。 -
keyword:关键字,以空格分离希望用户最终搜索的词。 -
author:作者信息 -
private:是否私有,需要修改为 false 才能发布到 npm -
license: 开源协议
参考设置:
{
  "name": "nandit-vue-vant",
  "version": "0.1.0",
  "private": false,
  "description": "基于vue3+vant的前端组件库",
  "main": "lib/index.min.js",
  "module": "lib/index.esm.js",
  "typings": "lib/index.d.ts",
  "keyword": "vue3 vant",
  "license": "MIT",
  "author": {
    "name": "yourname",
    "email": "youremail@126.com"
  }
 }
在 package.json 的 scripts 新增编译和发布的命令
"scripts": {
    "build": "yarn build:clean && yarn build:lib && yarn build:esm-bundle && rimraf lib/demo.html",
    "build:clean": "rimraf lib",
    "build:lib": "vue-cli-service build --target lib --name index --dest lib packages/index.ts",
    "build:esm-bundle": "rollup --config ./build/rollup.config.js"
}
其中 build:lib 是利用 vue-cli 进行 umd 方式打包,build:esm-bundle 是利用 rollup 进行 es 方式打包,具体参数解析如下:
-
--target: 构建目标,默认为应用模式。改为lib启用库模式。 -
--name: 输出文件名 -
--dest: 输出目录,默认dist。改成lib -
[entry]: 入口文件路径,默认为src/App.vue。这里我们指定编译packages/组件库目录。
以下是完整package.json参考示例
{
  "name": "nandit-vue-vant",
  "version": "0.1.0",
  "private": false,
  "description": "基于vue3+vant的前端组件库",
  "main": "lib/index.min.js",
  "module": "lib/index.esm.js",
  "typings": "lib/index.d.ts",
  "keyword": "vue3 vant",
  "license": "MIT",
  "author": {
    "name": "jiuage",
    "email": "nandit@126.com"
  },
  "scripts": {
    "serve": "vue-cli-service serve",
    "docs:dev": "vuepress dev docs",
    "docs:build": "vuepress build docs",
    "build": "yarn build:clean && yarn build:lib && yarn build:esm-bundle && rimraf lib/demo.html",
    "build:clean": "rimraf lib",
    "build:lib": "vue-cli-service build --target lib --name index --dest lib packages/index.ts",
    "build:esm-bundle": "rollup --config ./build/rollup.config.js"
  },
  "dependencies": {
    "core-js": "^3.6.5",
    "vue": "^3.0.0"
  },
  "devDependencies": {
    "@rollup/plugin-node-resolve": "^13.0.5",
    "@vue/cli-plugin-babel": "~4.5.0",
    "@vue/cli-plugin-typescript": "~4.5.0",
    "@vue/cli-service": "~4.5.0",
    "@vue/compiler-sfc": "^3.0.0",
    "rollup": "^2.58.0",
    "rollup-plugin-terser": "^7.0.2",
    "rollup-plugin-typescript2": "^0.30.0",
    "rollup-plugin-vue": "^6.0.0",
    "sass": "^1.26.5",
    "sass-loader": "^8.0.2",
    "typescript": "~4.1.5"
  }
}
3.5 rollup.config.js
新增 rollup.config.js,rollup 打包脚本
// import vue from 'rollup-plugin-vue'
import { nodeResolve } from '@rollup/plugin-node-resolve'
import path from 'path'
// import commonjs from '@rollup/plugin-commonjs'
import { terser } from 'rollup-plugin-terser'
import typescript from 'rollup-plugin-typescript2'
import pkg from '../package.json'
const deps = Object.keys(pkg.dependencies)
// eslint-disable-next-line @typescript-eslint/no-var-requires
const vue = require('rollup-plugin-vue')

export default [
  {
    input: path.resolve(__dirname, '../packages/index.ts'),
    output: [
      {
        format: 'es',
        file: pkg.module,
      }
    ],
    plugins: [
      terser(),
      nodeResolve(),
      // commonjs(),
      vue({
        target: 'browser',
        css: false,
        exposeFilename: false,
      }),
      typescript({
        tsconfigOverride: {
          compilerOptions: {
            declaration: true,
          },
          'include': [
            'packages/**/*',
            'typings/shims-vue.d.ts',
          ],
          'exclude': [
            'node_modules',
            'packages/**/__tests__/*',
          ],
        },
        abortOnError: false,
      }),
    ],
    external(id) {
      return /^vue/.test(id)
        || deps.some(k => new RegExp('^' + k).test(id))
    },
  },
]
4. 开发组件
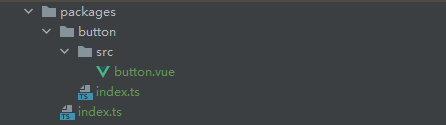
下面以Button组件作为开发示例,在 packages 目录下新建 index.ts 文件和 button 文件夹,在 button 下新建 index.ts 和 src/button.vue,结构如图
button.vue
<template>
  <button class="nd-btn">
    <span v-if="$slots.default"><slot></slot></span>
  </button>
</template>

<script lang="ts">
import { defineComponent } from 'vue'
export default defineComponent({
  name: "nd-button"
})
</script>

<style scoped>

</style>
button/index.ts,单独组件的入口文件,在其他项目可以使用 import { xxx } from 'nandit-vue-vant' 方式进行单个组件引用
import { App } from 'vue'
import Button from './src/button.vue'

// 定义 install 方法, App 作为参数
Button.install = (app: App): void => {
    app.component(Button.name, Button)
}

export default Button
index.ts 作为组件库的入口文件,可以在其他项目的 main.ts 引入整个组件库,内容如下
import { App } from 'vue'
import NdButton from './button'

// 所有组件列表
const components = [ NdButton ]

// 定义 install 方法, App 作为参数
const install = (app: App): void => {
    // 遍历注册所有组件
    components.map((component) => app.component(component.name, component))
}

export {
    NdButton
}

export default {
    install
}
这样,我们就完成一个简单的 button 组件,后续需要扩展其他组件,按照 button 的结构进行开发,并且在 index.ts 文件中 components 组件列表添加即可。
5. 编写示例
组件开发完成后,我们本地先测试一下,没有问题再发布到 npm 仓库。在示例入口 main.ts 引用我们的组件库
import { createApp } from 'vue'
import App from './App.vue'
import NanditVue from '~/index'  // 这里 ~ 就是在 tsconfig.json 以及 vue.config.js 配置的 packages 路径

const app = createApp(App)
app.use(NanditVue)
app.mount('#app')
App.vue 删除项目初始化的 HelloWorld 组件
<template>
  <div>组件示例</div>
  <div>{{ count }}</div>
  <nd-button @click="handleClick">按钮</nd-button>
</template>

<script lang="ts">
import { defineComponent } from 'vue';

export default defineComponent({
  name: 'App',
  components: {
  },
  data() {
    return {
      count: 0
    }
  },
  methods: {
    handleClick() {
      this.count ++
    }
  }
});
</script>

<style lang="scss">
#app {
  font-family: Avenir, Helvetica, Arial, sans-serif;
  -webkit-font-smoothing: antialiased;
  -moz-osx-font-smoothing: grayscale;
  text-align: center;
  color: #2c3e50;
  margin-top: 60px;
}
</style>
启动项目,测试看看
> yarn serve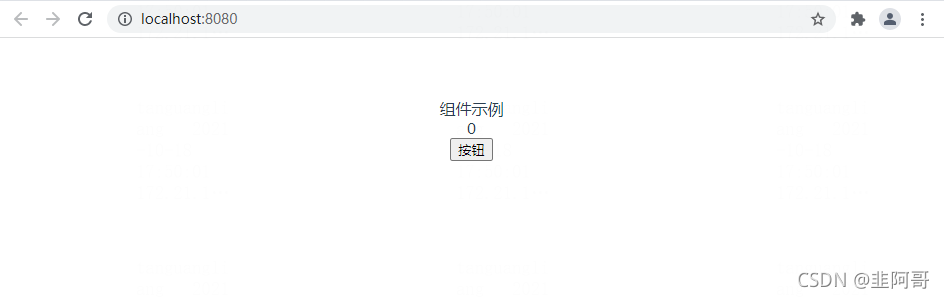
6. 发布组件
组件开发并测试通过后,就可以发布到 npm 仓库提供给其他项目使用了,首先执行编译库命令,生成 lib 目录
> yarn build 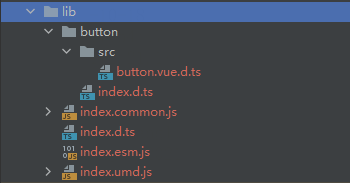
6.1 发布到npm官网
6.1.1 注册npm账号
前往官网注册 npm 账号,如果已注册过,则跳过此步骤
6.1.2 登录npm账号
在项目中 terminal 命令窗口登录 npm 账号
> npm login
Username:
Password:
Email:(this IS public)
输入在 npm 注册的账号、密码、邮箱
6.1.3 发布
确保 registry 是 https://registry.npmjs.org
> npm config get registry如果不是则先修改 registry
> npm config set registry=https://registry.npmjs.org然后执行命令
> npm publish如果需要删除已发布的组件(不推荐删除已发布的组件),则执行以下命令(加 --force 强制删除)
> npm unpublish --force删除指定版本的包,比如包名为 nandit-vue-vant 版本 0.1.0
> npm unpublish nandit-vue-vant@0.1.0如果24小时内有删除过同名的组件包,那么将会发布失败,提示
npm ERR! code E403
npm ERR! 403 403 Forbidden - PUT https://registry.npmjs.org/nandit-vue-vant - nandit-vue-vant cannot be republished until 24 hours have passed.
npm ERR! 403 In most cases, you or one of your dependencies are requesting
npm ERR! 403 a package version that is forbidden by your security policy.

npm ERR! A complete log of this run can be found in:
npm ERR!     D:\tools\nodejs\node_cache\_logs\2021-10-18T09_58_58_933Z-debug.log
只能换一个名称发布或者等24小时之后发布,所以不要随便删除已发布的组件(万一有项目已经引用)
6.2 发布到npm私服
6.2.1 nexus搭建npm私服
使用nexus(这里使用nexus2)搭建npm私服并分配发布账号,详情请参考另一篇文章《nexus2搭建npm私服》
6.2.2 修改npm registry
registry 对应于 nexus 的 npm group的 path
> npm config set registry=http://nexus.xx.com/nexus/content/groups/npm-group6.2.3 配置发布账号
修改 .npmrc 文件(C:\Users\用户名\.npmrc),在文件尾部加入email、always-auth、_auth信息
registry=http://nexus.xx.com/nexus/content/groups/npm-group
email=youremail@xx.com
always-auth=true
_auth=dGVzdDp0ZXN0MTIz
说明:
_auth=dGVzdDp0ZXN0MTIz 是发布账号:密码的base64编码(比如test:test123),可以在菜鸟工具在线进行base64编码
注意:
nexus2 搭建的 npm 私服,需要采用配置 .npmrc 方式进行发布,使用 npm login 方式会出现 401 的错误,比较麻烦。
6.2.4 发布
配置好 npm registry 和发布账号信息之后,在项目根目录执行npm publish --registry http://nexus.xx.com/nexus/content/repositories/npm-hosted/即可发布组件,这里需要指定 registry 为 npm 私服上的 hosted 类型的 repository
> npm publish --registry http://nexus.xx.com/nexus/content/repositories/npm-hosted/也可以在 package.json 配置 publishConfig
"publishConfig": {
	"registry": "http://nexus.xx.com/nexus/content/repositories/npm-hosted/"
}
注意:
registry需要为hosted类型,不能是public
registry地址最后的斜杠(/)不能省略nexus2 搭建的 npm 私服库不支持 @scope 方式发布,如@vue/vue-form,只能用 vue-form 作为组件发布名称,否则也会报 400 错误
nexus2 搭建的 npm 私服库不支持 unpublish
7. 测试
另外创建一个测试项目 vue-demo
7.1 查看 registry
> npm config get registry一般是设置为 https://registry.npmjs.org,如果是 nexus 搭建的 npm 私服库,则设置为私服库 public 地址,如:http://nexus.xx.com/nexus/content/groups/npm-group
7.2 测试 install
这里是为了测试 npm 私服库是否能正常 install 代理库上的依赖,选择一个 vue 项目,把 node_modules 目录删掉,然后再重新 install
> yarn // 或者使用 yarn install; 或者 npm i如果能正常把 vue、element-ui、core-js这些关键包 install 下来,就说明 npm 私服库可用
然后测试一下我们发布的组件
> yarn add nandit-vue-vant // 或者使用 npm i -S nandit-vue-vant看看 package.json 和 node_modules 是否有 nandit-vue-vant 的数据和包,然后在 main.ts 和 App.vue 引用组件(类似示例中的代码),启动项目,测试通过,这样我们的组件库给其他项目使用也没问题了。
7.3 使用组件
在测试项目的main.js(或者是main.ts)引用组件库
import NanditVue from 'nandit-vue-vant'
import 'nandit-vue-vant/lib/index.css'
createApp(App).use(nanditVue).mount('#app')在测试页面App.vue,使用nd-button组件,代码如下
<template>
<img alt="Vue logo" src="./assets/logo.png">
<div>{{ count }}</div>
<nd-button @click="handleClick">测试按钮</nd-button>
<HelloWorld msg="Welcome to Your Vue.js App"/>
</template>
<script>
import HelloWorld from './components/HelloWorld.vue'
export default {
name: 'App',
components: {
HelloWorld
},
data() {
return {
count: 0
}
},
methods: {
handleClick() {
this.count ++
}
}
}
</script>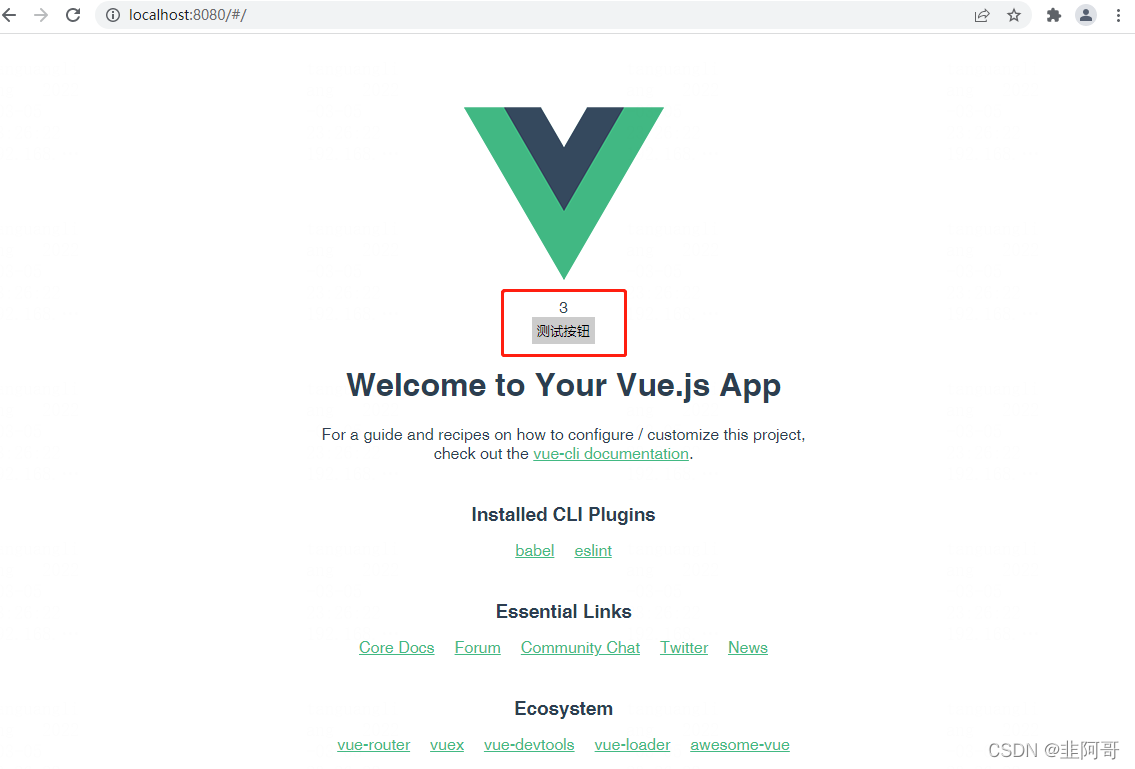
最后
Gitee 项目源码:nandit-vue-vant
有写的不足之处,请大神不吝指教,在此感谢!欢迎大家一起探讨 vue !

为开发者提供学习成长、分享交流、生态实践、资源工具等服务,帮助开发者快速成长。
更多推荐


 12
12 0
0- 0


 已为社区贡献1条内容

所有评论(0)