微信授权获取手机号
微信小程序获取手机号授权,先拿到token,再发送请求
·
首先去微信官方文档可以看到获取手机号的接口需要用到token权限。因此我们需要先拿到token。

在获取个人信息授权时候可以直接在前端调用getUserProfile方法
getUserProfile : function(){
				uni.getUserProfile({
					desc:'用于测试开发',
					success:function(infoRes){

						console.log(infoRes)
					},
					fail : function(err){
						console.log(err);
					}
				})
			}
在开发工具中点击按钮可以看到开始拉取授权,需要主要的是,getUserProfile方法是一定要在用户参与操作下才能启用的,否则该方法无法被调用。

然后我们尝试获取手机号,需要用到open-type="getPhoneNumber" @getphonenumber="getTel"
其中getPhoneNumber是官方给我们封装好的函数,getTel是我自己随意写的方法名open-type则是微信开放能力的固定写法。

getTel : function(res){
				console.log(res);
				let code = res.detail.code;
				console.log(res.detail.code);
				uni.request({
					url:"http://localhost:8080/wx/phone?code="+code,
					data:{},
					success: (res) => {
						console.log("取电话")
						console.log(res)
					}
				})
			}
函数体中可以通过res.detail.code获取后端调用手机号接口所需要的code。
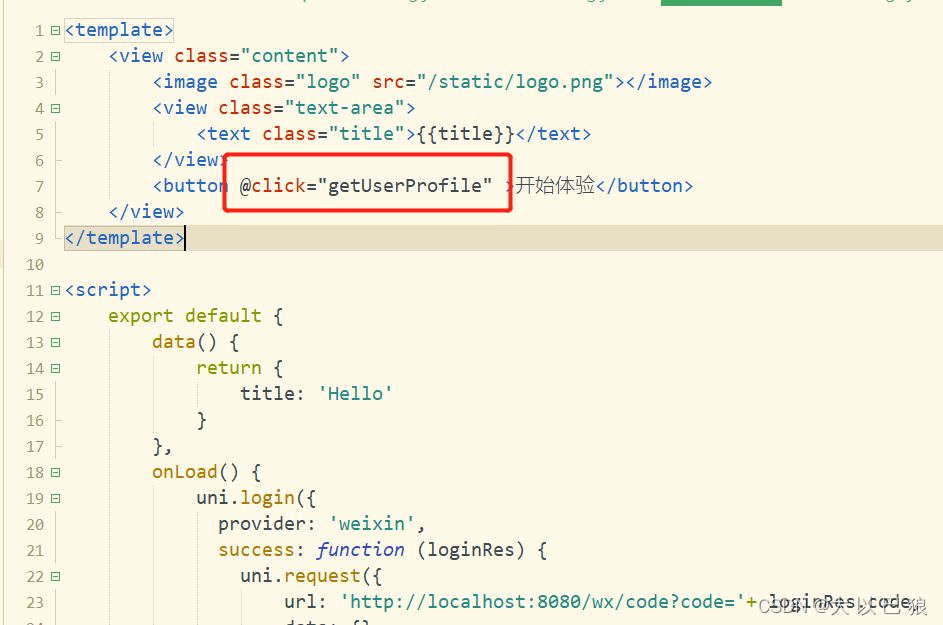
前端代码块:
<template>
	<view class="content">
		<image class="logo" src="/static/logo.png"></image>
		<view class="text-area">
			<text class="title">{{title}}</text>
		</view>
		<button @click="getUserProfile" open-type="getPhoneNumber" @getphonenumber="getTel">开始体验</button>
	</view>
</template>

<script>
	export default {
		data() {
			return {
				title: 'Hello'
			}
		},
		onLoad() {
			uni.login({
			  provider: 'weixin',
			  success: function (loginRes) {
				uni.request({
				    url: 'http://localhost:8080/wx/code?code='+ loginRes.code,
				    data: {},
				    success: (res) => {

				    }
				});
			  }
			});
		},
		methods: {
			getUserProfile : function(){
				uni.getUserProfile({
					desc:'用于开发测试',
					success:function(infoRes){

						console.log(infoRes)
					},
					fail : function(err){
						console.log(err);
					}
				})
			},
			getTel : function(res){
				console.log(res);
				let code = res.detail.code;
				console.log(res.detail.code);
				uni.request({
					url:"http://localhost:8080/wx/phone?code="+code,
					data:{},
					success: (res) => {
						console.log("取电话")
						console.log(res)
					}
				})
			}
		}
	}
</script>

<style>
	.content {
		display: flex;
		flex-direction: column;
		align-items: center;
		justify-content: center;
	}

	.logo {
		height: 200rpx;
		width: 200rpx;
		margin-top: 200rpx;
		margin-left: auto;
		margin-right: auto;
		margin-bottom: 50rpx;
	}

	.text-area {
		display: flex;
		justify-content: center;
	}

	.title {
		font-size: 36rpx;
		color: #8f8f94;
	}
</style>
后端首先新建一个Util类构造获取token的方法,这里我们使用同步锁以应对高并发,保障线程安全。并使用双重校验,保证运行过程中不会出现因系统编译排序导致的逻辑问题(概率极低,相当于一个人一辈子被雷劈中十次)
@Component
public class WXUtil {

	String appId = "这里是APPID";
	String secret = "这里是小程序秘钥";
	String accessToken = "";
	LocalDateTime passTime = null;

	@Autowired
	RestTemplate restTemplate;

	public String getAccessToken() {

		LocalDateTime current = LocalDateTime.now();

		//同步锁,使用当前对象作为锁头(spring中bean的声明周期默认单例,可以配置,request、session)
		//第一次校验:如果一个对象抢到锁头。
		if (StringUtils.isEmpty(this.accessToken) || null == passTime || current.isAfter(passTime)) {
			synchronized (this) {

				//双重校验,第二次校验
				//预防代码编译顺序被打乱。
				if (StringUtils.isEmpty(this.accessToken) || null == passTime || current.isAfter(passTime)) {

					//申请获取token
					String url = "https://api.weixin.qq.com/cgi-bin/token?grant_type=client_credential&appid=" + appId
							+ "&secret=" + secret;
					ResponseEntity<JSONObject> wxResult = restTemplate.getForEntity(url, JSONObject.class);
					this.accessToken = wxResult.getBody().getString("access_token");
					Long expiresIn = wxResult.getBody().getLong("expires_in");
					passTime = current.plusSeconds(expiresIn);
				}
			}

		}
		return this.accessToken;
	}
}
然后在获取到token后发送请求,获取到手机号信息。
@RestController
@RequestMapping("/wx")
public class WxSystemController {

	String appId = "这里是APPID";
	String secret = "这里是小程序秘钥";

	@Autowired
	RestTemplate restTemplate;

	@Autowired
	IUserService IUserService;

	@Autowired
	WXUtil wxutil;//将util文件注入进来

	@GetMapping("/code")
	public JSONObject code(String code) {

		JSONObject result = new JSONObject();

		// 向微信发请求 获取onenId
		String url = "https://api.weixin.qq.com/sns/jscode2session?appid=" + appId + "&secret=" + secret + "&js_code="
				+ code + "&grant_type=authorization_code";

		// 发送HTTP请求
		ResponseEntity<String> wxResult = restTemplate.getForEntity(url, String.class);
		// 把String转换成JSON
		JSONObject wxJsonObject = JSONObject.parseObject(wxResult.getBody());
		// 获取openId
		String openId = wxJsonObject.getString("openid");

		QueryWrapper<User> ifOppenIdqueryWaQueryWrapper = new QueryWrapper<>();

		ifOppenIdqueryWaQueryWrapper.eq("openId", openId);

		List<User> userList = IUserService.list(ifOppenIdqueryWaQueryWrapper);
		if (0 == userList.size()) {
			result.put("result", false);
			return result;
		} else {
			result.put("result", true);
			return result;
		}
	}

	@GetMapping("/phone")
	public JSONObject Phone(String code) {

		String accessToken = wxutil.getAccessToken();

		String url = "https://api.weixin.qq.com/wxa/business/getuserphonenumber?access_token=" + accessToken;

		Map<String, Object> requestParam = new HashMap<String, Object>();
		requestParam.put("code", code);

		ResponseEntity<JSONObject> wxResult = restTemplate.postForEntity(url, requestParam, JSONObject.class);
		JSONObject phoneInfo = wxResult.getBody().getJSONObject("phone_info");
		return phoneInfo;
	}

}
运行后可在微信开发者工具上打印出结果:


华为开发者空间,是为全球开发者打造的专属开发空间,汇聚了华为优质开发资源及工具,致力于让每一位开发者拥有一台云主机,基于华为根生态开发、创新。
更多推荐


 1
1 0
0- 0


 已为社区贡献1条内容

所有评论(0)