微信聊天小程序——(四、聊天页面)
我们拿到了与好友聊天的聊天记录。主要作用的是这个函数。具体效果:不显示错误。在massage页面。
·
四、聊天页面
步骤一、聊天页面的搭建
效果图:

思路:
聊天页面的搭建
- 首先在聊天页面获取我们所有的好友信息
- 其次当点击我们对应好友,进入聊天页面
注意传递我们此时的聊天记录表id,方便之后进行添加聊天记录 - 聊天页面下方布局发送消息
注意为传递参数的发送框 - 获取我们发送消息,传递到我们的聊天记录表的记录中
在聊天页面中:
getChatRecord()
  // 功能:当跳转到聊天页面的时候,显示聊天信息
  // 思路:1.更加我们接收到的_id在聊天表中查询,返回查询值
  //      2.在wxml页面进行渲染
publishChat()
// 功能:当我们发布消息的时候,更新我们的数据库表中的消息
// 思路:1.首先根据页面接收到的值,获取这条消息的_id
//      2.新建一个空白数组,将我们需要记录的信息、聊天内容放到这个数组中
//      3.将这个数组放到我们存放聊天记录的record数组中
//      4.更新我们的数据库表格
//      5.更新之后,再次调用,使刚刚发送的消息出现
//      6.将我们的评论和输入消息内筒赋值为空
getInputValue(event)
// 功能:获取输入框的值
在js文件:
const app=getApp()
const util= require("../../utils/utils")

Page({


  data: {

  },

  onShow(){
    this.setData({
      userInfo: app.globalData.userInfo
    })
  },

  // 功能:当点击好友的时候,传输好友信息
  onLoad(options) {
    console.log(options.id)
    this.setData({
      recordId:options.id
    })

  this.getChatRecord();

  },

  // 功能:当跳转到聊天页面的时候,显示聊天信息
  // 思路:1.更加我们接收到的_id在聊天表中查询,返回查询值
  //      2.在wxml页面进行渲染
  getChatRecord(){

    var that = this;
    wx.cloud.database().collection('chat_record1').doc(that.data.recordId).get({
      success(res){
        console.log(res)
        that.setData({
          chatList: res.data.record
        })
      }
    })
  },


// 功能:当我们发布消息的时候,更新我们的数据库表中的消息
// 思路:1.首先根据页面接收到的值,获取这条消息的_id
//      2.新建一个空白数组,将我们需要记录的信息、聊天内容放到这个数组中
//      3.将这个数组放到我们存放聊天记录的record数组中
//      4.更新我们的数据库表格
//      5.更新之后,再次调用,使刚刚发送的消息出现
//      6.将我们的评论和输入消息内筒赋值为空

  publishChat(){
    var that = this;
    wx.cloud.database().collection('chat_record1').doc(that.data.recordId).get({
      success(res){
        console.log(res)

        var record = res.data.record
        var msg = {}
        msg.userId = app.globalData.userInfo._id
        msg.nickName = app.globalData.userInfo.nickName
        msg.faceImg = app.globalData.userInfo.faceImg
        msg.openid = app.globalData._id
        msg.text = that.data.inputValue
        msg.time = util.formatTime(new Date())

        record.push(msg)
        console.log(msg)
        wx.cloud.database().collection('chat_record1').doc(that.data.recordId).update({
          data: {
            record: record
          },
          success(res){
            console.log(res)
            wx.showToast({
              title: '发布成功!',
            })

            //刷新下
            that.getChatRecord()

            that.setData({
              inputValue :'',
              plcaceHolder:'评论'
            })
          }
        })


      }
    })
  },


  // 功能:获取输入框的值
  getInputValue(event){

    console.log(event.detail.value)

    this.data.inputValue = event.detail.value

  },
})
在wxml文件中:
<view class="pub-comment">
  <view class="pub-left">
    <input class="pub-input" placeholder="{{plcaceHolder}}" bindinput="getInputValue" value="{{inputValue}}"></input>
  </view>

  <view class="pub-button" bindtap="publishChat">发送</view>
</view>
在wxss文件中:
/* 发布评论 */
.pub-comment {
  background-color: #F7F7F7;
  padding: 20rpx 40rpx;
  display: flex;
  flex-direction: row;
  align-items: center;
  position: fixed;
  bottom: 0;
}
.pub-left {
  background-color: #fff;
  color: #7F7F7F;
  border-radius: 10rpx;
  margin-right: 20rpx;
}
.pub-input {
  padding: 10rpx 20rpx;
  width: 500rpx;
}
.pub-button {
  color: #7F7F7F;
  border: solid 1rpx #7F7F7F;
  border-radius: 10rpx;
  padding: 10rpx 15rpx;
  direction:ltr;
}
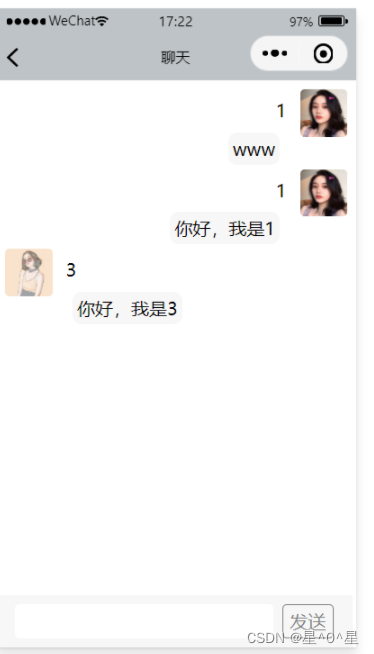
步骤二、聊天页面实现
具体效果:
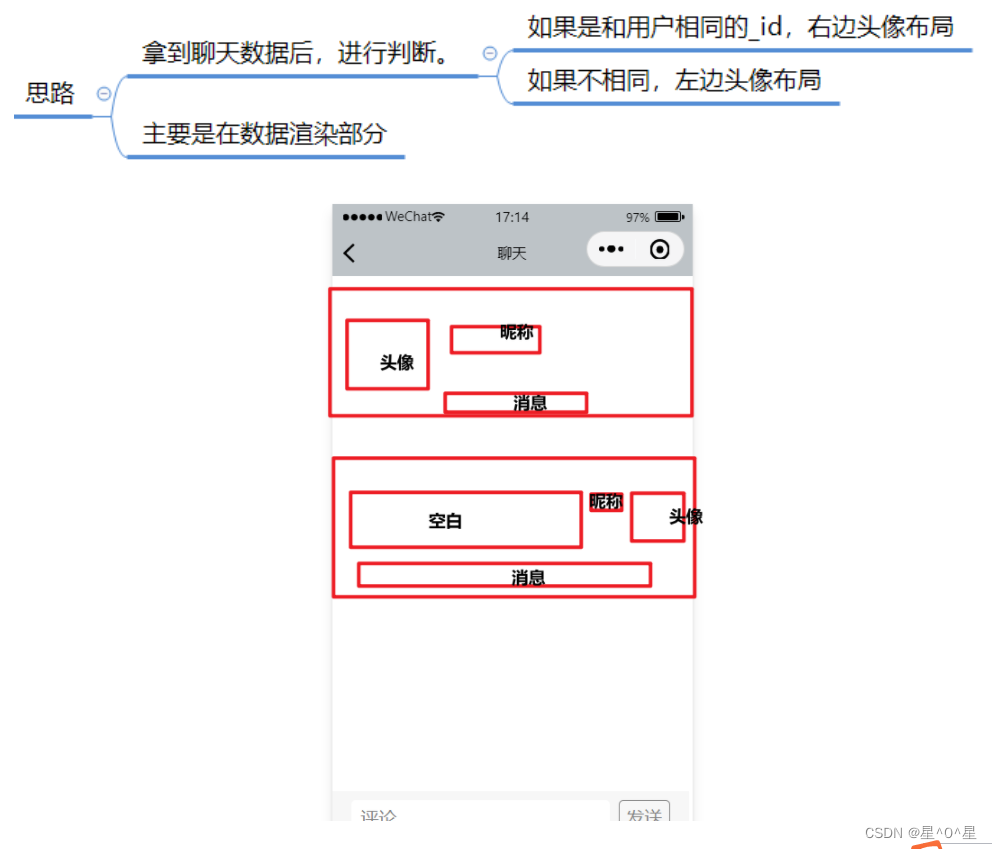
思路:
- 拿到聊天数据后,进行判断。
如果是和用户相同的_id,右边头像布局
如果不相同,左边头像布局 - 主要是在数据渲染部分
在js文件:
主要作用的是这个函数。
  // 功能:当跳转到聊天页面的时候,显示聊天信息
  // 思路:1.更加我们接收到的_id在聊天表中查询,返回查询值
  //      2.在wxml页面进行渲染
  getChatRecord(){

    var that = this;
    wx.cloud.database().collection('chat_record1').doc(that.data.recordId).get({
      success(res){
        console.log(res)
        that.setData({
          chatList: res.data.record
        })
      }
    })
  },
在wxml 文件:
<block wx:for="{{chatList}}">

<block wx:if="{{userInfo._id != item.userId}}">
  <view class="top">
    <image class="face" src="{{item.faceImg}}"></image>
    <view class="nick">{{item.nickName}}</view>
  </view>
  <view class="bot">
    <text class="bot-text">{{item.text}}</text>
  </view>
</block>

<block wx:if="{{userInfo._id == item.userId}}">
  <view class="top-right">
    <view></view>
    <view class="top-2">
      <view class="nick-right">{{item.nickName}}</view>
      <image class="face-right" src="{{item.faceImg}}"></image>
    </view>
  </view>
  <view class="bot-right">
    <text class="bot-text">{{item.text}}</text>
  </view>
</block>

</block>


<view class="pub-comment">
  <view class="pub-left">
    <input class="pub-input" placeholder="{{plcaceHolder}}" bindinput="getInputValue" value="{{inputValue}}"></input>
  </view>

  <view class="pub-button" bindtap="publishChat">发送</view>
</view>
在wxss文件:
/* 发布评论 */
.pub-comment {
  background-color: #F7F7F7;
  padding: 20rpx 40rpx;
  display: flex;
  flex-direction: row;
  align-items: center;
  position: fixed;
  bottom: 0;
}
.pub-left {
  background-color: #fff;
  color: #7F7F7F;
  border-radius: 10rpx;
  margin-right: 20rpx;
}
.pub-input {
  padding: 10rpx 20rpx;
  width: 500rpx;
}
.pub-button {
  color: #7F7F7F;
  border: solid 1rpx #7F7F7F;
  border-radius: 10rpx;
  padding: 10rpx 15rpx;
  direction:ltr;
}


.top {
  display: flex;
  flex-direction: row;
  margin: 20rpx 20rpx 0 20rpx;
}
.top-2 {
  display: flex;
  flex-direction: row;
}
.top-right {
  display: flex;
  flex-direction: row;
  margin: 20rpx 20rpx 0 20rpx;
  justify-content: space-between;
}
.face {
  width: 100rpx;
  height: 100rpx;
  border-radius: 10rpx;
  margin-right: 30rpx;
}
.face-right {
  width: 100rpx;
  height: 100rpx;
  border-radius: 10rpx;
  margin-left: 30rpx;
}
.bot {
  margin-left: 160rpx;
  margin-right: 20rpx;

}

.bot-right {
  margin-right: 160rpx;
  margin-left: 20rpx;

  text-align: right;
}
.bot-text {
  background-color: #F7F7F7;
  padding: 10rpx 10rpx;
  border-radius: 20rpx;
}
.nick {
  margin-top: 20rpx;
}
.nick-right {
  margin-top: 20rpx;
}
步骤三、实现自动登录
具体效果:不显示错误。
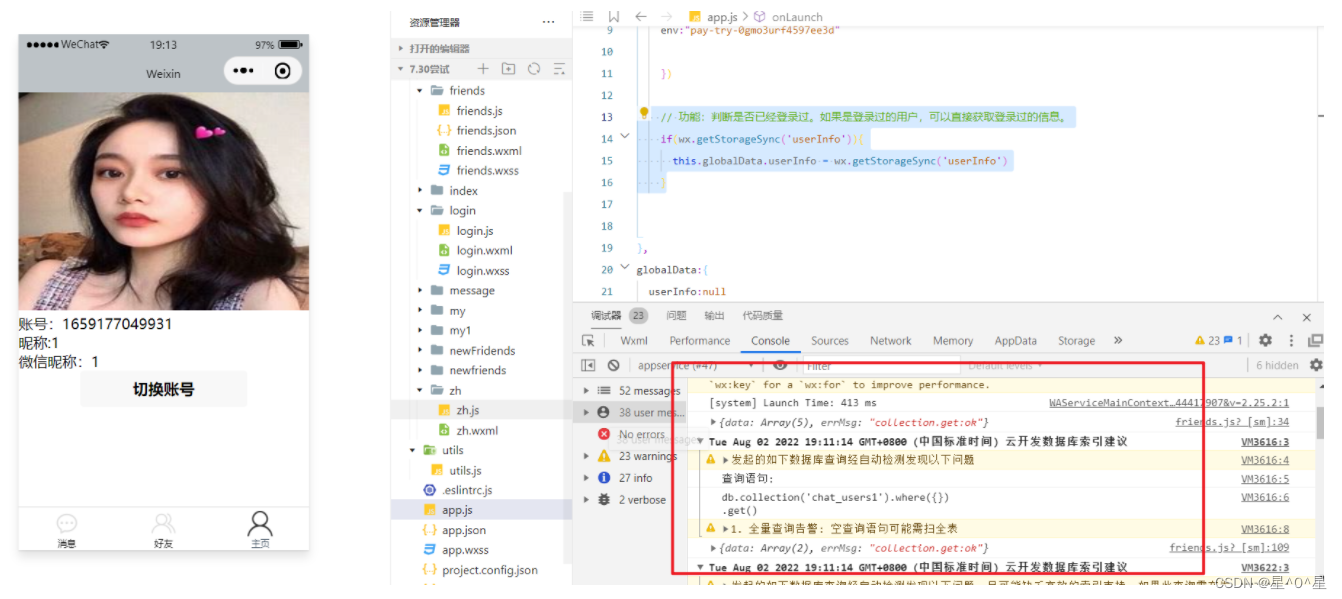
思路:
- 在登录成功之后,把登录信息存储。
- 把登录信息赋值给主页的js页面,之后再登录和注册页面引用。
- 在登录和注册页面,每次从缓存中拿我们的登录信息。
在注册页面:
      app.globalData.userInfo=res.data[0]//把个人数据赋值给全局

      wx.setStorageSync('userInfo', res.data[0])
在登录页面:
    app.globalData.userInfo=res.data

    wx.setStorageSync('userInfo', res.data)
在主页的js文件中:
    // 功能:判断是否已经登录过。如果是登录过的用户,可以直接获取登录过的信息。
    if(wx.getStorageSync('userInfo')){
      this.globalData.userInfo = wx.getStorageSync('userInfo')
    }
步骤四、消息页面查看最近的聊天消息和时间
具体效果:
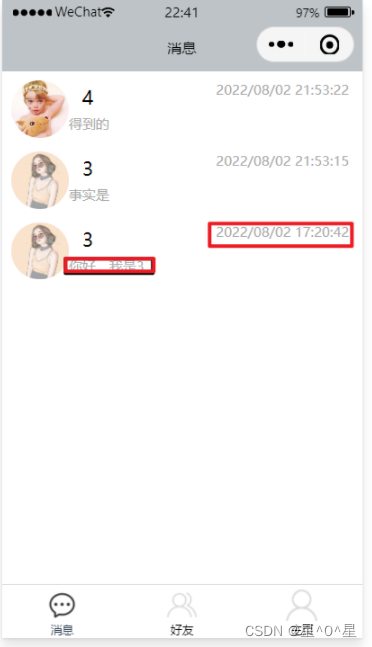
思路:
- 拿到我们聊天记录中的time和最后一条聊天消息
- 进行渲染,注意,渲染的时候,左边一个盒子,右边一个盒子
在massage页面
js文件中:
我们拿到了与好友聊天的聊天记录
  // 功能:当我的好友页面展示的时候,显示出我的好友
  // 思路:1.查询聊天表中,A或B为我们userinfo相同_id同时,好友状态为1。注意这个时候可以用command.or
  //      2.将满足条件的值给到我们本页的data中
  //      3.渲染的时候,进行判断,因为A和B都可能是我们的好友,所以,当某个是我们好友的时候,不在本页渲染。
  myFriends(){
    var that = this;
    const _ = wx.cloud.database().command
    wx.cloud.database().collection("chat_record1").where(
      _.or([
      {
        userA_id:app.globalData.userInfo._id,
        isFriend:1
     },
     {
      userB_id:app.globalData.userInfo._id,
      isFriend:1
     }])
   ).get({
      success(res){
        console.log(res)
        that.setData({
          myFriendsList:res.data
        })
      }
    })
   },
在wxml文件中:
<block class="list_fox" wx:for="{{myFriendsList}}">

  <view  class="list_item" bindtap="getChat_details" data-index="{{}}"  >
  <!-- 其中的一个条件 -->
    <block wx:if="{{userInfo._id==item.userA_id}}">
      <view class="left" bindtap="toChat" data-id="{{item._id}}">
        <image class="ima" src="{{item.userB_faceImg}}"></image>

        <view class="fox_right">
          <view class="name">{{item.userB_nickName}}</view>
          <view class="fox_text">{{item.record[item.record.length-1].text}}</view>
        </view>


      </view>

      <view>
        <view class="fox_right">{{item.record[item.record.length-1].time}}</view>
      </view>
    </block>


  <!-- 其中的另外一个条件 -->
    <block wx:if="{{userInfo._id==item.userB_id}}">
      <view class="left" bindtap="toChat" data-id="{{item._id}}">
        <image class="ima" src="{{item.userA_faceImg}}"></image>

        <view class="fox_right">
          <view class="name">{{item.userA_nickName}}</view>
          <view class="fox_text">{{item.record[item.record.length-1].text}}</view>
        </view>


      </view>

      <view>
        <view class="fox_right">{{item.record[item.record.length-1].time}}</view>
      </view>
    </block>
  </view>

</block>
在wxss页面中:
.myfriends{

  margin-left: 10rpx;

 }
 .ima{
   width: 120rpx ;
   height: 120rpx;
   border-radius: 50%;
 }
 .list_item{
   margin: 10rpx 10rpx;
   padding: 10rpx;
   display: flex;
   flex-direction: row;
   justify-content: space-between;

 }
 .name{
  margin: 10rpx 10rpx 10rpx 30rpx;
  color: black;
  font-size: 40rpx;
 }
 .left{
  display: flex;
  flex-direction: row;

 }
 .right{
  margin: 10rpx 0rpx 0rpx 350rpx;
 }
 .fox_right{
   margin-right: 20rpx;
   font-size: 30rpx;
   color: darkgray;
 }
 .fox_text{
   color: darkgray;
   font-size: 30rpx;
 }
 .fox_right{
   margin-right: 10rpx;
 }

为开发者提供学习成长、分享交流、生态实践、资源工具等服务,帮助开发者快速成长。
更多推荐


 16
16 0
0- 0


 已为社区贡献2条内容

所有评论(0)