深入了解el-scrollbar
原始的滚动条确实不太美观,放在浏览器中勉强也能接收,但是在页面中的DOM元素也是这个滚动条会影响很大。element-ui库有一个组件,虽然官方文档中没有介绍,但是在源码中是存在的,在源码的packages/scrollbar文件夹中。之前一直在用,现在花点时间了解一下他是如何做到的。...
原始的滚动条确实不太美观,放在浏览器中勉强也能接收,但是在页面中的DOM元素也是这个滚动条会影响很大。element-ui库有一个组件,虽然官方文档中没有介绍,但是在源码中是存在的,在源码的packages/scrollbar文件夹中。之前一直在用,现在花点时间了解一下他是如何做到的。
明确一点,如果要直接修改浏览器滚动条的样式,一般是要有浏览器前缀的选择器才能进行修改,比如这样::-webkit-scrollbar{}。这种会出现很多兼容问题,所以来看看el-scrollbar是如何处理兼容的。
打开src/main.js直接查看,好家伙,用渲染函数这种方式定义组件的,但问题不大,基本还是能看懂的。
首先直接查看render函数是如何定义组件的
// 获取浏览器滚动条宽度
let gutter = scrollbarWidth();
// 看看有没有wrapStyle绑定的属性过来
let style = this.wrapStyle;
// 有浏览器滚动条宽度
if (gutter) {
// 下面将wrapStyle标准化并加入margin属性
const gutterWith = `-${gutter}px`;
const gutterStyle = `margin-bottom: ${gutterWith}; margin-right: ${gutterWith};`;
if (Array.isArray(this.wrapStyle)) {
style = toObject(this.wrapStyle);
style.marginRight = style.marginBottom = gutterWith;
} else if (typeof this.wrapStyle === 'string') {
style += gutterStyle;
} else {
style = gutterStyle;
}
}
// 定义el-scrollbar__view,子组件有个插槽,就是放置el-scrollbar标签下的内容
const view = h(this.tag, {
class: ['el-scrollbar__view', this.viewClass],
style: this.viewStyle,
ref: 'resize'
}, this.$slots.default);
// 删除掉没啥用的,既然都要用了,还需要原生干嘛
// 定义el-scrollbar__wrap,就是el-scrollbar__view的父级元素
// 并将上述标准化的wrapStyle属性绑定下来
const wrap = (
<div
ref="wrap"
style={ style }
onScroll={ this.handleScroll }
class={ [this.wrapClass, 'el-scrollbar__wrap', gutter ? '' : 'el-scrollbar__wrap--hidden-default'] }>
{ [view] }
</div>
);
let nodes = ([
wrap,
<Bar
move={ this.moveX }
size={ this.sizeWidth }></Bar>,
<Bar
vertical
move={ this.moveY }
size={ this.sizeHeight }></Bar>
]);
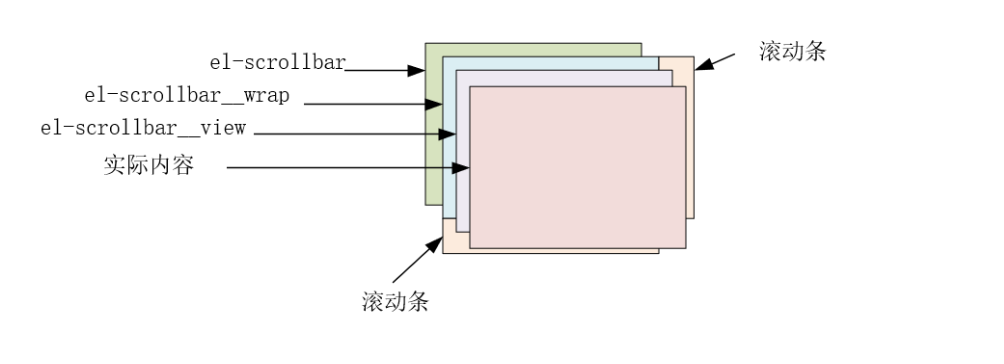
// 最终这里形成的模板就是
// <div class='el-scrollbar'>
// <div class= 'el-scrollbar__wrap'>
// <div class= 'el-scrollbar__view'>
// <slot></slot>
// </div>
// </div>
// <div class='el-scrollbar__bar'></div>
// <div class='el-scrollbar__bar'></div>
// </div>
return h('div', { class: 'el-scrollbar' }, nodes);
看到这里就醒悟了,实际上就是利用wrap通过 overflow:scroll;直接将滚动条显示出来,wrap的外层也就是el-scrollbar通过overflow: hidden隐藏掉促使看不见滚动条。同时这里监听了滚动,滚动函数简单的记录了几个参数,这里先不管。这里的render只是简单提了一下el-scrollbar__bar,那么我们需要详细看看,在src/bar.js中
const { size, move, bar } = this;

return (
  <div
    class={ ['el-scrollbar__bar', 'is-' + bar.key] }
    onMousedown={ this.clickTrackHandler } >
    <div
      ref="thumb"
      class="el-scrollbar__thumb"
      onMousedown={ this.clickThumbHandler }
      style={ renderThumbStyle({ size, move, bar }) }>
    </div>
  </div>
);
这个就比较简单了,通过bar.key去更改样式,实际上就是显示自定义滚动条还是不显示自定义滚动条,关键在于el-scrollbar__thumb,这个div就是能够拖动的那个div,所以很关键。可以看到这两个都绑定了一个监听鼠标按下的函数,基本上就是处理拖动的时候的数据的变化。
clickThumbHandler(e) {
  // prevent click event of right button
  if (e.ctrlKey || e.button === 2) {
    return;
  }
  this.startDrag(e);
  this[this.bar.axis] = (e.currentTarget[this.bar.offset] - (e[this.bar.client] - e.currentTarget.getBoundingClientRect()[this.bar.direction]));
},

clickTrackHandler(e) {
  const offset = Math.abs(e.target.getBoundingClientRect()[this.bar.direction] - e[this.bar.client]);
  const thumbHalf = (this.$refs.thumb[this.bar.offset] / 2);
  const thumbPositionPercentage = ((offset - thumbHalf) * 100 / this.$el[this.bar.offset]);

  this.wrap[this.bar.scroll] = (thumbPositionPercentage * this.wrap[this.bar.scrollSize] / 100);
},

startDrag(e) {
  e.stopImmediatePropagation();
  this.cursorDown = true;

  on(document, 'mousemove', this.mouseMoveDocumentHandler);
  on(document, 'mouseup', this.mouseUpDocumentHandler);
  document.onselectstart = () => false;
},

mouseMoveDocumentHandler(e) {
  if (this.cursorDown === false) return;
  const prevPage = this[this.bar.axis];

  if (!prevPage) return;

  const offset = ((this.$el.getBoundingClientRect()[this.bar.direction] - e[this.bar.client]) * -1);
  const thumbClickPosition = (this.$refs.thumb[this.bar.offset] - prevPage);
  const thumbPositionPercentage = ((offset - thumbClickPosition) * 100 / this.$el[this.bar.offset]);

  this.wrap[this.bar.scroll] = (thumbPositionPercentage * this.wrap[this.bar.scrollSize] / 100);
},

mouseUpDocumentHandler(e) {
  this.cursorDown = false;
  this[this.bar.axis] = 0;
  off(document, 'mousemove', this.mouseMoveDocumentHandler);
  document.onselectstart = null;
}
这里可以看出,el-scrollbar__thumb用了html5的拖拽然后去计算拖拽的距离,然后更新视图的位置,视图的位置通过renderThumbStyle函数中的定义的css的translate属性进行变换的。
handleScroll() {
  const wrap = this.wrap;

  this.moveY = ((wrap.scrollTop * 100) / wrap.clientHeight);
  this.moveX = ((wrap.scrollLeft * 100) / wrap.clientWidth);
},
上述提到的滚动函数,可以看出,warp.scrollTop的值的变换是原始滚动就会改变的,这里这是将滚动的值拿出来赋值给this.moveY促使自定义的滚动条也发生移动而已。

为开发者提供学习成长、分享交流、生态实践、资源工具等服务,帮助开发者快速成长。
更多推荐


 4
4 0
0- 0


 已为社区贡献1条内容

所有评论(0)