通过Jquery获取表单的数据
简单的JQuery获取表单
·
思路:
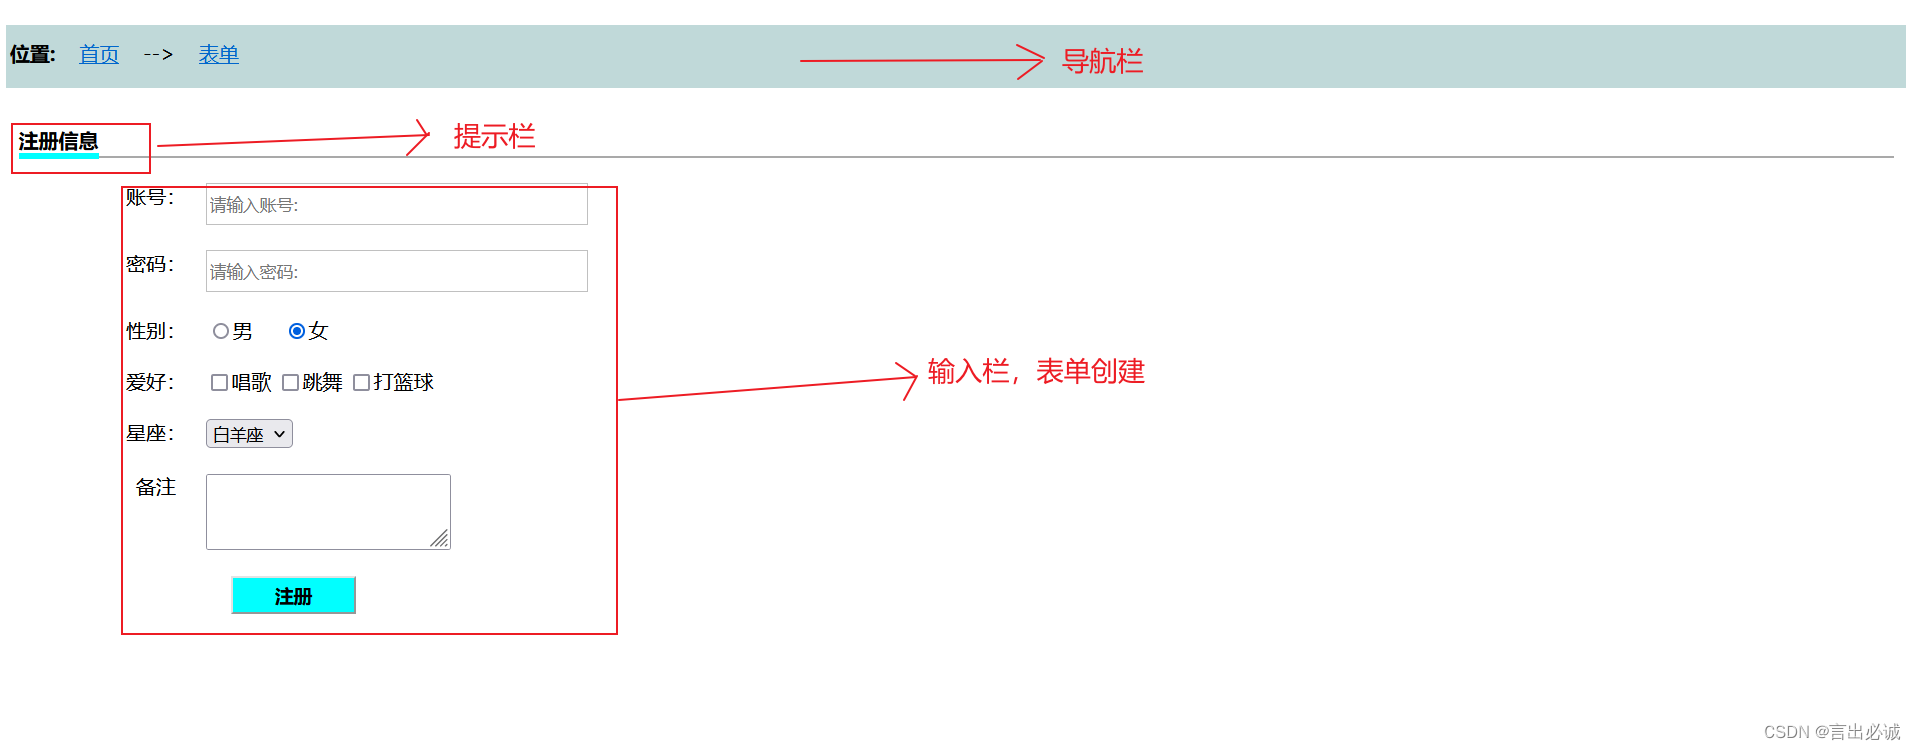
- 首先先想好页面布局,然后写出页面的样式。本次项目我分为以下三个部分来写。

- 对应代码实现需要的知识点有个模糊概念:(1)JQuery(2)form表单(3)盒子模型
- 代码实现:本次项目代码实现分为两个部分,一个部分是表单展示的实现,另一个部分则是JQuery获取信息,通过控制台输出。
实现过程及代码:
- 首先是表单结构 ,这里我用盒子模型划分成三个部分
<!DOCTYPE html> <html> <head> <meta charset="utf-8"> <title>注册</title> <style type="text/css"> #box1 { //导航栏的盒子 width: 100%; height: 50px; background-color: #C0D9D9; float: left; } .a { //导航栏盒子样式 width: 100%; height: 50px; text-align: -moz-left; } #box1_01 { width: 100%; height: 50px; margin-top: 12px; margin-left: 3px; } #box2 { //提示栏的盒子 width: 100%; height: 40px; float: left; margin-left: 10px; margin-top: 20px; margin-right: 10px; } .b { width: 100%; height: 39px; text-align: left; } #box3 { //表单的盒子 width: 100%; height: 100%; float: left; } .c { width: 100%; height: 600px; } .c ul{ list-style: none; } .c ul li{ margin-bottom: 20px; position: relative; } form { margin-top: 20px; margin-left: 40px; } span { font-weight: 700;//设置字体加粗的样式 } label{ //对表单里的行距进行设置 width:80px; border: 0px; display: inline-block; float: left; text-align: -moz-center; } .s { //设置灰色下划线 border-bottom: 2px solid darkgrey; margin-bottom: 10px; position: relative; height: 35px; margin-right: 20px; } .s span { //设置蓝色下划线并通过下移去覆盖灰色的下划线 border-bottom: 5px solid #00FFFF; position: absolute; bottom: -2.5px; } .k_input { //设置输入框的样式 width: 300px; height: 30px; border: 1px solid #C0C0C0; } #submit { //设置按钮样式 margin-left: 100px; background-color: #00FFFF; font-size: 15px; color: black; font-weight: bold; width: 100px; height: 30px; } </style> </head> <body> <div id="box1" class="a"> <div id="box1_01"> <span>位置:    </span><a href="#">首页</a>    -->    <a href="#">表单</a> </div> </div> <div id="box2" class="b"> <div class="s"> <div class="s1"> <span>注册信息</span> </div> </div> </div> <form> <div id="box3" class="c"> <ul> <li> <label>账号:</label> <input type="text" id="username" name="username" class="k_input" placeholder="请输入账号:" /> </li> <li> <label>密码:</label> <input type="text" id="password" name="password" class="k_input" placeholder="请输入密码:" /> </li> <li> <label>性别:</label> <input type="radio" name="sex" value="yes" checked />男     <input type="radio" name="sex" value="no" checked />女 </li> <li> <label>爱好:</label> <input type="checkbox" id="hobby" name="hobby" value="唱" />唱歌 <input type="checkbox" id="hobby" name="hobby" value="跳" />跳舞 <input type="checkbox" id="hobby" name="hobby" value="Rapper" />打篮球 </li> <li> <label>星座:</label> <select id="stars" name="stars"> <option value="1">白羊座</option> <option value="1">金牛座</option> <option value="1">处女座</option> </select> </li> <li> <label>备注</label> <textarea id="remark" name="remark"></textarea> </li> <li> <input type="button" name="submit" id="submit" value="注册"/> </li> </ul> </div> </form> </body> </html>一共是三个盒子box1、2、3;对应的三个类去实现相应的样式。
-
JQuery获取表单的代码:首先需要导入JQuery文件。

然后才是开始写入script代码

-
完整的代码如下
<!DOCTYPE html> <html> <head> <meta charset="utf-8"> <title>注册</title> <script src="js/jquery-3.6.0.js"></script> <style type="text/css"> #box1 { width: 100%; height: 50px; background-color: #C0D9D9; float: left; } .a { width: 100%; height: 50px; text-align: -moz-left; } #box1_01 { width: 100%; height: 50px; margin-top: 12px; margin-left: 3px; } #box2 { width: 100%; height: 40px; float: left; margin-left: 10px; margin-top: 20px; margin-right: 10px; } .b { width: 100%; height: 39px; text-align: left; } #box3 { width: 100%; height: 100%; float: left; } .c { width: 100%; height: 600px; } .c ul{ list-style: none; } .c ul li{ margin-bottom: 20px; position: relative; } form { margin-top: 20px; margin-left: 40px; } span { font-weight: 700; } label{ width:80px; border: 0px; display: inline-block; float: left; text-align: -moz-center; } .s { border-bottom: 2px solid darkgrey; margin-bottom: 10px; position: relative; height: 35px; margin-right: 20px; } .s span { border-bottom: 5px solid #00FFFF; position: absolute; bottom: -2.5px; } .k_input { width: 300px; height: 30px; border: 1px solid #C0C0C0; } #submit { margin-left: 100px; background-color: #00FFFF; font-size: 15px; color: black; font-weight: bold; width: 100px; height: 30px; } </style> <script type="text/javascript"> $(document).ready(function(){ $("#submit").click(function(){ var username = $("input[name='username']").val(); var password = $("input[name='password']").val(); var sex = $("input[name='sex']:checked").val(); var hobbys = []; var hobbyArrs = $("input[name='hobby']:checked"); for (var i = 0; i < hobbyArrs.length; i++) { hobbys[i] = $(hobbyArrs[i]).val(); } var stars = $("#stars option:selected").val(); var remark = $("#remark").val(); var res = {}; res.username = username; res.password = password; res.sex = sex; res.hobby = hobbys; res.stars = stars; res.remark = remark; console.log(res); $("#result").html(JSON.stringify(res)); }); }); </script> </head> <body> <div id="box1" class="a"> <div id="box1_01"> <span>位置:    </span><a href="#">首页</a>    -->    <a href="#">表单</a> </div> </div> <div id="box2" class="b"> <div class="s"> <div class="s1"> <span>注册信息</span> </div> </div> </div> <form> <div id="box3" class="c"> <ul> <li> <label>账号:</label> <input type="text" id="username" name="username" class="k_input" placeholder="请输入账号:" /> </li> <li> <label>密码:</label> <input type="text" id="password" name="password" class="k_input" placeholder="请输入密码:" /> </li> <li> <label>性别:</label> <input type="radio" name="sex" value="yes" checked />男     <input type="radio" name="sex" value="no" checked />女 </li> <li> <label>爱好:</label> <input type="checkbox" id="hobby" name="hobby" value="唱" />唱歌 <input type="checkbox" id="hobby" name="hobby" value="跳" />跳舞 <input type="checkbox" id="hobby" name="hobby" value="打篮球" />打篮球 </li> <li> <label>星座:</label> <select id="stars" name="stars"> <option value="白羊座">白羊座</option> <option value="金牛座">金牛座</option> <option value="处女座">处女座</option> </select> </li> <li> <label>备注</label> <textarea id="remark" name="remark"></textarea> </li> <li> <input type="button" name="submit" id="submit" value="注册"/> </li> </ul> </div> </form> <p id="result"></p> </body> </html>
检测及结果:
开始检测时,星座输出不了,经检查发现是一个单词option写错为opition。

因为是在代码中加了一个p标签,方便直接看到结果,所以有最后一行的输出。
最后去页面看控制台

更多推荐
 已为社区贡献1条内容


所有评论(0)