【vue】 配置代理、解决跨域问题
尚硅谷视频:https://www.bilibili.com/video/BV1Zy4y1K7SH?p=95axios官网教程:https://axios-http.com/docs/introvue配置代理:https://cli.vuejs.org/zh/config/#devserver-proxy安装axios发送ajax请求:使用:(官网:https://axios-http.com/d
参考文档
尚硅谷视频:https://www.bilibili.com/video/BV1Zy4y1K7SH?p=95
axios官网教程:https://axios-http.com/docs/intro
vue配置代理:https://cli.vuejs.org/zh/config/#devserver-proxy
跨域问题引入
安装axios发送ajax请求:
npm install axios
使用:(官网:https://axios-http.com/docs/example)
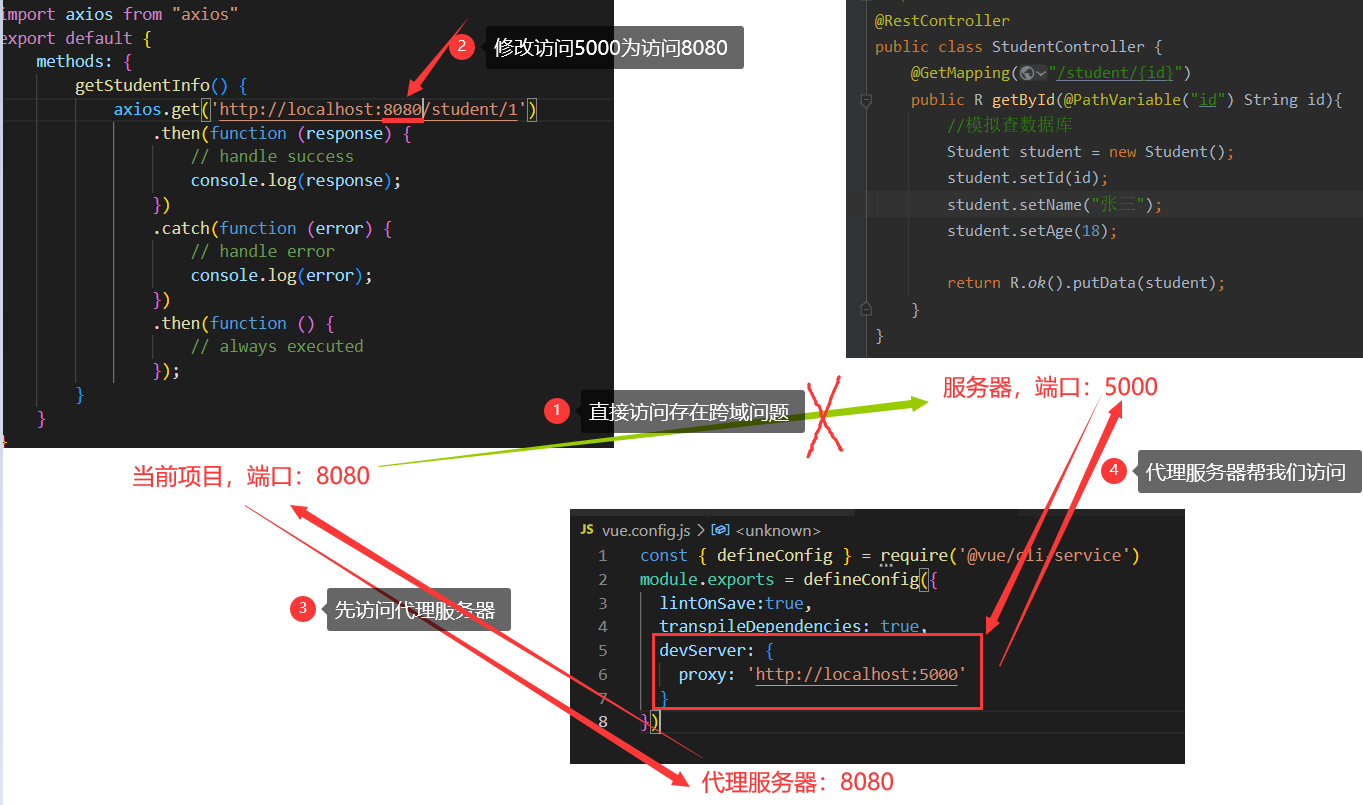
- 如图,通过axios请求服务器上的资源:

- 简单写了一个spring boot项目用于处理该请求:(你只需知道这个请求会被服务器处理)

- 出现跨域问题:(从8080端口请求5000端口,端口不一致)

也就是:

配置代理解决跨域问题:
官网:https://cli.vuejs.org/zh/config/#devserver-proxy
方法一:
新建vue.config.js配置文件(和 package.json放在同级目录下),配置如下内容:
const { defineConfig } = require('@vue/cli-service')
module.exports = defineConfig({
  devServer: {
    proxy: 'http://localhost:5000'
  }
})
表示访问代理服务器,代理服务器就会帮你访问:http://localhost:5000
这样,就相当于配置了一个代理服务器,它和我们的项目具有相同的端口,我们访问它,就不存在跨域问题!
现在,我们访问代理服务器(端口为8080),而不是直接访问5000端口的服务器

总结一下,就是:

方法二:
方式二的扩展性更好,原理和方法一是一样的!
新建vue.config.js配置文件(和 package.json放在同级目录下),配置如下内容:(含义在本文后面的总结里面有)
const { defineConfig } = require('@vue/cli-service')
module.exports = defineConfig({
  devServer: {
    proxy: {
      '/api': {
        target: 'http://localhost:5000',
        pathRewrite:{'^/api':''},//路径改写
      },
    }
  }
})
再修改一下路径:

使用方法二最终的文件:
vue.config.js
const { defineConfig } = require('@vue/cli-service')
module.exports = defineConfig({
  devServer: {
    proxy: {
      '/api': {
        target: 'http://localhost:5000',
        pathRewrite:{'^/api':''},//路径改写
      },
    }
  }
})
- main.js
import Vue from 'vue';
import App from './App.vue';

new Vue({
    el: '#app',
    render: (h) => h(App),
});
- App.vue
<template>
    <button @click="getStudentInfo">获取学生信息</button>
</template>

<script>
import axios from "axios"
export default {
    methods: {
        getStudentInfo() {
            axios.get('http://localhost:8080/api/student/1')
                .then(function (response) {
                    // handle success
                    console.log(response);
                })
                .catch(function (error) {
                    // handle error
                    console.log(error);
                })
                .then(function () {
                    // always executed
                });
        }
    }
}
</script>
效果:

总结


华为开发者空间,是为全球开发者打造的专属开发空间,汇聚了华为优质开发资源及工具,致力于让每一位开发者拥有一台云主机,基于华为根生态开发、创新。
更多推荐


 14
14 0
0- 0


 已为社区贡献3条内容

所有评论(0)