
React中的Redux
文章目录Redux1、什么是Redux2、配置Redux3、TodoList案例4、Redux-thunk中间件5、Redux中间件执行原理6、react-redux7、数据持久化7.1、基本用法7.2、整合react-reduxRedux1、什么是ReduxRedux 是React生态中重要的组成部分。很多人都说,简单的应用可以不用此工具。但是我个人认为,中小型应用使用的话,可以使文件结构更加规
文章目录
Redux
1、什么是Redux
Redux 是React生态中重要的组成部分。很多人都说,简单的应用可以不用此工具。但是我个人认为,中小型应用使用的话,可以使文件结构更加规范,代码可读性更强。因为React提出将展示组件与容器组件分离的思想,所以降低了React 与Redux之间的耦合度。
Redux是一个流行的JavaScript框架,为应用程序提供一个可预测的状态容器。Redux基于简化版本的Flux框架,Flux是Facebook开发的一个框架。在标准的MVC框架中,数据可以在UI组件和存储之间双向流动,而Redux严格限制了数据只能在一个方向上流动。
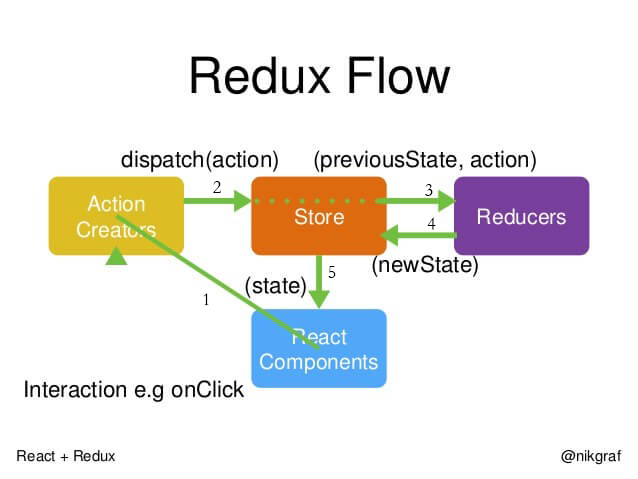
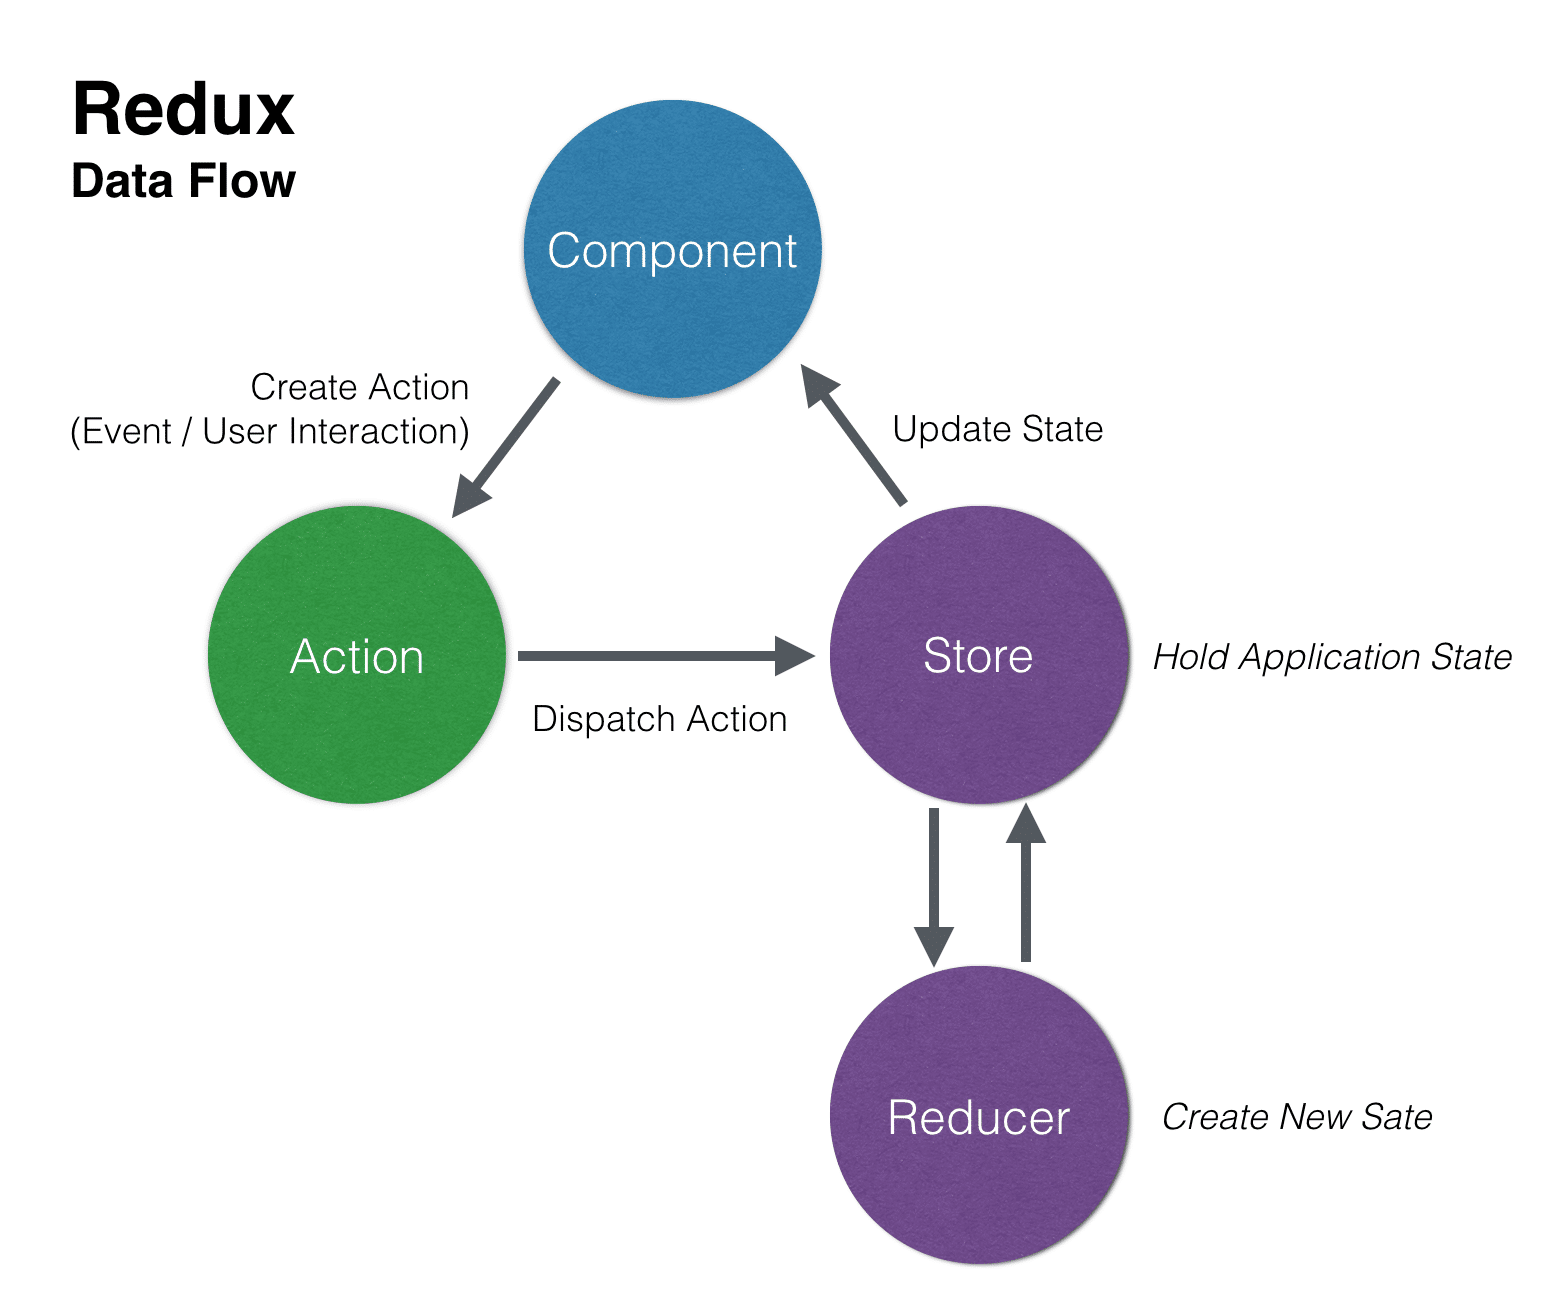
在Redux中,所有的数据(比如state)被保存在一个被称为store的容器中 → 在一个应用程序中只能有一个。store本质上是一个状态树,保存了所有对象的状态。任何UI组件都可以直接从store访问特定对象的状态。要通过本地或远程组件更改状态,需要分发一个action。分发在这里意味着将可执行信息发送到store。当一个store接收到一个action,它将把这个action代理给相关的reducer。reducer是一个纯函数,它可以查看之前的状态,执行一个action并且返回一个新的状态。
Redux的运行原理
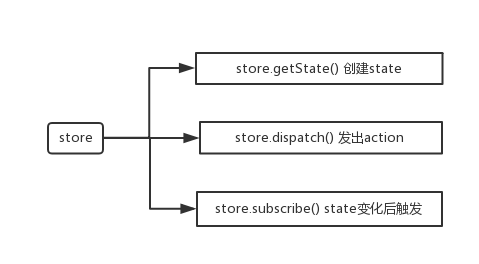
store中重要的方法
2、配置Redux
配置Redux开发环境的最快方法是使用create-react-app工具。在开始之前,确保已经安装并更新了nodejs,npm。
npm install redux
创建store目录,在store目录下新建index.js文件,键入以下内容:
/*
	该文件专门用于暴露一个store对象,整个应用只有一个store对象
*/
//引入createStore,专门用于创建redux中最为核心的store对象
import {createStore} from 'redux'
//引入为Count组件服务的reducer
import reducer from './reducer';
//暴露store
export default createStore(reducer)
在store目录下创建reducer.js文件,键入以下内容:
const defaultState = 0

//reducer可以接收state,但是不能修改state
export default (state = defaultState,action) => {
	const { type, data } = action;
    switch (type) {
    case "increment":
      return data + state;
    default:
      return state;
  }
}
在组件中就可以使用store的数据
import React, { Component } from "react";
import store from "../store/index";
import "./index.css";

export default class index extends Component {
  getIncrement = () => {
    let val = this.getInpVal.value
    store.dispatch({
      type: "increment",
      data: val*1,
    });
  };
  getDecrement = () => {
    let val = this.getInpVal.value
    store.dispatch({
      type: "decrement",
      data: val*1,
    });
  };
  getIncrementOdd = () => {
    if (store.getState()%2!=0) {
      let val = this.getInpVal.value
      store.dispatch({
        type: "increment",
        data: val*1,
      });
    }
  };
  getIncrementOAsync = () => {
    setTimeout(() => {
      let val = this.getInpVal.value
      store.dispatch({
        type: "increment",
        data: val*1,
      });
    }, 1000);
  };

  render() {
    return (
      <div>
        <h3>累加和为:{store.getState()}</h3>
        <select ref={c => this.getInpVal = c}>
          <option value="1">1</option>
          <option value="2">2</option>
          <option value="3">3</option>
        </select>
        <button onClick={this.getIncrement}>+</button>
        <button onClick={this.getDecrement}>-</button>
        <button onClick={this.getIncrementOdd}>奇数加</button>
        <button onClick={this.getIncrementOAsync}>异步加</button>
      </div>
    );
  }
}
3、TodoList案例
TodoList.js
import React,{Component} from 'react';
import store from './store/index';
import {DELETE_TODO_ITEM,CHANGE_INPUT_VALUE,ADD_TODO_ITEM} from './store/actionType'

class TodoList extends Component{

    constructor(props){
        super(props);
        this.state = store.getState();
        this.handleChange = this.handleChange.bind(this);
        this.handleStoreChange = this.handleStoreChange.bind(this);
        this.handleClick = this.handleClick.bind(this);
        store.subscribe(this.handleStoreChange);

    }

    handleChange(e){
        const action = {
            type:CHANGE_INPUT_VALUE,
            value:e.target.value
        }
        store.dispatch(action);
    }

    handleStoreChange(){
        this.setState(store.getState());
    }

    handleClick(){
        const action = {
            type:ADD_TODO_ITEM
        }
        store.dispatch(action);
    }

    handleClickItem(index){
        const action = {
            type:DELETE_TODO_ITEM,
            index:index
        }
        store.dispatch(action);
    }

    render(){
        return (
            <div>
                <input type='text' value={this.state.inputValue} onChange={this.handleChange} />
                <button onClick={this.handleClick}>提交</button>
                <ul>
                    {this.state.list.map((item,index)=>{
                        return (
                            <li key={index} onClick={this.handleClickItem.bind(this,index)}>{item}</li>
                        );
                    })}
                </ul>
            </div>
        );
    }
}

export default TodoList;
store/index.js
import {createStore} from 'redux';
import reducer from './reducer';

const store = createStore(reducer);

export default store;
store/reducer.js
import {DELETE_TODO_ITEM,CHANGE_INPUT_VALUE,ADD_TODO_ITEM} from './actionType'

const defaultState = {
    inputValue:'',
    list:[]
}

//reducer可以接收state,但是不能修改state
export default (state = defaultState,action) => {
    console.log(state,action);
    if(action.type === CHANGE_INPUT_VALUE){
        const newState = state;
        newState.inputValue = action.value;
        return newState;
    }
    if(action.type === ADD_TODO_ITEM){
        const newState = state;
        newState.list.push(newState.inputValue);
        newState.inputValue = '';
        return newState;
    }
    if(action.type === DELETE_TODO_ITEM){
        const newState = state;
        newState.list.splice(action.index,1);
        return newState;
    }

    return state;
}
store/actionType.js
export const CHANGE_INPUT_VALUE = 'change_input_value'
export const ADD_TODO_ITEM = 'add_todo_item'
export const DELETE_TODO_ITEM = 'delete_todo_item'
**参考文章: https://segmentfault.com/a/1190000011474522 **
核心API:
- createStore 创建store
- store.dispatch 派发action,把数据上传到Store中
- store.getState 获取store中所有的数据内容,但是Store中的数据发生变化时,组件不会知道
- store.subscribe 监听Store中的数据变化,Store中的数据一旦发生变化,该方法就会被执行
4、Redux-thunk中间件
第一步 安装redux-thunk中间件
npm install redux-thunk
第二步 在store中引入thunk组件
import {createStore,applyMiddleware } from 'redux';import Reducer from './Reducer';import thunk from 'redux-thunk';const store = createStore(Reducer,applyMiddleware(thunk));export default store;
第三步 封装异步请求方法
在TodoList.js组件中,封装异步获取请求的方法:
import React, { Component } from 'react'import Store from './Store'import axios from 'axios'export class TodoList extends Component { constructor(props){ super(props); this.state = Store.getState(); this.handleStoreChange = this.handleStoreChange.bind(this); Store.subscribe(this.handleStoreChange); } //在生命周期函数中调用异步方法 componentDidMount(){ Store.dispatch(this.getTodoListDatas()); } //异步获取请求的方法 getTodoListDatas(){ return (dispatch)=>{ axios.get("/data.json") .then(resp => { const action = { type:'axios_getdata', data:resp.data } dispatch(action) }) } } handleStoreChange(){ this.setState(Store.getState()); } render() { return ( <div> <input type='text' value={this.state.inputValue}></input> <button>添加</button> <hr></hr> <ul> {this.state.list.map((item,index)=>{ return ( <li key={index}>{item}</li> ); })} </ul> </div> ) }}export default TodoList
第四步 在reducer中接收action信息
const defaultState = { inputValue:'', list:[]}export default (state = defaultState,action) => { if(action.type === 'axios_getdata'){ const newState = state; newState.list = action.data; return newState; } return state}
5、Redux中间件执行原理
redux-thunk这个中间件可以使我们把这样的异步请求或者说复杂的逻辑可以放到action里面去处理,redux-thunk使redux的一个中间件,为什么叫做中间件
我们说中间件,那么肯定是谁和谁的中间,那么redux的中间件指的是谁和谁的中间呢?
view在redux中会派发一个action,action通过store的dispatch方法派发给store,store接收到action,连同之前到state,一起传给reducer,reducer返回一个新到数据给store,store去改变自己到state。这是redux的一个标准流程,那么我们说redux的中间件指的是谁和谁的之间,大家一定要记住,**redux的中间件指的是action和store之间。之前我们说action只能是一个对象,所以action是一个对象直接派发给了store。**但是现在,当我们使用了redux-thunk之后,action可以是函数了。
为什么可以是函数呢,看这张图。action通过dispatch方法被传递给store,那么action和store之间是谁,是不是就是dispatch这个方法,**实际上我们指的中间件指的是什么呢,就是对dispatch方法的一个封装,或者说是dispatch方法的一个升级,最原始的dispatch方法,他接收到一个对象之后,会把这个对象传递给store,这就是view中间件的一个情况。**当我们对dispath做了一个升级之后,比如说我们使用了redux-thunk这个中间件,对dispath做了一个升级,这个时候当你调用dispatch方法,给dispatch传递的参数是一个对象的话,那么这个dispatch就会把这个对象直接传给store。跟之前写一个对象,调用dispatch传给store没有任何的区别。但是这个时候假设传给dispatch方法是一个函数的话,这个时候dispatch方法已经升级了。他知道如果你传递过来是一个函数的话,他就不会把这个函数直接传递给store。他会怎么办呢?
他会让你这个函数先执行,然后执行完了之后,需要调用store的时候,这个函数再去调用store。所以dispatch做了一个事情,他会根据参数的不同,执行不同的事情,如果你参数是对象,那我直接传给store。如果你参数是函数,那就把这个函数执行结束。所以讲到这大家应该知道
**redux中间件,他的原理是非常简单的,他就是对store对dispatch方法做一个升级,之前这个dispatch方法只能接收一个对象,现在升级之后,就可以接收对象,也可以接收函数了。**当然这里用什么对他进行一个升级呢?用redux-thunk对他进行了升级。当然中间件不只redux-thunk这一个,实际上redux中间件非常多,比如说我们说的redux-log,可以记录action每次派发的日志,那他怎么记录呢?其实也很简单,每次调用 action的时候,都会通过dispatch把这个action传递给store,那么我可以对dispatch做一个升级,dispatch不仅仅把action传递给store,而且在每次传递之前呢,还通过console.log,把这个action打印出来。这样就写了一个redux-log的中间件。他可以在每次派发action的时候,把这个action打印在控制台里面。
最近用的比较火的redux中间件,除了redux-thunk,redux-log这样的东西,还有一个中间件,叫做redux-saga。他的应用范围也非常广,redux-saga也是解决redux中间异步问题的中间件。不同于redux-thunk。redux-thunk是把异步操作放在action里面操作。而redux-saga采用的设计思想是,单独的把一个异步逻辑拆分出来,放在一个异步文件里面管理,基本上掌握了redux-thunk和redux-saga这两者的设计思路之后呢,再去做redux里面的异步逻辑,或者说复杂的逻辑,如何去拆分,就比较明白了。
6、react-redux
第一步 安装react-redux
npm install react-redux
第二步 创建store和reducer
store.js文件
import {createStore } from 'redux';import reducer from './reducer';const store = createStore(reducer);export default store;
reducer.js文件
const defaultState = { inputValue:'hello', list:['a','b','c']}export default (state = defaultState,action) => { return state}
第三步 在index.js入口文件引入Provider组件
import React from 'react';import ReactDOM from 'react-dom';import TodoList from './reactredux/TodoList'import {Provider} from 'react-redux'import store from './reactredux/store'const APP = ( <Provider store={store}> <TodoList></TodoList> </Provider>);ReactDOM.render(APP , document.getElementById('root'));
第四步 在TodoList.js组件中引入connect组件
import React, { Component } from 'react'import {connect} from 'react-redux'export class TodoList extends Component { render() { return ( <div> <input type='text' value={this.props.inputValue} onChange={this.props.changeInputValue}></input> <button onClick={this.props.addClick.bind(this)}>添加</button> <hr></hr> <ul> {this.props.list.map((item,index)=>{ return ( <li key={index}>{item}</li> ); })} </ul> </div> ) }}const mapStateToProps = (state) =>{ return { inputValue: state.inputValue, list:state.list }}const mapDispatchToProps = (dispatch) =>{ return { changeInputValue(e){ const action = { type:"change_inputvalue", inputValue:e.target.value } dispatch(action); }, addClick(){ const action = { type:"add_list", value:this.props.inputValue } dispatch(action); } }}export default connect(mapStateToProps,mapDispatchToProps)(TodoList);
第五步 在reducer中接收action的值
const defaultState = { inputValue:'hello', list:['a','b','c']}export default (state = defaultState,action) => { if(action.type === 'change_inputvalue'){ const newState = JSON.parse(JSON.stringify(state)); newState.inputValue = action.inputValue; return newState; } if(action.type === 'add_list'){ const newState = JSON.parse(JSON.stringify(state)); newState.list.push(action.value); newState.inputValue = ""; return newState; } return state}
7、数据持久化
安装依赖
cnpm i redux-persist --save
7.1、基本用法
示例代码1:
/*
	该文件专门用于暴露一个store对象,整个应用只有一个store对象
*/
//引入createStore,专门用于创建redux中最为核心的store对象
import { createStore, applyMiddleware } from 'redux'
//引入redux-persist
import { persistStore, persistReducer } from 'redux-persist'
// import localStorage from 'redux-persist/lib/storage'
import storage from 'redux-persist/lib/storage/index'
//引入为Count组件服务的reducer
import reducer from './reducer';
//引入中间件 可传入action为函数
import thunk from 'redux-thunk';

const config = {
  key: 'root',
  storage:storage, //引入的storage是存在local或session
}

const store = createStore(persistReducer(config,reducer),applyMiddleware(thunk))
persistStore(store)
export default store
示例代码2:
const { browserHistory } = require('react-router');const { syncHistoryWithStore, routerReducer } = require('react-router-redux');const { createStore, combineReducers } = require('redux');const { student,school } = require('./reducers');// 只要用上 persistStore 和 autoRehydrate 就行啦const { persistStore, autoRehydrate } = require('redux-persist');// 存储机制,可换成cookie等其他机制const { asyncSessionStorage } = require('redux-persist/storages');const initialState = { student: { age: 21, sex: "female", }, school:{ name: "蓝翔大学" }};const reducers = combineReducers({ student, school, routing: routerReducer,}); // autoRehydrate作为参数传入redux的createStore方法const store = createStore( reducers, initialState, autoRehydrate(),);// persistStore的使用,可配置很多参数,如存储引擎、黑白名单等。persistStore( store, { storage: asyncSessionStorage, blacklist: [ 'routing', 'school' // school reducer 的数据不进行持久化 ], },);const history = syncHistoryWithStore(browserHistory, store);module.exports = { store, history,};
7.2、整合react-redux
store/index.js 文件代码:
import { createStore, applyMiddleware, compose } from 'redux';import reducers from './reducers';import thunk from 'redux-thunk';import { persistStore, persistReducer } from 'redux-persist';import storage from 'redux-persist/lib/storage';// 存储对象,默认存储到localstorageconst persistConfig = { key: 'root', storage,}// 重新组装reducerconst persistedReducer = persistReducer(persistConfig, reducers)// redux调试工具配置代码const composeEnhancers = typeof window === 'object' && window.__REDUX_DEVTOOLS_EXTENSION_COMPOSE__ ? window.__REDUX_DEVTOOLS_EXTENSION_COMPOSE__({}) : compose;const enhancer = composeEnhancers( applyMiddleware(thunk),);// 创建storeconst store = createStore(persistedReducer, enhancer);// 应用redux-persist以完成数据持久化export const persistor = persistStore(store)export default store;
index.js 入口文件代码:
import React from 'react';import ReactDOM from 'react-dom';import {Provider} from 'react-redux';import store from './store/index';import { PersistGate } from 'redux-persist/integration/react';import { persistor } from './store/index';import App from './App';ReactDOM.render( <Provider store={store} > {/* 持久化store配置 把App根组件以及所有子组件包裹起来 */} <PersistGate loading={null} persistor={persistor}> <App /> </PersistGate></Provider>, document.getElementById('root'));

为开发者提供学习成长、分享交流、生态实践、资源工具等服务,帮助开发者快速成长。
更多推荐


 2
2 0
0- 0


 已为社区贡献5条内容

所有评论(0)