k8s1.25.0+ubuntu20.04+containerd
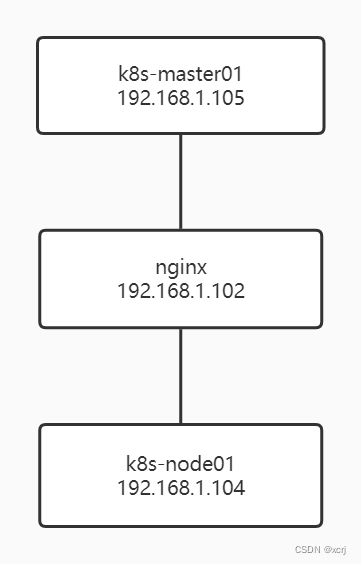
上图为理论部署架构,使用nginx负载均衡反向代理k8s-masterxx,k8s-nodexx访问nginx所在机器实际部署架构,没有那么多机器。
·
结构
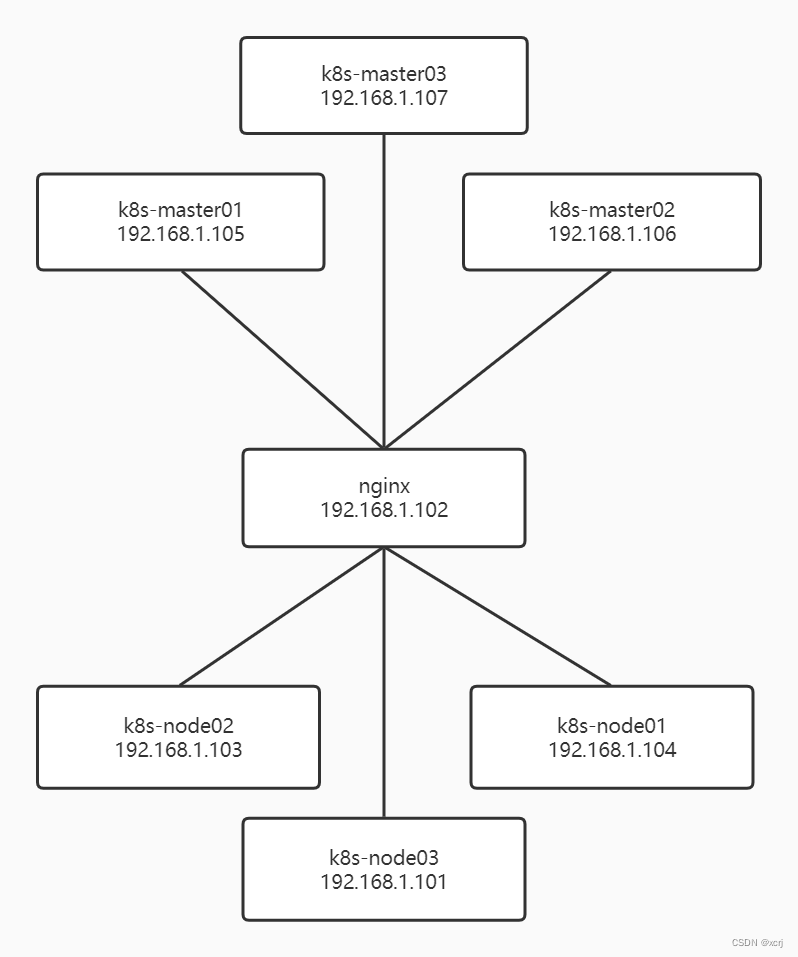
上图为理论部署架构,使用nginx负载均衡反向代理k8s-masterxx,k8s-nodexx访问nginx所在机器
实际部署架构,没有那么多机器
| hostname | node | IP | 机器 |
|---|---|---|---|
| xxx | nginx | 192.168.1.105 | ubuntu20.04,可以把nginx部署到windows上 |
| xcrj | k8s-master01 | 192.168.1.105 | ubuntu20.04 |
| xcrj01 | k8s-node01 | 192.168.1.104 | ubuntu20.04 |
k8s-lb-nginx
# 切换到root用户
sudo su -

# 可选,设置hostname
# systemctl set-hostname k8s-nginx

# 安装Nginx
apt install -y nginx

# 备份/etc/nginx/nginx.conf
cp /etc/nginx/nginx.conf /etc/nginx/nginx.conf-bk

# 配置nginx,见下
vim /etc/nginx/nginx.conf

# 编辑k8sstream.conf,见下
cd /etc/nginx
vim k8sstream.conf

# nginx相关文件语法校验
nginx -t

# 重启Nginx
systemctl restart nginx

#查看Nginx的运行状态
ps -ef | grep nginx
/etc/nginx/nginx.conf,http结束括号后添加stream,stream和http平级
注意,不能stream到nginx所在主机否则造成循环,nginx启动失败
stream {
    include k8sstream.conf;
}
k8sstream.conf
# 监听6443端口,upstream到k8s-apiserver
upstream k8s-apiserver {
    server 192.168.1.105:6443;
}
server {
    listen 6443;
    proxy_connect_timeout 1s;
    proxy_pass k8s-apiserver;
}

# ingress http
# 监听80端口,upstream到ingress-http
upstream ingress-http {
	# ingress的NodePort
    server 10.0.0.21:30080;
    # ingress的NodePort
    server 10.0.0.22:30080;
}
server {
    listen 80;
    proxy_connect_timeout 1s;
    proxy_pass ingress-http;
}

# ingress https
# 监听443端口,upstream到ingress-https
upstream ingress-https {
	# ingress的NodePort
    server 10.0.0.21:30443;
    # ingress的NodePort
    server 10.0.0.22:30443;
}
server {
    listen 443;
    proxy_connect_timeout 1s;
    proxy_pass ingress-https;
}
k8s-master01
# 切换root用户
sudo su -

# 更新源
apt update

# 升级包
apt upgrade -y

# 设置hostname,可选
# hostnamectl set-hostname k8s-master01

# 备份hosts文件
cp /etc/hosts /etc/hosts-bk

# 添加hosts,见下
vim /etc/hosts

# 永久关闭swap。pod运行在swap分区中会大大影响效率
swapoff -a && sed -i '/ swap / s/^\(.*\)$/#\1/g' /etc/fstab

# 添加容器化想加载的内核模块,见下
vim /etc/modules-load.d/containerd.conf

# 加载内核模块
modprobe overlay
modprobe br_netfilter

# 设置k8s所需内核参数,见下
vim /etc/sysctl.d/kubernetes.conf

# 应用内核参数
sysctl --system

# 安装必要包
apt install -y curl gnupg2 software-properties-common apt-transport-https ca-certificates

# containerd
## add docker apt key
curl -fsSL https://download.docker.com/linux/ubuntu/gpg | sudo apt-key add -
## add docker apt repository
add-apt-repository "deb [arch=amd64] https://download.docker.com/linux/ubuntu $(lsb_release -cs) stable"
## 更新源
apt update
## 安装containerd
apt install -y containerd.io
## 生成containetd的配置文件
containerd config default | sudo tee /etc/containerd/config.toml >/dev/null 2>&1
## 修改cgroup Driver为systemd
sed -i 's/SystemdCgroup \= false/SystemdCgroup \= true/g' /etc/containerd/config.toml
## 插入阿里云google_containers镜像源
sed -i 's/k8s.gcr.io/registry.aliyuncs.com\/google_containers/g' /etc/containerd/config.toml
## 创建
## 重启containerd
systemctl restart containerd
## 开机自启containerd
systemctl enable containerd

# kubernetes
## add aliyun/kubernetes apt key
curl https://mirrors.aliyun.com/kubernetes/apt/doc/apt-key.gpg | sudo apt-key add -
## add aliyun/Kubernetes apt repository
apt-add-repository "deb https://mirrors.aliyun.com/kubernetes/apt/ kubernetes-xenial main"
## 检查更新
apt update
## 安装kubelet kubeadm kubectl
apt install -y kubelet=1.25.0-00 kubeadm=1.25.0-00 kubectl=1.25.0-00
#apt-cache show kubeadm | grep 1.25.0
#apt install -y kubelet kubeadm kubectl
## 锁定版本,不随apt upgrade更新
apt-mark hold kubelet kubeadm kubectl
## 查看kubeadm版本
kubeadm version
## 开启路由功能
sysctl -w net.ipv4.ip_forward=1
## 初始化kubernetes,指定版本号为1.25.0,192.168.1.102为k8s-nginx的IP
sudo kubeadm init \
--kubernetes-version=v1.25.0  \
--image-repository registry.aliyuncs.com/google_containers --v=5 \
--control-plane-endpoint "192.168.1.102:6443" \
--upload-certs \
--service-cidr=10.96.0.0/12 \
--pod-network-cidr=10.244.0.0/16
## 执行成功后,保存打印的内容,见下
vim k8s-master01.txt

# 下面的命令来自 保存打印的内容
## 普通用户执行这个,To start using your cluster, you need to run the following as a regular user:
mkdir -p $HOME/.kube
sudo cp -i /etc/kubernetes/admin.conf $HOME/.kube/config
sudo chown $(id -u):$(id -g) $HOME/.kube/config
## root用户执行这个,Alternatively, if you are the root user, you can run
export KUBECONFIG=/etc/kubernetes/admin.conf
## You should now deploy a pod network to the cluster. 安装calico网络组件
kubectl apply -f "https://docs.projectcalico.org/manifests/calico.yaml"
/etc/hosts 添加下面的内容
# k8s-master01
192.168.1.105 xcrj
# k8s-node01
192.168.1.104 xcrj01
/etc/modules-load.d/containerd.conf
overlay
br_netfilter
说明:
- overlay:虚拟网络,构建于物理网络之上
- br_netfilter:bridge桥接模式防火墙
/etc/sysctl.d/kubernetes.conf
net.bridge.bridge-nf-call-ip6tables = 1
net.bridge.bridge-nf-call-iptables = 1
net.ipv4.ip_forward = 1
k8s-master01.txt
[bootstrap-token] Configured RBAC rules to allow certificate rotation for all node client certificates in the cluster
[bootstrap-token] Creating the "cluster-info" ConfigMap in the "kube-public" namespace
I0925 19:29:58.516309   52569 clusterinfo.go:47] [bootstrap-token] loading admin kubeconfig
I0925 19:29:58.517327   52569 clusterinfo.go:58] [bootstrap-token] copying the cluster from admin.conf to the bootstrap kubeconfig
I0925 19:29:58.517763   52569 clusterinfo.go:70] [bootstrap-token] creating/updating ConfigMap in kube-public namespace
I0925 19:29:58.529010   52569 clusterinfo.go:84] creating the RBAC rules for exposing the cluster-info ConfigMap in the kube-public namespace
I0925 19:29:58.558784   52569 kubeletfinalize.go:90] [kubelet-finalize] Assuming that kubelet client certificate rotation is enabled: found "/var/lib/kubelet/pki/kubelet-client-current.pem"
[kubelet-finalize] Updating "/etc/kubernetes/kubelet.conf" to point to a rotatable kubelet client certificate and key
I0925 19:29:58.559979   52569 kubeletfinalize.go:134] [kubelet-finalize] Restarting the kubelet to enable client certificate rotation
[addons] Applied essential addon: CoreDNS
[addons] Applied essential addon: kube-proxy

Your Kubernetes control-plane has initialized successfully!

To start using your cluster, you need to run the following as a regular user:

  mkdir -p $HOME/.kube
  sudo cp -i /etc/kubernetes/admin.conf $HOME/.kube/config
  sudo chown $(id -u):$(id -g) $HOME/.kube/config

Alternatively, if you are the root user, you can run:

  export KUBECONFIG=/etc/kubernetes/admin.conf

You should now deploy a pod network to the cluster.
Run "kubectl apply -f [podnetwork].yaml" with one of the options listed at:
  https://kubernetes.io/docs/concepts/cluster-administration/addons/

You can now join any number of the control-plane node running the following command on each as root:

  kubeadm join 192.168.1.102:6443 --token vec1sk.65oam2kcuee0eogy \
        --discovery-token-ca-cert-hash sha256:b84434080d676bf402aba832343faf07f119b2d261b95440ff47d67fd4d78eee \
        --control-plane --certificate-key bda1f9951bd4d072779f96992e88f49ce7bf9fbb091d64506182b7866183d20c

Please note that the certificate-key gives access to cluster sensitive data, keep it secret!
As a safeguard, uploaded-certs will be deleted in two hours; If necessary, you can use
"kubeadm init phase upload-certs --upload-certs" to reload certs afterward.

Then you can join any number of worker nodes by running the following on each as root:

kubeadm join 192.168.1.102:6443 --token vec1sk.65oam2kcuee0eogy \
        --discovery-token-ca-cert-hash sha256:b84434080d676bf402aba832343faf07f119b2d261b95440ff47d67fd4d78eee
k8s-node01
# 切换root用户
sudo su -

# 更新源
apt update

# 升级包
apt upgrade -y

# 设置hostname,可选
# hostnamectl set-hostname k8s-node01

# 备份hosts文件
cp /etc/hosts /etc/hosts-bk

# 添加hosts,见下
vim /etc/hosts

# 永久关闭swap。pod运行在swap分区中会大大影响效率
swapoff -a && sed -i '/ swap / s/^\(.*\)$/#\1/g' /etc/fstab

# 添加容器化想加载的内核模块,见下
vim /etc/modules-load.d/containerd.conf

# 加载内核模块
modprobe overlay
modprobe br_netfilter

# 设置k8s所需内核参数,见下
vim /etc/sysctl.d/kubernetes.conf

# 应用内核参数
sysctl --system

# 安装必要包
apt install -y curl gnupg2 software-properties-common apt-transport-https ca-certificates

# containerd
## add docker apt key
curl -fsSL https://download.docker.com/linux/ubuntu/gpg | sudo apt-key add -
## add docker apt repository
add-apt-repository "deb [arch=amd64] https://download.docker.com/linux/ubuntu $(lsb_release -cs) stable"
## 更新源
apt update
## 安装containerd
apt install -y containerd.io
## 生成containetd的配置文件
containerd config default | sudo tee /etc/containerd/config.toml >/dev/null 2>&1
## 修改cgroup Driver为systemd
sed -i 's/SystemdCgroup \= false/SystemdCgroup \= true/g' /etc/containerd/config.toml
## 插入阿里云google_containers镜像源
sed -i 's/k8s.gcr.io/registry.aliyuncs.com\/google_containers/g' /etc/containerd/config.toml
## 重启containerd
systemctl restart containerd
## 开机自启containerd
systemctl enable containerd

# kubernetes
## add aliyun/kubernetes apt key
curl https://mirrors.aliyun.com/kubernetes/apt/doc/apt-key.gpg | sudo apt-key add -
## add aliyun/Kubernetes apt repository
apt-add-repository "deb https://mirrors.aliyun.com/kubernetes/apt/ kubernetes-xenial main"
## 检查更新
apt update
## 安装kubelet kubeadm kubectl
apt install -y kubelet=1.25.0-00 kubeadm=1.25.0-00 kubectl=1.25.0-00
## 锁定版本,不随apt upgrade更新
apt-mark hold kubelet kubeadm kubectl
## 查看kubeadm版本
kubeadm version
## 开启路由功能
sysctl -w net.ipv4.ip_forward=1

# 来自k8s-master01.txt文件,192.168.1.102 nginx机器的IP,Then you can join any number of worker nodes by running the following on each as root
kubeadm join 192.168.1.102:6443 --token xxcbh2.xdulqkbvvrup3b90 \
        --discovery-token-ca-cert-hash sha256:b84434080d676bf402aba832343faf07f119b2d261b95440ff47d67fd4d78eee
/etc/hosts 添加下面的内容
# k8s-master01
192.168.1.105 xcrj
# k8s-node01
192.168.1.104 xcrj01
/etc/modules-load.d/containerd.conf
overlay
br_netfilter
说明:
- overlay:虚拟网络,构建于物理网络之上
- br_netfilter:bridge桥接模式防火墙
/etc/sysctl.d/kubernetes.conf
net.bridge.bridge-nf-call-ip6tables = 1
net.bridge.bridge-nf-call-iptables = 1
net.ipv4.ip_forward = 1
检查k8s安装情况
# 查看cluster-info
kubectl cluster-info
# 查看node信息,notReady稍等即可
kubectl get nodes

为开发者提供学习成长、分享交流、生态实践、资源工具等服务,帮助开发者快速成长。
更多推荐


 0
0 0
0- 0


 已为社区贡献4条内容

所有评论(0)