SpringCloud搭建微服务之OAuth2实现SSO单点登录
SSO单点登录实现方式有多种,在这里不介绍理论,本文只讨论采用spring-security-oauth2来实现,本文共有三个服务,一个权限认证中心,两个客户端
·
SSO单点登录实现方式有多种,在这里不介绍理论,本文只讨论采用spring-security-oauth2来实现,本文共有三个服务,一个权限认证中心,两个客户端
1. 认证服务搭建
1.1. 引入核心依赖
<dependency>
    <groupId>org.springframework.boot</groupId>
    <artifactId>spring-boot-starter-web</artifactId>
</dependency>
<dependency>
    <groupId>org.springframework.security.oauth</groupId>
    <artifactId>spring-security-oauth2</artifactId>
    <version>2.3.8.RELEASE</version>
</dependency>
1.2. 配置application.yml文件
server:
  port: 8830
  servlet:
    context-path: /auth
spring:
  application:
    name: cloud-oss-authorization-server
1.3. 编写主启动类
@EnableResourceServer
@SpringBootApplication
public class OssAuthorizationServerApplication {

    public static void main(String[] args) {
        SpringApplication.run(OssAuthorizationServerApplication.class, args);
    }
}
可以将Authorization Server和Resource Server放在同一个服务里
1.4. 编写SecurityConfig配置类
@Order(1)
@Configuration
public class SecurityConfig extends WebSecurityConfigurerAdapter {

    @Override
    protected void configure(AuthenticationManagerBuilder auth) throws Exception {
        auth.inMemoryAuthentication()
                .withUser("admin")
                .password(passwordEncoder().encode("123456"))
                .roles("USER");
    }

    @Override
    protected void configure(HttpSecurity http) throws Exception {
        http.requestMatchers()
                .antMatchers("/login", "/oauth/authorize")
                .and()
                .authorizeRequests()
                .anyRequest()
                .authenticated()
                .and()
                .formLogin()
                .permitAll()
                .and().csrf().disable();
    }

    @Bean
    public BCryptPasswordEncoder passwordEncoder() {
        return new BCryptPasswordEncoder();
    }
}
1.5. 编写AuthorizationServerConfig配置类
@Configuration
@EnableAuthorizationServer
public class AuthorizationServerConfig extends AuthorizationServerConfigurerAdapter {

    @Autowired
    private BCryptPasswordEncoder passwordEncoder;

    @Override
    public void configure(AuthorizationServerSecurityConfigurer security) throws Exception {
        security.tokenKeyAccess("permitAll()")
                .checkTokenAccess("isAuthenticated()");
    }

    @Override
    public void configure(ClientDetailsServiceConfigurer clients) throws Exception {
        clients.inMemory()
                .withClient("SampleClientId")
                .secret(passwordEncoder.encode("secret"))
                .authorizedGrantTypes("authorization_code")
                .scopes("user_info")
                .autoApprove(true)
                .redirectUris("http://localhost:8831/ui1/login", "http://localhost:8832/ui2/login");
    }
}
1.6. 编写UserController类
@RestController
public class UserController {

    @RequestMapping(value = "/user/me")
    public Principal user(Principal principal) {
        System.out.println(principal);
        return principal;
    }
}
2. 客户端服务搭建
分别新建两个客户端微服务8831和8832
2.1. 引入核心依赖
<dependency>
    <groupId>org.springframework.boot</groupId>
    <artifactId>spring-boot-starter-web</artifactId>
</dependency>
<dependency>
    <groupId>org.springframework.boot</groupId>
    <artifactId>spring-boot-starter-security</artifactId>
</dependency>
<dependency>
    <groupId>org.springframework.security.oauth.boot</groupId>
    <artifactId>spring-security-oauth2-autoconfigure</artifactId>
</dependency>
<dependency>
    <groupId>org.springframework.boot</groupId>
    <artifactId>spring-boot-starter-thymeleaf</artifactId>
</dependency>
<dependency>
    <groupId>org.thymeleaf.extras</groupId>
    <artifactId>thymeleaf-extras-springsecurity5</artifactId>
</dependency>
2.2. 配置application.yml文件
server:
  port: 8831 #另一个服务端口8832
  servlet:
    context-path: /ui1 #另一个服务路径/ui2
    register-default-servlet: true
    session:
      cookie:
        name: UISESSION1 #另一个服务cookie nameUISESSION2
spring:
  application:
    name: cloud-sso-client8831 #另一个服务名称cloud-sso-client8832
  thymeleaf:
    cache: false
security:
  basic:
    enabled: false
  oauth2:
    client:
      client-id: SampleClientId
      client-secret: secret
      access-token-uri: http://localhost:8830/auth/oauth/token
      user-authorization-uri: http://localhost:8830/auth/oauth/authorize
    resource:
      user-info-uri: http://localhost:8830/auth/user/me
2.3. 编写服务启动类
@SpringBootApplication
public class OssClientApplication extends SpringBootServletInitializer {

    @Bean
    public RequestContextListener requestContextListener() {
        return new RequestContextListener();
    }

    public static void main(String[] args) {
        SpringApplication.run(OssClientApplication.class, args);
    }
}
2.4. 编写SecurityConfig配置类
@Configuration
@EnableOAuth2Sso
public class SecurityConfig extends WebSecurityConfigurerAdapter {

    @Override
    protected void configure(HttpSecurity http) throws Exception {
        http.antMatcher("/**")
                .authorizeRequests()
                .antMatchers("/", "/login/**")
                .permitAll()
                .anyRequest()
                .authenticated();
    }
}
2.5. 编写WebConfig配置类
@EnableWebMvc
@Configuration
public class WebConfig implements WebMvcConfigurer {

    @Bean
    public static PropertySourcesPlaceholderConfigurer propertySourcesPlaceholderConfigurer() {
        return new PropertySourcesPlaceholderConfigurer();
    }

    @Override
    public void configureDefaultServletHandling(DefaultServletHandlerConfigurer configurer) {
        configurer.enable();
    }

    @Override
    public void addViewControllers(ViewControllerRegistry registry) {
        registry.addViewController("/")
                .setViewName("forward:/index");
        registry.addViewController("/index");
        registry.addViewController("/securedPage");
    }

    @Override
    public void addResourceHandlers(ResourceHandlerRegistry registry) {
        registry.addResourceHandler("/resources/**")
                .addResourceLocations("/resources/");
    }
}
2.6. 编写登录页面index.html
<!DOCTYPE html>
<html lang="en">
<head>
    <meta http-equiv="Content-Type" content="text/html; charset=utf-8" />
    <title>Spring Security SSO Client 1</title>
    <link rel="stylesheet" href="https://maxcdn.bootstrapcdn.com/bootstrap/3.3.2/css/bootstrap.min.css" />
</head>
<body>
<div class="container">
    <div class="col-sm-12">
        <h1>Spring Security SSO Client 1</h1>
        <a class="btn btn-primary" href="securedPage">Login</a>
    </div>
</div>
</body>
</html>
2.7. 编写登录后跳转页
<!DOCTYPE html>
<html lang="en">
<head>
<meta http-equiv="Content-Type" content="text/html; charset=utf-8" />
<title>Spring Security SSO</title>
<link rel="stylesheet" href="https://maxcdn.bootstrapcdn.com/bootstrap/3.3.2/css/bootstrap.min.css" />
</head>
<body>
<div class="container">
<div class="col-sm-12">
<h1>Secured Page</h1>
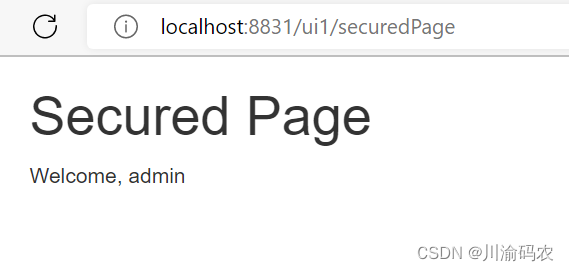
Welcome, <span th:text="${#authentication.name}">Name</span>
</div>
</div>
</body>
</html>
3. 验证
依次启动三个微服务cloud-oss-authorization-server、cloud-sso-client8831和cloud-sso-client8832
浏览器地址栏输入http://localhost:8831/ui1/
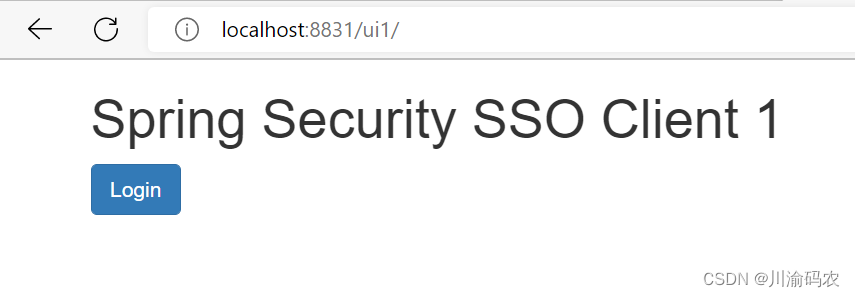
点击Login进入单点登录页
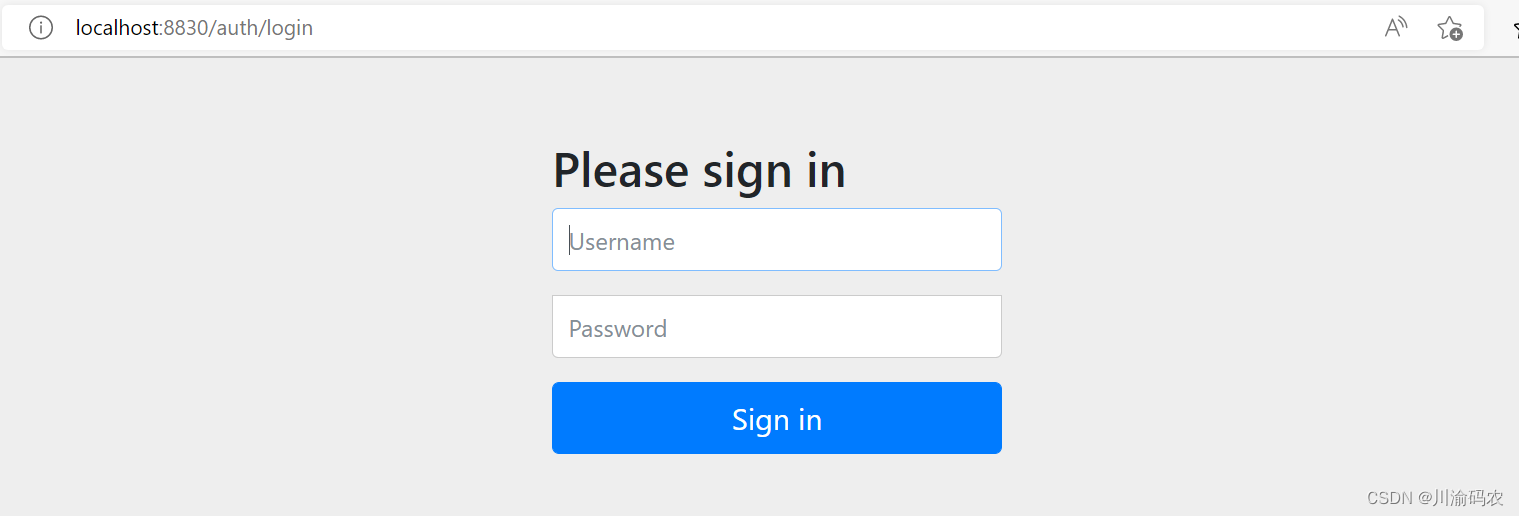
输入用户名和密码admin/123456

为开发者提供学习成长、分享交流、生态实践、资源工具等服务,帮助开发者快速成长。
更多推荐
 0
0 0
0- 0


 已为社区贡献4条内容

所有评论(0)