gradle搭建springBoot多模块项目
Gradle是源于Apache Ant和Apache Maven概念的项目自动化构建开源工具,它使用一种基于Groovy的特定领域语言(DSL)来声明项目设置,抛弃了基于XML的各种繁琐配置面向Java应用为主。当前其支持的语言暂时有Java、Groovy、Kotlin和Scala。Gradle是一个基于JVM的构建工具,是一款通用灵活的构建工具,支持maven, Ivy仓库,支持传递性依赖管理,
目录
1.gradle简介
Gradle是源于Apache Ant和Apache Maven概念的项目自动化构建开源工具,它使用一种基于Groovy的特定领域语言(DSL)来声明项目设置,抛弃了基于XML的各种繁琐配置面向Java应用为主。当前其支持的语言暂时有Java、Groovy、Kotlin和Scala。Gradle是一个基于JVM的构建工具,是一款通用灵活的构建工具,支持maven, Ivy仓库,支持传递性依赖管理,而不需要远程仓库或者是pom.xml和ivy.xml配置文件,基于Groovy,build脚本使用Groovy编写。
官网:
https://gradle.org/
https://plugins.gradle.org/search
2.下载安装配置gradle
官方网站:https://gradle.org/install/#manually提供了两种下载方式,Binary-only是只下载二进制源码,Complete, with docs and sources是下载源码和文档,这里下载Binary-only,不然安装配置之后,在idea配置完成,idea中的Terminal中执行gradle相关的指令就会报错的,使用Binary-only安装配置的则不会有这个问题。

2.1安装
解压安装包到想安装到的目录,安装的版本是最新版本7.5.1,7.x和6.x的idea中的项目build.gradle文件的配置、参数还是大的
2.2配置环境变量
2.2.1 GRADLE_HOME环境变量配置
新建变量变量名:GRADLE_HOME
变量值:解压到的目录

2.2.2 GRADLE_USER_HOME环境变量配置
新建变量变量名:GRADLE_USER_HOME
变量值: 自定义Gradle仓库目录或者Maven的仓库目录

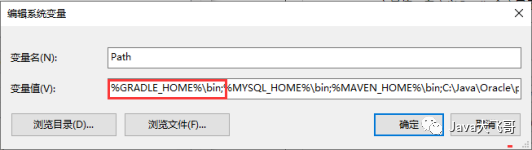
2.2.3 Path变量值配置
添加Path变量值:%GRADLE_HOME%\bin;
2.2.4配置Gradle仓库源
在Gradle安装目录下的 init.d 文件夹下,新建一个 init.gradle 文件,里面填写以下配置。
allprojects {
  repositories {
     maven {
            url 'https://maven.aliyun.com/repository/gradle-plugin'
        }
    maven {
            url "https://maven.aliyun.com/nexus/content/groups/public/"
        }
    maven {
            allowInsecureProtocol = true
            url 'http://xxxxxxx.xxxx/repository/maven-snapshots/'
      credentials {
                username 'xxxxxx'
                password 'xxxxx'
            }
        }
  maven {
      allowInsecureProtocol = true
      url 'http://xxxxxx:xxxxx/repository/maven-releases/'
      credentials {
                username 'xxxxxx'
                password 'xxxxx'
            }
    }
    mavenCentral()
    gradlePluginPortal()
    jcenter()
  maven { url 'file:///D:/app/gradle-repository'}
  mavenLocal()
  }

  buildscript {
    repositories {
      maven {
      allowInsecureProtocol = true
      url 'http://xxxxxxx.xxxxxxx/repository/maven-snapshots/'
      credentials {
                username 'xxxxx'
                password 'xxxxx'
            }
    }
      maven {
      allowInsecureProtocol = true
      url 'http://xxxxxxxx.xxxxx/repository/maven-releases/'
      credentials {
                username 'xxxxxx'
                password 'xxxxxx'
            }
    }
    }
  }
}
repositories 中写的是获取 jar 包的顺序从上到下
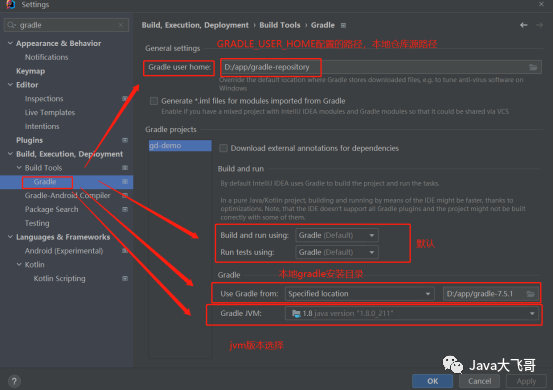
2.3 idea使用本地的gradle配置
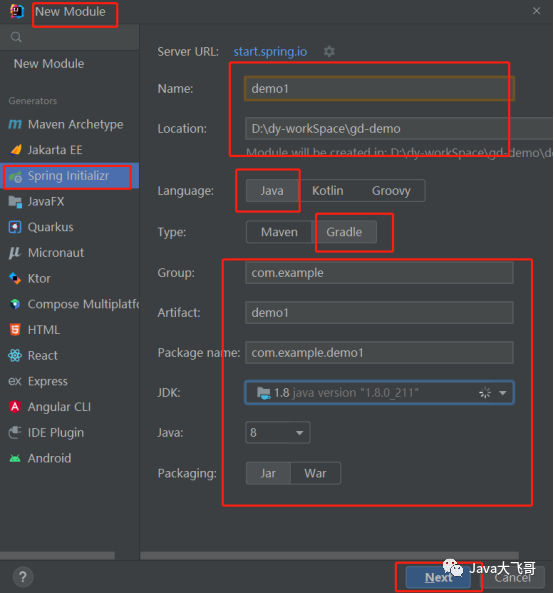
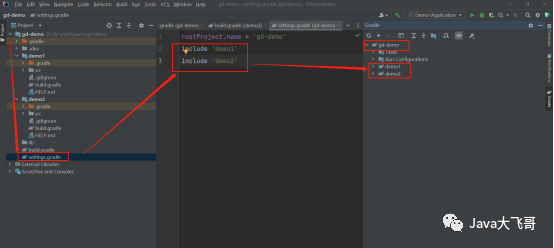
3. gradle搭建springBoot多模块项目
3.1 父工程搭建:


父工程的build.gradle文件内容如下:
plugins {

}
group = 'com.example'
version = '0.0.1-SNAPSHOT'

allprojects {
    // 指定需要的插件
    // 指定语言
    apply plugin: 'java'
    //指定编辑器
    apply plugin: 'idea'
    // 配置项目信息
    group 'com.example'
    version '1.0-SNAPSHOT'

    // 配置仓库
    repositories {
        maven {
            url 'https://maven.aliyun.com/repository/gradle-plugin'
        }
        maven {
            url "https://maven.aliyun.com/nexus/content/groups/public/"
        }
        maven {
            allowInsecureProtocol = true
            url 'http://xxxxx:xxxx/repository/maven-snapshots/'
        }
        mavenCentral()
        gradlePluginPortal()
        jcenter()
        //mavenLocal()
    }
}

// 配置子工程
subprojects {
    // 指定编译版本
    sourceCompatibility = 1.8
    targetCompatibility = 1.8
    // 配置字符编码
    tasks.withType(JavaCompile) {
        options.encoding = 'UTF-8'
    }
    // 配置全局依赖版本信息
    ext {
        junitVersion = '4.12'
    }

    //配置子模块依赖
    dependencies {
        implementation 'org.springframework.boot:spring-boot-starter-web'
        compileOnly 'org.projectlombok:lombok'
        implementation 'org.springframework.boot:spring-boot-starter'
        testImplementation 'org.springframework.boot:spring-boot-starter-test'
        // testCompile group: 'junit', name: 'junit', version:"${junitVersion}"
    }

}
3.2 子模块搭建
子模块的build.gradle文件内容如下所示:
plugins {
id 'org.springframework.boot' version '2.7.4'
id 'io.spring.dependency-management' version '1.0.14.RELEASE'
id 'java'
id 'maven-publish'
}
group = 'com.example'
version = '0.0.1-SNAPSHOT'
sourceCompatibility = '1.8'
repositories {
// mavenCentral()
}
dependencies {
/* implementation 'org.springframework.boot:spring-boot-starter'
testImplementation 'org.springframework.boot:spring-boot-starter-test'*/
}
// 打jar包的配置
/*jar {
manifest {
attributes "Manifest-Version": 1.0, 'Main-Class': 'com.example.demo1.Demo1Application'
}
}*/
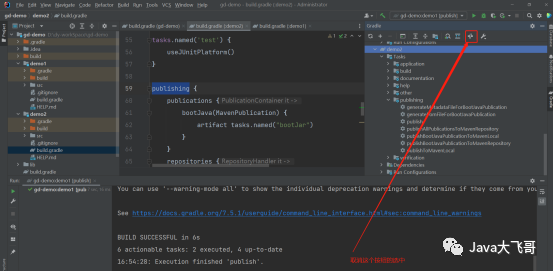
publishing {
publications {
bootJava(MavenPublication) {
artifact tasks.named("bootJar")
}
}
repositories {
maven {
credentials {
username 'xxxx'
password 'xxxxx'
}
// 发布maven存储库的url
url "http://xxxxx:xxxxx/repository/maven-snapshots/"
// 允许使用 http
allowInsecureProtocol = true
}
}
}
tasks.named('test') {
useJUnitPlatform()
}声明依赖
在声明依赖时,每个依赖项都需要确定其特定范围,比如有些依赖项只用于测试,有些只用于运行时可用。
在Gradle 中,使用dependencies{}来声明依赖项。格式为:
dependencies {
// 配置名称 依赖符号
configurationName dependencyNotation
}
configurationName 有以下几种:
compileOnly— 对于编译生产代码所必需但不应成为运行时类路径的一部分的依赖项
implementation(取代compile) — 用于编译和运行时
runtimeOnly(取代runtime)——仅在运行时使用,不用于编译
testCompileOnly— 与compileOnly测试相同
testImplementation— 测试等效于implementation
testRuntimeOnly— 测试等效于runtimeOnly
依赖包在本地文件目录中,可以使用以下方式引入:
repositories {
//依赖包在本地文件目录中,可以使用以下方式引入:
/*flatDir {
dirs 'lib'
}
flatDir {
dirs 'lib1', 'lib2'
}*/
// mavenCentral()
}
导入和排除依赖
dependencies {
/// 1. 在存储库中引入依赖
// group:name:version 风格
implementation 'commons-lang:commons-lang:2.6'
// Map 风格
implementation group: 'com.google.code.guice', name: 'guice', version: '1.0'
testImplementation 'org.mockito:mockito:1.9.0-rc1'
// 2. 将文件声明引入为依赖
implementation files('hibernate.jar', 'libs/spring.jar')
//将'libs'中的所有jar放入编译类路径
implementation fileTree('libs')*/
//依赖其他子项目
implementation project(':demo1')
/* 排除依赖
implementation('org.hibernate:hibernate:3.1') {
// 在版本冲突的情况下优先使用该版本
force = true
// 排除特定的依赖:
exclude module: 'cglib' // 按照模块排除
exclude group: 'org.jmock' // 按照组名排除
exclude group: 'org.unwanted', module: 'iAmBuggy' // 通过组名+模块排除
// 禁用此依赖项的所有传递依赖
transitive = false
}
}4.构建子模块上传maven私服仓库
maven-publish插件的SpringBoot的官网
https://docs.spring.io/spring-boot/docs/current/gradle-plugin/reference/htmlsingle/#publishing-your-application.maven-publish

在子模块的build.gradle文件中配置了maven-publish插件即可上传私服

遇到的问题:
Execution failed for task ':publishTspPublicationToMavenRepository'.
> Failed to publish publication 'tsp' to repository 'maven'
   > No cached resource 'http://xxx/maven-metadata.xml' available for offline mode.
注意报错信息中的“offline mode”,离线模式。
解决办法:
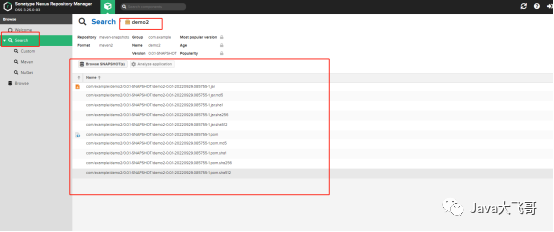
然后在maven私服中搜索demo2
注意:在gradle7.x中是没有如下配置上传maven私服的,只有低版本的gradle才会有,低版本是使用maven插件上传maven私服,而在gradle7.x中引入id : “maven”是拉取不到这个插件的,网上有好多的坑是如下配置的,结果直接是报错,在gradle7.x使用的是id 'maven-publish'插件来上传maven私服,不在支持低版本使用maven插件的方式:
/*task sourceJar (type:Jar) {
    classifier = 'sources'
    from sourceSets.main.allSource
}

artifacts {
    archives sourceJar
}*/

/*
//元数据定义和上传︎
uploadArchives {
    repositories {
        mavenDeployer {
            // beforeDeployment { MavenDeployment deployment -> signing.signPom(deployment) }

            */
/*  repository(url: "http://xxx:xxxxx/repository/maven-releases/") {
                  authentication(userName: "xxxxx", password: "xxxxx")
              }*//*
           */
/* snapshotRepository(url: "http://xxxx:xxxx/repository/maven-snapshots/") {
                authentication(userName: "xxxxxx", password: "xxxxxxx")
            }*//*

            pom.project {
                name 'grDemo Application'
                packaging 'jar'
                // optionally artifactId can be defined here
                description "xxxxx"
                */
/*url 'http://www.example.com/example-application'

                scm {
                    connection 'scm:svn:http://foo.googlecode.com/svn/trunk/'
                    developerConnection 'scm:svn:https://foo.googlecode.com/svn/trunk/'
                    url 'http://foo.googlecode.com/svn/trunk/'
                }

                licenses {
                    license {
                        name 'The Apache License, Version 2.0'
                        url 'http://www.apache.org/licenses/LICENSE-2.0.txt'
                    }
                }

                developers {
                    developer {
                        id 'manfred'
                        name 'Manfred Moser'
                        email 'manfred@sonatype.com'
                    }
                }*//*

            }
        }
    }
}*/
为开发者提供学习成长、分享交流、生态实践、资源工具等服务,帮助开发者快速成长。
更多推荐


 1
1 0
0- 0


 已为社区贡献4条内容

所有评论(0)