手把手OAuth2授权码模式(Authorization Code)
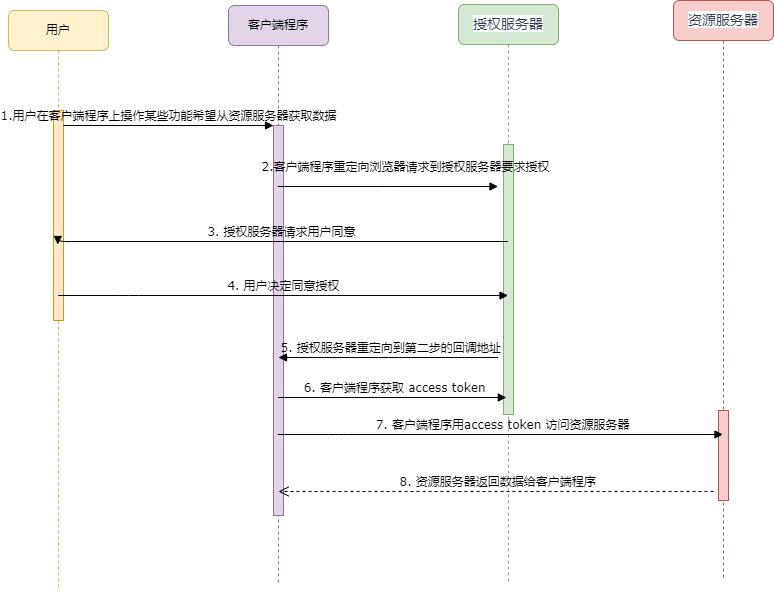
手把手入门OAuth2授权码模式(Authorization Code)1.简单介绍OAuth2 授权码模式模式基本上是用用户凭证获取token 后来获取资源的访问权限。其交互步骤如下图:交互过程如下:用户在客户端程序上操作某些功能希望从资源服务器获取数据客户端程序重定向浏览器请求到授权服务器要求授权,在重定向之前客户端程序会给授权服务器传递一个参数作为回调地址授权服务器请求用户同意,这个步骤一般
手把手入门OAuth2授权码模式(Authorization Code)
1.简单介绍
OAuth2 授权码模式模式基本上是用用户凭证获取token 后来获取资源的访问权限。其交互步骤如下图:

交互过程如下:
- 用户在客户端程序上操作某些功能希望从资源服务器获取数据
- 客户端程序重定向浏览器请求到授权服务器要求授权,在重定向之前客户端程序会给授权服务器传递一个参数作为回调地址
- 授权服务器请求用户同意,这个步骤一般需要用户先登录,如果已经登录则可能弹出一个交互页面请求用户同意授权
- 用户决定同意授权
- 授权服务器重定向到第二步的回调地址,并且在URL 后附带一个Authorization Code,这个Authorization Code 是明文传递给客户端程序的,所以不安全
- 客户端程序用 Authorization Code 和 认证的密钥获取 access token
- 客户端程序用access token 访问资源服务器(也就是实际的业务接口)
- 资源服务器返回数据给客户端程序
交互图如下

2.授权服务器
Spring Authorization Server 是一个spring 专门处理授权服务的项目,我们构建授权服务器就是基于它。 我们先一步一步操作完成后再看整个流程。
2.1 建立基本项目结构
整体项目结构如下

创建一个maven 项目oauth2-auth-server
pom.xml 如下:
源码地址 :细节请参考项目源码
<?xml version="1.0" encoding="UTF-8"?>
<project xmlns="http://maven.apache.org/POM/4.0.0" xmlns:xsi="http://www.w3.org/2001/XMLSchema-instance" xsi:schemaLocation="http://maven.apache.org/POM/4.0.0 https://maven.apache.org/xsd/maven-4.0.0.xsd">
	<modelVersion>4.0.0</modelVersion>
	<parent>
		<groupId>org.springframework.boot</groupId>
		<artifactId>spring-boot-starter-parent</artifactId>
		<version>2.6.7</version>
		<relativePath /> <!-- lookup parent from repository -->
	</parent>
	<groupId>com.xue</groupId>
	<artifactId>oauth2-auth-server</artifactId>
	<version>2022.04.28</version>
	<name>oauth2-auth-server</name>
	<description>spring Authorization Server Demo project for Spring Boot</description>
	<properties>
		<java.version>17</java.version>
		<p6spy>3.9.1</p6spy>
	</properties>
	<dependencies>

		<dependency>
			<groupId>org.springframework.boot</groupId>
			<artifactId>spring-boot-starter-web</artifactId>
		</dependency>

		<dependency>
			<groupId>org.springframework.boot</groupId>
			<artifactId>spring-boot-starter-data-jpa</artifactId>
		</dependency>

		<dependency>
			<groupId>org.springframework.security</groupId>
			<artifactId>spring-security-oauth2-authorization-server</artifactId>
			<version>0.2.3</version>
		</dependency>
		<dependency>
			<groupId>p6spy</groupId>
			<artifactId>p6spy</artifactId>
			<version>${p6spy}</version>
		</dependency>


		<dependency>
			<groupId>com.h2database</groupId>
			<artifactId>h2</artifactId>
			<scope>runtime</scope>
		</dependency>
		<dependency>
			<groupId>mysql</groupId>
			<artifactId>mysql-connector-java</artifactId>
			<scope>runtime</scope>
		</dependency>


		<dependency>
			<groupId>org.springframework.boot</groupId>
			<artifactId>spring-boot-starter-test</artifactId>
			<scope>test</scope>
		</dependency>
		<dependency>
			<groupId>org.springframework.boot</groupId>
			<artifactId>spring-boot-devtools</artifactId>
			<scope>runtime</scope>
			<optional>true</optional>
		</dependency>

	</dependencies>

	<build>
		<plugins>
			<plugin>
				<groupId>org.springframework.boot</groupId>
				<artifactId>spring-boot-maven-plugin</artifactId>
			</plugin>
		</plugins>
	</build>

</project>
注意 spring-security-oauth2-authorization-server这个依赖是最重要的
项目的配置文件application.yml如下
源码地址 :[细节请参考项目源码]
#https://docs.spring.io/spring-boot/docs spring文档
# https://docs.spring.io/spring-boot/docs/2.6.3/reference/html/application-properties.html#application-properties
server:
    port: 9000
# 默认激活dev配置
spring:
  profiles:
    active: "dev"
    #active: "prod"
    group:
      "dev": "common,jpa,h2,dev"
      "prod": "common,jpa,mysql,prod"

---
spring:
  config:
    activate:
      on-profile: "mysql"
jdbc:
  database: mysql
  init-mode: ALWAYS
  driver-class-name: com.mysql.cj.jdbc.Driver

---
spring:
  config:
    activate:
      on-profile: "h2"
  h2:
    console:
      #数据库控制台 http://localhost:9000/h2-console/login.jsp
      path: /h2-console
      enabled: true
      setting:
         web-allow-others: true
jdbc:
   database: h2
   init-mode: EMBEDDED
   driver-class-name: org.h2.Driver


---
spring:
  config:
    activate:
      on-profile: "dev"

jdbc:
   #是否打印sql,true 或false
   show-sql: true
   url: mem:db1;MODE=MySQL;DATABASE_TO_LOWER=TRUE;CASE_INSENSITIVE_IDENTIFIERS=TRUE;DB_CLOSE_DELAY=-1;DB_CLOSE_ON_EXIT=FALSE;TRACE_LEVEL_SYSTEM_OUT=2
   username: test
   password:


---
spring:
  config:
    activate:
      on-profile: "prod"
  devtools:
       restart:
          enabled : false
jdbc:
   #是否打印sql,true 或false
   show-sql: false
   url: //localhost:8024/test?useSSL=false&useUnicode=true&characterEncoding=UTF8&serverTimezone=GMT%2B8
   username: test
   password: 123456
---
spring:
  config:
    activate:
      on-profile: "common"
  application:
           name: auth-server
  logging:
     path : ./
  datasource:
    driver-class-name: ${jdbc.driver-class-name-show-sql-${jdbc.show-sql}}
    url  : ${jdbc.url-show-sql${jdbc.show-sql}}
    username: ${jdbc.username}
    password: ${jdbc.password}
    #连接池池参数配置
    type: com.zaxxer.hikari.HikariDataSource
    hikari:
        pool-name: hikariDataSourcePool
        connection-test-query: /* ping */  SELECT 1
        #connection-test-query: SELECT 1
        maximum-pool-size: 20
        minimum-idle: 5
        #默认30000  30s
        connection-timeout: 10000
        #默认5000
        validation-timeout: 3000
        #默认true
        is-auto-commit: false
        #默认false
        is-read-only: false


jdbc:
    #不打印sql
    driver-class-name-show-sql-false: ${jdbc.driver-class-name}
    url-show-sql-false : jdbc:${jdbc.database}:${jdbc.url}
    #打印sql
    driver-class-name-show-sql-true : com.p6spy.engine.spy.P6SpyDriver
    url-show-sql-true : jdbc:p6spy:${jdbc.database}:${jdbc.url}

---
spring:
  config:
    activate:
      on-profile: "jpa"
  jpa:
    database: ${jdbc.database}
    show-sql: false
    hibernate:
      ddl-auto: update
    open-in-view: false
注意我们的服务运行在 9000 端口
我们把用户信息用JPA 保存到数据库中,所以先建立用户模型
User.java
package com.xue.pojo;

@Entity
@Table(name = "sys_user")
public class User implements UserDetails {

	private static final long serialVersionUID = 1L;

	@Id
	@GeneratedValue(strategy = GenerationType.AUTO)
	private Long id;

	private final String username;
	private final String password;
	private final String role;
    ... 代码太多请参考项目源码
}
UserRepository.java 用户DAO 层
public interface UserRepository extends CrudRepository<User, Long> {

  User findByUsername(String username);

}
SecurityConfig.java spring安全配置
@EnableWebSecurity
public class SecurityConfig {
	@Bean
	SecurityFilterChain defaultSecurityFilterChain(HttpSecurity http) throws Exception {
		// @formatter:off
		return http
		          //设置了<iframe>标签的“同源策略”,解决了上面出现的问题
				  //https://blog.csdn.net/weixin_43981241/article/details/108240756
		          .headers().frameOptions().sameOrigin()
		          .and()
		          //使得h2 console页面不去做csrf检查
		          .csrf()
		          .ignoringAntMatchers("/h2-console/**")
		          .and()
		          .authorizeRequests()
		          //使得访问h2 console时,不需要先登录系统
		          .antMatchers("/h2-console/**").permitAll()
		          .and()
		          .authorizeRequests(authorizeRequests -> authorizeRequests.anyRequest().anonymous())
		          .formLogin()
		          .and()
		          .build();
		// @formatter:on

	}

	@Bean
	UserDetailsService userDetailsService(UserRepository userRepo) {
		return username -> userRepo.findByUsername(username);
	}
	@Bean
	public PasswordEncoder passwordEncoder() {
		return new BCryptPasswordEncoder();
	}

}
这里最主要的是任何匿名的访问都会重定向到登录页面
下边人认证服务器配置
AuthorizationServerConfig.java
@Configuration(proxyBeanMethods = false)
public class AuthorizationServerConfig {
	@Bean
	@Order(Ordered.HIGHEST_PRECEDENCE)
	public SecurityFilterChain authorizationServerSecurityFilterChain(HttpSecurity http) throws Exception {
		OAuth2AuthorizationServerConfiguration.applyDefaultSecurity(http);
		return http.formLogin(Customizer.withDefaults()).build();
	}

	// 注册客户端,目前时从内存种加载,正式环境需要从数据库种加载
	@Bean
	public RegisteredClientRepository registeredClientRepository(PasswordEncoder passwordEncoder) {
		// @formatter:off
		RegisteredClient registeredClient = RegisteredClient
				.withId(UUID.randomUUID().toString())
				.clientId("taco-admin-client")
				.clientSecret(passwordEncoder.encode("secret"))//密钥
				.clientAuthenticationMethod(ClientAuthenticationMethod.CLIENT_SECRET_BASIC)
				.authorizationGrantType(AuthorizationGrantType.AUTHORIZATION_CODE)
				.authorizationGrantType(AuthorizationGrantType.REFRESH_TOKEN)
				.redirectUri("http://127.0.0.1:9090/login/oauth2/code/taco-admin-client")
				.scope("writeIngredients")
				.scope("deleteIngredients")
				.scope(OidcScopes.OPENID)
				.clientSettings(ClientSettings.builder().requireAuthorizationConsent(true).build())
				.build();
		// @formatter:on
		// 如果持久化到数据库中
		// https://blog.csdn.net/qq_35067322/article/details/121347137
		return new InMemoryRegisteredClientRepository(registeredClient);
	}

	@Bean
	public ProviderSettings providerSettings() {
		return ProviderSettings.builder().issuer("http://localhost:9000").build();
	}

	@Bean
	public JWKSource<SecurityContext> jwkSource() throws NoSuchAlgorithmException {
		RSAKey rsaKey = generateRsa();
		JWKSet jwkSet = new JWKSet(rsaKey);
		return (jwkSelector, securityContext) -> jwkSelector.select(jwkSet);
	}

	private static RSAKey generateRsa() throws NoSuchAlgorithmException {
		KeyPair keyPair = generateRsaKey();
		RSAPublicKey publicKey = (RSAPublicKey) keyPair.getPublic();
		RSAPrivateKey privateKey = (RSAPrivateKey) keyPair.getPrivate();
		return new RSAKey.Builder(publicKey).privateKey(privateKey).keyID(UUID.randomUUID().toString()).build();
	}

	private static KeyPair generateRsaKey() throws NoSuchAlgorithmException {
		KeyPairGenerator keyPairGenerator = KeyPairGenerator.getInstance("RSA");
		keyPairGenerator.initialize(2048);
		return keyPairGenerator.generateKeyPair();
	}

	@Bean
	public JwtDecoder jwtDecoder(JWKSource<SecurityContext> jwkSource) {
		return OAuth2AuthorizationServerConfiguration.jwtDecoder(jwkSource);
	}

}
我们还需要在启动类AuthServerApplication.java中加载一些数据
@SpringBootApplication
public class AuthServerApplication {

	public static void main(String[] args) {
		SpringApplication.run(AuthServerApplication.class, args);
	}

	// 启动时初始化默认数据
	@Bean
	public ApplicationRunner dataLoader(UserRepository repo, PasswordEncoder encoder) {
		return args -> {
			repo.save(new User(1L, "a1", encoder.encode("1"), "ROLE_ADMIN"));
			repo.save(new User(2L, "a2", encoder.encode("1"), "ROLE_ADMIN"));
		};
	}
}
2.2 启动项目并测试
我们启动项目
访问
http://localhost:9000/ 会看到首页,首页代码请参看上面的源码连接

点击连接

请参考上图输入
其中JDBC URL 为 jdbc:h2:mem:db1;MODE=MySQL;DATABASE_TO_LOWER=TRUE;CASE_INSENSITIVE_IDENTIFIERS=TRUE;DB_CLOSE_DELAY=-1;DB_CLOSE_ON_EXIT=FALSE;TRACE_LEVEL_SYSTEM_OUT=2
用户 test 密码为 空
点击connect 看到数据库 sys_user表中有2条数据
其中 a1用户密码为 1,a2用户密码为 2,密码都是加密过的

测试登录,用户名输入 a1,密码为1
http://localhost:9000/login

看到响应码为403

在浏览器中访问
http://localhost:9000/oauth2/authorize?response_type=code&client_id=taco-admin-client&redirect_uri=http://127.0.0.1:9090/login/oauth2/code/taco-admin-client&scope=writeIngredients+deleteIngredients
会看到如下页面,当前登录的用户为 a1

至此基本完成认证服务器
3.资源服务器
资源服务器简单说来就是我们的对外接口
3.1 建立基本项目结构
项目源码

其中pom.xml 中最重要的是集成了以下内容
<dependency>
			<groupId>org.springframework.boot</groupId>
			<artifactId>spring-boot-starter-oauth2-resource-server</artifactId>
		</dependency>
再则是
SecurityConfig.java
@EnableWebSecurity
public class SecurityConfig {
	@Bean
	SecurityFilterChain defaultSecurityFilterChain(HttpSecurity http) throws Exception {
		// @formatter:off
		return http
		          //设置了<iframe>标签的“同源策略”,解决了上面出现的问题
				  //https://blog.csdn.net/weixin_43981241/article/details/108240756
		          .headers().frameOptions().sameOrigin()
		          .and()
		          //使得h2 console页面不去做csrf检查
		          .csrf()
		          .ignoringAntMatchers("/h2-console/**")
		          .and()
		          .authorizeRequests()
		          //使得访问h2 console时,不需要先登录系统
		          .antMatchers("/h2-console/**").permitAll()
		          .and()

		          //需要拦截的API
		          .authorizeRequests()
		          .antMatchers(HttpMethod.POST, "/api/ingredients")
		          .hasAuthority("SCOPE_writeIngredients")
		          .antMatchers(HttpMethod.DELETE, "/api/ingredients")
		          .hasAuthority("SCOPE_deleteIngredients")
		          .and()
		          //开启 ResourceServer
		          .oauth2ResourceServer(oauth2 -> oauth2.jwt())
		          .build();
		// @formatter:on

	}

}
注意画红线的地方

还有application.yml 的配置
server:
    port: 8080

# 默认激活dev配置
spring:
  profiles:
    active: "dev"
    #active: "prod"
    group:
      "dev": "common,jpa,h2,dev"
      "prod": "common,jpa,mysql,prod"
  security:
     oauth2:
       resourceserver:
                    jwt:
                      jwk-set-uri: http://localhost:9000/oauth2/jwks
这里配置了spring.security.oauth2.resourceserver.jwt.jwk-set-uri指向了 认证服务器http://localhost:9000/oauth2/jwks
此外的接口和DAO层请参考代码
项目源码
3.2 测试项目
4.第三方应用
第三方应用用户当前访问的应用
4.1 建立基本项目结构

pom.xml 注意以下内容
<dependency>
			<groupId>org.springframework.boot</groupId>
			<artifactId>spring-boot-starter-oauth2-client</artifactId>
		</dependency>
application.yml 配置是非常重要的
server:
  port: 9090

# tag::client_config[]
# tag::provider_config_0[]
spring:
  security:
    oauth2:
      client:
# end::provider_config_0[]
        registration:
          taco-admin-client:
            provider: tacocloud
            client-id: taco-admin-client
            client-secret: secret
            authorization-grant-type: authorization_code
            redirect-uri: "http://127.0.0.1:9090/login/oauth2/code/{registrationId}"
            scope: writeIngredients,deleteIngredients,openid
# end::client_config[]
# tag::provider_config[]
        provider:
          tacocloud:
            issuer-uri: http://localhost:9000
# end::provider_config[]
SecurityConfig.java 文件内容如下
@Configuration
public class SecurityConfig {

	@Bean
	SecurityFilterChain defaultSecurityFilterChain(HttpSecurity http) throws Exception {
		http.authorizeRequests(authorizeRequests -> authorizeRequests.anyRequest().authenticated())
				.oauth2Login(oauth2Login -> oauth2Login.loginPage("/oauth2/authorization/taco-admin-client"))
				.oauth2Client(withDefaults());
		return http.build();
	}

	@Bean
	@RequestScope
	public IngredientService ingredientService(OAuth2AuthorizedClientService clientService) {
		Authentication authentication = SecurityContextHolder.getContext().getAuthentication();

		String accessToken = null;

		if (authentication.getClass().isAssignableFrom(OAuth2AuthenticationToken.class)) {
			OAuth2AuthenticationToken oauthToken = (OAuth2AuthenticationToken) authentication;
			String clientRegistrationId = oauthToken.getAuthorizedClientRegistrationId();
			if (clientRegistrationId.equals("taco-admin-client")) {
				OAuth2AuthorizedClient client = clientService.loadAuthorizedClient(clientRegistrationId,
						oauthToken.getName());
				accessToken = client.getAccessToken().getTokenValue();
			}
		}
		return new RestIngredientService(accessToken);
	}

}
RestIngredientService.java 是客户端通过 rest api 访问资源服务器的具体实现类
public class RestIngredientService implements IngredientService {

  private RestTemplate restTemplate;

  /*
  public RestIngredientService() {
   */

  public RestIngredientService(String accessToken) {
    this.restTemplate = new RestTemplate();
    if (accessToken != null) {
      this.restTemplate
          .getInterceptors()
          .add(getBearerTokenInterceptor(accessToken));
    }
  }

  @Override
  public Iterable<Ingredient> findAll() {
    return Arrays.asList(restTemplate.getForObject(
            "http://localhost:8080/api/ingredients",
            Ingredient[].class));
  }

  @Override
  public Ingredient addIngredient(Ingredient ingredient) {
    return restTemplate.postForObject(
        "http://localhost:8080/api/ingredients",
        ingredient,
        Ingredient.class);
  }

  private ClientHttpRequestInterceptor
            getBearerTokenInterceptor(String accessToken) {
    ClientHttpRequestInterceptor interceptor =
          new ClientHttpRequestInterceptor() {
      @Override
      public ClientHttpResponse intercept(
            HttpRequest request, byte[] bytes,
            ClientHttpRequestExecution execution) throws IOException {
        request.getHeaders().add("Authorization", "Bearer " + accessToken);
        return execution.execute(request, bytes);
      }
    };

    return interceptor;
  }

}
其他代码请参考
项目源码地址
4.2 测试项目
如果一切没问题的话,现在可以来一个全流程的测试
-
启动授权服务器 oauth2-auth-server
-
启动资源服务器oauth2-res-server
-
启动客户端 oauth2-client-app
-
我们现在就是用户 访问 oauth2-client-app 程序 在浏览器中输入 http://localhost:9090/ 访问
-
如果你已经登录会直接看到第6步的页面,由于我们没有登录 被拦截后重定向到认证服务器 页面,如下图

-
输入a1,密码 1 进入授权页面

-
点击同意授权程序重定向到

-
点击原材料管理,发现现在客户端可以访问资源服务器提供的接口

5.总结一下大体流程
5.1在 oauth2-client-app 这个应用中需要访问 oauth2-res-server 的一些接口,
5.2 由于这些接口 是我们用户的私有信息所以需要我们授权,在访问接口时会重定向到oauth2-auth-server 要求授权,
5.3 我们统一授权后 oauth2-client-app 会获取一个token
5.4 oauth2-res-server就会返回数据

华为开发者空间,是为全球开发者打造的专属开发空间,汇聚了华为优质开发资源及工具,致力于让每一位开发者拥有一台云主机,基于华为根生态开发、创新。
更多推荐


 1
1 0
0- 0


 已为社区贡献4条内容

所有评论(0)