SpringBoot Schedule的三种使用方式
SpringBoot Schedule的三种使用方式
·
SpringBoot Schedule的三种使用方式
文章仅作为自己学习记录,如有问题,敬请指正,谢谢。
静态schedule
import org.springframework.context.annotation.Configuration;
import org.springframework.scheduling.annotation.EnableScheduling;
import org.springframework.scheduling.annotation.Scheduled;

import java.time.LocalTime;

@Configuration
@EnableScheduling
public class Schedule_1 {

    @Scheduled(cron = "0/5 * * * * ?")
    public void ScheduledM1() {
        System.err.println("【静态】执行定时任务:" + LocalTime.now().toString());
    }
}
结果图

这种静态的定时器的通过@Scheduled(cron=“cron表达式”) 控制定时任务执行。
该方法实现简单,但不宜更改,如果想要更改定时任务则需要重写cron表达式,同时重新启动项目,不方便。
动态schedule
动态schedule可以根据数据库中的数据,“动态改变” 定时任务
schedule代码
给出两种表达方式
1、匿名内部类方式
2、 lambda方式
在使用时,以上两种方式认选一种即可,必须将另一种注释或者删除掉
import com.example.spring.ScheduleMapper;
import org.springframework.beans.factory.annotation.Autowired;
import org.springframework.context.annotation.Configuration;
import org.springframework.scheduling.annotation.EnableScheduling;
import org.springframework.scheduling.annotation.SchedulingConfigurer;
import org.springframework.scheduling.config.ScheduledTaskRegistrar;
import org.springframework.scheduling.support.CronTrigger;

import java.time.LocalTime;

@Configuration
@EnableScheduling
public class Schedule_2 implements SchedulingConfigurer {

    @Autowired
    ScheduleMapper scheduleMapper;

    // 匿名内部类形式
//    @Override
//    public void configureTasks(ScheduledTaskRegistrar taskRegistrar) {
//        taskRegistrar.addTriggerTask(new Runnable() {
//            @Override
//            public void run() {
//                System.err.println("【动态】执行定时任务:" + LocalTime.now().toString() + "\n");
//            }
//        }, new Trigger() {
//            @Override
//            public Date nextExecutionTime(TriggerContext triggerContext) {
//                Integer id = 1;
//                String cron = scheduleMapper.getCronById(id);
//                System.out.println("cron表达式为:" + cron);
//                // 此处的cron可以从数据库中获取   重点
//                return new CronTrigger(cron).nextExecutionTime(triggerContext);
//            }
//        });
//    }

    // lambda表达式形式
    @Override
    public void configureTasks(ScheduledTaskRegistrar taskRegistrar) {
        taskRegistrar.addTriggerTask(() -> {
            System.err.println("【动态】执行定时任务:" + LocalTime.now().toString() + "\n");
        }, (triggerContext) -> {
            Integer id = 1;
            String cron = scheduleMapper.getCronById(id);
            System.out.println("cron表达式为:" + cron);
            // 此处的cron可以从数据库中获取   重点
            return new CronTrigger(cron).nextExecutionTime(triggerContext);
        });
    }
}
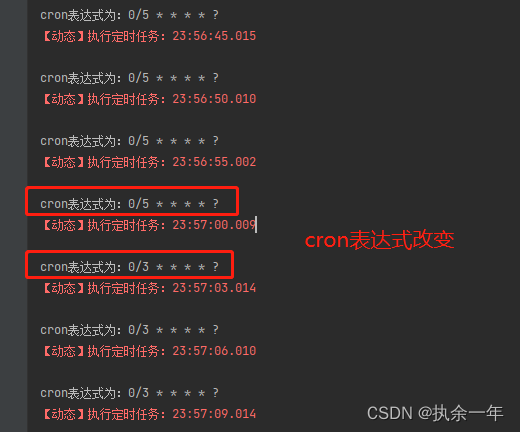
结果图
在项目运行时,改变数据库中的cron表达式
mapper代码
这里只是做了简单的查询,根据id查找表中的cron字段数据
import org.apache.ibatis.annotations.Mapper;
import org.apache.ibatis.annotations.Select;

@Mapper
public interface ScheduleMapper {
    @Select("select cron from schedule_config where id = #{id}")
    public String getCronById(int id);
}
application.yml文件配置
对数据库进行配置
spring:
  #JDBC
  datasource:
    username: root
    password: root
    url: jdbc:mysql://127.0.0.1:3306/test?characterEncoding=utf-8&useLegacyDatetimeCode=false&serverTimezone=GMT%2B8
    driver-class-name: com.mysql.cj.jdbc.Driver
pom依赖
项目为springboot项目,在这里我选用mybatis-plus,在实际使用中,可以根据自身情况随意选择
		<dependency>
            <groupId>com.baomidou</groupId>
            <artifactId>mybatis-plus-boot-starter</artifactId>
            <version>3.5.1</version>
        </dependency>
        <dependency>
            <groupId>mysql</groupId>
            <artifactId>mysql-connector-java</artifactId>
            <version>8.0.28</version>
        </dependency>
异步Schedule
多个定时器同步执行代码
多个同步定时器执行,会等待上一个定时器完成任务后,再执行后续的定时器!!!
import org.springframework.context.annotation.Configuration;
import org.springframework.scheduling.annotation.EnableScheduling;
import org.springframework.scheduling.annotation.Scheduled;

import java.time.LocalTime;

@Configuration
@EnableScheduling
public class Schedule_3 {

    @Scheduled(cron = "0/1 * * * * ?")
    public void s1() throws InterruptedException {
        Thread.sleep(5000);
        System.out.println("【同步1】执行定时任务:" + LocalTime.now().toString());
    }

    @Scheduled(cron = "0/1 * * * * ?")
    public void s2() {
        System.err.println("【同步2】执行定时任务:" + LocalTime.now().toString());
    }
}
结果图

多个定时器异步执行代码
import org.springframework.context.annotation.Configuration;
import org.springframework.scheduling.annotation.Async;
import org.springframework.scheduling.annotation.EnableAsync;
import org.springframework.scheduling.annotation.EnableScheduling;
import org.springframework.scheduling.annotation.Scheduled;

import java.time.LocalTime;

@Configuration
@EnableScheduling
@EnableAsync
public class Schedule_3 {

    @Async
    @Scheduled(cron = "0/1 * * * * ?")
    public void s1() throws InterruptedException {
        Thread.sleep(5000);
        System.out.println("【异步1】执行定时任务:" + LocalTime.now().toString());
    }

    @Async
    @Scheduled(cron = "0/1 * * * * ?")
    public void s2() {
        System.err.println("【异步2】执行定时任务:" + LocalTime.now().toString());
    }
}
结果图


为开发者提供学习成长、分享交流、生态实践、资源工具等服务,帮助开发者快速成长。
更多推荐


 3
3 0
0- 0


 已为社区贡献1条内容

所有评论(0)